
Installation Guide


ASUS Motherboard installation guide
9
English
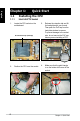
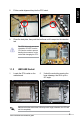
1.3 Installing a DIMM
UnplugthepowersupplybeforeaddingorremovingDIMMsorother
systemcomponents.Failuretodosocancauseseveredamagetoboththe
motherboard and the components.
ToinstallaDIMM:
1. UnlockaDIMMsocketby
pressing the retaining clips
outward.
2. AlignaDIMMonthesocket
suchthatthenotchontheDIMM
matches the break on the socket.
3. FirmlyinserttheDIMMintothe
socket until the retaining clips
snapbackinplaceandtheDIMM
isproperlyseated.
• ADDR2DIMMiskeyedwithanotchsothatittsinonlyonedirection.Do
NOTforceaDIMMintoasockettoavoiddamagingtheDIMM.
• ToinstalltwoormoreDIMMs,refertotheuserguidebundledinthe
motherboard package.
• Refertotheuserguideforqualiedvendorlistsofthememorymodules.
Unlocked retaining clip
DDR2 DIMM notch
1
2
3
1
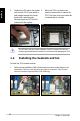
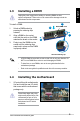
1.4 Installing the motherboard
1. I/O ports differ with motherboards.
Use and install the rear I/O shield
that comes with the motherboard
packageonly.
Some sharp edges and points
mightcausephysicalinjury.We
recommendyouputoncutor
puncture resistant gloves before
motherboard and I/O shield
installation.