
Users Manual

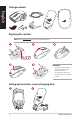
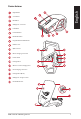


Table Of Contents

English
Quick Start Guide
6
Gaming mouse proles
Prole Default lighting eect
Prole 1
+
Rainbow (Default)
Prole 2
+
Color cycle
Prole 3
+
Breathing (blue)
Prole 4
+
Reactive (Green)
Prole 5
+
Comet
Battery Status
The LEDs on your gaming mouse will turn red (breathing) when the battery power is below 20% in RF 2.4G
mode. You may charge your gaming mouse by using the bundled USB cable or wireless receiver/charging dock.
Connecting your gaming mouse
Setting up your gaming mouse as a wired mouse
Connect the bundled USB Type-C® to Type-A cable to your gaming mouse and a USB port on your computer.
Setting up your gaming mouse as an RF wireless mouse
NOTE: Download the driver from https://www.asus.com and install
it on your computer.
1. Connect the bundled USB Type-C® to Type-A cable to your wireless
receiver/charging dock and a USB port on your computer.
NOTE: Your gaming mouse comes paired by default. Please follow
steps 2 - 5 only if you need to pair your gaming mouse again.
2. Press the Pairing button for 3 seconds on the rear of your wireless
receiver/charging dock, the Dock LED indicator should begin blinking
green.
3. Slide the Power Switch to turn on your ROG SPATHA X gaming mouse.
4. Press the Pairing button for 3 seconds on your ROG SPATHA X gaming
mouse, the LEDs should begin blinking green.
5. The Dock LED indicator and gaming mouse LEDs will return to their
original lighting eects when your ROG SPATHA X gaming mouse has
successfully paired.
NOTE: Click on the left button to wake your ROG SPATHA X gaming
mouse from sleep mode.
Specications*
Resolution DPI 1 DPI 2 DPI 3 (Default) DPI 4
100 DPI to 26000 DPI 400 DPI 800 DPI 1600 DPI 3200 DPI
* You may customize the DPI settings for DPI 1-4 through Armoury Crate or the DPI On-The-Scroll tuning function.