PB278 serie LCD-monitor Gebruikshandleiding
Inhoudsopgave Opmerkingen................................................................................................ iii Veiligheidsinformatie................................................................................... iv Onderhoud en reiniging............................................................................... v 1.1 Welkom!......................................................................................... 1-1 1.2 Inhoud van verpakking.........................................
Opmerkingen Kennisgeving van Federal Communications Commission Dit apparaat voldoet aan Deel 15 van de FCC-voorschriften. Bediening ervan dient te geschieden conform de volgende twee voorwaarden: • Dit apparaat mag geen schadelijke interferentie veroorzaken, en • Dit apparaat moet alle ontvangen interferentie accepteren, waaronder interferentie die een ongewenste werking kan veroorzaken.
Veiligheidsinformatie • • • • • • • • • • • • • • • • iv Alle documentatie die bij de verpakking is geleverd zorgvuldig doorlezen, alvorens de monitor in te stellen. De monitor niet blootstellen aan regen of vocht om gevaar op brand of schokken te vermijden. Probeer de monitorkast nooit te openen. De gevaarlijke hoge spanningen in de monitor kunnen ernstig lichamelijk letsel tot gevolg hebben. Als de stroomtoevoer defect is, deze niet zelf proberen te repareren.
Onderhoud en reiniging • Voordat u de monitor optilt of verplaatst, is het beter om alle kables en de stroomkabel te ontkoppelen. Volg de juiste heftechnieken bij het plaatsen van de monitor. Pak de randen van de monitor beet wanneer u de monitor optilt of draagt. Til het scherm niet op aan de voet of de kabel. • Reinigen. Schakel uw monitor uit en haal de stroomkabel uit het stopcontact. Reinig het oppervlak van de monitor met een pluisvrije, niet schurende doek.
Waar kunt u meer informatie vinden Raadpleeg de volgende bronnen voor aanvullende informatie en producten softwarebijwerkingen. vi 1. ASUS websites De wereldwijde ASUS websites bieden bijgewerkte informatie over de hardware- en softwareproducten van ASUS. Raadpleeg http://www.asus.com 2. Optionele documentatie Uw productverpakking kan aanvullende documentatie bevatten die door uw dealer kunnen zijn toegevoegd. Deze documenten vormen geen onderdeel van de standaardverpakking.
1.1 Welkom! Hartelijk dank voor het aanschaffen van de ASUS® LCD-monitor! De meest recente breedbeeld LCD-monitor van ASUS biedt een scherpere, breedere en helderdere weergave, evenals een reeks kenmerken die uw kijkervaring verruimen. Met deze kenmerken kunt u genieten van het gemak en de geweldige visuele ervaring die de monitor u geeft! 1.
1.3 De monitor monteren Zo zet u de monitor in elkaar: 1. Leg het scherm plat op een doek op tafel, monteer de voet overeenkomstig de tekening en gebruik een munt om de schroef aan te draaien. 2. Steek de snoerklem in het gat in de voet en plaats de monitor onder de hoek die voor u het beste is.
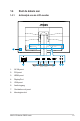
1.4 Sluit de kabels aan 1.4.1 Achterzijde van de LCD-monitor 8 1 1. AC-IN poort 2. DVI-poort 3. HDMI-poort 4. DisplayPort 5. VGA-poort 6. Audio-ingang 7. Oortelefoon-uit poort 8.
1.5 Inleiding tot de monitor 1.5.1 De bedieningsknoppen gebruiken Gebruik de bedieningsknop achterop de monitor om de beeldinstellingen aan te passen. Standaard Standaard 2560x1440@60Hz Menu QuickFit Ingangsselectie Sluiten Helderheid Splendid 7 6 5 4 3 2 1 1. Voedingsknop/Voedingsindicator: • Druk op de knop om de monitor aan en uit te zetten. • De kleurendefinitie van de stroomindicator staat in de onderstaande tabel. 2.
4. Ingangsselectieknop: • 5. Gebruik deze sneltoets om te wisselen tussen het ingangssignaal voor VGA, DVI, HDMI/MHL (alleen PB278QR) en DisplayPort. Knop Sluiten • 6. Het OSD-menu afsluiten. Toets Snelkoppeling 1 • Dit is een sneltoets. De standaardinstelling is Helderheid. • Dit is een sneltoets. De standaardinstelling is Splendid. 7.
1.5.2 QuickFit-functie De QuickFit-functie bevat drie patronen: (1) Raster (2) Papierformaat (3) Fotoformaat. 1. Rasterpatronen: maken het ontwerpers en gebruikers gemakkelijk om inhoud en opmaak op een pagina te ordenen en een consequent uiterlijk te bieden. Alignment Grid 2. Papierformaat: bied gebruikers de mogelijkheid hun documenten op ware grootte te zien op het scherm. A4 B5 A4 B5 EXIT 3.
2.1 De arm/voet ontkoppelen (voor VESA-wandbevestiging) Het afneembare voetstuk van deze monitor is speciaal ontworpen voor VESA-wandmontage. De arm/voet afnemen 1. Ontkoppel de stroom- en signaalkabels. Plaats de voorzijde van de monitor voorzichtig plat op een schone tafel. 2. Gebruik een schroevendraaier om de vier schroeven op de arm te verwijderen (figuur 1) en maak vervolgens de arm/voet los van de monitor (figuur 2).
2.2 De monitor afstemmen • Voor een optimale weergave, raden wij aan dat u naar de volledige voorzijde van de monitor kijkt en de monitor op de hoek afstemt die het meest comfortabel is voor u. • Houd de voet vast om te voorkomen dat de monitor valt bij het wijzigen van de hoek. • U kunt de kantelhoek van de monitor afstellen van +20˚ tot -5˚ en de draaihoek van links of rechts regelen tot 60˚. U kunt ook de hoogte van de monitor aanpassen binnen een bereik van +/- 12cm.
3.1 OSD (On-Screen Display) menu 3.1.1 Opnieuw configureren PB278 Standaard DisplayPort 2560x1440@60Hz Splendid Landschapmodus Kleur Standaard Beeldinst Theater Geluid Spel PIP/PBP-instelling Nacht Ingangsselectie sRGB Systeem-instelling Leesmodus Snelkoppeling Modus Donkere Kamer 1. Druk op de menuknop MENU om het OSD-menu te activeren. 2. Druk op de knoppen en om tussen de opties in het menu te wisselen.
3.1.2 1. Inleiding tot OSD-functie Splendid Deze functie bevat acht subopties die u kunt selecteren naar uw voorkeur. Elke modus heeft een Herinstelling-optie, waardoor u uw instelling kunt behouden of terug kunt keren naar de vooringestelde modus.
2. Kleur Selecteer de beeldkleur die u wilt met deze optie. PB278 Standaard DisplayPort 2560x1440@60Hz Splendid Helderheid Kleur Contrast Beeldinst Kleurverzadiging Geluid Kleur PIP/PBP-instelling Huidskleur Ingangsselectie Systeem-instelling Snelkoppeling • Helderheid: Het afstembereik is van 0 tot 100. • Contrast: Het afstembereik is van 0 tot 100. • Kleurverzadiging: Het afstembereik is van 0 tot 100.
3. Beeldinst U kunt de Scherpte, Trace Free, Beeldaspect aanpassen, VividPixel, ASCR, Positie (alleen VGA), Scherpstellen (alleen VGA) en Automatisch afstemmen (alleen VGA) vanaf deze hoofdfunctie instellen.
4. Geluid Stemt de geluidsinstellingen af op uw voorkeur. PB278 Standaard DisplayPort 2560x1440 @ 60Hz Splendid Volume Kleur Dempen Beeldinst Bron Geluid PIP/PBP-instelling Ingangsselectie Systeem-instelling Snelkoppeling 5. • Volume: Stemt het niveau van het uitgangsvolume af. • Dempen: Dempt het uitgangsvolume.
• PIP/PBP-modus: Selecteert de PIP- of PBP-functie of schakelt deze uit. • PIP/PBP-bron: Selecteer de video-ingangsbron uit “VGA”, “DVI”, “HDMI/ MHL” of “DisplayPort”. • Grootte: Past de grootte van het PIP-scherm aan op “Klein”, “Gemiddeld” of “Groot”. • Positie: Stelt de positie van het PIP-subvenster in op “Rechtsboven”, “Linksboven”, “Rechtsonder" of “Linksonder”. • Beeldaspect aanpassen: Past de PIP-beeldverhouding in en past automatisch de grootte van het PIP-venster aan.
7. Systeem-instelling Stemt de systeemconfiguratie af.
• Druk op om de gekozen functie te bevestigen. Druk op terug te keren. Druk op om af te sluiten. Hoofdmenu GamePlus om GamePlus - Aimpoint GamePlus Richtpunt Timer (Oefenstand) GamePlus hoofdmenu- Timer GamePlus hoofdmenu- Timer Positie Positie 3-8 • ECO Mode: activeer de ecologiemodus voor energiebesparing. • OSD-instelling: Past de OSD Timeout, DDC/CI en Doorzichtigheid van het OSD-menu aan. • Taal: Selecteer de OSD-taal.
8. Snelkoppeling Door deze optie te selecteren, kunt u twee snelkoppelingstoetsen instellen.
3.2 Specificaties Model 68,6 cm (27,0") B Max. Resolutie 1920x1080 (VGA); 2560 x 1440 (DVI, HDMI, DP) Helderheid (std.) Intrinsieke contrastverhouding (std.
3.3 Probleemoplossing (Veelgestelde vragen) Probleem Mogelijke oplossing Stroom-LED brandt niet • Druk op de knop om te controleren of de monitor aan staat. • Controleer of de stroomkabel goed is aangesloten op de monitor en de netvoeding. • Controleer de functie Voedingsindicator in het OSD-hoofdmenu. Selecteer "Aan" om de voedingsLED in te schakelen. De stroom-LED brandt amberkleurig en er is geen schermbeeld • Controleer of de monitor en de computer aan staan.
3.
VESA-modi, gebruikerbeschikbare timing Resolutie Vernieuwingsfrequentie Horizontale frequentie 848x480 1280x720 (RB) 1280x720 1280x720 1280x768 (RB) 1280x800 (RB) 1280x800 1280x800 1366x768 1440x900 (RB) 1440x900 1680x1050 (RB) 1920x1080 60Hz 60Hz 60Hz 75Hz 60Hz 60Hz 60Hz 75Hz 60Hz 60Hz 75Hz 60Hz 60Hz 31.