® Vintage-PE1 Barebone System Quick Start Guide
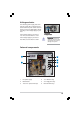
Front panel features N O T E . The photos in this guide are for reference only. For detailed information on your system’s specifications, refer to the user guide. External Internal 5.25-inch bays (drive not included) HDD bay FDD bay (drive not included) Reset Button HDD LED Power button USB 2.0 ports IEEE port1394 ports Microphone port Headphone port Rear panel features Power socket Voltage selector Power supply module PS/2 keyboard port PS/2 mouse port Serial port VGA port USB 2.0 ports USB 2.
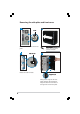
Voltage selector The switching power supply that came with the system has a voltage selector switch below the power socket. Use this switch to select the appropriate voltage according to the voltage supply in your area. 115V/230V Voltage selector If the voltage supply in your area is 100-127V, set the switch to 115V. If the voltage supply in your area is 200-240V, set the switch to 230V. C A U T I O N .
Removing the side plate and front cover 1 2 Screw Remove the two screws on the rear panel. 3 Side lock tab I M P O R T A N T . Repeat steps 1 and 2 to remove the other side plate. 4 Release the side lock tabs. Hinge-like tab Swing the left edge of the front panel outward, then unhook the hinge-like tabs from the holes on the right side of the front panel.
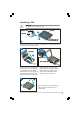
Installing a CPU C A U T I O N . Incorrect installation of the CPU into the socket may bend the pins and severely damage the CPU! PnP Cap Retention tab A Load lever B This side of the cam box should face you. 1 Press the load lever with your thumb (A) and move it to the left (B) until it is released from the retention tab. 3 2 B Load plate A Alignment key Gold triangle mark Lift the load lever in the direction of the arrow to a 135º angle.
Installing system memory C A U T I O N . A DDR DIMM is keyed with a notch so that it fits in only one direction. DO NOT force a DIMM into a socket to avoid damaging the DIMM. 2 1 1 DIMM notch Socket break Installing the fan and heatsink assembly N O T E . Your boxed Intel® Pentium® 4 processor package should come with installation instructions for the CPU, heatsink, and the retention mechanism. If the instructions in this section do not match the CPU documentation, follow the latter.
Installing an optical drive 2 1 1 Remove the drive bay plate. 3 4 Installing a hard disk drive Audio cable IDE ribbon cable Red stripe to pin 1 Power cable HDD label side 1 2 3 4 Connect the blue interface of the IDE ribbon cable to the primary IDE connector (blue connector labeled PRI_IDE1) on the motherboard.
Replacing the side plate and front cover 2 1 Hinge-like tab Side lock tab Snap the side lock tabs to secure the front panel. 4 3 Screw Replace the side plate. Drive in two screws on the rear panel. I M P O R T A N T . Repeat steps 3 and 4 to replace the other side plate.