
User’s Manual
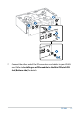
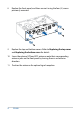
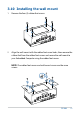
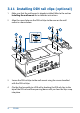
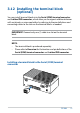
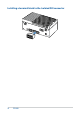


Table Of Contents
- About this manual
- Chapter 1: Getting to know your Embedded Computer
- Chapter 2: Using your Embedded Computer
- Chapter 3: Upgrading your Embedded Computer
- 3.1 Removing the bottom cover
- 3.2 Replacing the bottom cover
- 3.3 Removing the top cover
- 3.4 Replacing the top cover
- 3.5 Installing a nano SIM card (Front panel)
- 3.6 Installing an SD card (Top side)
- 3.7 Installing a wireless card to the M.2 slot (Top side)
- 3.8 Installing an mPCIe / mSATA module (Bottom side)
- 3.9 Installing antennas (optional)
- 3.10 Installing the wall mount
- 3.11 Installing DIN rail clips (optional)
- 3.12 Installing the terminal block (optional)
- Chapter 4: Setting up your Embedded Computer
- Appendix

PE100A
55
3.12 Installing the terminal block
(optional)
You may install terminal blocks into the Serial (COM) terminal connector
and Isolated DIO connector, which allow you to support additional devices
with serial ports or micro controllers by referring to the pin definitions and
connecting cables to the slots on the terminal blocks as needed.
IMPORTANT! Connect only one (1) cable to a slot on the terminal
block.
NOTE:
• The terminal block is purchased separately.
• Please refer to Rear view for the location and pin definitions of the
Serial (COM) terminal connector and Isolated DIO connector.
Installing a terminal block to the Serial (COM) terminal
connector