PEB-10G/SFP+ Series 10 Gigabit/s Ethernet card User Guide
E7131 First Edition V1 May 2012 Copyright © 2012 ASUSTeK COMPUTER INC. All Rights Reserved. No part of this manual, including the products and software described in it, may be reproduced, transmitted, transcribed, stored in a retrieval system, or translated into any language in any form or by any means, except documentation kept by the purchaser for backup purposes, without the express written permission of ASUSTeK COMPUTER INC. (“ASUS”).
Contents Contents....................................................................................................... iii About this guide.......................................................................................... iv How this guide is organized...............................................................iv Where to find more information..........................................................iv Conventions used in this guide...........................................................
About this guide This user guide contains the information you need when installing and configuring the server management board. How this guide is organized This guide contains the following parts: • • • Chapter 1: Product introduction This chapter offers the PEB-10G/SFP+ Ethernet card features and the new technologies it supports. Chapter 2: Boot Agent configuration This chapter provides instructions on setting the Broadcom NetXtreme Ethernet Boot Agent.
Conventions used in this guide To make sure that you perform certain tasks properly, take note of the following symbols used throughout this manual. DANGER/WARNING: Information to prevent injury to yourself when trying to complete a task. CAUTION: Information to prevent damage to the components when trying to complete a task. IMPORTANT: Instructions that you MUST follow to complete a task. NOTE: Tips and additional information to help you complete a task.
PEB-10G/SFP+ Series specifications summary Product • PEB-10G/SPF+/Single • PEB-10G/SPF+/Dual Speeds & Ports • 10 Gigabit/s Ethernet • Fiber; Single & Dual Port Ethernet Controller PHY • BCM 57712 • BCM 8727 Interface PCI-E Gen2 x8 Form Factor Low Profile (6.6”x 2.6”) Support Cable Type • MMF 62.
This chapter offers the PEB-10G/SFP+ Series Ethernet card features and the new technologies it supports.
1.1 Welcome! Thank you for buying an ASUS® PEB-10G/SFP+ Series 10 Gigabit/s Ethernet card! Before you start installing the Ethernet card, check the items in your package with the list below. 1.2 Package contents Check your package for the following items.
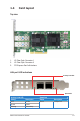
1.4 Card layout Top view 1 2 3 1. LC Fiber Optic Connector 1 3. PCI Express Gen2 x8 interface 2.
1.5 1-4 Replacing card bracket 1. Take out the low profile bracket from the Ethernet card package. 2. Remove the two screws that secure the high profile bracket on the rear end of the Ethernet card. 3. Secure the low profile bracket using the two screws you removed earlier to the rear end of the Ethernet card.
This chapter provides instructions on setting the Broadcom NetXtreme Ethernet Boot Agent.
2.1 Broadcom NetXtreme Ethernet Boot Agent The Broadcom NetXtreme Ethernet Boot Agent provides hardware-based Ethernet card configurations. To start the Broadcom NetXtreme Ethernet Boot Agent and access the main screen: 1. Turn on the system. During POST, press when the following screen appears. Broadcom NetXtreme Ethernet Boot Agent Copyright (C) 2000-2012 Broadcom Corporation All rights reserved. Press Ctrl-S to enter Configuration Menu 2. The Device List screen appears.
2.1.1 Device Hardware Configuration Menu Comprehensive Configuration Management v7.2.14 Copyright (C) 2000-2012 Broadcom Corporation All rights reserved. Device Hardware Configuration Multi-Function Mode : DCB Protocol : SF Disabled Configure NIC Hardware Mode (Read Only) [Enter]:Enter Next Menu; [↑|↓]:Next Entry; [ESC]:Quit Menu Current Adapter:Primary, Bus=03 Device=00 Func=00, MAC=C8:60:00:22:86:B7 DCB Protocol [Disabled] Configuration options: [Disabled] [Enabled] 2.1.
Boot Strap Type [Auto] Configuration options: [Auto] [BBS] [Int18h] [Int19h] Hide Setup Prompt [Disabled] Configuration options: [Disabled] [Enabled] Setup Key Stroke [Ctrl-S] Configuration options: [Ctrl-S] [Ctrl-B] Banner Message Timeout [5 Seconds] Configuration options: [1 Second] – [14 Seconds] Link Speed [10Gbps] Configuration options: [10Gbps] [1Gbps] Pre-boot Wake On LAN [Enabled] Configuration options: [Enabled] [Disabled] VLAN Mode [Disabled] Configuration options: [Disabled] [Enabled
2.1.3 iSCSI Boot Configuration Comprehensive Configuration Management v7.2.14 Copyright (C) 2000-2012 Broadcom Corporation All rights reserved.
[One Time Disabled] On the first system boot, the iSCSI boot host software does not attempt to boot from the iSCSI target. On subsequent system reboots, the iSCSI boot host software will attempt to boot from the iSCSI target. This option is useful when doing a remote install of the OS to an iSCSI target. • When using iSCSI boot, set Boot to iSCSI Target to [Disabled] or [One Time Disabled]. • When using iSCSI boot to install Windows Server 2008 OS, refer to http://support.microsoft.
Initiator Parameters Key in the necessary parameters. CComprehensive Configuration Management v7.2.14 Copyright (C) 2000-2012 Broadcom Corporation All rights reserved. Initiator Parameters IP Address Subnet Mask Default Gateway Primary DNS Secondary DNS iSCSI Name CHAP ID CHAP Secret : : : : : : : : 0.0.0.0 0.0.0.0 0.0.0.0 0.0.0.0 0.0.0.0 iqn.1995-05.com.broadcom.
2-8 Chapter 2: Boot Agent Configuration
This chapter provides instructions for installing the Ethernet card drivers on different operating systems.
3.1 Windows® Server OS Driver Installation To update the Ethernet card driver for Windows® Server OS: 1. 2. 3-2 Restart the computer, and then log on with Administrator privileges. Insert the Ethernet card Support CD to the optical drive. The Support CD automatically displays the Drivers menu if Autorun is enabled in your computer. • If Windows® automatically detects the LAN controllers and displays a New Hardware Found window, click Cancel to close this window.
5. Toggle I accept the terms in the license agreement and click Next to continue. 6. Follow the screen instructions to complete the installation. 7. If the Windows Security window appears during the driver installation, click Install this driver software anyway to continue.
8. When finished, press Finish to exit the installation wizard. 3.1.1 Checking Windows® Server OS firmware version To check the Windows® Server OS firmware version: 1. 2. 3-4 Insert the support CD to the optical drive. Go to Computer and double-click PEB-10G series. Go to Utilities and copy the FwUpg folder to your desktop.
3. Go to Win folder and select the platform. 4. Follow the Readme.txt for installing winfwnx2. Ensure that the drivers are installed. 5. Double-click winfwnx2.exe.
3-6 6. Key in the command dir . 7. Check the version number in entry MFW1/2.
3.2 Linux OS Driver Installation The following Linux operating systems are supported by PEB-10G/SFP+: Red Hat Enterprise AS 5.7/5.8 Red Hat Enterprise AS 6.1/6.2 SuSE Linux Enterprise Server 11.1/11.2 To install the Ethernet card driver for Linux OS: 1. Within the Linux Terminal, install the source RPM package: rpm -ivh netxtreme2-.src.rpm For Red Hat Linux: For SuSE Linux: 2. CD to the RPM path and build the binary driver for your kernel: cd /usr/src/{redhat,OpenLinux,turbo,packages,rpm ..
rpm -bb SPECS/netxtreme2.spec or (For RPM version 4.x.x) rpmbuild -bb SPECS/netxtreme2.spec Note that the RPM path is different for different Linux distributions. The driver will be compiled for the running kernel by default. To build the driver for a kernel different than the running one, specify the kernel by defining it in KVER: rpmbuild -bb SPECS/netxtreme2.spec --define “KVER ” in the form of 2.x.y-z is the version of another kernel that is installed on the system.
3. Install the newly built package (driver and main page): rpm -ivh RPMS//netxtreme2-..
3-10 Chapter 3: Driver installation
For SuSE Linux: ASUS PEB-10G/SFP+ 3-11
where is the machine architecture such as i386: rpm -ivh RPMS/i386/netxtreme2-.i386.rpm Note that the --force option may be needed on some Linux distributions if conflicts are reported. The drivers will be installed in the following path: 2.4.x kernels: /lib/modules//kernel/drivers/net/bnx2.o /lib/modules//kernel/drivers/net/bnx2x.o 2.6.0 kernels: /lib/modules//kernel/drivers/net/bnx2.
4. Unload existing driver if necessary: rmmod bnx2 rmmod bnx2x If the cnic driver is loaded, it should also be unloaded along with dependent drivers: rmmod bnx2fc rmmod bnx2i rmmod cnic 5. Load the bnx2 driver for the BCM5706/BCM5708/5709/5716 devices: insmod bnx2.o or insmod bnx2.ko (on 2.6.x kernels) or modprobe bnx2 To load the bnx2x driver for the BCM57710/BCM57711/BCM57711E/ BCM57712 devices: insmod bnx2x.o or insmod bnx2x.ko (on 2.6.
or modprobe bnx2i To load the bnx2fc driver for BCM57712 device: insmod bnx2fc.ko or modprobe bnx2fc service bnx2fcd start Note that the inbox kernel may have an older version of bnx2, bnx2x and cnic driver. It is important for FCoE offload user to unload these inbox versions before attempting to load bnx2fc driver. You can do either of these two options: a) b) 6. 3-14 Reboot the server.
3.2.1 Checking Linux OS firmware version To check the Linux OS firmware version: 1. 2. 3. Insert the support CD to the optical drive. Double-click PEB-10G series on your desktop. Go to Utilities and copy the FwUpg folder to your desktop. Go to Linux folder and select the platform. For SUSE Linux: 1. 2. Follow the Readme.txt for installing lnxfwnx2. Ensure that the drivers are installed. Key in the command to untar the lnxfwnx2 SDK package: tar -zxvf lnxfwnx2-{arch}.sdk.tgz 3.
4. Key in the command ls . Then key in the command ln -sf $(BMAPI_LIB_NAME)-{version}$(BMAPI_LIB_NAME).so.6 3-16 5. Copy brcm_pci.ids to /usr/share directory. 6. Key in the command dir . Check the version number in entry MFW1/2.
For Red Hat Linux: 1. Repeat the steps and commands for SUSE Linux in installing Inxfwnx2. Follow the Readme.txt and ensure that the drivers are installed.
2. 3-18 Key in the command dir . Check the version number in entry MFW1/2.
ASUS contact information ASUSTeK COMPUTER INC. (Taiwan) Address Telephone Fax E-mail Web site Technical Support Telephone Online Support 15 Li-Te Road, Peitou, Taipei, Taiwan 11259 +886-2-2894-3447 +886-2-2890-7798 info@asus.com.tw http://www.asus.com.tw +886-2-2894-3447 (0800-093-456) http://support.asus.com/techserv/techserv.aspx ASUSTeK COMPUTER INC. (China) Address Telephone Fax Web site Technical Support Telephone Online Support No.
800 Corporate Way, Fremont, CA 94539. Asus Computer International Signature : Date : Representative Person’s Name : Apr. 12, 2012 Steve Chang / President This device complies with part 15 of the FCC Rules. Operation is subject to the following two conditions: (1) This device may not cause harmful interference, and (2) this device must accept any interference received, including interference that may cause undesired operation.