
User’s Manual
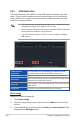
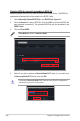
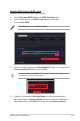
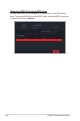
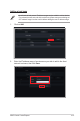
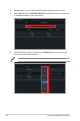
Table Of Contents
- About this guide
- Chapter 1: Getting Started
- Chapter 2: Main Menu Overview
- Chapter 3: Deploy Management
- 3.1 Agent Management overview
- 3.2 Deploying agents
- 3.2.1 Automatically scanning and deploying to devices
- 3.2.2 Scanning an IP range
- 3.2.3 Adding and deploying to devices
- 3.2.4 Editing device information
- 3.2.5 Installing agents manually
- 3.2.6 Installing Agents in silent mode
- 3.2.7 Upgrading or repairing agents
- 3.2.8 Setting up a Windows 7 deployment environment
- 3.3 Removing agents
- 3.4 Client Agent Updater
- Chapter 4: Device Information
- Chapter 5: Management Functions
- 5.1 Metadata Management
- 5.2 Software Management
- 5.3 Task Scheduler
- 5.4 OOB Control
- 5.5 Management Control Overview
- 5.6 Management Control Information Overview
- 5.7 DASH Management Control Information
- 5.8 RTL8117 Management Control Information
- 5.9 vPro Management Control Information
- 5.10 BMC Management Control Information
- 5.10.1 Hardware Sensor
- 5.10.2 Inventory
- 5.10.3 Control
- 5.10.4 Remote Desktop
- 5.10.5 Smart BIOS
- 5.10.6 Firmware Update
- 5.10.7 Event Log
- 5.10.8 IPMI
- 5.10.9 IPMI Serial-over-LAN (SOL)
- 5.10.10 Settings
- 5.10.11 Configuration
- 5.10.12 FRU Information
- 5.10.13 Image Redirection
- 5.10.14 Platform Event Filters
- 5.10.15 BSOD Capture
- 5.10.16 Error Codes
- 5.11 Screen Broadcast
- Chapter 6: Settings Migrator
- Chapter 7: Report Generator
- Chapter 8: Account & General Settings

5-92 Chapter 5: Management Functions
3. Repeat steps 1 and 2 to add more IP address ranges to the trust zone.
4. Select
By List
in the
Trust Zone Mode
field drop down menu to activate the
IP addresses added to the trust zone list.
5. (optional) Select another device from the
Clients
drop down list to set the
trust zone for the selected device.
Only follow this step if you selected multiple devices to set the trust zone.