User Manual ASUS GO Navigation software for ASUS R700 UK English December 2007, ver. 1.
Copyright note The product and the information contained herein is subject to change without prior notification. This manual may not, in whole or in part, be reproduced or transmitted in any form either electronically or mechanically, including photocopying and recording, without the express written consent of Asus. © 2007 - Asus Whereis® map data is © 2006 Telstra Corporation Limited and its licensors Data Source © 2006 Tele Atlas N.V.
Thank you for choosing ASUS GO as your door-to-door in-car navigator. Read the Quick Start Guide first and start using ASUS GO right away. This document is the detailed description of the software. You can easily discover ASUS GO while you are using it; however, we still recommend that you read this manual to understand the screens and the features of ASUS GO.
Table of contents 1 Warnings and safety information ............................................................................. 6 2 Getting started with ASUS GO .................................................................................. 7 2.1 Simple and Advanced modes ..............................................................................................8 2.2 Hardware buttons ..................................................................................................................
3.1.5 Selecting the destination or a waypoint from the History .....................................................24 3.1.6 Selecting the destination by entering its coordinates ...........................................................24 3.2 Creating a multi-point route................................................................................................25 3.3 Watching the simulation of a route....................................................................................25 3.
1 Warnings and safety information ASUS GO is a navigation system that helps you find your way to your destination with its built-in GPS receiver. ASUS GO does not transmit your GPS position; others cannot track you. It is important that you look at the display only when it is safe to do so. If you are the driver of the vehicle, we recommend that you operate ASUS GO before you start your journey. Plan the route before your departure and stop if you need to change something in the route.
2 Getting started with ASUS GO ASUS GO is optimised for in-car use. You can use it easily by tapping the screen buttons and the map with your fingertips. ASUS GO can plan routes throughout the whole installed map set; you do not need to change maps or switch to a poorly detailed general map to navigate between map segments or countries. Tasks Using a stylus Instructions You do not need a stylus to use ASUS GO. Tap the buttons and the map with your fingertips.
• a Favourite (page 23) • a POI (page 23) • the History of previously set destinations and waypoints (page 24) 2.1 Simple and Advanced modes The application starts in Simple mode, but you have the possibility to choose between the two user modes: • Simple mode: you have easy access to the most important navigation functions and the basic settings only. • Advanced mode: you have access to the full functionality of ASUS GO.
Type of action Available in Simple Available mode Advanced mode Sound settings Route settings Regional settings Only master volume No Only language selection No Warnings in Explanation Yes Yes Yes See page 34 See page 32 See page 34 Yes See page 36 2.2 Hardware buttons You can use ASUS GO mostly by tapping the touch screen. The device has only one hardware button, the Power on/off button. You can turn on or off ASUS R700 at any time.
2.4.2 Manipulating the map You can change how the map looks: • You can tilt it, rotate it or scale it to best suit your needs while you are creating, planning or following a route. • You can customise which icons and buttons are visible.
Action Button(s) Description • If the next turn is at a distance, ASUS GO zooms out and lowers the view angle to show you the road in front of you. 2.4.3 Switching between the 2D and 3D modes You can switch between the 2D and 3D modes as follows: With the 2D/3D switch buttons Tap them to switch between the two modes. or The value always shows the mode the button switches to: If you are in 2D mode, you can see the button and you need to tap it to switch to 3D mode. 2.4.
2.4.
2.6 ASUS GO concepts 2.6.1 Smart Zoom Smart Zoom is a lot more than just a usual automatic zoom: • While following a route calculated by ASUS GO: when approaching a turn, it will zoom in and raise the view angle to let you easily recognise your manoeuvre at the next junction. If the next turn is at a distance, it will zoom out and lower the view angle to be flat so you can see the road in front of you.
2.6.3 Selected location on the map (Cursor) If you tap the map, the Cursor appears at the selected point on the map. ASUS GO displays the Cursor with a red dot and radiating red circles to make it visible at all zoom levels, even when it is in the background of a 3D map view. .
2.6.5 Daylight and night colour schemes ASUS GO uses different skins (colour schemes) during the day and during the night. • Daylight colours are similar to paper road maps. • The night colour schemes use dark colours for large objects to keep the average brightness of the screen low. ASUS GO offers several daytime and night colour schemes.
2.6.9 Simulation A simulation drives you through the route, following the driving instructions (page 25). You can use it, for example, to see which bridge ASUS GO planned for the route; if you do not want to take that bridge, you can avoid it. 2.6.10 Speed Cameras A speed camera is a special POI. ASUS GO is not shipped with a built-in database of speed cameras, but you can add speed cameras by marking their positions on the map. 2.6.
3 Navigating with ASUS GO You can set up your route in ASUS GO in several ways: • if you need a simple route (a route with only one destination, without any intermediate via points), you can select the destination and start navigating to it right away • you can plan a multi-point route (available in Advanced mode only) • you can also plan a route independently of your current GPS position or even without GPS reception (available in Advanced mode only) 3.
3.1.2 Entering an address or part of an address If you know at least a part of the address, it is the quickest way to select the destination of the route. You can find an address by entering: • the exact address, including house number • the centre of a settlement • an intersection • the midpoint of a street • any of the above, starting the search with the postal code (page 22) 3.1.2.1 Entering an address The procedure is explained starting from the Navigation menu. 1.
4. 5. 6. • After entering a couple of characters, the hits that match the string appear in a list. • Tap the automatically. button to open the hit list before it appears Pick the street from the list. Enter the house number: 1. Tap 2. Enter the house number on the keyboard. 3. Tap the . button to finish entering the address. The map appears with the selected point in the middle. Tap (Simple mode) or (Advanced mode) from the Cursor menu.
3.1.2.3 Selecting an intersection as the destination The procedure is explained starting from the Navigation menu. 1. Tap the following buttons: (Advanced mode). 2. By default, ASUS GO proposes the country/state and settlement where you are. If needed, tap the button with the name of the country/state, and select a different one from the list. (Simple mode), or , 3. Tip! To select the settlement from the list of recently used ones, tap the button. To change the settlement: 1.
7. The map appears with the selected point in the middle. Tap (Simple mode) or (Advanced mode) from the Cursor menu. The route is then automatically calculated, and you can start navigating. 3.1.2.4 Selecting a city centre as the destination The City Centre is not the geometric centre of the settlement but an arbitrary point the map creators have chosen. In towns and villages, it is usually the most important intersection; in larger cities, it is an important intersection.
3.1.2.5 Entering an address with a postal code The procedure is explained starting from the Navigation menu. (Simple mode), or , 1. Tap the following buttons: (Advanced mode). 2. By default, ASUS GO proposes the country/state and settlement where you are. If needed, tap the button with the name of the country/state, and select a different one from the list. 3. Tap the button with the name of the settlement, and enter the postal code: 1. Start entering the code on the keyboard. 2.
3.1.3 Selecting the destination from your Favourites You can select as your destination a location that you have already saved as a Favourite. The procedure is explained starting from the Navigation menu. (Simple mode) or 1. Tap the following buttons: (Advanced mode). 2. Tap the Favourite that you want to set as your destination. 3. The map appears with the selected point in the middle. Tap , (Simple mode) or (Advanced mode) from the Cursor menu.
3.1.5 Selecting the destination or a waypoint from the History The destinations that you have set earlier appear in the History. The procedure is explained starting from the Navigation menu. 1. Tap the following (Simple buttons: mode), or , (Advanced mode). 2. If necessary, turn the page to see earlier destinations with the arrow buttons. 3. Tap the desired item. 4. The map appears with the selected point in the middle. Tap (Simple mode) or (Advanced mode) from the Cursor menu.
3.2 Creating a multi-point route (available in Advanced mode only) 1. Multi-point routes are extended from single routes, so a route must be active first. 2. Select another point as you did in the previous sections. This will be the additional destination in the route. 3. The map appears with the selected point in the middle, and the Cursor menu opens automatically. 4. Tap 5. Now add the new point to the existing route: 6. to open the full Cursor menu with the additional functions.
3.4 Pausing the active route You do not need to pause the active route: when you start driving again, ASUS GO restarts the voice instructions from your position. 3.5 Deleting the active route (available in Advanced mode only) The procedure is explained starting from the Cockpit screen. • Tap the following buttons: , , . 3.6 Using track logs ASUS GO can record the track (how your GPS position changed) that you drive.
Changing the colour of a Track Log 1. Tap the following buttons: , 2. Tap the log and then tap the button. , . 3.7 Saving a route (available in Advanced mode only) When you save a route, ASUS GO only saves the waypoints: • If you updated your map since you first saved the route, ASUS GO calculates the driving instructions according to the latest available map information. • ASUS GO deletes the information about the legs and waypoints that you already left behind during navigation.
4 Reference book (Advanced mode) ASUS GO starts with the Navigation menu. From there you can access the following screens: Screen Button Description Map The map. Find Setting the destination (for example from an address or a POI) or using the search engine of ASUS GO. My Data Managing user data, such as saved point (POI, Favourites, Pins), History items, Saved Routes, and Track logs.
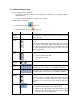
Symbol Name Zoom in, zoom out Action Scale the map Current GPS position (on nearest n/a road) Cursor (selected map location) n/a Map view modes Switches between 2D and 3D map modes Tilt up, tilt down Tilt the 3D map Rotate left, rotate right Rotate the 3D map left or right Bottom row Current street n/a Green line Active route n/a Trip data Opens Trip Data screen Menu Map orientation n/a Return to GPS position Moves the map back to the current GPS position Battery status Opens Cockpi
4.1.1 Buttons on the map 4.1.1.1 Zooming, tilting and rotating buttons These buttons appear when you tap the map. Button Description Zooms in/out. the Available in which map view modes map In all modes. Tilts the up/down. map Only in 3D mode. Rotates left/right. map Only in 2D and 3D modes, not in Overview mode. the 4.1.1.2 Map view buttons The button of the non-active map view is always visible on the map. Tap it to switch to another view.
ASUS GO supports the following 3D object types: Type Description 3D landmarks Tourist attractions and well-known buildings. Elevation model Hills and mountains. Elevated roads 3D buildings 3D terrain Complex intersections and bridges are elevated. Realistic buildings can be seen on the map. Terrain is illustrated by colours. 4.1.
Symbol Name Description GO cannot avoid such roads, the route will include them and it will show them in a colour that is different from the route colour. Two-way and multi-lane streets ASUS GO displays the route line on the driving side or roads on two-way streets/roads and on the axis of oneway streets/roads. One-way streets If you zoom in and the street line is wide enough, small arrows show the direction of the street. 4.
Button Description You can run a demonstration of the route at high speed or at normal speed. You can browse the driving instructions that ASUS GO follows during navigation. You can exclude manoeuvres or streets to adjust the route to your preferences. Opens a screen with useful route and travel data. You can save the active route for later use. You can load a previously saved route for navigation.
Name Menu settings Smart Zoom Overview Description • Button animation. • User selectable background picture. Configures whether Smart Zoom (page 13) is enabled. Related settings: • Minimum and maximum zoom levels • Automatic restore for Smart Zoom • Automatic zooming function when the map returns after find, based on the type of object searched for Configures whether the automatic Overview mode (page 13) is enabled.
4.4.4 Route There are various settings that influence the way routes are calculated. 4.4.4.1 Route Calculation Method The following route planning types exist in this application: Option Description Fast Gives the quickest possible route if you can travel at or near the speed limit on all roads. Usually the best selection for fast and normal cars. Short Gives a route that has the smallest total distance of all possible routes between the waypoints.
Type Description disable toll roads, ASUS GO plans the best toll-free route. Charge roads Charge roads are pay roads where there is a per-use charge. They can be enabled or disabled separately from toll roads. U-turns ASUS GO can exclude manoeuvres that would include a U-turn. Turning back on dual carriageways does not count as a U-turn. Permit needed You might need a permit or permission from the owners to use certain roads or to enter certain areas.
5 Glossary 2D/3D GPS reception The GPS receiver uses satellite signals to calculate its (your) position and need at least four signals to give a three-dimensional position, including elevation. Because the satellites are moving and because objects can block the signals, your GPS device might not receive four signals. If three satellites are available, the receiver can calculate the GPS position but the accuracy is lower and the GPS device does not give you elevation data: only 2D reception is feasible.
Scheme ASUS GO comes with different colour schemes for the map for the daylight or night use. Schemes are custom graphic settings for the map and they can have different colours for streets, blocks or surface waters in 2D and 3D modes, and they display shades or shadows in different ways in 3D mode. One daytime scheme and one night-time scheme is always selected. ASUS GO uses them when it switches from day to night and back. Speed Camera A special POI type.