ROG PHONE ZS673KS Hướng Dẫn
VN20050 Tháng 3 2022 Phiên bản đã sửa đổi phiên bản 3 Hướng dẫn chăm sóc và an toàn An toàn trên đường là ưu tiên hàng đầu. Chúng tôi khuyến nghị bạn không được sử dụng điện thoại khi đang lái xe hoặc điều khiển bất kỳ loại xe nào. Chỉ nên sử dụng điện thoại này ở môi trường có nhiệt độ xung quanh khoảng 0°C (32°F) - 35°C (95°F). Tắt điện thoại của bạn tại các khu vực bị hạn chế nơi cấm sử dụng thiết bị di động.
Thải bỏ thích hợp Nguy cơ xảy ra cháy nổ nếu pin được thay thế bằng loại pin khác không phù hợp. Thải bỏ pin đã qua sử dụng theo hướng dẫn. Không được thải bỏ pin vào rác thải đô thị. Biểu tượng thùng rác có bánh xe gạch chéo cho biết pin không được thải bỏ vào rác thải đô thị. Không được thải bỏ thiết bị của bạn vào rác thải đô thị. Sản phẩm này đã được thiết kế để cho phép tái sử dụng thích hợp các linh kiện và tái chế.
Mục lục 1 Khái niệm cơ bản Chào mừng!.............................................................................................................................................. 7 Chuẩn bị sẵn Điện thoại ROG!............................................................................................................ 8 Khởi động lần đầu................................................................................................................................16 Sử dụng màn hình cảm ứng................
Nhận cuộc gọi........................................................................................................................................43 Các tùy chọn gọi khác.........................................................................................................................44 Ghi âm cuộc gọi....................................................................................................................................45 Quản lý số liên lạc..............................................
Màn hình chính thời tiết....................................................................................................................64 Đồng hồ........................................................................................................................65 Đồng hồ báo thức................................................................................................................................65 Đồng hồ thế giới............................................................................
1 Khái niệm cơ bản Khái niệm cơ bản 1 Chào mừng! Khám phá sự đơn giản trực quan của ASUS Zen UI! ASUS Zen UI là giao diện trực quan và quyến rũ dành riêng cho điện thoại ROG Phone. Nó cung cấp cho bạn các ứng dụng đặc biệt tích hợp riêng hoặc chung với các ứng dụng khác để phù hợp nhu cầu cá nhân duy nhất và giúp cuộc sống của bạn dễ dàng hơn trong khi cho phép bạn tận hưởng niềm vui với điện thoại ROG Phone.
Chuẩn bị sẵn Điện thoại ROG! Các bộ phận và tính năng Hãy cầm điện thoại của bạn và khởi động nó trong nháy mắt.
CẢNH BÁO! • Để tránh các sự cố kết nối mạng và pin: • ĐỪNG đặt nhãn dán bằng kim loại lên vùng ăngten. • ĐỪNG dùng khung/hộp bảo vệ bằng kim loại trên Điện thoại ROG. • ĐỪNG che phủ vùng ăngten bằng tay hoặc các vật dụng khác khi đang sử dụng một số tính năng như gọi điện hoặc sử dụng kết nối dữ liệu di động. • Chúng tôi khuyên bạn nên sử dụng miếng dán bảo vệ màn hình tương thích với ASUS.
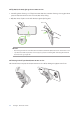
Để lắp đặt bộ tản nhiệt gắn ngoài AeroActive Cooler: 1. Căn thẳng Chân cắm Pogo có lỗ lắp ở bên sườn điện thoại với Chân cắm Pogo ở trong phía dưới quạt tản nhiệt AeroActive Cooler và ấn nhẹ điện thoại xuống. 2. Đẩy điện thoại về phía sau cho đến khi bạn nghe thấy tiếng tách. GHI CHÚ: • Bạn không nên kết nối các thiết bị khác với điện thoại ROG khi lắp điện thoại trên AeroActive Cooler.
Lắp thẻ Nano SIM Cả hai khe cắm thẻ Nano SIM đều hỗ trợ các băng tần mạng GSM/GPRS/EDGE, WCDMA/HSPA+/DCHSPA+, FDD-LTE, TD-LTE và 5G NR Sub-6. CHÚ Ý! Phải hết sức cẩn thận khi xử lý thẻ SIM nano. ASUS không chịu trách nhiệm cho bất kỳ trường hợp mất dữ liệu hay thiệt hại nào đối với các thẻ SIM nano của bạn. Để lắp thẻ SIM nano: 1. Đẩy thanh ghim kèm theo vào lỗ trên khe cắm thẻ để nhả khay ra. 2. Lắp (các) thẻ Nano SIM vào (các) khe cắm. M2 -SI no Na M1 -SI no Na 3.
Tháo thẻ SIM nano CHÚ Ý! Phải hết sức cẩn thận khi xử lý thẻ SIM nano. ASUS không chịu trách nhiệm cho bất kỳ trường hợp mất dữ liệu hay thiệt hại nào đối với các thẻ SIM nano của bạn. Để tháo thẻ SIM nano: 1. Đẩy thanh ghim kèm theo vào lỗ trên khe cắm thẻ để nhả khay ra. 2. Tháo (các) thẻ Nano SIM ra khỏi (các) khe cắm. M2 Chương 1: Khái niệm cơ bản -SI 12 no Na M1 -SI no Na 3. Ấn nhẹ khay trở lại cho đến khi nó được đóng chặt.
Sạc pin điện thoại ROG Phone Điện thoại ROG Phone chỉ được sạc một phần pin khi mua nhưng bạn có thể sạc đầy pin trước khi sử dụng điện thoại lần đầu. Đọc các thông báo và chú ý quan trọng sau đây trước khi sạc pin cho điện thoại của bạn. QUAN TRỌNG! • Bóc lớp màng bảo vệ trên bộ sạc AC và cáp USB Loại C trước khi sử dụng chúng với thiết bị của bạn. • Đảm bảo cắm adapter nguồn AC vào ổ cắm điện tương thích. Bạn có thể cắm adapter nguồn AC vào mọi ổ cắm điện 100~240 V tương thích.
GHI CHÚ: • Chúng tôi khuyên bạn nên sạc điện thoại ROG cùng một lúc thông qua một cổng USB Loại C. • Chỉ cổng USB Type-C ở bên trái ROG Phone mới có chức năng Cổng màn hình. • Nếu bạn cắm các thiết bị sạc hoặc OTG USB Type-C vào cả hai cổng USB Type-C trên ROG Phone, thì cổng USB Type-C ở bên trái ROG Phone sẽ trở thành cổng chính, và dòng điện sạc hoặc thiết bị OTG ở cổng ở phía dưới sẽ bị hạn chế.
Bật hoặc tắt điện thoại ROG Phone Bật điện thoại của bạn Để bật điện thoại, hãy nhấn và giữ nút nguồn cho đến khi điện thoại báo rung và bật lên. Tắt điện thoại của bạn Để tắt điện thoại: 1. Nếu màn hình điện thoại đã tắt, hãy nhấn nút nguồn để bật nó. Nếu màn hình bị khóa, hãy mở khóa màn hình điện thoại. 2. Nhấn và giữ nút nguồn, sau đó khi được nhắc, hãy chạm Power off (Tắt nguồn). Chế độ chờ Để chuyển điện thoại vào chế độ chờ, nhấn nút nguồn một lần cho đến khi màn hình tắt.
Khởi động lần đầu Khi bạn bật điện thoại ROG Phone lần đầu, Setup Wizard (Thuật Sĩ Cài Đặt) sẽ hướng dẫn bạn vượt qua quy trình cài đặt. Thực hiện theo các hướng dẫn trên màn hình để chọn ngôn ngữ ưu tiên, thiết lập mạng di động, Wi-Fi và các tính năng bảo mật cũng như tài khoản đồng bộ. Sử dụng tài khoản Google hoặc ASUS của bạn để cài đặt điện thoại; nếu bạn chưa có tài khoản Google hoặc ASUS, hãy tiến hành tạo tài khoản mới.
Sử dụng màn hình cảm ứng Dùng những thao tác này trên màn hình cảm ứng để bật các ứng dụng, truy cập một số cài đặt và điều hướng thiết bị ROG Phone của bạn. Bật các ứng dụng hoặc chọn các mục Để bật ứng dụng, chỉ cần chạm vào nó. Di chuyển hoặc xóa các mục Thực hiện bất kỳ thao tác nào sau đây: • Để di chuyển một ứng dụng hoặc widget, chạm và giữ rồi kéo nó sang vị trí bạn muốn di chuyển đến. • Để xóa ứng dụng hoặc tiện ích, hãy chạm và giữ nó rồi chạm Uninstall (Gỡ bỏ).
Chuyển qua các trang hoặc màn hình Thực hiện bất kỳ thao tác nào sau đây: • Vuốt ngón tay sang trái hoặc phải để chuyển đổi giữa các màn hình hoặc mở trang Tìm kiếm Google. • Cuộn ngón tay lên hoặc xuống để chuyển qua các trang web hoặc danh mục. Phóng to Vuốt hai ngón tay ra trên màn hình cảm ứng để phóng to ảnh trong Photos (Ảnh chụp) hoặc Maps (Bản đồ), hoặc phóng to một trang web.
Thu nhỏ Chụm hai ngón tay vào trên màn hình cảm ứng để thu nhỏ ảnh trong Photos (Ảnh chụp) hoặc Maps (Bản đồ), hoặc thu nhỏ một trang web. LƯU Ý: Bạn không thể phóng to/thu nhỏ một số trang web vì những trang này có thể đã được thiết kế riêng để khớp với màn hình ĐTDĐ.
2 Không có nơi nào như Màn hình chính Không có nơi nào như Màn hình chính 2 Tính năng màn hình chính của ĐT Zen Màn hình chính Nhận báo nhắc cho các sự kiện quan trọng, cập nhật ứng dụng và hệ thống, dự báo thời tiết, và tin nhắn văn bản từ những người thật sự quan trọng đối với bạn, ngay trên Màn hình chính điện thoại.
Cài đặt nhanh Cửa sổ Cài đặt nhanh cho phép truy cập một chạm vào một số tính năng và cài đặt không dây trên điện thoại ROG Phone. Mỗi tính năng này đều được đại diện bởi một nút. Để bật cửa sổ Quick settings (Cài đặt nhanh), vuốt xuống hai lần từ đỉnh màn hình. LƯU Ý: Nút màu xanh cho biết tính năng hiện đã được bật trong khi nút xám cho biết tính năng đã bị tắt.
Thông báo Từ cửa sổ Notifications (Thông báo), bạn có thể nhìn thấy các cập nhật mới nhất và những thay đổi hệ thống vừa thực hiện trên điện thoại ROG. Hầu hết những thay đổi này là liên quan đến dữ liệu và hệ thống. Để bật cửa sổ Thông báo, vuốt xuống từ đỉnh màn hình.
Tùy chỉnh màn hình chính Ghi dấu cá tính riêng của bạn lên Màn hình chính. Chọn thiết kế hấp dẫn làm hình nền và thêm các widget để xem lại nhanh thông tin quan trọng. Bạn cũng có thể thêm nhiều trang hơn để có thể thêm và truy cập nhanh hoặc xem lại nhiều ứng hoặc widget hơn trên Màn hình chính. Để bật Màn hình chính Manage (Quản lý), chạm và giữ một vùng trống trên Màn hình chính Widget (Tiện ích nhỏ) Bạn có thể đặt các widget - vốn là các ứng dụng động nhỏ - lên Màn hình chính.
Hình nền Cho phép các ứng dụng, biểu tượng của bạn, và các thành phần khác của ĐT hiển thị trên hình nền được thiết kế hấp dẫn. Bạn có thể thêm màu nền mờ vào hình nền để dễ đọc và rõ nét. Bạn cũng có thể thêm hình nền động để giúp màn hình trở nên sống động. Vuốt sang phải hoặc trái để chọn vị trí bạn muốn áp dụng hình nền Chạm để chọn hình từ Thư viện Chạm để cắt hình nền Vuốt sang phải hoặc trái để chọn hình nền Áp dụng hình nền Để áp dụng hình nền: 1.
Chỉnh sửa màn hình chính Bạn có thể mở rộng màn hình chính, chọn hiệu ứng cuộn, đổi màu nhãn biểu tượng và chọn chủ đề thư mục. 1. Chạm và giữ một vùng trống trên màn hình chính rồi chọn Edit Home screen (Sửa hàn hình chính). 2. Chạm một tính năng để sửa màn hình chính của bạn. Cài đặt ngày giờ Theo mặc định, ngày giờ hiển thị trên Màn hình chính sẽ tự động đồng bộ với các cài đặt của nhà cung cấp dịch vụ di động. Để đổi cài đặt ngày giờ: 1.
Màn hình khóa Theo mặc định, màn hình khóa hiển thị sau khi bạn bật điện thoại và trong khi khởi động ĐT từ chế độ chờ. Từ màn hình khóa, bạn có thể chuyển sang hệ điều hành Android® của điện thoại bằng các chạm nhẹ vào bảng điều khiển màn hình cảm ứng. Bạn cũng có thể tùy chỉnh màn hình khóa điện thoại để điều chỉnh cách truy cập vào các dữ liệu và ứng dụng di động. Tùy chỉnh màn hình khóa Nếu bạn muốn đổi cài đặt màn hìn khóa từ tùy chọn Swipe (Vuốt) mặc định, hãy tham khảo các bước sau: 1.
Cảm biến nhận dạng dấu vân tay Cảm biến nhận dạng dấu vân tay giúp ngăn chặn người khác sử dụng trái phép điện thoại ROG của bạn. Bạn có thể sử dụng dấu vân tay của mình để mở khóa điện thoại, truy cập các cuộc gọi và dữ liệu trên điện thoại. Khi thiết lập nhận dạng dấu vân tay, bạn cũng cần phải thiết lập cách khóa màn hình để khởi động thiết bị. Bật điện thoại ROG lần đầu Để thiết lập nhận dạng dấu vân tay khi sử dụng điện thoại ROG của bạn lần đầu: 1.
Thiết lập nhận dạng dấu vân tay từ Settings (Cài đặt) Để thiết lập nhận dạng dấu vân tay của bạn từ Settings (Cài đặt): 1. Đảm bảo bộ quét dấu vân tay và ngón tay của bạn luôn sạch sẽ và khô ráo. 2. Bật màn hình Settings (Cài đặt) bằng cách thực hiện một trong các cách sau: • • Bật Quick settings (Cài đặt nhanh) rồi chạm . Vuốt lên trên Màn hình chính rồi chạm Settings (Cài đặt). 3.
Mở khóa bằng khuôn mặt Mở khóa bằng khuôn mặt dễ dàng ngăn chặn người khác sử dụng trái phép điện thoại ROG của bạn. Bạn có thể bật sáng màn hình điện thoại ROG và nhìn vào đó để mở khóa điện thoại rồi truy nhập vào màn hình chính điện thoại chỉ trong một giây. Khi thiết lập mở khóa bằng khuôn mặt, bạn cũng cần thiết lập cách khóa màn hình để khởi động điện thoại. Thiết lập mở khóa bằng khuôn mặt từ Settings (Cài đặt) Để thiết lập mở khóa bằng khuôn mặt từ Settings (Cài đặt): 1.
4. Thực hiện theo các hướng dẫn để thiết lập phương pháp khóa màn hình dự phòng của bạn. 5. 30 Chạm Next (Kế Tiếp) và thực hiện theo các hướng dẫn để đăng ký khuôn mặt của bạn.
6. Chọn cách bạn muốn hiển thị các thông báo trên màn hình khóa rồi chạm Done (Xong). 7. Khi hoàn tất, chạm Turn On (Bật) để bật nhận diện khuôn mặt để mở khóa điện thoại của bạn. LƯU Ý: • Hãy hiển thị đầy đủ miệng, mũi và mắt mở khi bạn sử dụng tính năng mở khóa bằng khuôn mặt. • Việc đeo kính mát hoặc thiếu ánh sáng sẽ khiến cho việc mở khóa bằng khuôn mặt không thành công.
3 Làm việc hết mình, vui chơi thỏa thích Làm việc hết mình, vui chơi thỏa thích 3 Chrome Trình duyệt Chrome dùng cho Android cho phép bạn tận hưởng những trải nghiệm duyệt web nhanh, an toàn và ổn định giống như trình duyệt Chrome trên máy tính để bàn. Đăng nhập vào tài khoản Google của bạn để đồng bộ các thẻ, chỉ trang, và lược sử duyệt web qua mọi thiết bị của bạn. Nếu bạn chưa có tài khoản Google, hãy đăng ký một tài khoản. LƯU Ý: Để biết chi tiết về cách tạo tài khoản Google, hãy xem Gmail.
Chia sẻ trang Chia sẻ với mọi người các trang thú vị từ điện thoại ROG Phone qua tài khoản email, tài khoản lưu trữ đám mây, Bluetooth hoặc các ứng dụng khác trên điện thoại ROG Phone. 1. Bật Chrome. 2. Từ một trang web bất kỳ, chạm > Share... (Chia sẻ ...) 3. Chạm để chọn cách chia sẻ trang này. Đánh dấu trang Đánh dấu các trang hoặc trang web yêu thích để bạn có thể truy cập và duyệt lại chúng. Để đánh dấu một trang: Từ trang đó, chạm > .
Gmail Sử dụng Gmail để thiết lập tài khoản Google của bạn nhằm truy cập các dịch vụ và ứng dụng liên quan đến Google cũng như nhận, gửi và duyệt email ngay trên điện thoại ROG. Bạn cũng có thể thiết lập các tài khoản email khác như Yahoo hoặc tài khoản email làm việc khác qua Gmail. QUAN TRỌNG! Bạn phải kết nối internet để có thể thêm tài khoản email hoặc gửi và nhận email từ những tài khoản đã thêm. Để biết thêm chi tiết, xem Luôn kết nối. Để thiết lập tài khoản Google: 1.
Lịch Google Mang lịch trình vào cuộc sống và theo dõi mọi sự kiện hoặc báo nhắc quan trọng của bạn. Các sự kiện bạn đã tạo hoặc sửa đổi sẽ tự động đồng bộ với mọi phiên bản Lịch Google mà bạn đã đăng nhập. Tạo sự kiện Để tạo sự kiện: 1. Từ Màn hình chính, thực hiện một trong các tùy chọn sau để bật Calendar (Lịch): • Chạm Google > Calendar (Lịch). • Vuốt lên trên Màn hình chính rồi chạm Calendar (Lịch). 2. Chạm rồi chạm Event (Sự kiện). 3. Nhập tên sự kiện của bạn, và chọn ngày giờ cho sự kiện đó.
Soạn báo nhắc Để soạn báo nhắc: 1. Từ màn hình chính, chạm Google > Calendar (Lịch). 2. Chạm rồi chạm Reminder (Báo nhắc). 3. Nhập tên báo nhắc của bạn. 4. Cài ngày giờ cho báo nhắc. Bạn có thể cài báo nhắc làm báo nhắc cả ngày hoặc định kỳ. • Báo nhắc cả ngày: Từ mục All day (Tất cả các ngày), chuyển thanh trượt sang phải. • Báo nhắc định kỳ: Chạm , rồi chọn tần suất bạn muốn báo nhắc tái diễn hoặc lặp lại. 5. Một khi đã hoàn tất, chạm Save (Lưu).
Quản lý file Dùng ứng dụng Quản lý file cho phép bạn dễ dàng xác định vị trí và quản lý dữ liệu của bạn trên bộ nhớ trong điện thoại ROG Phone. Để bật Quản lý file, vuốt lên trên Màn hình chính rồi chạm File Manager (Quản lý file).
Truyền dữ liệu ASUS Truyền không dây dữ liệu của bạn như danh bạ, nhật ký cuộc gọi hoặc ảnh từ thiết bị di động cũ sang ROG Phone của bạn. Để sử dụng Truyền dữ liệu ASUS: 1. 1. Vuốt lên trên Màn hình chính rồi chạm ASUS Data Transfer(Truyền dữ liệu ASUS) . 2. Chạm Get Started (Bắt đầu sử dụng) rồi thực hiện theo các hướng dẫn trên màn hình để hoàn tất quá trình truyền dữ liệu.
4 Giữ liên lạc Giữ liên lạc 4 Gọi điện sành điệu Tính năng SIM kép Tính năng SIM kép trên điện thoại ROG Phone cho phép bạn quản lý cài đặt của các thẻ Nano SIM đã lắp đặt. Với tính năng này, bạn có thể bật/tắt các thẻ Nano SIM, gán tên các SIM, hoặc cài một SIM làm mạng ưu tiên. Đổi tên các thẻ Nano SIM Đổi tên các thẻ Nano SIM trên điện thoại ROG Phone để bạn có thể nhận dạng chúng dễ dàng. Để đổi tên các thẻ Nano SIM, chạm tên SIM1 hoặc SIM2 rồi nhập tên cho các Nano SIM của bạn.
Gán thẻ SIM mặc định Gán thẻ SIM làm SIM ưu tiên của bạn cho các cuộc gọi thoại và dịch vụ dữ liệu. SIM dùng cho cuộc gọi thoại Khi bạn thực hiện cuộc gọi, điện thoại ROG Phone tự động sử dụng thẻ SIM ưu tiên để kết nối cuộc gọi. Để gán thẻ SIM cho các cuộc gọi thoại, chạm Voice call (Cuộc gọi thoại) rồi chạm SIM bạn muốn sử dụng. QUAN TRỌNG! Bạn chỉ có thể sử dụng tính năng này nếu thực hiện cuộc gọi từ danh bạ.
Thực hiện cuộc gọi Điện thoại ROG Phone cung cấp cho bạn nhiều cách để thực hiện cuộc gọi. Gọi cho bạn bè từ danh sách số liên lạc, gọi thông minh để gọi nhanh hoặc nhập số gọi nhanh để gọi đến số liên lạc thường gọi. LƯU Ý: Tổ chức số liên lạc trong ứng dụng Danh bạ. Để biết chi tiết, xem Quản lý số liên lạc. Bật ứng dụng Điện thoại Trên Màn hình chính, thực hiện một trong các cách sau để bật ứng dụng Điện thoại: • Chạm . • Vuốt lên trên Màn hình chính rồi chạm Phone (Điện thoại).
Tự động gọi đến số nội bộ Bạn có thể chèn một khoảng dừng ngắn hoặc dài sau khi bấm số chính, khi đó số nội bộ sẽ được gọi tự động. 1. Từ ứng dụng Điện thoại, nhập số điện thoại chính. 2. Để chèn dấu tạm dừng, chạm và giữ phím * cho đến khi xuất hiện dấu phảy (,). 3. Nhập số nội bộ cần gọi. 4. Chọn từ các nút gọi SIM1 hoặc SIM2 để thực hiện cuộc gọi. 5. Chạm để kết thúc cuộc gọi.
Gọi số liên lạc yêu thích Khi thêm một số liên lạc vào danh sách Số yêu thích, bạn có thể gọi nhanh đến số liên lạc đó từ ứng dụng Danh bạ. 1. Bật ứng dụng Danh bạ. 2. Chạm Groups (Nhóm) > Favorites (Mục yêu thích) để hiển thị danh sách Số yêu thích rồi chạm số liên lạc yêu thích mà bạn muốn gọi. 3. Chạm để kết thúc cuộc gọi. Nhận cuộc gọi Màn hình cảm ứng của điện thoại ROG Phone sẽ sáng lên khi có cuộc gọi đến. Màn hình hiển thị cuộc gọi đến cũng khác nhau tùy tình trạng của điện thoại ROG Phone.
Gọi lại số gần nhất Để gọi lại số điện thoại gọi gần nhất: 1. Từ ứng dụng Điện thoại, chạm Recents (Gần đây) để hiển thị nhật ký cuộc gọi. 2. Chạm số ĐT vừa gọi gần nhất để gọi lại số đó. 3. Nếu đã lắp hai thẻ SIM, hãy chạm SIM mà bạn muốn gọi lại số đó. 4. Chạm để kết thúc cuộc gọi. Các tùy chọn gọi khác Khi đang đàm thoại, chạm một trong các tùy chọn gọi có thể thực hiện khi đang đàm thoại. Danh bạ Mở ứng dụng Contacts (Danh bạ).
Ghi âm cuộc gọi Điện thoại ROG Phone cho phép bạn ghi âm hội thoại để tham khảo hoặc lưu giữ thông tin về sau. 1. Gọi một số liên lạc hoặc bấm một số điện thoại. 2. Chạm để ghi âm cuộc gọi. QUAN TRỌNG! Trước khi ghi âm cuộc gọi, đảm bảo bạn đã xin phép bên hoặc các bên kia. 3. Để dừng ghi âm, chạm . Biểu tượng này hiển thị trên thanh thông báo hệ thống. 4. Vuốt xuống góc phải phía trên màn hình rồi chạm thông báo Call recording saved (Đã lưu ghi âm cuộc gọi) để xem hội thoại đã ghi âm.
Quản lý số liên lạc Sắp xếp các số liên lạc của bạn và luôn giữ liên lạc dễ dàng với chúng qua các cuộc gọi, tin nhắn SMS, email hoặc mạng xã hội. Phân nhóm các số liên lạc như Số yêu thích để liên lạc với chúng nhanh chóng, hoặc phân nhóm chúng như số VIP để được thông báo về bất kỳ sự kiện nào sắp diễn ra, các cuộc gọi nhỡ hoặc tin nhắn chưa đọc.
Thêm số liên lạc Thêm số liên lạc vào các tài khoản email trên điện thoại, công ty, Google hoặc tài khoản email khác và điền thông tin liên lạc quan trọng hơn như số liên lạc, địa chỉ email, sự kiện đặc biệt cho các số VIP và nhiều mục khác. 1. Bật ứng dụng Danh bạ rồi chạm . 2. Chọn Device (Thiết bị). LƯU Ý: • Bạn cũng có thể lưu số liên lạc vào thẻ SIM hoặc tài khỏa email. • Nếu bạn chưa có tài khoản email, chạm Add account (Thêm tài khoản) rồi tạo tài khoản mới. 3.
Tùy chỉnh hồ số của số liên lạc Sửa thông tin của số liên lạc, thêm ảnh chụp, cài nhạc chuông hoặc chụp ảnh làm ảnh bìa cho hồ sơ của số liên lạc. 1. Bật ứng dụng Danh bạ rồi chọn số liên lạc có thông tin hoặc hồ sơ bạn muốn sửa hoặc tùy chỉnh. 2. Thực hiện các thay đổi từ trang hồ sơ của số liên lạc đó. Chạm để sửa thông tin của số liên lạc Chạm để thêm vào D.
Quản lý danh sách chặn Chặn số điện thoại Để tạo danh sách các số ĐT bị chặn nhằm tránh nhận bất kỳ cuộc gọi hoặc tin nhắn nào không mong muốn. Các cuộc gọi và tin nhắn bị chặn của bạn sẽ được lưu vào mục lưu trữ Danh sách chặn. 1. Vuốt lên trên Màn hình chính rồi chạm Phone (Điện thoại) rồi chạm > Settings (Cài đặt) > Call blocking (Chặn cuộc gọi) & block list (d.sách chặn) > Block list (D.sách chặn). 2.
Đồng bộ tài khoản mạng xã hội Đồng bộ tài khoản mạng xã hội của bạn để thêm tài khoản mạng xã hội từ số liên lạc đó vào điện thoại ROG Phone. 1. Thực hiện một trong các cách sau để bật ứng dụng Cài đặt: • • Bật Cài đặt nhanh rồi chạm . Vuốt lên trên Màn hình chính rồi chạm Settings (Cài đặt). 2. Từ màn hình Cài đặt, chạm tài khoản mạng xã hội của bạn trong mục Tài khoản. 3. Trượt Automatically sync data (Tự động đ.bộ dữ liệu) sang ON (BẬT) để đồng bộ tài khoản mạng xã hội từ các số liên lạc của bạn. 4.
5 Vui chơi và giải trí 5 Vui chơi và giải trí Sử dụng tai nghe Cảm máy thoải mái để thực hiện những việc khác khi đang gọi điện hoặc thưởng thức âm nhạc yêu thích bằng tai nghe. Cắm giắc cắm tai nghe Cắm giắc cắm âm thanh 3.5mm của tai nghe vào thiết bị của bạn bằng bộ chuyển đổi USB Type-C to 3.5mm kèm theo. CẢNH BÁO! Nghe điện thoại ở mức âm lượng cao trong thời gian dài có thể làm hỏng thính giác của bạn. GHI CHÚ: • Tai nghe và bộ chuyển đổi giắc cắm tai nghe từ USB Type-C sang 3.
YT Music Với YT Music, bạn có thể truyền phát nhạc yêu thích, tạo danh sách nhạc hoặc nghe radio. Bạn cũng có thể đăng ký với YT Music để truy cập không giới hạn và không quảng cáo đối với hàng triệu tập tin nhạc mà bạn có thể thêm vào thư viện nhạc riêng. Thiết lập YT Music Đăng nhập vào tài khoản Google hoặc Gmail để có thể sử dụng YT Music.
6 Những khoảnh khắc quý giá Những khoảnh khắc quý giá 6 Ghi lại những khoảnh khắc Bật ứng dụng Camera Chụp hình và quay phim bằng ứng dụng Camera trên điện thoại ROG Phone. Tham khảo bất kỳ bước nào dưới đây để mở ứng dụng Camera. Từ màn hình khóa Vuốt dấu lên để khởi chạy ứng dụng camera. Từ màn hình chính Chạm .
Màn hình chính camera Camera điện thoại ROG Phone của bạn được trang bị các tính năng phát hiện cảnh chụp tự động và ổn định hình tự động. Nó cũng tích hợp tính năng ổn định video giúp đề phòng rung lắc trong khi quay video. Chạm các biểu tượng để bắt đầu sử dụng camera và tìm hiểu các tính năng hình ảnh và video trên điện thoại ROG Phone.
Tua nhanh thời gian Tính năng video tua nhanh thời gian của điện thoại ROG Phone cho phép bạn chụp ảnh tĩnh để phát lại theo kiểu tua nhanh thời gian tự động. Thực chất, các sự kiện dường như di chuyển theo kiểu chuyển tiếp nhanh dù chúng thực sự đã xảy ra và đã được ghi lại giữa các khoảng thời gian dài. Quay video tua nhanh thời gian 1. Trên màn hình chính của ứng dụng Camera, vuốt sang phải đến Time lapse (Tua nhanh thời gian). 2.
Sử dụng thư viện Xem hình ảnh và video trên điện thoại ROG Phone bằng ứng dụng Thư viện. Ứng dụng này cũng cho phép bạn chỉnh sửa, chia sẻ hoặc xóa các file hình ảnh và video trên điện thoại ROG Phone. Từ Thư viện, bạn có thể hiển thị hình ảnh trong trình chiếu hoặc chạm để xem file hình ảnh hoặc video đã chọn. Để bật Thư viện, vuốt lên trên Màn hình chính rồi chạm Gallery (Thư viện). Xem địa điểm ảnh chụp Bật truy cập địa điểm trên điện thoại ROG Phone và nhận các chi tiết địa điểm trên ảnh chụp của bạn.
3. Chạm rồi chọn từ danh sách nơi bạn muốn chia sẻ các hình ảnh. Xóa file khỏi thư viện 1. Thực hiện một trong các tùy chọn sau: • • Từ màn hình Gallery (Thư viện) > Photos (Ảnh chụp), chạm dấu >Select (Chọn) để kích hoạt lựa chọn file. Từ màn hình Gallery (Thư viện) > Album, chạm thư mục nơi chứa các file bạn muốn xóa. Sau khi mở thư mục, chạm dấu > Select (Chọn) để kích hoạt lựa chọn file. 2. Chạm các file bạn muốn xóa. Dấu kiểm hiển thị ở phía trên hình bạn chọn. 3. Chạm .
7 Luôn kết nối Luôn kết nối 7 Mạng di động Khi không có mạng Wi-Fi khả dụng mà bạn có thể kết nối, hãy bật truy cập dữ liệu từ mạng di động để kết nối internet. Bật mạng di động 1. Thực hiện một trong các cách sau để bật màn hình Cài đặt: • • Bật Cài đặt nhanh rồi chạm . Vuốt lên trên Màn hình chính rồi chạm Settings (Cài đặt). 2. Chạm Network & Internet (Mạng & internet) > Mobile network (Mạng di động). 3. Trượt nút Mobile data sang On (Bật) và thiết lập các cài đặt mạng di động khác nếu cần.
Kết nối mạng Wi-Fi 1. Trên màn hình Settings (Cài đặt), chạm Network & Internet (Mạng & internet) > Wi-Fi để hiển thị tất cả các mạng Wi-Fi phát hiện được. 2. Chạm tên của một mạng để kết nối. Đối với mạng an toàn, bạn có thể được nhắc nhập mật khẩu hoặc các chứng chỉ bảo mật khác. GHI CHÚ: • Điện thoại ROG Phone sẽ tự động kết nối lại với mạng mà bạn đã kết nối trước đó. • Tắt tính năng Wi-Fi để giúp tiết kiệm nguồn pin. Tắt mạng Wi-Fi Để tắt mạng Wi-Fi: 1.
Kết nối ROG Phone với thiết bị Bluetooth® Trước khi sử dụng tính năng Bluetooth trên ROG Phone với mức độ hoàn chỉnh, bạn phải kết nối nó trước với thiết bị Bluetooth. Điện thoại ROG Phone sẽ tự động lưu lại kết nối của thiết bị Bluetooth. 1. Trên màn hình Settings (Cài đặt), chạm Connected devices (Các thiết bị đã kết nối) > Connection preferences (Ưu tiên kết nối) > Bluetooth để hiển thị mọi thiết bị khả dụng.
Kết nối Khi dịch vụ Wi-Fi không có sẵn, bạn có thể sử dụng điện thoại ROG Phone làm modem hoặc chuyển nó thành Trạm phát Wi-Fi để truy cập internet trên laptop, máy tính bảng và các thiết bị di động khác. QUAN TRỌNG! Hầu hết các nhà cung cấp dịch vụ di động có thể yêu cầu bạn thuê bao gói dữ liệu để có thể sử dụng chức năng tethering. Liên hệ với nhà cung cấp dịch vụ đi động để được trợ giúp về thuê bao gói dữ liệu này. LƯU Ý: • Truy cập internet qua tethering có thể chậm hơn kết nối Wi-Fi hoặc di động.
Chia sẻ kết nối USB Bật chia sẻ kết nối USB trên điện thoại ROG và chia sẻ kết nối internet của nó với các thiết bị khác. 1. Kết nối điện thoại ROG với một thiết bị khác bằng cáp USB. 2. Từ màn hình Settings (Cài đặt), chạm Network & Internet (Mạng & internet) > Hotspot & Tethering, sau đó trượt USB tethering (Chia sẻ kết nối USB) sang ON (BẬT) để bật tính năng chia sẻ kết nối.
8 Du lịch và bản đồ 8 Du lịch và bản đồ Thời tiết Nhận bản tin cập nhật thời tiết trực tiếp từ điện thoại ROG Phone của bạn với ứng dụng thời tiết. Thông qua ứng dụng Thời tiết, bạn cũng có thể kiểm tra các thông tin thời tiết chi tiết khác trên toàn thế giới. Bật ứng dụng Thời tiết Từ màn hình chính, chạm biểu tượng Weather (Thời tiết) để bật ứng dụng thời tiết.
Màn hình chính thời tiết Thiết lập và tải các cập nhật thời tiết cho địa điểm hiện hành của bạn cũng như các vùng khác trên thế giới. Chạm vào để sửa danh sách địa điểm Chạm vào để làm mới thông tin thời tiết, thêm thành phố vào danh sách địa điểm hoặc định cấu hình cài đặt thời tiết Vuốt lên để xem thông tin thời tiết khác. Vuốt sang trái hoặc phải để xem thông tin thời tiết của các thành phố khác trong danh sách địa điểm của bạn.
Đồng hồ Tùy chỉnh cài đặt múi giờ trên điện thoại ROG Phone của bạn, cài báo thức và sử dụng điện thoại ROG Phone làm đồng hồ bấm giờ với ứng dụng Đồng hồ. Bật ứng dụng Đồng hồ Bật ứng dụng Đồng hồ bằng một trong hai cách sau: • • Vuốt lên trên Màn hình chính rồi chạm Clock (Đồng hồ). Từ màn hình chính điện thoại ROG Phone, chạm màn hình đồng hồ kỹ thuật số. Đồng hồ báo thức Chạm Alarm (Đồng hồ báo thức) để truy cập các cài đặt đồng hồ thế giới trong điện thoại ROG Phone của bạn.
Đồng hồ thế giới Chạm World Clock (Đồng hồ thế giới) để truy cập các cài đặt đồng hồ thế giới trong điện thoại ROG Phone của bạn. Chạm vào đây để sửa các thành phố được đánh dấu trên đồng hồ thế giới Chạm vào đây để thêm một thành phố mới để đánh đấu trên bản của đồ đồng hồ thế giới. Đồng hồ bấm giờ Chạm Stopwatch (Đồng hồ bấm giờ) để dùng điện thoại ROG Phone của bạn làm đồng hồ bấm giờ. Chạm nút này để bắt đầu chạy tính năng đồng hồ bấm giờ.
Hẹn giờ Bạn có thể thiết lập nhiều tùy chọn hẹn giờ cho điện thoại ROG Phone. Để thiết lập, thực hiện theo các bước sau: Cài bộ hẹn giờ Chạm Timer (Hẹn giờ) để truy cập tính năng hẹn giờ trong điện thoại ROG Phone. Chạm nút này để bắt đầu chạy bộ hẹn giờ. Chạm vào đây để cài bộ hẹn giờ mới.
9 Zen mọi lúc mọi nơi 9 Zen mọi lúc mọi nơi Công cụ Zen đặc biệt Máy tính Tính toán qua ROG Phone bằng cách bật ứng dụng máy tính. Bật máy tính Bật máy tính bằng một trong hai tùy chọn sau: • • Vuốt lên trên màn hình chính rồi chạm Calculator (Máy tính). Mở giao diện Quick settings (Cài đặt nhanh), biểu tượng Calculator (Máy tính) sẽ hiển thị trên danh sách. Chạm nó để bắt đầu sử dụng các phép tính.
Máy ghi âm Ghi các file âm thanh bằng điện thoại ROG Phone bằng cách bật ứng dụng Máy ghi âm. Bật máy ghi âm Để bật máy ghi âm, vuốt lên trên Màn hình chính rồi chạm Sound Recorder (Trỉnh ghi Âm thanh). Chạm nút này để tùy chỉnh cài đặt Máy ghi âm. Chạm biểu tượng này để xem danh sách các file ghi âm đã lưu. Chạm nút này để bắt đầu ghi âm.
Tạm dừng ghi âm Trong khi ghi âm bị tạm dừng, bạn có thể chọn để tiếp tục, xóa hoặc lưu bản ghi âm. Chạm để xóa bản ghi âm Chạm để tiếp tục bản ghi âm Chạm để lưu bản ghi âm D.sách bản ghi âm Từ Recording List (D.sách bản ghi âm), bạn có thể phát, đổi tên, chia sẻ hoặc xóa file ghi âm đã lưu. Để xem d.sách bản ghi âm của bạn, chạm trên màn hình chính Sound Recorder (Máy ghi âm).
Trình quản lý di động Trình quản lý di động cung cấp giao diện tích hợp cho nhiều ứng dụng được thiết kế để tối ưu hóa hiệu suất thiết bị, quản lý nguồn pin điện thoại, và sử dụng bộ nhớ. Để bật Trình quản lý di động, vuốt lên trên màn hình chính rồi chạm Settings (Cài đặt) > Advanced (Nâng cao) > Mobile Manager (Trình quản lý di động). Đóng các tiến trình không sử dụng đang chạy trên nền điện thoại để tận dụng thêm bộ nhớ hệ thống.
10 Bảo dưỡng điện thoại Zen Bảo dưỡng điện thoại Zen 10 Cập nhật điện thoại của bạn Luôn cập nhật điện thoại ROG Phone của bạn bằng các bản cập nhật hệ điều hành Android và các ứng dụng và tính năng cải tiến. Cập nhật hệ thống 1. Vuốt lên trên Màn hình chính rồi chạm Settings (Cài đặt). 2. Trên màn hình Settings (Cài đặt), trượt xuống để hiển thị các mục khác rồi chạm System (Hệ thống) > System updates (Cập nhật hệ thống) để kiểm tra xem các cập nhật hệ thống. 3.
2. Từ cửa sổ Reset (Cài lại), bạn có thể: • Reset Wi-Fi, mobile & Bluetooth (Cài lại Wi-Fi, mạng di động & Bluetooth): Tính năng này phục hồi các mật khẩu Wi-Fi và cài đặt mạng khác. • Erase all data (factory reset) [Xóa mọi dữ liệu (Cài về mặc định gốc)]: Xóa mọi dữ liệu trên điện thoại. Bảo mật cho điện thoại ROG Phone Sử dụng các tính năng bảo mật của điện thoại ROG Phone để chặn các cuộc gọi hoặc kiểu truy cập thông tin trái phép.
Mã PIN Nhập ít nhất bốn số để cài một mã PIN. QUAN TRỌNG! Đảm bảo ghi nhớ mã PIN mà bạn đã tạo để mở khóa điện thoại. Hình vẽ Trượt ngón tay lên các chấm và tao một hình vẽ. QUAN TRỌNG! Bạn có thể tạo một hình vẽ với tối thiểu bốn chấm. Đảm bảo ghi nhớ hình vẽ mà bạn đã tạo để mở khóa điện thoại.
Mật khẩu Nhập ít nhất bốn ký tự để tạo một mật khẩu. QUAN TRỌNG! Đảm bảo ghi nhớ mật khẩu mà bạn đã tạo để mở khóa điện thoại. Cài đặt mã nhận dạng ROG Phone Biết rõ mã nhận dạng của Điện thoại ROG như số serial, mã IMEI (Nhận dạng Thiết bị Di động Quốc tế) hoặc số hiệu mẫu điện thoại. Điều này là rất quan trọng, vì khi mất điện thoại ROG Phone, bạn có thể liên hệ với nhà khai thác mạng di động và cung cấp thông tin để họ đưa vào danh sách đen việc người khác sử dụng ROG Phone của bạn trái phép.
Phụ lục Phụ lục Thông tin an toàn CHÚ Ý! Sử dụng các nút điều khiển hoặc điều chỉnh hoặc thực hiện các quy trình khác với các quy trình được nêu trong tài liệu này có thể dẫn đến phơi nhiễm bức xạ nguy hiểm. Bảo dưỡng điện thoại ROG Phone • Sử dụng điện thoại ROG Phone trong môi trường có nhiệt độ xung quanh từ 0 °C (32 °F) đến 35 °C (95 °F). Pin CẢNH BÁO: Tự tháo rời pin sẽ vô hiệu chế độ bảo hành liên quan và có thể gây ra thiệt hại nghiêm trọng.
• Không chạm vào các tiếp điểm pin. • Để tránh gây ra hỏa hoạn hoặc bị bỏng, không được tháo rời, uốn cong, đè nén hoặc đục thủng pin. GHI CHÚ: • Nguy cơ xảy ra cháy nổ nếu pin được thay thế bằng một loại pin khác không phù hợp. • Thải bỏ pin đã qua sử dụng theo các chỉ dẫn. Bộ sạc • Chỉ sử dụng bộ sạc kèm theo điện thoại ROG Phone của bạn. • Không được kéo dây bộ sạc để rút nó ra khỏi ổ cắm điện. Hãy kéo chính bộ sạc. Chú ý Điện thoại ROG Phone là mẫu thiết bị chất lượng cao.
Tuân thủ Chỉ thị Thiết bị Vô tuyến Liên minh châu Âu (EU) Tuyên bố Tuân thủ Liên minh châu Âu Đơn Giản hóa Theo đây, ASUSTek Computer Inc. tuyên bố rằng loại thiết bị vô tuyến ASUS_I005D / ASUS_I005DC tuân thủ Chỉ thị 2014/53/EU. Nội dung đầy đủ của Tuyên bố tuân Thủ EU có sẵn tại https://www. asus.com/support/. (Tìm kiếm ZS673KS) Bảng công suất tần số vô tuyến Mục Bluetooth WLAN 2.
Mục Bảng công suất đầu ra tần số vô tuyến tối đa 5G NR n1 (1920~1980; 2110~2170 MHz) NR n3 (1710~1785; 1805~1880 MHz) NR n5 (824~849; 869~894 MHz) NR n7 (2500~2570; 2620~2690 MHz) NR n8 (880~915; 925~960 MHz) NR n20 (832~862; 791~821 MHz) NR n28 (703~748; 758~803 MHz) NR n38 (2570~2620 MHz) NR n40 (2300~2400 MHz) NR n41 (2496~2690 MHz) NR n77 (3300~4200 MHz) NR n78 (3300~3800 MHz) NR n79 (4400~5000 MHz) 24.5 (dBm) 24.5 (dBm) 24.5 (dBm) 24.5 (dBm) 24.5 (dBm) 24.5 (dBm) 24.5 (dBm) 24.5 (dBm) 24.
Chứng nhận Ánh sáng xanh Thấp Điện thoại ROG giảm thiểu ánh sáng xanh phát ra từ màn hình, giúp mang lại cho bạn trải nghiệm xem thoải mái hơn. Theo mặc định, độ sáng màn hình được cài ở mức tối đa và điện thoại tuân thủ Chứng nhận Ánh sáng xanh Thấp của TÜV Rheinland.. Giảm mỏi mắt Để giảm mỏi mắt: • Thường xuyên nghỉ giải lao khi sử dụng Điện thoại ROG (giải lao ít nhất 10 phút sau mỗi nửa tiếng sử dụng). • Thường xuyên tập trung vào những vật ở xa để mắt được thư giãn.
Thông báo về vỏ phủ QUAN TRỌNG! Để tạo lớp cách điện và đảm bảo độ an toàn điện, thân máy được phủ một lớp cách điện, ngoại trừ ở những chỗ tích hợp cổng Ra/Vào (I/O). Thông báo chiến dịch ASUS Xanh ASUS cam kết tạo ra các sản phẩm thân thiện với môi trường và đóng gói theo cách thức bảo vệ sức khỏe người dùng trong khi giảm thiểu tác hại đối với môi trường. Giảm số trang giấy trong sổ tay hướng dẫn sử dụng đồng nghĩa với việc giảm lượng khí thải cacbon.