
User's Manual
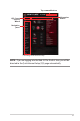
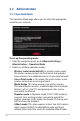


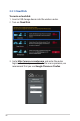

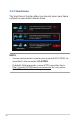

Table Of Contents
- 1 Getting to know your wireless router
- 2 Getting started
- 3 Configuring the General and Advanced Settings of ROG Gaming Center
- 3.1 Logging into the Web GUI
- 3.2 Administration
- 3.3 AiCloud 2.0
- 3.4 Aiprotection Pro
- 3.5 Dash Board
- 3.6 Firewall
- 3.7 Game Boost
- 3.8 Game Private Network
- 3.9 Game Profile
- 3.10 Game Radar
- 3.11 Guest Network
- 3.12 IPv6
- 3.13 LAN
- 3.14 Network Map
- 3.15 Smart Connect
- 3.16 System Log
- 3.17 Traffic Analyzer
- 3.18 USB Application
- 3.19 VPN
- 3.20 WAN
- 3.21 Wireless
- 3.22 WiFi Radar
- 4 Utilities
- 5 Troubleshooting
- Appendices

23
nearby to join your AiMesh system. AiMesh system provides
whole-home coverage and centralized management.
3. Click Apply.
NOTE: The router will reboot when you change the modes.
3.2.2 System
The System page allows you to configure your wireless router
settings.
To set up the System settings:
1. From the navigation panel, go to Advanced Settings >
Administration > System.
2. You can configure the following settings:
• Change router login password: You can change the
password and login name for the wireless router by entering
a new name and password.
• Time Zone: Select the time zone for your network.
• NTP Server: The wireless router can access a NTP (Network
time Protocol) server in order to synchronize the time.
• Enable Telnet: Click Ye s to enable Telnet services on the
network. Click No to disable Telnet.
• Authentication Method: You can select HTTP, HTTPS, or
both protocols to secure router access.
• Enable Web Access from WAN: Select Yes to allow devices
outside the network to access the wireless router GUI
settings. Select No to prevent access.
• Allow only specified IP address: Click Ye s if you want to
specify the IP addresses of devices that are allowed access to
the wireless router GUI settings from WAN.
• Client List: Enter the WAN IP addresses of networking
devices allowed to access the wireless router settings. This
list will be used if you clicked Yes in the Only allow specific
IP item.
3. Click Apply.