MY22826 GT-AX11000 PRO Penghala Permainan Tiga jalur ROG Rupture
MY22826 Edisi Pertama November 2023 Hak cipta © 2023 ASUSTeK COMPUTER INC. Hak Cipta Terpelihara. Tiada bahagian daripada manual ini, termasuk produk dan perisian yang diterangkan di dalamnya boleh dikeluarkan semula, dipindahkan, ditranskrip, disimpan dalam sistem pengambilan, atau diterjemah ke dalam sebarang bahasa dalam sebarang bentuk atau apa-apa kaedah, kecuali dokumentasi yang disimpan oleh pembeli untuk tujuan sandaran, tanpa kebenaran tersurat bertulis ASUSTeK COMPUTER INC. (“ASUS”).
Kandungan 1 1.1 1.2 1.3 1.4 1.5 2 2.1 Mengenali penghala wayarles anda Selamat datang!.............................................................................7 Kandungan pakej..........................................................................7 Penghala wayarles anda.............................................................8 Menetapkan kedudukan penghala anda.......................... 10 Keperluan Penyediaan.............................................................
Kandungan 3.4.5 FAQs (Soalan Lazim)..............................................................34 3.5 AiProtection ................................................................................ 36 3.5.1 3.5.2 3.5.3 3.5.4 3.5.5 3.6 3.7 Papan Pemuka ........................................................................... 45 Tembok Api.................................................................................. 48 3.7.1 3.7.2 3.7.3 3.7.4 3.7.5 3.8 Mengkonfigurasikan AiProtection..............
Kandungan 3.14 3.15 NAT Terbuka & Profil Permainan........................................... 70 Smart Connect ........................................................................... 72 3.15.1 Menyediakan Smart Connect ...........................................72 3.15.2 Peraturan Smart Connect ...................................................73 3.16 3.17 3.18 Log Sistem.................................................................................... 76 Penganalisis Trafik.......................
3.22 Wayarles......................................................................................106 3.22.1 Umum..................................................................................... 106 3.22.2 WPS.......................................................................................... 108 3.22.3 Penghubung......................................................................... 110 3.22.4 Penapis MAC Wayarles...................................................... 112 3.22.5 Seting RADIUS.
1 Mengenali penghala wayarles anda 1.1 Selamat datang! Terima kasih kerana membeli Penghala Wayarles ROG Rapture! Penghala yang bergaya menampilkan jalur ganda 2.4GHz, 5GHz-1 dan 5GHz-2 untuk penstriman HD wayarles serentak yang tidak sepadan; pelayan SMB, pelayan UPnP AV, dan pelayan FTP untuk perkongsian fail 24/7; keupayaan untuk mengendalikan 300,000 sesi; dan Teknologi Rangkaian Hijau ASUS, yang menyediakan sehingga 70% penyelesaian penjimatan kuasa. 1.
1.3 Penghala wayarles anda Butang WPS Tekan lama butang untuk melancarkan WPS Wizard. Butang LED (Kunci LED) Tekan butang ini untuk menghidupkan/mematikan LED. Port Kuasa (DCIN) Masukkan adapter AC yang diletakkan bersama ke dalam port ini dan sambung penghala anda ke sumber kuasa. Ksuis kuasa Tekan suis ini untuk menghidupkan atau mematikan sistem. Port USB 2.0 Masukkan peranti yang serasi dengan USB 2.0 seperti cakera keras USB atau pemacu kilat USB ke dalam port ini. Port USB 3.
Port 1GE LAN Sambung kabel rangkaian ke dalam port ini untuk membentuk sambungan LAN. 2.5 / 1GE WAN (Internet) port Sambung kabel rangkaian ke dalam port ini untuk membentuk sambungan WAN 2.5G / 1GE. Port 10GE Sambungkan kabel rangkaian ke dalam port ini untuk mengutamakan paket. 2.5 / 1GE WAN (Internet) LED Merah: Tiada IP atau sambungan fizikal. Hidup: Mempunyai sambungan fizikal ke rangkaian kawasan setempat (WAN). LAN LED Mati: Tiada kuasa atau sambungan fizikal.
1.4 Menetapkan kedudukan penghala anda Untuk mendapatkan prestasi rangkaian wayarles yang terbaik daripada penghala wayarles anda, ikuti saranan di bawah: • Letakkan penghala wayarles di tengah-tengah rangkaian anda untuk liputan wayarles yang maksimum. • Pastikan peranti berada jauh dari sekatan logam dan jauh dari cahaya matahari langsung. • Pastikan peranti berada jauh dari peranti Wi-Fi 802.11g atau 20MHz sahaja, persisian komputer 2.
1.5 Keperluan Penyediaan Untuk menyediakan rangkaian anda, anda perlukan satu atau dua komputer yang memenuhi keperluan sistem yang berikut: • Port Ethernet RJ-45 (LAN) (10Base-T/100Base-TX/ 1000Base-TX) • Keupayaan wayarles IEEE 802.11a/b/g/n/ac/ax • Perkhidmatan TCP/IP yang terpasang • Penyemak imbas Web seperti Microsoft Internet Explorer, Firefox, Safari, atau Google Chrome NOTA: • Jika komputer tidak mempunyai keupayaan wayarles terbina dalam, pasang penyesuai IEEE 802.
2 Bermula 2.1 Penyediaan Penghala PENTING! • Gunakan sambungan berwayar semasa menyediakan penghala wayarles anda untuk mengelakkan isu penyediaan wayarles yang mungkin berlaku. • Sebelum menyediakan penghala wayarles ASUS anda, lakukan yang berikut: • Jika anda sedang menggantikan penghala yang sedia ada, tanggalkannya daripada rangkaian anda. • Putuskan sambungan kabel/wayar dari modem anda yang sedia ada. Jika modem anda mempunyai bateri sandaran, tanggalkannya juga.
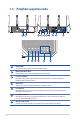
A. Sambungan berwayar NOTA: Penghala wayarles anda menyokong kedua-dua kabel tembus lalu atau silang atas semasa menyediakan sambungan berwayar. Untuk menyediakan rangkaian menggunakan sambungan berwayar: 1. Pasang masuk penghala anda ke sumber kuasa dan hidupkan kuasanya. Sambungkan kabel rangkaian dari komputer anda ke port LAN pada penghala anda. Modem LINE Wall Power Outlet Power 1 2 LAN Laptop 3 LAN RESET PWR WAN 2. GUI web dilancarkan secara automatik apabila anda membuka pelayar web.
B. Sambungan wayarles Untuk menyediakan rangkaian menggunakan sambungan berwayar: 1. Pasang masuk penghala anda ke sumber kuasa dan hidupkan kuasanya. Smart phone Tablet Modem Laptop LINE Wall Power Outlet Power 1 2 LAN RESET PWR WAN Printer 2. Sambung ke nama rangkaian (SSID) yang ditunjukkan pada label produk di bahagian belakang penghala. Untuk keselamatan rangkaian yang lebih baik, ubah ke SSID unik dan berikan kata laluan. ASUS router Nama Wi-Fi 2.
3. GUI web dilancarkan secara automatik apabila anda membuka pelayar web. Jika ia tidak melakukan pelancaran auto, masuki http://www.asusrouter.com. 4. Sediakan kata laluan untuk penghala anda bagi menghalang akses yang tidak dibenarkan. NOTA: • Untuk mendapatkan butiran mengenai menyambung kepada rangkaian wayarles, rujuk manual pengguna penyesuai WLAN. • Untuk menyediakan tetapan keselamatan untuk rangkaian anda, rujuk seksyen Menyediakan keselamatan wayarles dalam Bab 3 manual pengguna ini.
2.2 Persediaan Internet Cepat (QIS) dengan pengesanan auto Ciri Persediaan Internet Cepat (QIS) membimbing anda untuk menyediakan sambungan Internet anda dengan cepat. NOTA: Semasa menetapkan sambungan Internet buat pertam kali, tekan butang Tetap semula pada penghala wayarles anda untuk menetapkannya ke tetapan lalai kilang. Untuk menggunakan QIS dengan pengesanan cepat: 1. Lancarkan penyemak imbas web. Anda akan dihalakan semula ke Wizard Penyediaan ASUS (Penyediaan Internet Pantas).
NOTA: • Auto-pengesanan jenis sambungan ISP anda berlaku apabila anda mengkonfigurasi penghala wayarles buat kali pertama atau apabila penghala wayarles anda ditetapkan kepada tetapan lalainya. • Jika QIS gagal untuk mengesan jenis sambungan Internet anda, klik Skip to manual setting (Langkau ke tetapan manual) dan konfigurasi tetapan sambungan anda secara manual. 3. Berikan nama rangkaian (SSID) dan kunci keselamatan untuk sambungan wayarles 2.4GHz dan 5GHz anda. Klik Apply (Guna) setelah selesai.
4. Pada halaman Login Information Setup (Penyediaan Maklumat Log Masuk), ubah kata laluan log masuk penghala untuk menghalang akses tanpa kebenaran ke penghala wayarles anda. NOTA: Nama pengguna dan kata laluan log masuk adalah berbeza daripada nama rangkaian (SSID) 2.4GHz/5GHz dan kunci keselamatan. Nama pengguna dan kata laluan log masuk penghala wayarles membolehkan anda untuk log masuk ke GUI Web penghala wayarles anda untuk mengkonfigurasikan tetapan penghala wayarles. Nama rangkaian (SSID) 2.
2.3 Menyambung ke rangkaian wayarles anda Selepas menyediakan penghala wayarles anda melaui QIS, anda boleh menyambungkan komputer anda atau peranti pintar lain ke rangkaian wayarles anda. Untuk menyambung kepada rangkaian anda: 1. Pada komputer anda, klik ikon rangkaian dalam kawasan pemberitahuan untuk memaparkan rangkaian wayarles tersedia. 2. Pilih rangkaian wayarles yang anda ingin bersambung dengan, kemudian klik Connect (Sambung). 3.
3 Mengkonfigurasi Tetapan Am dan Lanjutan 3.1 Melog masuk ke GUI web Penghala Wayarles Permainan ROG Rapture anda menggunakan antara muka pengguna berasaskan web - Pusat Permainan ROG, yang memberikan anda kawalan rangkaian sepenuhnya, dengan maklumat yang perlu diketahui seperti status peranti yang bersambung dan nilai ping permainan-pelayan seluruh dunia dan akses segera ke semua ciri permainan yang menakjubkan. NOTA: Ciri mungkin berbeza dengan versi perisian tegar berbeza.
Butang arahan atas Panji maklumat QIS Navigasi panel * Imej adalah untuk rujukan sahaja. NOTA: Jika anda melog masuk ke dalam GUI Web buat pertama kali, anda akan diarahkan ke halaman Penyediaan Internet Pantas (QIS) secara automatik.
3.2 Pentadbiran 3.2.1 Mod Operasi Halaman Mod Operasi membolehkan anda memilih mod bersesuaian untuk rangkaian anda. Untuk menyediakan mod operasi: 1. Daripada panel navigasi, pergi ke tab Advanced Settings (Tetapan Lanjutan) > Administration (Pentadbiran) > Operation Mode (Mod Operasi). 2.
AiMesh untuk mencari nod AiMesh tersedia yang berdekatan untuk menyertai sistem AiMesh anda. Sistem AiMesh menyediakan liputan seluruh rumah dan pengurusan berpusat. 3. Klik Apply (Guna). NOTA: Penghalan ini akan but semula bila anda menukar mod. 3.2.2 Sistem Halaman System (Sistem) membolehkan anda mengkonfigurasikan tetapan penghala anda. Untuk menyediakan tetapan Sistem: 1. Daripada panel navigasi, pergi ke tab Advanced Settings (Tetapan Lanjutan) > Administration (Pentadbiran) > System (Sistem). 2.
3.2.3 Menatarkan perisian tegar NOTA: Muat turun perisian tegar terkini dari laman web ASUS di http://www.asus.com Untuk menatarkan perisian tegar: 1. Daripada panel navigasi, pergi ke tab Advanced Settings (Tetapan Lanjutan) > Administration (Pentadbiran) > Firmware Upgrade (Naik Taraf Perisian Tegar). 2. Dalam item New Firmware File (Fail Perisian Tegar baru), klik Browse (Semak Imbas). Navigasi ke fail perisian tegar yang dimuat turun. 3. Klik Upload (Muat naik).
3.3 AiCloud 2.0 AiCloud 2.0 adalah aplikasi perkhidmatan awan yang membolehkan anda menyimpan, menyegerak, berkongsi, dan mengakses fail anda. Untuk menggunakan AiCloud: 1. Dari Google Play Store atau Apple Store, muat turun dan pasang aplikasi ASUS AiCloud ke peranti pintar anda. 2. Sambung peranti pintar ke rangkaian anda. Ikut arahan untuk melengkapan proses persediaan AiCloud.
3.3.1 Cakera Awan Untuk mencipta cakera awan: 1. Masukkan peranti storan USB ke dalam penghala wayarles. 2. Hidupkan Cloud Disk (Cakera Awan).
3. Pergi ke http://www.asusrouter.com dan masukkan log masuk dan kata laluan akaun penghala. Untuk pengalaman yang lebih baik, kami mencadangkan anda menggunakan Google Chrome atau Firefox. 4. Anda boleh mula mengakses fail Cakera Awan pada perantu yang disambungkan kepada rangkaian. NOTA: Semasa mengakses peranti yang bersambung ke rangkaian, anda perlu memasukkan nama pengguna dan kata laluan peranti secara manual, yang tidak akan disimpan oleh AiCloud untuk sebab keselamatan.
3.3.2 Akses Pintar Fungsi Akses Pintar membolehkan anda untuk mengakses rangkaian rumah anda melalui nama domain penghala anda dengan mudah. NOTA: • Anda boleh mencipta nama domain untuk penghala anda dengan ASUS DDNS. Untuk butiran lanjut, rujuk bahagian 3.20.6 DDNS. • Secara lalai, AiCloud memberikan sambungan HTTPS yang selamat. Masukkan https://[yourASUSDDNSname].asuscomm. com untuk penggunaan Cakera Awan dan Akses Pintar yang sangat selamat.
3.3.3 Segerak AiCloud Unuk menggunakan Segerak AiCloud: 1. Lancarkan AiCloud, klik AiCloud Sync (Segerak AiCloud) > Go (Pergi). 2. Pilih ON (HIDUP) untuk mendayakan Segerak AiCloud. 3. Klik Add new account (Tambah akaun baru). 4. Masukkan kata laluan akaun ASUS WebStorage anda dan pilih direktori yang anda ingin segerakkan dengan WebStorage. 5. Klik Apply (Guna).
3.4 ASUS AiMesh 3.4.1 Sebelum tetapan Bersedia untuk menyediakan sistem Wi-Fi AiMesh 1. Dua (2) penghala ASUS (model yang menyokong AiMesh https://www.asus.com/AiMesh/). 2. Tetapkan satu sebagai penghala AiMesh dan satu lagi sebagai nod AiMesh. NOTA: Jika anda mempunyai berbilang penghala AiMesh, kami mengesyorkan anda menggunakan penghala dengan spesifikasi tertinggi sebagai penghala AiMesh anda dan yang lain sebagai nod AiMesh. Nod AiMesh Penghala AiMesh 3.4.
Penghala AiMesh 1) Rujuk Panduan Mula Cepat penghala lain untuk menyambungkan penghala AiMesh anda ke PC dan modem anda, dan kemudian log masuk ke GUI web. Modem Penghala AiMesh Nod AiMesh Logout/Reboot Penghala AiMesh 2) Pergi ke halaman Peta Rangkaian, klik ikon AiMesh dan kemudian, Cari nod AiMesh lanjutan anda. NOTA: Jika anda tidak menemui ikon AiMesh di sini, klik pada versi perisian tegar dan kemas kini perisian tegar.
3) Klik Cari, ia akan mencari nod AiMesh anda secara automatik. Apabila nod AiMesh muncul pada halaman ini, kliknya untuk menambahnya ke sistem AiMesh. NOTA: Jika anda tidak menemui sebarang nod AiMesh, sila pergi ke PENYELESAIAN MASALAH. 4) Satu mesej dipaparkan apabila penyegerakan lengkap. Successfully added RT-ABCDE to your AiMesh system, it will take awhile to show up as connected in the AiMesh router list.
3.4.3 Penyelesaian masalah Jika penghala AiMesh anda tidak menemui sebarang nod AiMesh yang berdekatan atau penyegerakan gagal, sila semak perkara berikut dan cuba lagi. 1) Alihkan nod AiMesh anda lebih hampir dengan penghala AiMesh dengan sempurna. Pastikan ia dalam jarak 1-3 meter. 2) Kuasa nod AiMesh anda dihidupkan. 3) Nod AiMesh anda dinaik taraf ke perisian tegar yang disokong AiMesh. i. M uat turun AiMesh - perisian tegar yang disokong di: https://www.asus.com/AiMesh ii.
3.4.4 Penempatan Semula Prestasi terbaik: Letakkan penghala dan nod AiMesh di tempat terbaik. NOTA: • • Bagi meminimumkan gangguan, jauhkan penghala daripada peranti seperti telefon tanpa kord, peranti Bluetooth dan ketuhar gelombang mikro. Kami mengesyorkan anda meletakkan penghala di lokasi yang terbuka atau luas. 3.4.5 FAQs (Soalan Lazim) S1: Adakah penghala AiMesh menyokong mod Titik Capaian? J: Ya. Anda boleh memilih untuk menetapkan penghala AiMesh sebagai mod penghala atau mod titik capaian.
S2: Bolehkah saya menyediakan sambungan berwayar di antara penghala AiMesh (Angkut balik Ethernet)? A: Ya. Sistem AiMesh menyokong kedua-dua sambungan wayarles dan berwayar di antara penghala dan nod AiMesh untuk memaksimumkan daya pemprosesan dan kestabilan.
3.5 AiProtection AiProtection menyediakan pemantauan masa nyata yang mengesan perisian hasad, perisian pengintip dan akses tidak dikehendaki. Ia juga menapis laman web dan aplikasi yang tidak dikehendaki serta membolehkan anda menjadualkan masa supaya peranti yang bersambung dapat mengakses Internet.
3.5.1 Mengkonfigurasikan AiProtection AiProtection menghalang rangkaian daripada mengeksploitasi dan menjamin keselamatan rangkaian anda daripada akses yang tidak dikehendaki. Untuk Mengkonfigurasikan AiProtection: 1. Dari panel navigasi, pergi ke General (Am) > AiProtection. 2. Dari halaman utama AiProtection, klik Network Protection (Perlindungan Rangkaian). 3. Dari tab Network Protection (Perlindungan Rangkaian), klik Scan (Imbas).
PENTING! Item yang bertanda dengan Yes (Ya) pada halaman Router Security Assessment (Penilaian Keselamatan Penghala) dianggap selamat. 4. (Pilihan) Dari halaman Router Security Assessment (Penilaian Keselamatan Penghala), konfigurasikan secara manual item yang ditandakan sebagai No (Tidak), Weak (Lemah) atau Very Weak (Sangat Lemah). Untuk melakukan ini: a. Klik item untuk pergi ke halaman tetapan item. b.
3.5.2 Menyekat Laman Hasad Ciri ini mengehadkan akses ke laman web hasad dalam pangkalan data awan untuk perlindungan terkini setiap masa. NOTA: Fungsi ini didayakan secara automatik jika anda menjalankan Router Weakness Scan (Imbasan Kelemahan Penghala). Untuk mendayakan Sekatan Laman Hasad: 1. Dari panel navigasi, pergi ke General (Am) > AiProtection. 2. Dari halaman utama AiProtection, klik Network Protection (Perlindungan Rangkaian). 3.
3.5.3 IPS Dua Hala Ciri ini menyelesaikan eksploitasi biasa dalam konfigurasi penghala. NOTA: Fungsi ini didayakan secara automatik jika anda menjalankan Router Weakness Scan (Imbasan Kelemahan Penghala). Untuk mendayakan IPS Dua Hala: 1. Dari panel navigasi, pergi ke General (Am) > AiProtection. 2. Dari halaman utama AiProtection, klik Network Protection (Perlindungan Rangkaian). 3. Dari anak tetingkap IPS Dua Hala, klik ON (HIDUP).
3.5.4 Pencegahan dan Sekatan Peranti Dijangkiti Ciri ini menghalang peranti dijangkiti daripada menyampaikan maklumat peribadi atau status dijangkiti kepada pihak luaran. NOTA: Fungsi ini didayakan secara automatik jika anda menjalankan Router Weakness Scan (Imbasan Kelemahan Penghala). Untuk mendayakan pencegahan dan sekatan peranti dijangkiti: 1. Dari panel navigasi, pergi ke General (Am) > AiProtection. 2. Dari halaman utama AiProtection, klik Network Protection (Perlindungan Rangkaian). 3.
3.5.5 Menyediakan Kawalan Ibu Bapa Kawalan Ibu Bapa membolehkan anda mengawal masa akses Internet atau menetapkan had masa untuk penggunaan rangkaian klien. Untuk mendayakan IPS Dua Hala: 1. Dari panel navigasi, pergi ke General (Am) > AiProtection. 2. Dari halaman utama AiProtection, klik Parental Controls (Kawalan Ibu Bapa).
Penapis Web & Aplikasi Penapis Web & Aplikasi ialah ciri Kawalan Ibu Bapa yang membolehkan anda menyekat akses ke laman web atau aplikasi yang tidak dikehendaki. Untuk mengkonfigurasi Penapis Web & Aplikasi: 1. Dari panel navigasi, pergi ke General (Am) > AiProtection. 2. Dari halaman utama AiProtection, klik ikon Parental Controls (Kawalan Ibu Bapa) untuk pergi ke tab Kawalan Ibu Bapa. 3. Dari anak tetingkap Web & Apps Filters (Penapis Web & Aplikasi), klik ON (HIDUP).
Penjadualan Waktu Penjadualan Waktu membolehkan anda menetapkan had masa untuk penggunaan rangkaian klien. NOTA: Pastikan bahawa waktu sistem anda disegerakkan dengan pelayan NTP. Untuk mengkonfigurasikan Penjadualan Waktu: 1. Dari panel navigasi, pergi ke General (Am) > AiProtection > Parental Controls (Kawalan Ibu Bapa) > Time Scheduling (Penjadualan Waktu). 2. Dari anak tetingkap Enable Time Scheduling (Dayakan Penjadualan Waktu), klik ON (HIDUP). 3.
3.6 Papan Pemuka Papan Pemuka membolehkan anda memantau trafik masa nyata untuk persekitaran perangkaian anda dan menganalisis ping rangkaian masa nyata dan sisihan ping. Ping rangkaian merujuk pada pengalaman permainan dalam talian. Ping yang lebih tinggi bermaksud kependaman yang lebih tinggi untuk permainan masa nyata. Untuk kebanyakan permainan dalam talian, ping rangkaian kurang daripada 99 ms dianggap kualiti bagus. Jika ping rangkaian yang kurang daripada 150 ms, kualiti adalah boleh diterima.
ping rangkaian lebih daripada 150 ms, ia sukar untuk bermain permainan dengan lancar. Sisihan ping juga amat berkaitan dengan pengalaman permainan dalam talian. Dengan sisihan ping yang lebih tinggi, ia berkemungkinan jauh lebih mudah menyebabkan togol apabila bermain permainan dalam talian. Tiada garis asas untuk sisihan ping. Walau bagaimanapun, sisihan ping yang lebih rendah adalah lebih baik.
• • RGB Aura: Membolehkan pengguna menentukan atau menghidupkan/mematikan RGB Aura daripada Papan Pemuka. Anda boleh menyediakan sebarang warna dan memilih sebarang daripada lima corak pencahayaan. Kekunci Galakan: Penghala permainan ROG Rapture menyokong Kunci Rangsangan dan membolehkan pengguna menentukan fungsi Kunci Rangsangan daripada Papan Pemuka. • LED hidup/mati • Saluran DFS hidup/mati • RGB Aura hidup/mati • Rangsangan Permainan: Dayakan/nyahdayakan keutamaan paket permainan.
3.7 Tembok Api Penghala wayarles boleh menjadi tembok api perkakas untuk rangkaian anda. NOTA: Ciri Tembok Api didayakan secara lalai. 3.7.1 Umum Untuk menyediakan tetapan Tembok Api asas: 1. Daripada panel navigasi, pergi ke tab Advanced Settings (Tetapan Lanjutan) > Firewall (Tembok Api) > General (Am). 2. Pada medan Enable Firewall (Dayakan Tembok Api), pilih Yes (Ya). 3.
2. Pada medan Dayakan Penapis URL, pilih Enabled (Didayakan). . 3. Masukkan URL dan klik butang 4. Klik Apply (Guna). 3.7.3 Penapis kata kunci Penapis kata kunci menyekat akses ke laman web mengandungi kata kunci yang dinyatakan. Untuk menyediakan penapis kata kunci: 1. Daripada panel navigasi, pergi ke tab Advanced Settings (Tetapan Lanjutan) > Firewall (Tembok Api) > Keyword Filter (Penapis Kata Kunci). 2. Pada medan Dayakan Penapis Kata Kunci, pilih Enabled (Didayakan). 3.
3.7.4 Penapis Perkhidmatan Rangkaian Penapis Perkhidmatan Rangkaian menyekat pertukaran paket LAN ke WAN dan mengehadkan klien rangkaian daripada mengakses perkhidmatan web khusus seperti Telnet atau FTP. Untuk menyediakan penapis Perkhidmatan Rangkaian: 1. Daripada panel navigasi, pergi ke tab Advanced Settings (Tetapan Lanjutan) > Firewall (Tembok Api) > Network Service Filter (Penapis Perkhidmatan Rangkaian). 2. Pada medan Dayakan Penapis Perkhidmatan Rangkaian, pilih Yes (Ya). 3.
3.7.5 IPv6 Firewall (Tembok Api IPv6) Secara lalai, penghala wayarles ASUS anda menyekat semua trafik masuk tanpa diminta. Fungsi IPv6 Tembok Api membolehkan trafik masuk datang daripada perkhidmatan tertentu untuk melalui rangkaian anda.
3.8 Pencepatan Permainan Ciri ini membolehkan anda mendayakan Rangsangan Permainan dengan satu klik. Apabila Rangsangan Permainan didayakan, penghala permainan ROG Rapture meletakkan paket permainan sebagai keutamaan tertinggi untuk menyediakan anda dengan pengalaman permainan terbaik. Rangsangan Permainan Untuk mendayakan Rangsangan Permainan: Dari Game Boost (Rangsangan Permainan), alihkan penggelongsor Dayakan Rangsangan Permainan kepada HIDUP.
3.8.1 QoS Ciri ini memastikan lebar jalur untuk tugasan dan aplikasi yang diutamakan. Untuk mendayakan fungsi QoS: 1. Dari panel navigasi, pergi ke General (Am) > Game Acceleration (Pencepatan Permainan) > QoS. 2. Dari anak tetingkap Enable QoS (Dayakan QoS), klik ON (HIDUP). 3. Pilih Jenis QoS (Mudah Suai, Tradisional atau pengehad Lebar Jalur) untuk konfigurasi anda. NOTA: Rujuk tab QoS untuk definisi Jenis QoS. 4.
3.8.2 Pencepat Gear Pencepat Gear membolehkan anda mengutamakan peranti permainan secara wayarles melalui panel kawalan dalam talian untuk pengalaman permainan yang terbaik. Untuk mengkonfigurasikan Pencepat Gear: 1. Dari panel navigasi, pergi ke General (Am) > Game Acceleration (Pencepatan Permainan). 2. Dari tab Gear Accelerator (Pencepat Gear), klik ON (HIDUP). 3. Selepas menggunakan tetapan, klik Add (Tambah) untuk memilih nama klien. untuk menambah profil klien. 4. Klik 5.
3.9 Radar Permainan Radar Permainan ialah alat diagnostik yang membantu anda mengenal pasti kualiti sambungan pelayan untuk permainan khusus. Untuk menggunakan Radar Permainan: 1. Dari panel navigasi, pergi ke General (Am) > Game Radar (Radar Permainan) dan pilih permainan daripada senarai permainan.
2. Semak Ping Status (Status Ping) bagi setiap pelayan. 3. Untuk pengalaman permainan dalam talian yang lancar, pilih pelayan permainan dengan status ping rendah.
3.10 Rangkaian Tetamu Guest Network (Rangkaian Tetamu) memberikan sambungan Internet kepada tetamu sementera melalui akses untuk mengasingkan akses SSID atau rangkaian tanpa memberikan akses kepada rangkaian peribadi anda. NOTA: GT-AX11000 PRO menyokong sehingga enam SSID (tiga 2.4GHz, tiga 5GHz-1 dan tiga 5GHz-2). Mencipta rangkaian tetamu anda: 1. Daripada panel navigasi, pergi ke Advanced Settings (Tetapan Lanjutan) > Guest Network (Rangkaian Tetamu). 2.
4. Untuk mengubah tetapan tetamu, klik tetapan tetamu yang anda ingin diubah suai. Klik Remove (Alih Keluar) untuk memadam tetapan tetamu. 5. Berikan nama wayarles untuk rangkaian sementara anda pada medan (SSID) Nama Rangkaian. 6. Pilih Kaedah Pengesahan. 7. Jika anda memilih kaedah pengesahan WPA, pilih Penyulitan WPA. 8. Nyatakan Access time (Masa akses) atau klik Limitless (Tanpa had). 9. Pilih Disable (Nyahdayakan) atau Enable (Dayakan) pada item Access Intranet (Akses Intranet). 10.
3.11 IPv6 Penghala wayarles ini menyokong pengalamatan IPv6, sistem yang menyokong lebih alamat IP. Standard ini belum lagi tersedia secara meluas. Hubungi ISP anda jika perkhidmatan Internet anda menyokong IPv6. Untuk menyediakan IPv6: 1. Daripada panel navigasi, pergi ke Advanced Settings (Tetapan Lanjutan) > IPv6. 2. Pilih Connection type (Jenis sambungan) anda. Pilih konfigurasi berbeza bergantung pada jenis sambungan terpilih anda. 3. Masukkan tetapan IPv6 LAN dan DNS anda. 4. Klik Apply (Guna).
3.12 LAN 3.12.1 IP LAN Skrin IP LAN membolehkan anda mengubah suai tetapan IP LAN penghala wayarles anda. NOTA: Apa-apa perubahan kepada alamat IP LAN akan ditunjukkan pada tetapan DHCP anda. Untuk mengubah suai tetapan IP LAN: 1. Daripada panel navigasi, pergi ke tab Advanced Settings (Tetapan Lanjutan) > LAN > IP LAN. 2. Mengubah suai IP address (Alamat IP) dan Subnet Mask. 3. Apabila selesai, klik Apply (Guna).
3.12.2 Pelayan DHCP Penghala wayarles anda menggunakan DHCP untuk menguntukkan alamat IP secara automaik pada rangkaian anda. Anda boleh menyatakan julat alamat IP dan masa pajakan untuk kelian pada rangkaian anda. Untuk mengkonfigurasi pelayan DHCP: 1. Daripada panel navigasi, pergi ke tab Advanced Settings (Tetapan Lanjutan) > LAN > DHCP Server (Pelayan DHCP). 2. Dalam medan Enable the DHCP Server (Dayakan Pelayan DHCP), tandakan Yes (Ya). 3.
6. Dalam medan Lease Time (Masa Pajakan) (saat), nyatakan dalam saat bila alamat IP yang diuntukkan akan tamat tempoh. Sebaik sahaja ia mencapai had masa ini, pelayan DHCP kemudiannya akan menguntukkan alamat IP yang baru. NOTA: • ASUS menyarankan agar anda menggunakan format alamat IP 192.168.1.xxx (di mana xxx boleh jadi sebarang nombor antara 2 dan 254) apabila menyatakan julat alamat IP. • IP Pool Starting Address (Alamat Permulaan Kumpulan IP) tidak boleh melebihi Alamat Akhir Kumpulan IP). 7.
3.12.3 Hala Jika rangkaian anda menggunakan lebih daripada satu penghala wayarles, anda boleh mengkonfigurasikan jadual penghalaan untuk berkongsi perkhidmatan Internet yang sama. NOTA: Kami mengesyorkan anda tidak menukar tetapan hala lalai melainkan anda mempunyai pengetahuan lanjutan mengenai jadual penghalaan. Untuk mengkonfigurasikan jadual Penghalaan LAN: 1. Daripada panel navigasi, pergi ke tab Advanced Settings (Tetapan Lanjutan) > LAN > Route (Hala). 2.
3.12.4 IPTV Penghala wayarles menyokong sambungan ke perkhidmatan IPTV melalui ISP atau LAN. Tab IPTV memberikan tetapan konfigurasi yang diperlukan untuk menyediakan IPTV, VoIP, multisiar, dan UDP untuk perkhidmatan anda. Hubungi ISP anda untuk maklumat khusus mengenai perkhidmatan anda.
3.13 Peta Rangkaian Peta Rangkaian membolehkan anda mengkonfigurasikan tetapan keselamatan anda, menguruskan klien rangkaian anda, dan memantau peranti USB anda. 3.12.1 Menyediakan keselamatan wayarles Untuk melindungi rangkaian wayarles anda daripada akses yang tidak dibenarkan, anda perlu mengkonfigurasi tetapan keselamatan penghala anda. Untuk menyediakan tetapan keselamatan wayarles: 1. Daripada panel navigasi, pergi ke Advanced Settings (Tetapan Lanjutan) > Network Map (Peta Rangkaian). 2.
NOTA: Anda boleh menyediakan beberapa tetapan keselamatan wayarles untuk jalur 2.4GHz, 5GHz-1 dan 5GHz-2. Tetapan keselamatan 2.4GHz Tetapan keselamatan 5GHz-1 Tetapan keselamatan 5GHz-2 3. Pada medan Network Name (SSID) (Nama Rangkaian (SSID)), masukkan nama unik bagi rangkaian wayarles anda. 4. Daripada senarai jatuh bawah Authentication Method (Kaedah Pengesahan), pilih kaedah pengesahan untuk rangkaian wayarles anda.
3.13.2 Menguruskan klien rangkaian anda Untuk menguruskan klien rangkaian anda: 1. Daripada panel navigasi, pergi ke tab Advanced Settings (Tetapan Lanjutan) > Network Map (Peta Rangkaian) 2. Pada skrin Peta Rangkaian, pilih ikon Client (Klien) untuk memaparkan maklumat rangkaian klien anda. 3. Klik Lihat Senarai di bawah ikon Clients (Klien) untuk memaparkan semua klien. 4. Untuk menyekat akses klien ke rangkaian anda, pilih klien dan klik ikon buka kunci.
3.13.3 Memantau peranti USB anda Penghala Wayarles ASUS menyediakan dua port USB untuk menyambungkan peranti USB atau pencetak USB untuk membolehkan anda berkongsi fail dan pencetak dengan klien dalam rangkaian anda. NOTA: • Untuk menggunakan ciri ini, anda perlu pasang palan peranti storan USB, seperti cakera keras USB atau pemacu kilat USB, ke port USB 3.0/2.0 pada panel belakang penghala wayarles anda. Pastikan peranti storan USB diformat dan dibahagikan dengan betul.
Untuk memantau peranti USB anda: 1. Daripada panel navigasi, pergi ke Advanced Settings (Tetapan Lanjutan) > Network Map (Peta Rangkaian). 2. Pada skrin Peta Rangkaian, pilih ikon USB Disk Status (Status Cakera USB) untuk memaparkan maklumat peranti USB anda. 3. Pada medan Wizard AiDisk, klik GO (PERGI) untuk menyediakan pelayan FTP untuk perkongsian fail Inernet. NOTA: • Untuk butiran lanjut, rujuk bahagian 3.18.2 Using Servers Center (Menggunakan Pusat Pelayan) dalam manual pengguna ini.
3.14 NAT Terbuka & Profil Permainan NAT Terbuka menawarkan cara yang ringkas bagi mewujudkan peraturan pemajuan port untuk permainan dalam talian dan mengoptimumkan paket penghalaan daripada konsol permainan anda ke modem dengan pengalaman permainan yang dioptimumkan. Apabila bermain PC atau permainan konsol, mungkin terdapat beberapa masalah sambungan kerana tetapan ISP atau penghala dalam persekitaran anda seperti NAT dan blok port.
Untuk mengkonfigurasikan NAT Terbuka: 1. Dari panel navigasi, pergi ke General (Am) > Open NAT (NAT Terbuka). 2. Luncur pada Dayakan Pemajuan Port. 3. Daripada Senarai Permainan, pilih permainan anda dan lengkapkan tetapan asas. 4. Klik OK .
3.15 Smart Connect Smart Connect direka untuk memandu klien secara automatik ke satu daripada tiga radio (satu 2.4 GHz, satu 5 GHz-1 dan 5 GHz-2) untuk memaksimumkan jumlah penggunaan daya pemprosesan wayarles. 3.15.1 Menyediakan Smart Connect Anda boleh mendayakan Smart Connect daripada GUI Web melalui dua cara berikut: • Melalui skrin Wayarles 1. Pada penyemak imbas web anda, masukkan alamat IP lalai penghala wayarles secara manual: http://www.asusrouter.com. 2.
3.15.2 Peraturan Smart Connect ASUSWRT menyediakan tetapan syarat lalai untuk memacu mekanisme pertukaran. Anda juga boleh mengubah syarat pemicu menurut persekitaran perangkaian anda. Untuk mengubah tetapan, pergi ke tab Peraturan Smart Connect pada skrin Alat Rangkaian.
Keadaan Pemicu Stereng Set kawalan ini menetapkan kriteria untuk memulakan pemanduan jalur. • Penggunaan Lebar Jalur Apabila penggunaan lebar jalur melebihi peratusan ini, pemanduan akan dimulakan. • Dayakan Keseimbangan Beban Ini mengawal penyeimbangan beban. • RSSI Jika tahap isyarat yang diterima bagi sebarang klien yang berkaitan memenuhi kriteria ini, pemanduan akan dipicu. • Kadar PHY Kurang / Kadar PHY Lebih Tinggi Kawalan-kawalan ini menentukan kadar pautan STA yang memicu pemanduan jalur.
Dasar Pemilihan STA Sebaik sahaja pemanduan telah dipicu, ASUSWRT akan mengikut Dasar Pemilihan STA untuk memilih klien(STA) yang akan dipandu ke jalur yang paling sesuai. Pemilihan Antara Muka dan Prosedur Layak Kawalan-kawalan ini menentukan di mana klien yang dipandu akan berakhir. Kawalan Target Band (Jalur Sasaran) menentukan pilihan sasaran pemanduan pertama dan kedua.
3.16 Log Sistem Log Sistem mengandungi aktiviti rangkaian terakam anda. NOTA: Log sistem menetap semula apabila penghala dibut semula atau dimatikan. Untuk melihat log sistem anda: 1. Daripada panel navigasi, pergi ke Advanced Settings (Tetapan Lanjutan) > System Log (Log Sistem). 2.
3.17 Penganalisis Trafik Penganalisis Trafik memberikan anda pandangan sekali imbas tentang perkara yang sedang berlaku pada rangkaian anda secara harian, mingguan atau bulanan. Ia membolehkan anda melihat dengan cepat penggunaan lebar jalur setiap pengguna, atau peranti atau aplikasi yang digunakan, membantu anda mengurangkan cerutan dalam sambungan Internet anda. Ia juga cara yang hebat untuk memantau penggunaan atau aktiviti Internet pengguna. Untuk mengkonfigurasikan Penganalisis trafik: 1.
3.18 Aplikasi USB Fungsi Aplikasi USB menyediakan submenu AiDisk, Pusat Pelayan, Pelayan Pencetak Rangkaian dan Download Master. PENTING! Untuk menggunakan fungsi pelayan ini, anda perlu memasukkan peranti storan USB, seperti cakera keras USB atau pemacu kilat USB, ke port USB 3.0 pada panel belakang penghala wayarles anda. Pastikan peranti storan USB diformat dan dibahagikan dengan betul. Rujuk tapak web ASUS di http://event. asus.com/2009/networks/disksupport/ untuk jadual sokongan sistem fail.
3.18.1 Menggunakan AiDisk AiDisk membolehkan anda menggunakan fail yang disimpan pada peranti USB yang disambungkan melalui Internet. AiDisk juga membantu anda dengan menyediakan ASUS DDNS dan pelayan FTP. Untuk menggunakan AiDisk: 1. Daripada panel navigasi, pergi ke Advanced Settings (Tetapan Lanjutan) > USB Application (Aplikasi USB), kemudian klik ikon AiDisk. 2. Daripada skrin wizard Selamat Datang AiDisk, klik Go (Pergi). 3.
4. Mencipta nama domain anda melalui perkhidmatan ASUS DDNS, baca Terma Perkhidmatan dan pilih I will use the service and accept the Terms of service (Saya akan menggunakan perkhidmatan dan menerima Terma Perkhidmatan) dan masukkan nama domain anda. Apabila selesai, klik Next (Seterusnya). Anda juga boleh memilih Skip ASUS DDNS settings (Langkau tetapan ASUS DDNS) kemudian klik Next (Seterusnya) untuk melangkau tetapan DDNS. 5. Klik Finish (Selesai) untuk melengkapkan tetapan. 6.
3.18.2 Menggunakan Pusat Pelayan Pusat Pelayan membolehkan anda berkongsi fail media daripada cakera USB melalui direktori Pelayan Media, perkhidmatan perkongsian Samba, atau perkhidmatan perkongsian FTP. Anda juga boleh mengkonfigurasi tetapan lain untuk cakera USB dalam Pusat Pelayan. Menggunakan Pelayan Media Penghala wayarles anda membolehkan peranti disokong UPnP untuk mengakses fail multimedia daripada cakera USB yang disambungkan ke penghala wayarles anda.
Menggunakan perkhidmatan Kongsi Tempat Rangkaian(Samba) Kongsi Tempat Rangkaian (Samba) membolehkan anda menyediakan akaun dan kebenaran untuk perkhidmatan Samba. Untuk menggunakan kongsi Samba: 1. Dari panel navigasi, pergi ke tab Advanced Settings (Tetapan Lanjutan) > USB Application (Aplikasi USB) > Network Place (Samba) Share / Cloud Disk (Perkongsian (Samba) Tempat Rangkaian / Cakera Awan). NOTA: Kongsi Tempat Rangkaian (Samba) didayakan secara lalai. 2.
Untuk memadam akaun sedia ada: a) Pilih akaun yang anda ingin padam: b) Klik . c) Apabila digesa, klik Delete (Padam) untuk mengesahkan pemadaman akaun. Untuk menambah folder: a) Klik . b) Masukkan nama folder dan klik Add (Tambah). Folder yang anda cipta akan ditambah ke senarai folder. 3. Daripada senarai folder, pilih jenis kebenaran akses yang anda ingin tugaskan untuk folder khusus: • R/W: Pilih pilihan ini untuk menugaskan akses baca/tulis.
Menggunakan perkhidmatan Kongsi FTP Kongsi FTP mendayakan pelayan FTP untuk berkongsi fail daripada cakera USB ke peranti lain melalui rangkaian kawasan setempat anda atau melalui Internet. PENTING: • Pastikan anda mengeluarkan cakera USB dengan selamat. Pengeluaran tidak betul cakera USB boleh menyebabkan kerosakan data. • Untuk mengeluarkan cakera USB dengan selamat, rujuk bahagian Safely removing the USB disk (Mengeluarkan cakera USB dengan selamat) di bawah 3.13.
2. Daripada senarai folder, pilih jenis kebenaran akses yang anda ingin tugaskan untuk folder khusus: • R/W: Pilih untuk menugaskan akses baca/tulis folder khusus. • W: Pilih untuk menugaskan akses tulis sahaja folder khusus. • R: Pilih untuk menugaskan akses baca sahaja folder khusus. • Tidak: Pilih pilihan ini jika anda tidak mahu berkongsi folder fail khusus. 3. Jika anda lebih gemar, anda boleh menetapkan medan Allow anonymous login (Benarkan log masuk tanpa nama) kepada ON (HIDUP). 4.
3.18.3 3G/4G Modem USB 3G/4G boleh disambungkan ke GT-AC5300 untuk membenarkan akses Inernet. NOTA: Untuk senarai modem USB yang disahkan, sila lawati: http://event.asus.com/2009/networks/3gsupport/ Untuk menyediakan akses Internet 3G/4G: 1. Daripada panel navigasi, klik Advanced Settings (Tetapan Lanjutan) > USB application (Aplikasi USB) > 3G/4G. 2. Pada medan Enable USB Modem (Dayakan Modem USB), pilih Yes (Ya). 3.
3.19 VPN Rangkaian Persendirian Maya (VPN) menyediakan komunikasi selamat dengan komputer atau rangkaian jauh menerusi rangkaian awam seperti Internet. NOTA: Sebelum menyediakan sambungan VPN, anda memerlukan alamat IP atau nama domain pelayan VPN. Untuk menyediakan akses ke pelayan VPN: 1. Dari panel navigasi, pergi ke General (Am) > VPN. 2. Pada medan Enable PPTP VPN Server (Dayakan Pelayan PPTP VPN), klik ON (HIDUP). 3.
3.19.2 Gabungan VPN Gabungan VPN membolehkan anda menyambung ke berbilang pelayan VPN secara serentak dan menugaskan peranti klien anda untuk menyambung ke terowong VPN yang berbeza. Sesetengah peranti seperti kotak set-atas, TV pintar dan pemain Blu-ray tidak menyokong perisian VPN. Ciri ini menyediakan akses VPN ke peranti sedemikian dalam rangkaian rumah tanpa perlu memasang perisian VPN, manakala telefon pintar anda kekal bersambung ke Internet dan bukannya VPN.
Untuk bermula, sila ikuti langkah-langkah di bawah: 1. Klik di sebelah Server List (Senarai Pelayan) untuk menambah terowong VPN baharu. 2. Aktifkan sambungan VPN yang anda cipta dalam Senarai Pelayan. 3. Klik di sebelah Exception List (Senarai Pengecualian) dan pilih klien dalam talian yang anda mahu konfigurasikan. 4. Tetapkan sambungan VPN ke peranti klien dan klik OK. 5. Aktifkan dasar VPN dalam Exception List (Senarai Pengecualian) dan klik Apply (Guna) di bahagian bawah halaman.
3.19.2 Pengawal Segera Pengawal Segera menjalankan pelayan VPN peribadi anda sendiri pada penghalan anda sendiri. Apabila anda menggunakan terowong VPN, semua data anda akan melalui pelayan. Dengan Pengawal Segera, anda mengawal sepenuhnya pelayan anda sendiri, menjadikannya penyelesaian yang mungkin paling selamat.
3.20 WAN 3.20.1 Sambungan Internet Skrin Sambungan Internet membolehkan anda mengkonfigurasikan tetapan pelbagai jenis sambungan WAN. Untuk mengkonfigurasikan tetapan sambungan WAN: 1. Daripada panel navigasi, pergi ke tab Advanced Settings (Tetapan Lanjutan) > WAN > Internet Connection (Sambungan Internet). 2. Konfigurasi tetapan di bawah yang berikut. Apabila selesai, klik Apply (Guna). • Jenis Sambungan WAN: Pilih jenis Pembekal Perkhidmatan Internet anda.
• Mendayakan WAN: Pilih Yes (Ya) untuk membolehkan akses penghala Internet. Pilih No (Tidak) untuk mendayakan akses Internet. • Mendayakan NAT: NAT (Terjemahan Alamat Rangkaian) adalah sistem di mana satu IP awam (IP WAN) digunakan untuk memberikan akses Internet ke klien rangkaian dengan alamat IP peribadi dalam LAN. Alamat IP peribadi setiap klien rangkaian disimpan dalam jadual NAT dan ia digunakan pada paket data masuk penghala.
• Nama Hos: Medan ini membenarkan anda untuk memberikan nama hos untuk penghala anda. Biasanya ia adalah keperluan istimewa daripada ISP anda. Jika ISP anda diberikan nama hos kepada komputer anda, masukkan nama hos di sini. • Alamat MAC: Alamat MAC (Kawalan Capaian Media) adalah pengecam unik untuk peranti perangkaian anda. Beberapa ISP memantau alamat MAC peranti perangkaian yang bersambung ke perkhidmatan mereka dan menolak mana-mana peranti yang tidak dikenali yang mencuba untuk bersambung.
3.20.2 WAN Dual Penghala wayarles ASUS anda menyediakan sokongan WAN dual. Anda boleh menetapkan ciri WAN dual kepada mana-mana dua mod ini: • Failover Mode (Mod Gagal Seluruh): Pilih mod ini untuk menggunakan WAN sekunder sebagai akses rangkaian sandaran. • Load Balance Mode (Mod Keseimbangan Beban): Pilih mod ini untuk mengoptimumkan lebar jalur, meminimumkan masa respons dan menghalang data terlebih beban untuk kedua-dua sambungan WAN primer dan sekunder.
3.20.3 Picu Port Picu julat port membuka port masuk yang ditentukan untuk tempoh masa yang terhad apabila klien di rangkaian kawasan setempat menjadi sambungan keluar ke port yang dinyatakan. Picu port digunakan dalam senario berikut: • Lebih daripada satu klien setempat memerlukan pemajuan port untuk aplikasi yang sama pada masa yang berbeza. • Satu aplikasi memerlukan port masuk khusus yang berbeza daripada port keluar. Untuk menyediakan Picu Port: 1.
• Port Picu: Tentukan port picu untuk membukan port masuk. • Protokol: Pilih protokol, TCP, atau UDP. • Port Masuk: Nyatakan port masuk untuk menerima data masuk daripada Internet. 5. Klik Add (Tambah) untuk memasukkan maklumat pemicu port ke senarai. Klik butang Delete (Padam) untuk mengalih keluar entri pemicu port daripada senarai. 6. Apabila selesai, klik Apply (Guna). NOTA: • Apabila menyambung ke pelayan IRC, PC klien membuat sambungan keluar menggunakan julat port picu 66660-7000.
3.20.4 Pelayan Maya/Pemajuan Port Pemajuan por adalah kaedah untuk menghala trafik rangkaian dari Internet ke port khusus atau julat port khusus ke satu peranti atau beberapa peranti pada rangkaian tempatan anda. Menyediakan Pemajuan Port pada penghala anda membenarkan PC di luar rangkaian untuk mengakses perkhidmatan khusus yang diberikan oleh PC dalam rangkaian anda. Untuk menyediakan Pemajuan Port: 1.
Item ini menyenaraikan port yang diperlukan untuk permainan dalam talian popular pilihan anda berfungsi dengan betul. 5. Pada jadual Port Forwarding List (Senarai Pemajuan Port), masukkan maklumat berikut: • Nama Perkhidmatan: Masukkan nama perkhidmatan. • Julat Port: Jika anda mahu menentukan Liputan Port untuk klien pada rangkaian yang sama, masukkan Nama Perkhidmatan, Liputan Port (cth. 10200:10300), alamat IP LAN dan biarkan Port Setempat kosong.
• Protokol: Pilih protokol. Jika anda tidak pasti, pilih KEDUADUANYA. 6. Klik Add (Tambah) untuk memasukkan maklumat pemicu port ke senarai. Klik butang Delete (Padam) untuk mengalih keluar entri pemicu port daripada senarai. 7. Apabila selesai, klik Apply (Guna). Untuk memeriksa jika Pemajuan Port telah berjaya dikonfigurasi: • Pastikan pelayan atau aplikasi anda disediakan dan berjalan. • Anda memerlukan klien di luar LAN anda tetapi mempunyai akses Internet (dirujuk sebagai "Klien Internet").
3.20.5 DMZ DMZ Maya mendedahkan satu klien ke Internet, membolehkan klien ini menerima semua paket masuk diarahkan ke Rangkaian Kawasan Setempat. Trafik masuk dari Internet biasanya dibuang dan dihalakan ke klien tertentu hanya jika pemajuan port atau picu port telah dikonfigurasikan pada rangkaian. Dalam konfigurasi DMZ, satu klien rangkaian menerima semua paket masuk.
3.20.6 DDNS Menyediakan DDNS (DNS Dinamik) membolehkan anda mengakses penghala daripada luar rangkaian anda melalui Perkhidmatan DDNS ASUS atau perkhidmatan DDNS lain. Untuk menyediakan DDNS: 1. Daripada panel navigasi, pergi ke tab Advanced Settings (Tetapan Lanjutan) > WAN > DDNS. 2. Konfigurasi tetapan di bawah yang berikut. Apabila selesai, klik Apply (Guna). • Mendayakan Klien DDNS: Dayakan DDNS untuk mengakses penghala ASUS melalui nama DNS dan bukannya alamat IP WAN.
NOTA: Perkhidmatan DDNS tidak akan berfungsi di bawah keadaan ini: • Apabila penghala wayarles menggunakan alamat peribadi IP WAN (192.168.x.x, 10.x.x.x, atau 172.16.x.x), seperti yang ditunjukkan oleh teks berwarna kuning. • Penghala mungkin berada pada rangkaian yang menggunakan jadual NAT berbilang. 3.20.7 Masuk Lalu NAT Masuk Lalu NAT membolehkan sambungan Rangkaian Peribadi Maya (VPN) untuk melalui penghala ke klien rangkaian.
3.21 WiFi Radar Radar Wi-Fi, satu alat analisis lanjutan untuk rangkaian wayarles anda, menyelidiki saluran dan data paket secara mendalam untuk penyelesaian masalah. NOTA: Mendayakan Radar Wi-Fi boleh menyebabkan prestasi wayarles jatuh. Hanya dayakan Radar Wi-Fi apabila perlu. Untuk menggunakan Radar Wi-Fi: 1. Dari panel navigasi, pergi ke General (Am) > WiFi Radar (Radar Wi-Fi), pergi ke Tetapan dan konfigurasikan semua parameter Radar Wi-Fi.
2. Klik Start Data Collection (Mulakan Pengumpulan Data) dan tetapkan jadual untuk Pengumpulan data. 3. Klik Submit (Serah) selepas anda menetapkan semua parameter. 3.21.1 Tinjauan Tapak Wi-Fi Tinjauan Tapak Wi-Fi membenarkan anda mencari rangkaian wayarles dalam persekitaran anda.
3.21.2 Statistik Saluran Wayarles Ciri ini menunjukkan penggunaan saluran bagi semua statistik pengagihan jalur dan saluran dalam persekitaran anda. 3.21.3 Penyelesaian Masalah Lanjutan Ciri ini menunjukkan statistik glic Wi-Fi dalam persekitaran anda.
3.22 Wayarles 3.22.1 Umum Tab Am membolehkan anda mengkonfigurasikan tetapan wayarles asas. Untuk mengkonfigurasi tetapan wayarles asas: 1. Daripada panel navigasi, pergi ke tab Advanced Settings (Tetapan Lanjutan) > Wireless (Wayarles) > General (Am). 2. Pilih 2.4GHz atau 5GHz sebagai jalur frekuensi untuk rangkaian wayarles anda. 3. Jika anda ingin menggunakan fungsi Sambung Pintar, alihkan peluncur kepada ON (HIDUP) dalam medan Enable Smart Connect (Dayakan Sambung Pintar).
4. Berikan nama unik yang mengandungi sehingga 32 aksara untuk SSID (Pengecam Set Perkhidmatan) atau nama rangkaian untuk mengenal pasti rangkaian wayarles anda. Peranti Wi-Fi boleh mengenal pasti dan menyambung ke rangkaian wayarles melalui SSID ditentukan anda. SSID pada panji maklumat dikemas kini apabila SSID baru disimpan pada tetapan. NOTA: Anda boleh menugaskan SSID unik untuk jalur frekuensi 2.4GHz, 5GHz-1 dan 5GHz-2. 5.
3.22.2 WPS WPS (Persediaan Dilindungi WiFi) adalah standard keselamatan wayarles yang membenarkan anda untuk menyambungkan peranti dengan mudah ke rangkaian wayarles. Anda boleh mengkonfigurasi fungsi WPS melalui kod PIN atau butang WPS. NOTA: Memastikan bahawa peranti menyokong WPS. Untuk mendayakan WPS pada rangkaian wayarles anda: 1. Daripada panel navigasi, pergi ke tab Advanced Settings (Tetapan Lanjutan) > Wireless (Wayarles) > WPS. 2. Dalam medan Dayakan WPS, gerakkan gelangsar ke HIDUP. 3.
4. Dalam medan Kaedah WPS, pilih kod Push button (Butang tolak) atau Client PIN Code (Kod PIN Klien). Jika anda memilih Push button (Butang tolak), pergi ke langkah 5. Jika anda memilih Client PIN Code (Kod PIN Klien), pergi ke langkah 6. 5. Untuk menyediakan WPS menggunakan butang penghala WPS, ikuti langkah ini: a. Klik Mula atau tekan butang WPS yang dijumpai di belakang penghala wayarles. b. Tekan butang WPS pada peranti wayarles anda. Ini biasanya dikenal pasti melalui logo WPS.
3.22.3 Penghubung Penghubung atau WDS (Sistem Pengedaran Wayarles) membolehkan penghala wayarles ASUS anda untuk bersambung ke titik akses wayarles lain secara eksklusif, mengelakkan peranti wayarles lain atau stesen untuk mengakses penghala wayarles ASUS anda. Ia juga boleh dianggap sebagai pengulang wayarles di mana penghala wayarles ASUS anda berkomunikasi dengan titik akses lain dan peranti wayarles lain. Untuk menyediakan penghubung wayarles: 1.
3. Dalam medan Mod AP, pilih mana-mana pilihan ini: • AP Sahaja: Nyahdaya fungsi Penghubung Wayarles. • WDS Sahaja: Mendayakan ciri Penghubung Wayarles tetapi menghalang peranti/stesen wayarles lain daripada bersambung ke penghala. • HIBRID: Mendayakan ciri Penghubung Wayarles dan membenarkan peranti/stesen wayarles lain bersambung ke penghala. NOTA: Dalam mod Hibrid, peranti wayarles bersambung dengan penghala wayarles ASUS hanya akan menerima separuh kelajuan sambungan Titik Akses. 4.
3.22.4 Penapis MAC Wayarles Penapis MAC Wayarles memberikan kawalan ke atas paket yang dihantar ke alamat MAC (Kawalan Akses Media) yang dinyatakan pada rangkaian wayarles anda. Untuk menyediakan penapis Wayarles MAC: 1. Daripada panel navigasi, pergi ke tab Advanced Settings (Tetapan Lanjutan) > Wireless (Wayarles) > Wireless MAC Filter (Penapis MAC Wayarles). 2. Pilih jalur frekuensi. 3. Raitkan Yes (Ya) dalam medan Enable Mac Filter (Dayakan Penapis Mac). 4.
3.22.5 Seting RADIUS Tetapan RADIUS (Perkhidmatan Pengguna Dail Pengesahan Jauh) memberikan lapisan tambahan keselamatan semasa anda memilih WPA-Enterprise, WPA2-Enterprise, atau Radius dengan 802.1x sebagai Mod Pengesahan anda. Untuk menyediakan tetapan wayarles RADIUS: 1. Pastikan mod pengesahan penghala wayarles ditetapkan ke WPA-Enterprise atauWPA2-Enterprise. NOTA: Sila rujuk bahagian 3.22.1 General (Umum) untuk mengkonfigurasikan Mod Pengesahan penghala wayarles anda. 2.
3.22.6 Profesional Skrin Profesional memberikan pilihan konfigurasi lanjutan. NOTA: Kami mengesyorkan anda menggunakan nilai lalai pada halaman ini. Dalam skrin tetapan Professional (Profesional), anda boleh mengkonfigurasikan yang berikut: • Jalur: Pilih jalur frekuensi yang tetapan profesional akan digunakan.
• Mendayakan Radio: Pilih Yes (Ya) untuk mendayakan perangkaian wayarles. Pilih No (Tidak) untuk menyahdayakan perangkaian wayarles. • Dayakan penjadual wayarles: Pilih Ya untuk mendayakan dan mengkonfigurasi penjadual wayarles. Pilih Tidak untuk menyahdayakan penjadual wayarles. • Tarikh untuk Mendayakan Radio (hari kerja): Anda boleh menyatakan hari kerja yang mana perangkaian wayarles didayakan.
• • • • • • • • • 116 wayarles sibuk dengan trafik rangkaian tinggi. Pilih Long (Panjang) jika rangkaian wayarles anda terdiri daripada peranti wayarles lama atau legasi. AMPDU RTS: Dayakan fungsi ini membenarkan anda membina sekumpulan bingkai sebelum ia dihantar dan menggunakan RTS untuk setiap AMPDU bagi komunikasi antara peranti 802.11g dan 802.11b.
• Keadilan Masa Siaran: Dengan keadilan masa siaran, kelajuan rangkaian tidak ditentukan oleh trafik paling perlahan. Dengan memperuntukkan masa yang sama di kalangan klien, Keadilan Masa Siaran membenarkan setiap penghantaran untuk beralih pada potensi kelajuan tertingginya. • Pembentukan Alur Nyata: Kedua-dua penyesuai dan penghala WLAN klien menyokong teknologi pembentukan alur.
4 Utiliti NOTA: • Muat turun dan pasangkan utiliti penghala wayarles daripada laman web ASUS: • Penemuan Peranti v1.4.7.1 di http://dlcdnet.asus.com/pub/ASUS/ LiveUpdate/Release/Wireless/Discovery.zip • Pemulihan Semula Perisian Tegar v1.9.0.4 di http://dlcdnet.asus. com/pub/ASUS/LiveUpdate/Release/Wireless/Rescue.zip • Utiliti Pencetak Windows v1.0.5.5 di http://dlcdnet.asus.com/pub/ ASUS/LiveUpdate/Release/Wireless/Printer.zip • Utiliti tidak disokong pada MAC OS. 4.
4.2 Pemulihan Perisian Tegar Firmware Restoration (Pemulihan Perisian Tegar) digunakan pada Penghala Wayarles ASIS selepas penataran perisian tegar yang gagal dijalankan. Utiliti ini memuat naik fail perisian tegar ke penghala wayarles. Proses ini mengambil masa kira-kira tiga hingga empat minit. PENTING: Lancarkan mod menyelamat sebelum menggunakan utiliti Firmware Restoration (Pemulihan Perisian Tegar). NOTA: Ciri ini tidak disokong pada MAC OS.
4. Dari desktop komputer anda, klik Start (Mulakan) > All Programs (Semua Atur cara) > ASUS Utility (Utiliti ASUS) > GT-AX11000 PRO Wireless Router (Penghala Wayarles GT-AX11000 PRO) > Firmware Restoration (Pemulihan Perisian Tegar). 5. Untuk menavigasi ke fail perisian tegar, kemudian klik Upload (Muat naik). NOTA: Utiliti Firmware Restoration (Pemulihan Perisian Tegar) tidak digunakan untuk menatarkan perisian tegar bagi Pengha Wayarles ASUS yang berfungsi.
NOTA: Fungsi pelayan pencetak disokong pada Windows® 7/8/8.1/10. Untuk menyediakan mod perkongsian EZ Printer: 1. Daripada panel navigasi, pergi ke Advanced Settings (Tetapan Lanjutan) > USB Application (Aplikasi USB) > Network Printer Server (Rangkaian Pelayan Pencetak). 2. Klik Download Now! (Muat Turun Sekarang!) untuk memuat turun utiliti rangkaian pencetak. NOTA: Utiliti rangkaian pencetak disokong pada Windows® 7/8/8.1/10.
4. Ikuti arahan pada skrin untuk menyediakan perkakas anda, kemudian klik Next (Seterusnya). 5. Tunggu beberapa minit untuk penyediaan pemulaan selesai. Klik Next (Seterusnya). 6. Klik Finish (Selesai) untuk melengkapkan pemasangan.
7. Ikuti arahan OS Windows® untuk memasang pemacu pencetak. 8. Selepas pemasangan pemacu pencetak selesai, klien rangkaian boleh menggunakan pencetak.
4.3.2 Menggunaka LPR untuk Berkongsi Pencetak Anda boleh berkongsi pencetak anda dengan komputer yang berjalan pada sistem operasi Windows® dan MAC menggunakan LPR/LPD (Kawalan Jauh Talian Pencetak/Daemon Talian Pencetak). Berkongsi pencetak LPR anda Untuk berkongsi pencetak LPR anda: 1. Dari desktop Windows®, klik Start (Mula) > Devices and Printers (Peranti dan Pencetak) > Add a printer (Tambah Pecetak) untuk menjalankan Add Printer Wizard (Wizard Tambah Pencetak). 2.
3. Pilih Create a new port (Cipta port baru) kemudian tetapkan Type of Port (Jenis Port) untuk Standard TCP/IP Port (TCP/ Port IP Standard). Klik Next (Seterusnya). 4. Dalam medan Hostname or IP address (Nama hos atau alamat IP), masukkan alama IP penghala wayarles kemudian klik Next (Seterusnya).
5. Pilih Custom (Tersuai) kemudian klik Settings (Tetapan). 6. Tetapkan Protocol (Protokol) ke LPR. Dalam medan Queue Name (Nama Baris), masukkan LPRServer kemudian klik OK untuk meneruskan.
7. Klik Next (Seterusnya) untuk menyelesaikan menyediakan port TCP/IP standard. 8. Pasang pemacu pencetak dari senarai model vendor. Jika pencetak anda tiada dalam senarai, klik Have Disk (Ada Cakera) untuk memasang pemacu pencetak secara manual daripada CD-ROM atau fail.
9. Klik Next (Seterusnya) untuk menerima nama lalai pencetak. 10. Klik Finish (Selesai) untuk melengkapkan pemasangan.
4.4 Download Master Download Master adalah utiliti yang membantu anda memuat turun fail walaupun semasa komputer riba atau peranti lain anda dimatikan. NOTA: Anda memerlukan peranti USB yang disambungkan ke penghala wayarles untuk menggunakan Download Master. Untuk menggunakan Download Master: 1. Klik Advanced Settings (Tetapan Lanjutan) > USB Application (Aplikasi USB) > Download Master untuk memuat turun dan memasang utiliti secara automatik.
5. Gunakan panel navigasi untuk mengkonfigurasikan tetapan lanjutan. 4.4.1 Mengkofigurasikan tetapan muat turun Bit Torrent Untuk mengkonfigurasikan tetapan muat turun BitTorrent: 1. Dari panel navigasi Download Master, klik Bit Torrent untuk melancarkan halaman Bit Torrent Setting (Tetapan Bi Torrent). 2. Pilih port khusus untuk tugasan muat turun anda. 3. Untuk mengelakkan kesesakan rangkaian, anda boleh mengehadkan kelajuan muat naik dan muat turun maksimum di bawah Speed Limits (Had Kelajuan). 4.
4.4.2 Tetapan NZB Anda boleh menyediakan pelayan USENET untuk memuat turun fail NZB. Selepas memasukkan tetapan USENET, Apply (Guna).
5 Menyelesai Masalah Bab ini memberikan penyelesaian untuk isu yang anda mungkin hadapi dengan penghala anda. Jika anda menghadapi masalah yang tidak disebut dalam bab ini, lawati tapak sokongan ASUS di: http://support.asus.com/ untuk maklumat produk lanjut dan butiran untuk dihubungi Sokongan Teknikal ASUS. 5.1 Penyelesaian Masalah Asas Jika anda mengalami masalah dengan penghala anda, cuba langkah asas dalam bahagian ini sebelum mencari penyelesaian lanjut. Naik taraf Perisian Tegar ke versi terkini.
Periksa jika kabel Ethernet dipalam dengan betul. • Apabila kabel Ethernet menyambungkan penghala dengan modem dipalam dengan betul, LED WAN akan dihidupkan. • Apabila kabel Ethernet menyambungkan komputer yang dihidupkan anda dengan penghala dipalam dengan betul, LED LAN berkenaan akan dihidupkan. Periksa jika tetapan wayarles pada komputer anda sepadan dengan penghala anda.
5.2 Soalan Lazim (FAQs) Saya tidak dapat mengakses GUI penghala menggunakan penyemak imbas web. • Jika komputer anda diwayarkan, periksa sambungan kabel Ethernet dan status LED seperti yang diterangkan dalam bahagian sebelum ini. • Pastikan anda menggunakan maklumat log masuk yang betul. Nama log masuk dan kata laluan kilang lalai adalah “admin/ admin”. Pastikan kunci Huruf Besar dinyahdaya semasa anda memasukkan maklumat log masuk. • Padam kuki dan fail dalam penyemak imbas anda.
Klien tidak dapat mewujudkan sambungan wayarles dengan penghala. NOTA: Jika anda mempunyai isu menyambung ke rangkaian 5GHz, pastikan peranti wayarles anda menyokong keupayaan 5GHz atau ciri dwi jalur. • Di Luar Jarak Lingkungan: • Letakkan penghala sebih dekat dengan klien wayarles. • Cuba untuk melaraskan antena penghala kepada arahan terbaik seperti yang diterangkan dalam bahagian 1.4 Positioning your router (Meletakkan penghala anda). • Pelayan DHCP telah dinyahdayakan: 1. Lancarkan Web GUI.
• SSID telah disembunyikan. Jika peranti anda boleh mencari SSID dari penghala lain tetapi tidak boleh mencari SSID penghala anda, pergi ke Advanced Settings (Tetapan Lanjutan) > Wireless (Wayarles) > General (Am), pilih No (Tidak) pada Hide SSID (Sembunyi SSID), dan pilih Auto pada Control Channel (Saluran Kawalan). • Jika anda menggunakan adapter LAN wayarles, periksa jika saluran wayarles yang digunakan mengikut saluran tersedia di negara/kawasan anda.
Internet tidak dapat diakses. • Periks jika penghala anda boleh bersambung ke alama IP WAN ISP anda. Untuk melakukannya, lancarkan GUI web dan pergi ke Advanced Settings (Tetapan Lanjutan) > Network Map (Peta Rangkaian), dan periksa Internet Status (Status Internet).
Bagaimanakah anda memulihkan sistem kepada tetapan lalainya? • Pergi ke Administration (Pentadbiran) > Restore/Save/ Upload Setting (Tetapan Pemulihan/Simpan/Muat Naik), dan klik Restore (Pemulihan). Berikut ini adalah tetapan lalai kilang: Nama pengguna: admin Kata Laluan: admin Dayakan DHCP: Ya (jika kabel WAN dipasangkan) Alamat IP: http://www.asusrouter.com (atau 192.168.50.1) Nama domain: (Kosong) Subnet Mask: 255.255.255.0 Pelayan DNS 1: 192.168.50.
Tidak dapat mengakses GUI Web Sebelum anda mengkonfigurasikan penghala wayarles anda, lakukan langkah yang diterangkan dalam bahagian ini untuk komputer hos dan klien rangkaian anda. A. Nyahdayakan sebarang pelayan proksi yang dikonfigurasikan. Windows® 1. Klik Start (Mula) > Internet Explorer untuk melancarkan penyemak imbas. 2. Klik Tools (Alatan) > Internet options (Pilihan Internet) > Connections (Sambungan) > LAN settings (Tetapan LAN). 3.
MAC OS 1. Dari penyemak imbas Safari anda, klik Safari (Safari) > Preferences (Keutamaan) > Advanced (Lanjutan)> Change Settings... (Tukar Tetapan...). 2. Dari skrin Network (Rangkaian), buang tanda FTP Proxy (FTP Proksi) dan Web Proxy (HTTP) (Proksi Web). 3. Klik Apply Now (Guna Sekarang) setelah selesai. NOTA: Rujuk ciri bantuan penyemak imbas anda untuk butiran mengenai menyahdaya pelayan proksi. B. Menetapkan tetapan TCP/IP untuk dapatkan alamat IP secara automatik. Windows® 1.
2. Klik Sifat untuk memaparkan tetingkap Sifat Ethernet. 3. Pilih Protokol Internet Versi 4 (TCP/IPv4) atau Protokol Internet Versi 6 (TCP/IPv6), kemudian klik Properties (Ciriciri). 4. Untuk mendapatkan tetapan IP IPv4 secara automatik, tandakan Obtain an IP address automatically (Dapatkan alamat IP secara automatik). Untuk mendapatkan tetapan IP IPv6 secara automatik, tandakan Obtain an IP address automatically (Dapatkan alamat IP secara automatik). 5. Klik OK setelah selesai.
MAC OS 1. Klik ikon Apple terletak di bahagian atas sebelah kiri skrin anda. 2. Klik System Preferences (Keutamaan Sistem) > Network (Rangkaian) > Configure... (Konfigurasi...). 3. Dari tab TCP/IP, pilih Using DHCP (Menggunakan DHCP) dalam senarai jatuh bawah Configure IPv4 (Konfigurasi IPv4). 4. Klik Apply Now (Guna Sekarang) setelah selesai. NOTA: Rujuk bantuan dan ciri sokongan sistem operasi anda untuk butiran mengenai mengkonfigurasi tetapan TC/IP komputer anda. C.
Lampiran GNU General Public License Licensing information This product includes copyrighted third-party software licensed under the terms of the GNU General Public License. Please see The GNU General Public License for the exact terms and conditions of this license. All future firmware updates will also be accompanied with their respective source code. Please visit our web site for updated information. Note that we do not offer direct support for the distribution.
When we speak of free software, we are referring to freedom, not price. Our General Public Licenses are designed to make sure that you have the freedom to distribute copies of free software (and charge for this service if you wish), that you receive source code or can get it if you want it, that you can change the software or use pieces of it in new free programs; and that you know you can do these things.
Finally, any free program is threatened constantly by software patents. We wish to avoid the danger that redistributors of a free program will individually obtain patent licenses, in effect making the program proprietary. To prevent this, we have made it clear that any patent must be licensed for everyone’s free use or not licensed at all. The precise terms and conditions for copying, distribution and modification follow. Terms & conditions for copying, distribution, & modification 0.
You may charge a fee for the physical act of transferring a copy, and you may at your option offer warranty protection in exchange for a fee. 2.
These requirements apply to the modified work as a whole. If identifiable sections of that work are not derived from the Program, and can be reasonably considered independent and separate works in themselves, then this License, and its terms, do not apply to those sections when you distribute them as separate works.
c) Accompany it with the information you received as to the offer to distribute corresponding source code. (This alternative is allowed only for noncommercial distribution and only if you received the program in object code or executable form with such an offer, in accord with Subsection b above.) The source code for a work means the preferred form of the work for making modifications to it.
Therefore, by modifying or distributing the Program (or any work based on the Program), you indicate your acceptance of this License to do so, and all its terms and conditions for copying, distributing or modifying the Program or works based on it. 6. Each time you redistribute the Program (or any work based on the Program), the recipient automatically receives a license from the original licensor to copy, distribute or modify the Program subject to these terms and conditions.
range of software distributed through that system in reliance on consistent application of that system; it is up to the author/ donor to decide if he or she is willing to distribute software through any other system and a licensee cannot impose that choice. This section is intended to make thoroughly clear what is believed to be a consequence of the rest of this License. 8.
NO WARRANTY 11 BECAUSE THE PROGRAM IS LICENSED FREE OF CHARGE, THERE IS NO WARRANTY FOR THE PROGRAM, TO THE EXTENT PERMITTED BY APPLICABLE LAW. EXCEPT WHEN OTHERWISE STATED IN WRITING THE COPYRIGHT HOLDERS AND/OR OTHER PARTIES PROVIDE THE PROGRAM “AS IS” WITHOUT WARRANTY OF ANY KIND, EITHER EXPRESSED OR IMPLIED, INCLUDING, BUT NOT LIMITED TO, THE IMPLIED WARRANTIES OF MERCHANTABILITY AND FITNESS FOR A PARTICULAR PURPOSE. THE ENTIRE RISK AS TO THE QUALITY AND PERFORMANCE OF THE PROGRAM IS WITH YOU.
Maklumat keselamatan Apabila menggunakan produk ini, sentiasa patuhi langkah berjaga-jaga asas, termasuk tetapi tidak terhad pada berikut: AMARAN! • Kord bekalan kuasa mesti dipalam masuk ke salur keluar soket yang disediakan dengan pembumian yang sesuai. Sambungkan peralatan hanya ke salur keluar soket berdekatan yang mudah diakses. • Jika Penyesuai, jangan cuba untuk membetulkannya sendiri. Hubungi juruteknik servis bertauliah atau peruncit anda.
AMARAN! • JANGAN letakkan pada permukaan kerja yang tidak rata atau tidak stabil. • JANGAN letakkan atau jatuhkan objek di bahagian atas produk. Elakkan produk terdedah kepada kejutan mekanikal seperti penghancuran, pembengkokan, pembocoran atau pencincangan. • JANGAN tanggalkan, buka, gelombang mikro, bakar, cat, atau sumbat sebarang objek asing ke dalam produk ini. • Rujuk label perkadaran di bahagian bawah produk anda dan pastikan penyesuai kuasa anda mematuhi perkadaran ini.
Perkhidmatan dan Sokongan Lawati laman web kami yang pelbagai bahasa di https://www.asus.com/support.