Table des matières Avertissements............................................................................................ iii Informations de sécurité............................................................................. iv Soin & Nettoyage......................................................................................... vi 1.1 Bienvenu........................................................................................ 1-1 1.2 Contenu de la boîte.....................................
Avertissements Déclaration de la Commission Fédérale des Télécommunications (FCC) Cet appareil est conforme à la section 15 du règlement de la FCC. L'utilisation est permise sujette aux deux conditions suivantes : • Cet appareil ne peut pas causer d'interférences nocives. • Cet appareil doit pouvoir accepter toutes les interférences reçues, y compris les interférences risquant d’engendrer un fonctionnement indésirable.
Cet appareil numérique de Classe B est conforme à la norme canadienne ICES-003. Cet appareil numérique de Classe B respecte toutes les exigences de la réglementation canadienne sur les équipements causant des interférences. Cet appareil numérique de la classe B respecte toutes les exigences du Règlement sur le matériel brouilleur du Canada. Informations de sécurité iv • Avant d’installer le moniteur, lisez attentivement toute la documentation qui accompagne la boîte.
• N’insérez jamais des objets et ne renversez jamais du liquide dans les fentes du boîtier du moniteur. • Pour assurer un fonctionnement satisfaisant, n’utilisez le moniteur qu’avec des ordinateurs listés UL qui possèdent des réceptacles configurés appropriés marqués entre 100 ~ 240V CA. • La prise de courant doit être installée à proximité de l’équipement et doit être facile d’accès. • Si vous rencontrez des problèmes techniques avec le moniteur, contactez un réparateur qualifié.
Soin & Nettoyage • • • Avant de soulever ou de déplacer votre moniteur, il est préférable de débrancher les câbles et le cordon d’alimentation. Suivez les bonnes techniques de levage quand vous soulevez le moniteur. Quand vous soulevez ou transportez le moniteur, tenez les bords du moniteur. Ne soulevez pas le moniteur en tenant le support ou le cordon d’alimentation. Nettoyage. Éteignez votre moniteur et débranchez le cordon d’alimentation.
Où trouver plus d’informations Référez-vous aux sources suivantes pour les informations supplémentaires et pour les mises à jour de produit et logiciel. 1. Sites Web de ASUS Les sites Web internationaux d’ASUS fournissent des informations mises à jour sur les produits matériels et logiciels d’ASUS. Référezvous à http://www.asus.com 2. Documentation en option Votre emballage produit peut inclure une documentation en option qui peut avoir été ajoutée par votre revendeur.
1.1 Bienvenu Merci d'avoir acheté un moniteur DEL d'ASUS® ! Le dernier moniteur à écran LCD large d’ASUS offre un affichage plus net, plus large et plus lumineux, en plus de toute une gamme de fonctions qui améliorent votre séance de visionnage. Avec ces fonctions du moniteur, vous pouvez profiter du confort et vous régaler d’une expérience visuelle ! 1.
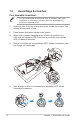
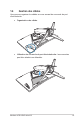
1.3 Assemblage du moniteur Pour assembler le moniteur: • Lors de l'assemblage du bras/de la base du moniteur, nous vous conseillons de conserver le moniteur dans son emballage en polystyrène expansé (EPS). 1. Alignez le trou de vis sur le bras avec la vis fournie sur la base. Puis insérez la base dans le bras. 2. Fixez la base au bras en serrant la vis fournie. 3. Alignez les marques triangulaires sur la base du moniteur et le couvercle de projection LED.
1.4 Gestion des câbles Vous pouvez organiser les câbles en vous servant du couvercle du port d'entrée/sortie. • Organisation des câbles • Utilisation du couvercle du port d'entrée/sortie : les couvercles peut être attachés ou détachés.
1.5 Branchement des câbles 1.5.1 Arrière du moniteur LCD XG32VQ 8 Mini HDMI 1 1-4 2 3 DCIN 4 1. Port HDMI 2.0 2. DisplayPort 3. Mini DisplayPort 4. Prise des écouteurs 5. Port USB amont 6. Port USB aval 7. Port d’entrée CC 8.
XG32VQR 8 HDMI-2 HDMI-1 1 2 DCIN 3 4 1. Port HDMI 2.0 2. Port HDMI 2.0. 3. DisplayPort 4. Prise des écouteurs 5. Port USB amont 6. Port USB aval 7. Port d’entrée CC 8.
XG35VQ 8 1-6 HDMI-2 HDMI-1 1 2 DCIN 3 4 1. Port HDMI 1.4 2. Port HDMI 2.0. 3. DisplayPort 4. Prise des écouteurs 5. Port USB amont 6. Port USB aval 7. Port d’entrée CC 8.
1.6 Présentation du moniteur 1.6.1 Utilisation des boutons de contrôle Utilisez les boutons de contrôle à l'arrière du moniteur pour régler les paramètres du moniteur. 6 6 5 5 4 4 3 3 2 2 1 1. Indicateur d’alimentation : • 2. Les couleurs du voyant d’alimentation sont indiquées dans le tableau ci-dessous. État Description Blanc Marche Orange Mode Veille Arrêt Arrêt Bouton d'alimentation : • Appuyez sur ce bouton pour allumer/éteindre le moniteur.
• Activez la fonction Viseur, Minuterie, Compteur de FPS ou Alignement écran • Déplacez le bouton ( ) vers le haut/bas pour sélectionner et appuyez sur ( ) pour confirmer la fonction souhaitée. Appuyez sur pour sortir et quitter. • Viseur/Minuterie/Compteur de FPS peut être déplacé en appuyant sur la touche 5 directions. Menu principal de GamePlus Viseur de GamePlus (Practice Mode) Minuterie de GamePlus Compteur de FPS GamePlus GamePlus FPS NEXT 5. Bouton Fermer • 6.
2.1 Réglage du moniteur • Pour une vision optimale, il est recommandé d’avoir une vision de face sur le moniteur, ensuite réglez l’angle du moniteur pour qu’il soit confortable. • Tenez le pied pour empêcher le moniteur de tomber quand vous le changez d’angle. • Vous pouvez ajuster l’angle du moniteur entre +20˚ et -5˚ et le tourner par jusqu'à 50˚ vers la droite ou la gauche. Vous pouvez aussi ajuster la hauteur du moniteur à +/- 10cm.
2.2 Détacher le bras / support (pour support mural VESA) • Évitez d'endommager la surface du moniteur. En détachant le support du moniteur, conservez toujours le moniteur dans son emballage EPS. Le bras démontable de ce moniteur est conçu spécialement pour un montage mural VESA. Pour démonter le bras/le support 2-2 1. Débranchez les câbles d’alimentation et de signal. Mettez délicatement le moniteur face orientée vers le bas sur son emballage EPS. 2.
3.1 Menu OSD (affichage à l’écran) 3.1.1 Reconfiguration DisplayPort 2560x1440@ 60Hz Mode course Aura OFF ROG Strix XG35VQ GameVisual Mode Paysage Filtre de lumière bleue Mode course Couleur Mode cinéma Image Mode RTS/RPG Paramètre PIP/PBP Mode FPS Input Select Mode sRGB System Setup Mode MOBA MyFavorite Mode Utilisateur MOVE/ENTER BACK EXIT 1. Appuyez sur le bouton central du bouton 5 directions pour afficher le menu OSD. 2.
3.1.2 1. Présentation des fonctions OSD GameVisual Cette fonction contient huit sous-fonctions que vous pouvez sélectionner en fonction de votre préférence.
2. Filtre de lumière bleue Ajustez le niveau d'énergie de la lumière bleue émise par le rétroéclairage à DEL. DisplayPort 2560x1440@ 60Hz Mode course Aura OFF ROG Strix XG35VQ Niveau 0 GameVisual Filtre de lumière bleue Niveau 1 Niveau 2 Couleur Niveau 3 Image Niveau 4 Paramètre PIP/PBP Input Select System Setup MyFavorite MOVE/ENTER BACK EXIT • Niveau 0 : Aucune modification. • Niveau 1~4: Plus le niveau est élevé, plus la lumière bleue sera réduite.
3. Couleur Choisissez la couleur d'image désirée avec cette fonction. DisplayPort 2560x1440@ 60Hz Mode course Aura OFF ROG Strix XG35VQ GameVisual Filtre de lumière bleue Luminosité 90 Contraste 80 Saturation Couleur Température Couleur Image Gamma Paramètre PIP/PBP Input Select System Setup MyFavorite MOVE/ENTER EXIT • Luminosité : La plage de réglage est de 0 à 100. • Contraste : La plage de réglage est de 0 à 100. • Saturation : La plage de réglage est de 0 à 100.
• Contrôle de l'aspect: Règle le rapport d'aspect sur "Plein écran", "4:3" et "16:9" (Uniquement sur XG35VQ). • ASCR : Sélectionnez MARCHE ou ARRÊT pour activer ou désactiver la fonction de rapport de contraste dynamique, ASCR est Désactivé lorsque ELMB est activé. • ELMB : Cochez pour diminuer le flou cinétique et réduire la partie dédoublée ("fantôme") lorsque des objets à l'écran se déplacent rapidement. ELMB sera désactivé si la source d'entrée HDMI est sélectionnée.
5. Paramètre PIP/PBP (Uniquement sur XG35VQ) Réglage PIP/PBP permet d'ouvrir une nouvelle fenêtre, qui est connectée à une autre source vidéo, à coté de la fenêtre principale affichant la source vidéo originale.
6. Input Select (Sélection Entrée) Sélectionnez la source d'entrée : • HDMI, DisplayPort et Mini DisplayPort. (sur XG32VQ) • HDMI-1 (v2.0), HDMI-2 (v2.0) et DisplayPort. (for XG32VQR) • DisplayPort, HDMI-1 (v2.0) et HDMI-2.
7. System Setup (Configuration Système) Pour ajuster la configuration du système.
8. • USB Hub: Activer/désactiver la fonction Concentrateur USB pendant le mode veille. • Configuration OSD : Pour ajuster le Délai OSD, DDC/CI, et la Transparence de l'écran OSD. • Langue : Pour choisir la langue du menu OSD. Les sélections possibles sont : Anglais, Français, Allemand, Espagnol, Italien, Hollandais, Russe, Polonais, Tchèque, Croate, Hongrois, Roumain, Portugais, Turc, Chinois simplifié, Chinois traditionnel, Japonais, Coréen, Perse, Thaï et Indonésien.
3.2 Aura AURA est un programme logiciel qui contrôle les LED de couleur sur les appareils pris en charge, tels que des moniteurs, des cartes mères, des cartes graphiques, des PC de bureau, etc. Aura vous permet d'ajuster la couleur des LED RVB sur ces appareils et de sélectionner différents effets lumineux. Vous pouvez également corriger ou ajuster la couleur des LED en les étalonnant. Pour activer Aura : 1. Activez la fonction Aura Sync dans le menu OSD. 2. Raccordez le port USB 3.
4 Cliquez pour annuler les modifications. 5 Cliquez pour appliquer les modifications. Si la connexion USB amont entre le moniteur et l'ordinateur est désactivée, pour rétablir la fonction Aura, vous devez reconnecter le port USB 3.0 amont du moniteur à l'ordinateur puis redémarrer l'ordinateur.
3.3 Spécifications Modèle Taille du panneau Résolution max. 2560x1440 Luminosité (Typ.) 300cd/m2 Rapport de contraste intrinsèque (Typ.) 3000:1 Angle de vue (CR>10) 178°(H) /178°(V) Couleurs de l’écran 16,7 M Temps de réponse 4 ms (G à G) Son de HDMI Oui Entrée HDMI HDMI2.0 x 1 Entrée DisplayPort Oui Mini DP1.2 Oui Port USB3.
Modèle Taille du panneau XG32VQR 31,5”W (80,1 cm) Résolution max. 2560x1440 Luminosité (Typ.) 450cd/m2 Rapport de contraste intrinsèque (Typ.) 3000:1 Angle de vue (CR>10) 178°(H) /178°(V) Couleurs de l’écran ≥16,7 M Temps de réponse 4 ms (G à G) Son de HDMI Oui Entrée HDMI HDMI2.0 x 2 Entrée DisplayPort Port USB3.
Modèle Taille du panneau 35”W (88,9 cm) Résolution max. 3440x1440 Luminosité (Typ.) 300cd/m2 Rapport de contraste intrinsèque (Typ.) 2500:1 Angle de vue (CR>10) 178°(H) /178°(V) Couleurs de l’écran 16,7 M Temps de réponse 4 ms (G à G ), 1 ms (MPRT) Son de HDMI Oui Entrée HDMI HDMI1.4 x 1, HDMI2.0 x 1 Entrée DisplayPort Port USB3.
3.4 Guide de dépannage (FAQ) Problème Solution possible Le voyant DEL d’alimentation n’est pas MARCHE • Appuyez sur le bouton pour vérifier si le moniteur est en mode ALLUMÉ. • Vérifiez si le cordon d’alimentation est correctement branché sur le moniteur et sur la prise de courant. • Vérifiez la fonction Indicateur d’alimentation dans le menu principal OSD. Sélectionnez "Marche" pour activer le voyant DEL.
3.5 Fréquences supportées Fréquences primaires de PC supportées XG32VQ Liste des synchronisations HDMI2.0 DisplayPort 1.
XG32VQR Liste des synchronisations HDMI2.0 DisplayPort 1.
XG35VQ Liste des synchronisations HDMI1.4 HDMI2.0 DisplayPort 1.
Synchronisation vidéo XG32VQ Liste des synchronisations HDMI2.0 DisplayPort 1.
XG35VQ Liste des synchronisations HDMI1.4 HDMI2.0 DisplayPort 1.