First Edition April 2021 Copyright © 2021 ASUSTeK COMPUTER INC. All Rights Reserved. No part of this manual, including the products and software described in it, may be reproduced, transmitted, transcribed, stored in a retrieval system, or translated into any language in any form or by any means, except documentation kept by the purchaser for backup purposes, without the express written permission of ASUSTeK COMPUTER INC. (“ASUS”).
Table of Contents Notices................................................................iv Safety information.............................................v Care & Cleaning.............................................. viii 1.1 Welcome!................................................. 1-1 1.2 Package Contents............................... 1-1 1.3 Assembling the Monitor..................... 1-2 1.4 Connect Cables..................................... 1-4 1.4.1 Rear of the LCD Monitor........................
Notices Federal Communications Commission Statement This device complies with Part 15 of the FCC Rules. Operation is subject to the following two conditions: • This device may not cause harmful interference. • This device must accept any interference received including interference that may cause undesired operation. This equipment has been tested and found to comply with the limits for a Class B digital device, pursuant to Part 15 of the FCC Rules.
Canadian Department of Communications Statement This digital apparatus does not exceed the Class B limits for radio noise emissions from digital apparatus set out in the Radio Interference Regulations of the Canadian Department of Communications. This class B digital apparatus complies with Canadian ICES-003. This Class B digital apparatus meets all requirements of the Canadian Interference -Causing Equipment Regulations.
• Do not overload power strips and extension cords. Overloading can result in fire or electric shock. • Avoid dust, humidity, and temperature extremes. Do not place the monitor in any area where it may become wet. Place the monitor on a stable surface. • Unplug the unit during a lightning storm or if it will not be used for a long period of time. This will protect the monitor from damage due to power surges. • Never push objects or spill liquid of any kind into the slots on the monitor cabinet.
• ALWAYS use furniture that can safely support the product. • ALWAYS ensure the product is not overhanging the edge of the supporting furniture. • ALWAYS educate children about the dangers of climbing on furniture to reach the product or its controls. • ALWAYS route cords and cables connected to your product so they cannot be tripped over, pulled or grabbed. • NEVER place a product in an unstable location.
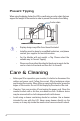
Prevent Tipping When using the display, fasten the LCD to a wall using a cord or chain that can support the weight of the monitor in order to prevent the monitor from falling. Cord or chain • Display design may differ from those illustrated. • Installing must be done by a qualified technician , and please contact your supplier for more information. • For the Models with net weight >=7kg. Please select the suitable way to Prevent Tipping.
This symbol of the crossed out wheeled bin indicates that the product (electrical, electronic equipment, and mercury-containing button cell battery) should not be placed in municipal waste. Please check local regulations for disposal of electronic products. AEEE yönetmeliğine uygundur The following symptoms are normal with the monitor: • The screen may flicker during the initial use due to the nature of the fluorescent light.
Where to find more information Refer to the following sources for additional information and for product and software updates. x 1. ASUS websites The ASUS websites worldwide provide updated information on ASUS hardware and software products. Refer to http://www.asus.com 2. Optional documentation Your product package may include optional documentation that may have been added by your dealer. These documents are not part of the standard package.
1.1 Welcome! Thank you for purchasing the ASUS® LCD monitor! The latest widescreen LCD monitor from ASUS provides a crisper, broader, and brighter display, plus a host of features that enhance your viewing experience. With these features, you can enjoy the convenience and delightful visual experience that the monitor brings to you! 1.
1.3 Assembling the Monitor To assemble the monitor: •• 1. While assembling the monitor arm/base, we recommend that you keep the monitor inside its EPS (Expanded Polystyrene) packaging. Take out all accessory from the upside EPS. 1 2. 3. Take out upside EPS from carton box. Push open stand assembly hole. 3 4. 5. 1-2 2 Align the screw holes on the monitor with the bundled screws on the arm. Install the arm to the monitor and fix by fastening the four (4) bundled screws.
6. Cover the VESA cover. or 6 5 4 7. 8. Align and install the base to the arm. Fix the base to the arm by fastening the two (2) bundled screws. 8 7 9. Remove the monitor from its EPS packaging. •• •• Please do not hold the panel, we recommend hold the monitor stand to pick up monitor. Base screw size is M6 x 15 mm. Adjust the monitor to the angle that is most comfortable for you.
1.4 Connect Cables 1.4.1 Rear of the LCD Monitor 1 HDMI 2 1-4 3 USB-C/ 4 5 6 7 8 7 1. Kensington Lock 5. USB C/DP Port (PD 5V/3A or 9V/2A) 2. DC-IN Port 6. USB3.0 Upstream Port 3. HDMI Port 7. USB3.0 Downstream Ports (x2) 4. DisplayPort 8.
1.5 Monitor Introduction 1.5.1 Using the Control Buttons Use control buttons on the bottom of the monitor to adjust the monitor settings. •• Press the Input Select menu. button or the button to call out the quick OSD Input Select Menu Close GamePlus GameVisual Volume Power Off 1. Power Indicator: • The color definition of the power indicator is as the table below. Status 2. Description White ON Amber Standby mode OFF OFF Power Button: • 3. Press this button to turn the monitor on/off.
• GamePlus Button: This is a shortcut key. The default setting is GamePlus. - Activate Crosshair, Timer, FPS Counter, or Display Alignment function. - Move the button up/down to select and press the function needed. •• • to confirm For more information on GamePlus function, refer to page 1-7. GameVisual Button: This is a shortcut key. The default setting is GameVisual.
1.5.2 GamePlus Function The GamePlus function provides a toolkit and creates a better gaming environment for users when playing different types of games. The crosshair overlay with four different crosshair options lets you choose the one that best suits the game you are playing. There is also an onscreen timer you can position on the left of the display so you can keep track of the elapsed gaming time; while the FPS (frames per second) counter lets you know how smooth the game is running.
GamePlus — FPS Counter GamePlus FPS NEXT BACK/EXIT GamePlus 1.5.3 GameVisual Function The GameVisual function helps you select among different picture modes in a convenient way. To active GameVisual: Press the GameVisual hotkey repeatedly to select. • Scenery Mode: This is the best choice for scenery photo displaying with GameVisualTM Video intelligence Technology. 1-8 • Racing Mode: This is the best choice for racing game playing with GameVisualTM Video intelligence Technology.
• MOBA Mode: This is the best choice for Multiplayer Online Battle Arena (MOBA) games playing with GameVisualTM Video intelligence Technology. • User Mode: More items are adjustable in the Color menu. •• •• •• In the Racing Mode, the Saturation, Sharpness, and ASCR functions are not user-configurable. In the sRGB, the Saturation, Color Temp., Sharpness, Brightness, Contrast, and ASCR functions are not user-configurable. In the MOBA Mode, the Saturation and ASCR functions are not userconfigurable.
2.1 Detaching the Stand (for VESA Wall Mount) •• Avoid damaging the monitor surface. While detaching the monitor stand, always keep the monitor inside its EPS packaging. The detachable stand of this monitor is specially designed for VESA wall mount. 1. Disconnect power and signal cables. Carefully put the monitor facedown on its EPS packaging. 2. Remove the covers on where the monitor and the arm meet. 3. Loosen the four (4) bundled screws securing the arm to the rear of the monitor. 4.
or •• •• 2-2 The VESA wall mount kit (100 x 100 mm) is purchased separately. Use only the UL Listed Wall Mount Bracket with minimum weight/load 22.7kg (screw size is M4 x 10 mm).
2.2 Adjusting the Monitor • For optimal viewing, we recommend that you look at the full face of the monitor, then adjust the monitor to the angle that is most comfortable for you. • Hold the stand to prevent the monitor from falling when you change its angle. • You can adjust the monitor's angle from -5° to 20° and it allows 25° swivel adjustment from either left or right. You can also adjust the monitor's height within ± 10 cm.
3.1 OSD (On-Screen Display) Menu 3.1.1 How to Reconfigure HDMI 3440x1440@ 100Hz Racing Mode Aura Off ROG Strix XG349C HDR OFF Gaming Overclocking Image Variable OD Color Variable Refresh Rate Input Select ELMB/ELMB SYNC PIP/PBP Setup GamePlus Lighting Effect GameVisual MyFavorite Shadow Boost System Setup MOVE/ENTER BACK EXIT 1. Press the menu. button or Input Select button to display the quick OSD 2. Press the button to activate the OSD menu. 3.
3.1.2 OSD Function Introduction 1. Gaming Configure your gaming preferences. HDMI 3440x1440@ 100Hz Racing Mode Aura Off ROG Strix XG349C HDR OFF Gaming Overclocking Image Variable OD Color Variable Refresh Rate Input Select ELMB/ELMB SYNC PIP/PBP Setup GamePlus Lighting Effect GameVisual MyFavorite Shadow Boost System Setup MOVE/ENTER • EXIT Overclocking: Allows to adjust the refresh rate. •• Overclocking is available only if the input source is DisplayPort.
•• •• •• • • • To activate ELMB, turn off Variable Refresh Rate function first. If ELMB is enabled, the Adaptive-Sync, PIP/PBP Mode, Dynamic Dimming, and ASCR functions will be disabled. ELMB is disabled if input V frequency is less than 75Hz. GamePlus: Configures the gaming environment. For more information, refer to pages 1-7 and 1-8. GameVisual: Selects the picture mode. For more information, refer to pages 1-8 and 1-9.
• Dynamic Dimming: Synchronizes with contents while contrast changing to execute backlight dynamic dimming. • ASCR: Select ON or OFF to enable or disable dynamic contrast ratio function. •• • Aspect Control: Adjusts the aspect ratio to Full, 4:3, 16:9 (24"W), and 16:9 (27"W). •• • ASCR is not available if the Dynamic Dimming function is enabled. Select 4:3 to display the picture according to the original aspect ratio of the input source.
3. Color Select the image color you like from this menu. HDMI 3440x1440@ 100Hz Racing Mode Aura Off ROG Strix XG349C HDR OFF Gaming Color Temp. Image Gamma Color Saturation Input Select PIP/PBP Setup Lighting Effect MyFavorite System Setup BACK MOVE/ENTER • EXIT Color Temp.: Selects the desired color temperature. Available options: Cool, Normal, Warm, and User Mode. •• In the User Mode, colors of R (Red), G (Green), and B (Blue) are user-configurable; the adjusting range is from 0 to 100.
5. PIP/PBP Setup Configure the multi-picture related settings. HDMI 3440x1440@ 100Hz Racing Mode Aura Off ROG Strix XG349C HDR OFF Gaming PIP/PBP Mode Image PIP/PBP Source Color Color Setting Input Select PIP Size PIP/PBP Setup Lighting Effect MyFavorite System Setup BACK MOVE/ENTER EXIT • PIP/PBP Mode: Select your preferred PIP/PBP mode or disable the function. • PIP/PBP Source: Selects the video input source among, HDMI, DisplayPort, and Type-C.
• Aura Sync: Allows you to turn on or off the Aura Sync function that synchronizes the Aura RGB light effect among all supported devices. • Aura RGB: Sets the Aura RGB light pattern on the rear of the monitor. Available options: Color Cycle, Static, Breathing, Strobing, and OFF. •• •• •• For Aura RGB patterns, such as Static, Breathing, and Strobing you can set your preferred color. The color options include red (R), green (G), blue (B), cyan (C), magenta (M), and yellow (Y).
8. System Setup Adjust the system configuration.
• USB Setup: • KVM: Switches USB downstream port to USB-C or USB-B upstream port. • Type-C Bandwidth: Select USB Type-C with USB 2.0 or USB 3.1. USB 3.1 is up to 3440x1440-60Hz. • USB Hub: Sets the USB Hub operation to On During Standby (USB Type A ports on the LCD monitor can be used for charging a USB device during standby) or Off During Standby (USB Type A ports cannot be used for charging a USB device during standby).
3.2 Aura Armoury Crate is a software program that controls the colorful LEDs on supported devices, such as monitors, motherboards, graphic cards, desktop PCs, etc. Aura allows you to adjust the color of the RGB LEDs on these devices and select different light effects. You can also correct or adjust the color of the LEDs by calibrating them. To activate Aura: 1. Turn ON the Aura Sync function in the OSD menu. 2. Connect the USB 3.0 upstream port of the monitor to the USB port of your computer. 3.
3.3 Specifications Model XG349C Panel Size 34.14'' W (86.72cm) Max. Resolution 3440x1440 Brightness (Typ.) 400 nits (typical) Contrast Ratio (Typ.) 1000:1 Viewing Angle (CR≤10) 178°(H)/178°(V) Display Colors Response Time 1.07B 1ms (G to G) Sound from HDMI Yes HDMI Input Yes DisplayPort Input Yes PIP/PBP Yes USB3.
3.4 Troubleshooting (FAQ) Problem Power LED is not ON Possible Solution • Press the button to check if the monitor is turned on. • Check if the adapter and power cord are properly connected to the monitor and the power outlet. • Check the Power Indicator function in the OSD menu. Select “ON“ to turn on the power LED. The power LED lights white and there is no screen image • Check if the monitor and the computer are turned on.
3.5 Supported Timing List PC Supported Primary Timing Resolution 640x480-60Hz H Freq V Freq (KHz) (Hz) 31.46 DCLK (MHz) HDMI DP/ Type-C 59.94 25.17 V V 640x480-67Hz 35 67 30.24 V V 640x480-72Hz 37.86 72.80 31.5 V V 640x480-75Hz 37.5 75 31.5 V V 720x400-70Hz 31.46 70.16 28.35 V V 800x600-56Hz 35.15 56.25 36 V V 800x600-60Hz 37.87 60.31 40 V V 800x600-72Hz 48.07 72.18 50 V V 800x600-75Hz 46.87 75 49.5 V V 1024x768-60Hz 48.
CEA Timing Resolution H Freq (KHz) V Freq (Hz) DCLK (MHz) HDMI DP/ Type-C 640x480p-60 Hz 31.46 59.94 25.17 V V 720x480p-60 Hz 31.46 59.94 27 V V 720x480p-60 Hz 31.46 59.94 27 V V 1280x720p-60 Hz 45 60 74.25 V V 1920x1080i-60 Hz 33.75 60 74.25 V V 1440x480p-60 Hz 31.46 59.94 54 N/A V 1440x480p-60 Hz 31.46 59.94 54 N/A V 1920x1080p-60 Hz 67.5 60 148.5 V V 720x576p-50 Hz 31.25 50 27 V N/A 1280x720p-50 Hz 37.5 50 74.25 V V 1920x1080i-50 Hz 28.