Cuprins Note .......................................................................................................... iii Informaţii referitoare la siguranţă.............................................................. iv Îngrijire şi curăţare...................................................................................... vi 1.1 Bine aţi venit.................................................................................. 1-1 1.2 Conţinut pachet...............................................
Note Declaraţie a Comisiei federale pentru comunicaţii Acest dispozitiv respectă Secţiunea 15 a Regulilor FCC. Funcţionarea trebuie să îndeplinească următoarele două condiţii: • Acest dispozitiv nu poate cauza interferenţe nocive. • Acest dispozitiv trebuie să accepte orice interferenţe primite, inclusiv interferenţele care pot provoca o funcţionare nedorită.
Acest aparat digital de clasă B îndeplineşte toate cerinţele Regulamentului canadian privind echipamentele generatoare de interferenţe. Cet appareil numérique de la classe B respecte toutes les exigences du Réglement sur le matériel brouiller du Canada. Informaţii referitoare la siguranţă iv • Înainte de configurarea monitorului, citiţi cu atenţie toată documentaţia care însoţeşte produsul. • Pentru a preveni pericolul de incendiu sau de electrocutare, nu expuneţi monitorul la ploaie sau umiditate.
• Pentru a asigura funcţionarea satisfăcătoare, utilizaţi monitorul doar cu computere certificate UL care au prize configurate adecvat, marcate între 100 ~ 240 V c.a. • Priza va fi instalată în apropierea echipamentului şi va fi amplasată într-un loc uşor de accesat. • Dacă întâmpinaţi probleme tehnice cu monitorul, contactaţi un tehnician de service calificat. • Realizaţi o conexiune de împământare înainte de a conecta fişa de reţea la reţea.
Îngrijire şi curăţare • Înainte să ridicaţi sau să mutaţi monitorul, este bine să deconectaţi cablurile şi cablul de alimentare. Respectaţi tehnicile de ridicare corecte când poziţionaţi monitorul. Când ridicaţi sau transportaţi monitorul, ţineţi de marginile monitorului. Nu ridicaţi monitorul apucându-l de suport sau de cablu. • Curăţirea. Opriţi monitorul şi deconectaţi cablul de alimentare. Curăţaţi suprafaţa monitorului cu o cârpă fără scame, neabrazivă.
Unde găsiţi informaţii suplimentare Consultaţi următoarele surse pentru informaţii suplimentare şi pentru actualizări ale produsului şi software-ului. 1. Site-uri ASUS Site-urile ASUS internaţionale oferă informaţii actualizate despre produsele hardware şi software ASUS. Consultaţi http://www.asus.com 2. Documentaţie opţională Pachetul produsului dvs. poate include documentaţie opţională care poate fi adăugată de dealer. Aceste documente nu fac parte din pachetul standard.
1.1 Bine aţi venit Vă mulţumim pentru achiziţionarea monitorului LCD ASUS®! Cel mai nou monitor LCD cu ecran panoramic de la ASUS oferă un afişaj cu contrast mai mare, mai lat şi mai luminos, plus o mulţime de caracteristici care îmbunătăţesc experienţa de vizualizare. Cu aceste caracteristici, vă puteţi bucura de confortul şi de experienţa vizuală încântătoare pe care o oferă monitorul! 1.
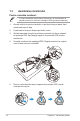
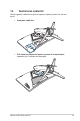
1.3 Asamblarea monitorului Pentru a asambla monitorul: • În timpul asamblării braţului/bazei monitorului, vă recomandăm să păstraţi monitorul în interiorul ambalajului EPS (polistiren expandat). 1. Aliniaţi orificiul de şurub al braţului cu şurubul inclus pe bază. Apoi introduceţi baza în braţ. 2. Fixaţi baza la braţ prin fixarea şurubului inclus. 3. Aliniaţi marcajele triunghi de pe baza monitorului şi de pe capacul de proiecţie LED. Apoi ataşaţi capacul de proiecţie LED la baza monitorului. 4.
1.4 Gestionarea cablurilor Puteţi organiza cablurile cu ajutorul capacului pentru porturi de intrare/ ieşire. • Aranjarea cablurilor • Prin folosirea capacului pentru porturi de intrare/ieşire: capacele pot fi ataşate sau detaşate.
1.5 Conectaţi cablurile 1.5.1 Partea posterioară a monitorului LCD XG32VQ 8 Mini HDMI 1 1-4 2 3 DCIN 4 5 1. Port HDMI 2.0 2. DisplayPort 3. Mini DisplayPort 4. Mufă căşti 5. Port ascendent USB 6. Port descendent USB 7. Port de intrare c.c. 8.
XG32VQR 8 HDMI-2 HDMI-1 1 2 DCIN 3 4 5 1. Port HDMI 2.0 Port 2. Port HDMI 2.0 Port 3. DisplayPort 4. Mufă căşti 5. Port ascendent USB 6. Port descendent USB 7. Port de intrare c.c. 8.
XG35VQ 8 1-6 HDMI-2 HDMI-1 1 2 DCIN 3 4 5 1. Port HDMI 1.4 2. Port HDMI 2.0 Port 3. DisplayPort 4. Mufă căşti 5. Port ascendent USB 6. Port descendent USB 7. Port de intrare c.c. 8.
1.6 Introducere monitor 1.6.1 Folosirea butoanelor de comandă Puteţi folosi butonul de comandă din partea posterioară a monitorului pentru a regla setările monitorului. 6 6 5 5 4 4 3 3 2 2 1 1. Indicator alimentare: • 2. Definiţia de culoare a indicatorului de alimentare se află în tabelul de mai jos. Stare Descriere Alb PORNIT Auriu Mod aşteptare OPRIT OPRIT Butonul Alimentare: • 3. Utilizaţi acest buton pentru a porni şi opri monitorul.
• Activare Punct ochit, Temporizator sau Contor FPS sau funcţia Aliniere afişaj • Deplasaţi butonul ( ) în sus/în jos pentru a selecta şi apăsaţi ( ) pentru a confirma funcţia dorită. apăsaţi pe pentru a ieşi. • Puteţi comuta între funcţiile Punct ochit/Temporizator/Contor FPS folosind tasta cu 5 direcţii. Meniul principal GamePlus GamePlus-Punct ochit (Practice Mode) GamePlus-Temporizator GamePlus-Contor FPS GamePlus FPS NEXT 5. Butonul Close (Închidere) • 6.
2.1 Reglarea monitorului • Pentru vizualizare optimă, vă recomandăm să priviţi faţa completă a monitorului, apoi reglaţi monitorul la unghiul care este cel mai confortabil pentru dvs. • Ţineţi suportul pentru a preveni căderea monitorului în timpul modificării unghiului acestuia. • Puteţi regla unghiul monitorului de la +20˚ la -5˚ şi puteţi regla rotirea cu 50˚, de la stânga sau de la dreapta. De asemenea, puteţi regla înălţimea monitorului cu +/- 10 cm.
2.2 Detaşarea braţului/suportului (pentru montarea pe perete VESA) • Evitaţi deteriorarea suprafeţei monitorului. Când detaşaţi suportul monitorului, păstraţi întotdeauna monitorul în interiorul ambalajului EPS. Suportul detaşabil al acestui monitor este proiectat special pentru montarea pe perete VESA. Pentru a detaşa braţul/suportul 2-2 1. Deconectaţi cablurile de alimentare şi de semnal. Aşezaţi cu atenţie monitorul cu faţa în jos pe ambalajul EPS. 2.
3.1 Meniu OSD (On Screen Display - Afişare pe ecran) 3.1.1 Cum se reconfigurează DisplayPort 2560x1440@ 60Hz Mod curse Aura OFF ROG Strix XG35VQ GameVisual Mod peisaj Filtru Lumină Albastră Mod curse Culoare Mod cinema Imagine Mod RTS/RPG Setare PIP/PBP Mod FPS Input Select Mod sRGB System Setup Mod MOBA MyFavorite Mod utilizator MOVE/ENTER BACK EXIT 1. Apăsaţi pe partea centrală a butonului cu 5 direcţii pentru a afişa meniul OSD. 2.
3.1.2 1. Introducere funcţie OSD GameVisual Această funcţie conţine opt subfuncţii pe care le puteţi selecta după cum doriţi.
2. Filtru lumină albastră Reglaţi nivelul de energie al luminii albastre emise de retroiluminarea cu LED-uri. DisplayPort 2560x1440@ 60Hz Mod curse Aura OFF ROG Strix XG35VQ Nivel 0 GameVisual Filtru Lumină Albastră Nivel 1 Nivel 2 Culoare Nivel 3 Imagine Nivel 4 Setare PIP/PBP Input Select System Setup MyFavorite MOVE/ENTER BACK EXIT • Nivel 0: Nicio schimbare. • Nivel 1~4: Cu cât nivelul este mai mare, cu atât cantitatea de lumină albastră este redusă mai mult.
3. Culoare Selectaţi culoarea dorită a imaginii cu această funcţie. DisplayPort 2560x1440@ 60Hz Mod curse Aura OFF ROG Strix XG35VQ GameVisual Filtru Lumină Albastră Strălucire 90 Contrast 80 Saturație Culoare Culoare temperatură Imagine Gama Setare PIP/PBP Input Select System Setup MyFavorite MOVE/ENTER EXIT • Strălucire: Intervalul de reglare este de la 0 la 100. • Contrast: Intervalul de reglare este de la 0 la 100. • Saturaţie: Intervalul de reglare este de la 0 la 100.
• ASCR: Selectaţi PORNIT sau OPRIT pentru a activa sau a dezactiva funcţia raportului de contrast dinamic. Funcţia ASCR este dezactivată când funcţia ELMB este activată. • ELMB: Bifaţi pentru a reduce efectul de înceţoşare a mişcării şi pentru a minimiza efectul de remanenţă atunci când obiectele de pe ecran se mişcă rapid. Funcţia ELMB va fi dezactivată dacă se selectează sursa de intrare HDMI.
5. Setare PIP/PBP (doar pentru XG35VQ) Opţiunea Setare PIB/PBP vă permite să deschideţi o altă fereastră secundară conectată de la o altă sursă video pe lângă fereastra principală de la sursa video originală.
6. Input Select (Selectare introducere) Selectaţi sursa de intrare: • HDMI, DisplayPort şi Mini DisplayPort. (pentru XG32VQ) • HDMI-1 (v2.0), HDMI-2 (v2.0), and DisplayPort. (pentru XG32VQR) • DisplayPort, HDMI-1 (v2.0) şi HDMI-2.
7. System Setup (Configurare sistem) Reglează configuraţia sistemului.
8. • USB Hub: Activaţi/dezactivaţi funcţia Hub USB în modul standby. • Configurare OSD: Reglează parametrii Pauză OSD, DDC/CI şi Transparenţă pentru ecranul OSD. • Limbă: Selectaţi limba OSD. Opţiunile sunt: Engleză, Franceză, Germană, Spaniolă, Italiană, Olandeză, Rusă, Poloneză, Cehă, Croată, Maghiară, Română, Portugheză, Turcă, Chineză simplificată, Chineză tradiţională, Japoneză, Coreeană, Persană, Thailandeză şi Indoneziană. • Informaţii: Afişează informaţiile referitoare la monitor.
3.2 Aura AURA este un program software care controlează LED-urile colorate de pe dispozitivele acceptate, cum ar fi monitoarele, plăcile de bază, plăcile video, PC-urile desktop etc. Aura vă permite să reglaţi culoarea LED-urilor RGB pe aceste dispozitive şi să selectaţi diferite efecte de lumină. De asemenea, puteţi calibra LED-urile pentru a le corecta sau regla culoarea. Pentru a activa funcţia Aura: 1. Activaţi funcţia Aura Sync din meniul OSD. 2. Conectaţi portul USB 3.
5 Faceţi clic pentru a aplica modificările. În cazul în care conexiunea USB ascendentă dintre monitor şi computer se deconectează, pentru a relua funcţia Aura trebuie să conectaţi din nou portul USB 3.0 ascendent al monitorului la computer şi apoi să reporniţi computerul.
3.3 Specificaţii Model Dimensiune panou Rezoluţie max. 2560x1440 Strălucire (Tipic) 300cd/m2 Raport de contrast intrinsec (tipic) Unghi de vizualizare (CR>10) Culori afişaj Timp de răspuns Sunet de la HDMI Intrare HDMI 3000:1 178° (H)/178° (V) 16,7 M 4 ms (G la G) Da HDMI2.0x1 Intrare DisplayPort Da Mini DP1.2 Da Port USB3.
Model Dimensiune panou XG32VQR 31,5”L (80,1 cm) Rezoluţie max. 2560x1440 Strălucire (Tipic) 450cd/m2 Raport de contrast intrinsec (tipic) Unghi de vizualizare (CR>10) Culori afişaj 3000:1 178° (H)/178° (V) ≥16,7 M Timp de răspuns 4 ms (G la G) Sunet de la HDMI Da Intrare HDMI Intrare DisplayPort Port USB3.0 Căşti Consum de energie în funcţionare Culori carcasă Mod de economisire a energiei Mod alimentare oprită Înclinare HDMI2.
Model Dimensiune panou 35”L (88,9 cm) Rezoluţie max. 3440x1440 Strălucire (Tipic) 300cd/m2 Raport de contrast intrinsec (tipic) Unghi de vizualizare (CR>10) Culori afişaj 2500:1 178° (H)/178° (V) 16,7 M Timp de răspuns 4 ms (G la G), 1 ms (MPRT) Sunet de la HDMI Da Intrare HDMI Intrare DisplayPort Port USB3.0 Căşti Consum de energie în funcţionare Culori carcasă Mod de economisire a energiei Mod alimentare oprită Înclinare HDMI1.4x1, HDMI2.
3.4 Depanare (FAQ) Problemă LED-ul de alimentare nu este PORNIT Soluţie posibilă • Apăsaţi butonul pentru a verifica dacă monitorul este în modul PORNIT. • Verificaţi conectarea corectă a cablului de alimentare la monitor şi la priza electrică. • Consultaţi starea pentru funcţia Indicator alimentare din OSD-ul meniului principal. Selectaţi „PORNIT” pentru a activa LED-ul de alimentare.
3.5 Listă de frecvenţe acceptate Frecvenţă principală acceptată de PC XG32VQ 3-16 Listă de frecvenţe HDMI2.0 DisplayPort 1.
XG32VQR Listă de frecvenţe HDMI2.0 DisplayPort 1.
XG35VQ Listă de frecvenţe HDMI1.4 HDMI2.0 DisplayPort 1.
Frecvenţă video XG32VQ Listă de frecvenţe HDMI2.0 DisplayPort 1.2 Mini DP 640x480 la 59.94 Hz V V V 640x480 la 60 Hz V V V 720x480P la 59.94 Hz V V V 720x480P la 60 Hz V V V 720x576P la 50 Hz V V V 1280x720P la 50 Hz V V V 1280x720P la 59.94 Hz V V V 1280x720P la 60 Hz V V V 1440x480P la 59.94 Hz V V V 1440x480P la 60 Hz V V V 1440x576P la 50 Hz V V V 1920x1080P la 50 Hz V V V 1920x1080P la 59.
XG35VQ Listă de frecvenţe HDMI1.4 HDMI2.0 DisplayPort 1.2 640x480 la 59.94 Hz V V V 640x480 la 60 Hz V V V 720x480P la 59.94 Hz V V V 720x480P la 60 Hz V V V 720x576P la 50 Hz V V V 1280x720P la 50 Hz V V V 1280x720P la 59.94 Hz V V V 1280x720P la 60 Hz V V V 1440x480P la 59.94 Hz V V V 1440x480P la 60 Hz V V V 1440x576P la 50 Hz V V V 1920x1080P la 50 Hz V V V 1920x1080P la 59.