Obsah Upozornenia................................................................................................. iii Bezpečnostné informácie........................................................................... iv Starostlivosť a čistenie............................................................................... vi 1.1 Vitajte............................................................................................. 1-1 1.2 Obsah balenia.......................................................
Upozornenia Vyhlásenie Amerického federálneho výboru pre telekomunikácie (FCC) Toto zariadenie vyhovuje časti 15 pravidiel FCC. Prevádzka je podmienená nasledovnými dvoma podmienkami: • Toto zariadenie nesmie spôsobovať škodlivé rušenie. • Toto zariadenie musí prijať akékoľvek rušenie, vrátane rušenia, ktoré môže spôsobovať nežiaducu prevádzku. Toto zariadenie bolo preskúšané a bolo zistené, že je v zhode s limitnými hodnotami pre digitálne zariadenia triedy B, a to v súlade s časťou 15 Pravidiel FCC.
Digitálny prístroj triedy B spĺňa všetky požiadavky kanadských nariadení o zariadeniach spôsobujúcich rušenie. Cet appareil numérique de la classe B respecte toutes les exigences du Réglement sur le matériel brouiller du Canada. Bezpečnostné informácie iv • Pred vykonaním nastavenia monitora si dôkladne prečítajte dokumentáciu, ktorú nájdete v balení. • Aby ste zabránili vzniku požiaru alebo zasiahnutiu elektrickým prúdom, nikdy nevystavujte monitor účinkom dažďa alebo vlhkosti.
• Aby ste zabezpečili uspokojujúcu činnosť, monitor používajte iba v spojení s počítačmi uvedenými v zozname UL, a to takými, ktoré majú vhodne nakonfigurované zástrčky označené 100 - 240 V AC. • Zásuvka musí byť nainštalovaná v blízkosti zariadenia a musí byť ľahko dostupná. • Ak sa na monitore vyskytnú technické problémy, kontaktujte kvalifikovaného servisného technika. • Pred pripojením elektrickej zástrčky do elektrickej siete je nutné zriadiť uzemňovacie pripojenie.
Starostlivosť a čistenie • Pred zdvíhaním alebo premiestňovaním monitora je lepšie, ak odpojíte káble a sieťový kábel. Pri umiestňovaní monitora používajte správne techniky dvíhania. Pri dvíhaní alebo prenášaní monitora uchopte monitor za jeho okraje. Displej nezdvíhajte držiac ho za stojan alebo kábel. • Čistenie. Monitor vypnite a odpojte sieťový kábel. Povrch monitora vyčistite tkaninou nepúšťajúcou vlákna, ktorá nemá abrazívne účinky.
Kde môžete nájsť viac informácií Ďalšie informácie o výrobku a aktualizáciách softvéru nájdete v nasledovných zdrojoch. 1. Webové lokality ASUS Webové lokality spoločnosti ASUS poskytujú aktualizované informácie o hardvérových a softvérových výrobkoch spoločnosti ASUS. Pozrite si stránku http://www.asus.com 2. Doplňujúca dokumentácia Balenie vášho výrobku môže obsahovať doplňujúcu dokumentáciu, ktorú do balenia pridal váš predajca. Tieto dokumenty nepredstavujú súčasť štandardného balenia.
1.1 Vitajte Ďakujeme, že ste si zakúpili LCD monitor značky ASUS®! Najnovší širokouhlý LCD monitor od spoločnosti ASUS ponúka ostrejšie, širšie a jasnejšie zobrazenie vrátane základných funkcií ktoré vylepšujú váš zážitok z pozerania. Pomocou týchto funkcií sa dokážete potešiť z pohodlia a z vynikajúceho vizuálneho zážitku, ktorý vám tento monitor prináša. 1.
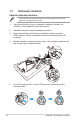
1.3 Zostavenie monitora Spôsob zostavenia monitora: • Počas zostavovania základne/ramena monitora odporúčame monitor ponechať v polystyrénovom obale. 1. Zarovnajte skrutkový otvor na ramene s dodanou skrutkou na základni. Potom základňu vložte do ramena. 2. Základňu upevnite k ramenu dodanou skrutkou. 3. Zarovnajte značky trojuholníka na základni monitora s krytom LED projekcie. Potom na základňu monitora namontujte kryt LED projekcie. 4. Monitor vyberte z polystyrénového obalu.
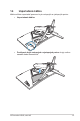
1.4 Usporiadanie káblov Káble môžete usporiadať pomocou krytu vstupných a výstupných portov. • Usporiadanie káblov • Používanie krytu vstupných a výstupných portov: kryty možno nasadiť alebo demontovať.
1.5 Pripojenie káblov 1.5.1 Zadná strana LCD monitora XG32VQ 8 Mini HDMI 1 1-4 2 3 DCIN 4 5 6 7 1. Port HDMI 2.0 2. Port displeja 3. Port Mini Display 4. Konektor pre slúchadlá 5. Port USB upstream 6. Porty USB downstream 7. Vstupný port na napájanie jednosmerným prúdom 8.
XG32VQR 8 HDMI-2 HDMI-1 1 2 DCIN 3 4 5 6 7 1. Port HDMI 2.0 2. Port HDMI 2.0 3. Port displeja 4. Konektor pre slúchadlá 5. Port USB upstream 6. Porty USB downstream 7. Vstupný port na napájanie jednosmerným prúdom 8.
XG35VQ 8 1-6 HDMI-2 HDMI-1 1 2 DCIN 3 4 5 6 7 1. Port HDMI 1.4 2. Port HDMI 2.0 3. Port displeja 4. Konektor pre slúchadlá 5. Port USB upstream 6. Porty USB downstream 7. Vstupný port na napájanie jednosmerným prúdom 8.
1.6 Predstavenie monitora 1.6.1 Používanie ovládacích tlačidiel Ovládacie tlačidlá na zadnej strane monitora používajte na zmenu nastavení monitora. 6 6 5 5 4 4 3 3 2 2 1 1. 2. 3. 4. Indikátor napájania: • Zadefinovanie farby indikátora napájania zo siete je v dolu uvedenej tabuľke. • • • Stav Popis Biely ZAP. Žltý Pohotovostný režim VYP. VYP. Hlavný vypínač: Stlačte toto tlačidlo, aby ste zapli alebo vypli monitor.
• Aktivujte funkciu Crosshair (Vlasový kríž), Timer (Časovač) alebo FPS Counter (Počítadlo strelca z pohľadu prvej osoby) a funkciu Display Alignment (Zarovnanie zobrazenia). • Posúvaním tlačidla ( ) nahor/nadol zvoľte a stlačením ( ) potvrďte potrebnú funkciu. Stlačením zatvoríte ponuku. • vypnete a Crosshair (Vlasový kríž)/Timer (Časovač)/FPS Counter (Počítadlo strelca z pohľadu prvej osoby) môžete posúvať 5-smerovým tlačidlom.
2.1 Nastavenie monitora • Pre optimálne sledovanie vám odporúčame, aby ste sa pozerali na celú prednú časť monitora; následne monitor nastavte do pre vás vyhovujúcej polohy. • Počas zmeny uhla pridržiavajte stojan, aby ste zabránili pádu monitora. • Uhol monitora môžete nastaviť v rozsahu +20° až -5˚ a môžete ho natočiť o 50° doľava alebo doprava. Výšku monitora môžete nastaviť v rozsahu +/- 10 cm. -5 ~ 20 50° 50° 10cm Je bežné, pokiaľ sa monitor počas nastavenia uhla sledovania mierne trasie.
2.2 Demontáž ramena/stojana (pre prvok VESA určený na montáž na stenu) • Zabráňte poškodeniu povrchu monitora. Počas odpájania stojana monitora vždy ponechajte monitor v polystyrénovom obale. Odpojiteľný stojan tohto monitora je špeciálne navrhnutý pre montážnu zostavu VESA na namontovanie na stenu. Odpojenie ramena/stojana 2-2 1. Odpojte sieťový a signálne káble. Opatrne položte monitor prednou stranou na polystyrénový obal. 2. Snímte kryty na mieste, kde sa stretáva monitor s ramenom. 3.
3.1 Ponuka OSD (zobrazenie na obrazovke) 3.1.1 Ako vykonať opätovnú konfiguráciu DisplayPort 2560x1440@ 60Hz Racing Mode Aura OFF ROG Strix XG35VQ GameVisual Scenery Mode Blue Light Filter Racing Mode Color Cinema Mode Image RTS/RPG Mode PIP/PBP Setting FPS Mode Input Select sRGB Mode System Setup MOBA Mode MyFavorite User Mode MOVE/ENTER BACK EXIT 1. Stlačením stredového 5-smerového tlačidla zobrazíte ponuku OSD. 2.
3.1.2 1. Predstavenie funkcií OSD GameVisual Táto funkcia obsahuje osem podriadených funkcií, ktoré si môžete zvoliť na základe vlastných preferencií.
2. Blue Light Filter (Filter modrého svetla) Nastavte energetickú úroveň modrého svetla, ktoré je vyžarované z LED podsvietenia. DisplayPort 2560x1440@ 60Hz Racing Mode Aura OFF ROG Strix XG35VQ Level 0 GameVisual Level 1 Blue Light Filter Level 2 Color Level 3 Image Level 4 PIP/PBP Setting Input Select System Setup MyFavorite MOVE/ENTER BACK EXIT • Level 0 (Úroveň 0): Bez zmeny: • Level 1~4 (Úroveň 1 až 4): Čím je úroveň vyššia, tým viac bude modré svetlo znížené.
3. Color (Farba) Pomocou tejto funkcie si zvoľte farbu obrazu, ktorá vám vyhovuje. DisplayPort 2560x1440@ 60Hz Racing Mode Aura OFF ROG Strix XG35VQ GameVisual Blue Light Filter Brightness 90 Contrast 80 Saturation Color Color Temp. Image Gamma PIP/PBP Setting Input Select System Setup MyFavorite MOVE/ENTER EXIT • Brightness (Jas): Rozsah nastavenia je od 0 do 100. • Contrast (Kontrast): Rozsah nastavenia je od 0 do 100. • Saturation (Sýtosť): Rozsah nastavenia je od 0 do 100.
• Aspect Control (Nastavenie pomeru strán): Nastavuje pomer strán obrazu na „Full“ (Celá obrazovka), „4:3“ a „16:9“ (len pre XG35VQ). • ASCR: Zvoľte ON (Zap.) alebo OFF (Vyp.) na zapnutie alebo vypnutie funkcie dynamického kontrastného pomeru; funkcia ASCR je vypnutá pri zapnutí ELMB. • ELMB: Začiarknite na zníženie rozmazania pohybu a minimalizovanie tieňov (duchov) pri rýchlom pohybe objektov na obrazovke. Ak zvolíte vstup HDMI, funkcia ELMB bude vypnutá.
5. PIP/PBP Setting (Nastavenie funkcie PIP/PBP) (len pre XG35VQ) PIP/PBP Setting (Nastavenie PIP/PBP) vám umožňuje otvoriť ďalšie podriadené okno prepojené s ďalším zdrojom obrazu vedľa hlavného okna pôvodného zdroja obrazu.
6. Input Select (Voľba vstupu) Zvoľte vstupný zdroj: • HDMI, DisplayPort a Mini DisplayPort. (pre XG32VQ) • HDMI-1 (v2.0), HDMI-2 (v2.0) a DisplayPort. (pre XG32VQR) • DisplayPort, HDMI-1 (v2.0) a HDMI-2.
7. System Setup (Nastavenie systému) Slúži na úpravu konfigurácie systému.
8. • USB Hub: Počas pohotovostného režimu zapnite/vypnite funkciu USB rozbočovača. • OSD Setup (Nastavenie OSD): Slúži na nastavenie funkcie OSD Timeout (Vypnutie OSD), DDC/CI a Transparency (Priehľadnosť) pre obrazovku OSD. • Language (Jazyk): Slúži na voľbu jazyka OSD.
3.2 Aura AURA je softvérový program, ktorý ovláda farebné LED na podporovaných zariadeniach, ako sú monitory, základné dosky, grafické karty, stolové PC atď. Program Aura vám umožňuje upraviť farbu RGB LED týchto zariadení a vybrať rôzne svetelné efekty. Môžete taktiež opraviť alebo upraviť farbu LED ich kalibrovaním. Aktivovanie programu Aura: 1. V ponuke OSD zapnite funkciu Aura Sync. 2. Prepojte port USB 3.0 upstream na monitore s USB portom na počítači. 3.
4 Kliknutím vrátite vykonané zmeny. 5 Kliknutím aplikujete zmeny. Ak dôjde k odpojeniu USB upstream prepojenia medzi monitorom a počítačom, na obnovenie funkcie Aura budete musieť znova pripojiť port USB 3.0 upstream monitora a reštartovať počítač.
3.3 Technické špecifikácie Model Veľkosť panela Maximálne rozlíšenie 2560x1440 Jas (typ.) 300 cd/m2 Kontrastný pomer Intrisinc (typ.) Pozorovací uhol (CR>10) 3000:1 178° (H); 178° (V) Farby displeja 16,7 M Doba odozvy 4 ms (G - G ) Zvuk z HDMI Áno Vstup HDMI HDMI2.0x1 Vstup port displeja Mini DP1.2 Port USB 3.
Model Veľkosť panela XG32VQR 31,5” širokouhlý (80,1 cm) Maximálne rozlíšenie 2560x1440 Jas (typ.) 450 cd/m2 Kontrastný pomer Intrisinc (typ.) Pozorovací uhol (CR>10) 3000:1 178° (H); 178° (V) Farby displeja ≥16,7 M Doba odozvy 4 ms (G - G ) Zvuk z HDMI Áno Vstup HDMI HDMI2.0x2 Vstup port displeja Áno Mini DP1.2 Áno Port USB 3.
Model Veľkosť panela 35” širokouhlý (88,9 cm) Maximálne rozlíšenie 3440x1440 Jas (typ.) 300 cd/m2 Kontrastný pomer Intrisinc (typ.) Pozorovací uhol (CR>10) 2500:1 178° (H); 178° (V) Farby displeja 16,7 M Doba odozvy 4 ms (G - G ), 1 ms (MPRT) Zvuk z HDMI Áno Vstup HDMI HDMI1.4x1, HDMI2.0x1 Vstup port displeja Port USB 3.
3.4 Riešenie problémov (Často kladené otázky) Problém LED indikátor napájania nesvieti Možné riešenie • Stlačte tlačidlo a skontrolujte, či je monitor v režime zapnutia. • Skontrolujte, či je sieťový kábel správne pripojený k monitoru a k sieťovej zásuvke. • V hlavnej ponuke OSD si pozrite funkciu Indikátor napájania. Voľbou „ON“ (Zap.) zapnete LED indikátor napájania. LED indikátor napájania svieti na • Skontrolujte, či je monitor a počítač v režime žlto a obrazovka je bez obrazu zapnutia.
3.5 Zoznam podporovaných synchronizácií Primárna synchronizácia podporovaná PC XG32VQ 3-16 Zoznam časovania HDMI2.0 DisplayPort 1.
XG32VQR Zoznam časovania HDMI2.0 DisplayPort 1.
XG35VQ 3-18 Zoznam časovania HDMI1.4 HDMI2.0 DisplayPort 1.
Synchronizácia obrazu XG32VQ Zoznam časovania HDMI2.0 DisplayPort 1.
XG35VQ Zoznam časovania HDMI1.4 HDMI2.0 DisplayPort 1.