Innehållsförteckning Meddelanden................................................................................................ iii Säkerhetsinformation.................................................................................. iv Underhåll och rengöring............................................................................. vi 1.1 Välkommen.................................................................................... 1-1 1.2 Förpackningens innehåll.....................................
Meddelanden Meddelande från Federal Communications Commission Denna enhet uppfyller del 15 av FCC-reglerna. Användning får ske under följande två villkor: • Enheten får inte orsaka skadliga störingar. • Denna enhet måste acceptera alla mottagna störningar, inklusive störningar som kan orsaka oönskade funktioner. Denna utrustning har testats och befunnits överensstämma med gränserna för en digital enhet av Klass B, enligt del 15 av FCC-reglerna.
Cet appareil numérique de la classe B respecte toutes les exigences du Réglement sur le matériel brouiller du Canada. Säkerhetsinformation iv • Innan bildskärmen installeras läs noga igenom all dokumentation som medföljde förpackningen. • Förebygg brand eller elstötar genom att inte utsätta bildskärmen för regn eller väta. • Försök inte att öppna bildskärmshöljet. De farliga spänningarna inuti bildskärmen kan orsaka allvarliga personskador.
• Se till att ha en jordanslutning innan stickkontakten ansluts till elnätet. Och när du kopplar bort jordanslutning, se till att koppla bort efter att du drar ut stickkontakten ur vägguttaget. • Använd ADP-90YD B of DELTA-adapter. VARNING! Användning av andra hörlurar än vad som anges kan leda till hörselskador på grund av för högt ljudtryck.
Underhåll och rengöring • Innan du lyfter eller flyttar på bildskärmen är ddet bäst att först koppla ifrån kablar och nätsladd. Använd korrekt lyftteknik vid placering av bildskärmen. När du lyfter eller bör bildskärmen, håll i dess kanter. Lyft inte bildskärmen via stativet eller kabeln. • Rengöring. Stäng av projektorn och dra ur nätsladden. Rengör bildskärmsytan med en dammfri, mjuk trasa. Svåra fläckar kan tas bort med en tygduk som är fuktad med ett milt rengöringsmedel.
Vart man hittar mer information Se följande källor för ytterligare information och för produkt- och programuppdateringar. 1. ASUS webbsidor ASUS webbsidor ger uppdaterad information över hela världen för ASUS hårdvaru- och programprodukter. Se http://www.asus.com 2. Ytterligare dokumentation Produktförpackningen kan innehålla ytterligare dokumentation som lagts till av din återförsäljare. Dessa dokument är inte en del av den vanliga förpackningen.
1.1 Välkommen Tack för att du köpt ASUS® LCD-monitor! Den senaste LCD-bredbildsskärmen från ASUS ger en tydligare, bredare och ljusstarkare bild tillsammans med en mängd egenskaper som förbättrar din betraktningsupplevelse. Med dessa egenskapper kan du njuta av bekvämligheten och den njutbara synupplevelsen som monitorn ger dig! 1.
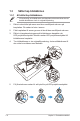
1.3 Sätta ihop bildskärmen 1.3.1 Att sätta ihop bildskärmen: • Vid montering av bildskärmens arm/basplatta rekommenderas det att behålla bildskärmen inuti sin originalförpackning. 1. Rikta in skruvhålet på armen med den medföljande skruven på basplattan. För sedan in foten i armen. 2. Fäst basplattan till armen genom att dra åt den medföljande skruven. 3. Rikta in triangelmarkeringarna på bildskärmens basplatta och LED-projektionsskyddet.
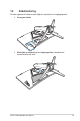
1.4 Kabelhantering Du kan organisera kablarna med hjälp av skyddet på in-/utgångsporten. • Arrangera kablar • Med hjälp av skyddet på in-/utgångsporten: skydden kan monteras eller tas bort.
1.5 Kabelanslutning 1.5.1 LCD-bildskärmens baksida XG32VQ 8 Mini HDMI 1 1-4 2 3 DCIN 4 1. HDMI 2.0-port 2. DisplayPort 3. Mini DisplayPort 4. Hörlursuttag 5. USB uppströmsuttag 6. USB nedströmsuttag 7. Likströmsingångsport 8.
XG32VQR 8 HDMI-2 HDMI-1 1 2 DCIN 3 4 1. HDMI 2.0-port 2. HDMI 2.0-port. 3. DisplayPort 4. Hörlursuttag 5. USB uppströmsuttag 6. USB nedströmsuttag 7. Likströmsingångsport 8.
XG35VQ 8 1-6 HDMI-2 HDMI-1 1 2 DCIN 3 4 1. HDMI 1.4-port 2. HDMI 2.0-port. 3. DisplayPort 4. Hörlursuttag 5. USB uppströmsuttag 6. USB nedströmsuttag 7. Likströmsingångsport 8.
1.6 Introduktion till bildskärmen 1.6.1 Använda kontrollknapparna Använd kontrollknapparna på baksidan av bildskärmen för att justera bildskärmens inställningar. 6 6 5 5 4 4 3 3 2 2 1 1. Strömindikator: • 2. Färgdefinitionerna för strömindikatorn är som följer. Status Beskrivning Vit PÅ Amber Standbyläge AV AV Strömknapp: • Tryck på den här knappen för att sätta på eller stänga av bildskärmen.
• Aktivera funktionen Crosshair (sikte), Timer eller FPS Counter (FPS-räknare) eller Display Alignment (Bildskärmsjustering) • Flytta ( ) upp/ner-knappen för att välja och tryck på ( ) för att bekräfta önskad funktion. Tryck på för att stänga av och avsluta. • Crosshair (Sikte)/Timer/FPS Counter (FPS-räknare) kan flyttas genom att trycka på 5-vägsknappen. GamePlus-huvudmenyn GamePlus-Crosshair (sikte) (Practice Mode) GamePlus-Timer GamePlus-FPS Counter (FPS-räknare) GamePlus FPS NEXT 5.
2.1 • Justera bildskärmen För optimal visning rekommenderar vi att du tittar på hela bidslkärmsytan och sedan justerar vinkeln till den vinkel du finner bekvämast. • Håll i foten för att förhindra att skärmen faller när du ändrar vinkeln. • Du kan ställa in bildskärmens vinkel från +20˚ till -5˚ och den tillåter 50˚ vridningsinställning åt antingen höger eller vänster. Du kan också justera monitorns höjd inom +/- 10cm.
2.2 Ta bort armen/stället (för VESAväggmontering) • Undvik att skada bildskärmens yta. Vid montering av bildskärmens ställ, håll alltid bildskärkmen inuti sin originalförpackning. Den avskiljbara ställningen för denna monitor är speciellt konstruerad för VESA väggmontering. Ta bort armen/stället 2-2 1. Koppla ifrån nätsladd och signalkablar. Placera försiktigt bildskärmen med skärmen vänd nedåt i sin originalförpackning. 2. Ta bort skydden där bildskärkmen och armen möts. 3.
3.1 Skärmmeny (OSD) 3.1.1 Hur man rekonfigurerar DisplayPort 2560x1440@ 60Hz Racing Mode Aura OFF ROG Strix XG35VQ GameVisual Scenery Mode Blue Light Filter Racing Mode Color Cinema Mode Image RTS/RPG Mode PIP/PBP Setting FPS Mode Input Select sRGB Mode System Setup MOBA Mode MyFavorite User Mode MOVE/ENTER BACK EXIT 1. Tryck i mitten på 5-vägsknappen för att öppna skärmmenyn. 2. Tryck på upp- och nedknapparna för att ändra alternativen i menyn.
3.1.2 1. Introduktion för funktioner i skärmmenyn GameVisual Den här funktionen har åtta underfunktioner som du kan välja mellan beroende på dina preferenser.
2. Blue Light Filter (Filter för blått ljus) Justera energinivån för blått ljus som avges från LEDbakgrundsbelysning. DisplayPort 2560x1440@ 60Hz Racing Mode Aura OFF ROG Strix XG35VQ Level 0 GameVisual Level 1 Blue Light Filter Level 2 Color Level 3 Image Level 4 PIP/PBP Setting Input Select System Setup MyFavorite MOVE/ENTER BACK EXIT • Level 0 (Nivå 0): Ingen förändring. • Level 1~4 (Nivå 1~4): Ju högre nivå desto mindre blått ljus.
3. Color (färg) Välj den bildfärg som du gillar i denna funktion. DisplayPort 2560x1440@ 60Hz Racing Mode Aura OFF ROG Strix XG35VQ GameVisual Blue Light Filter Brightness 90 Contrast 80 Saturation Color Color Temp. Image Gamma PIP/PBP Setting Input Select System Setup MyFavorite MOVE/ENTER EXIT • Brightness (ljusstyrka): Justeringsintervallet är från 0 till 100. • Contrast (kontrast): Justeringsintervallet är från 0 till 100.
• Aspect Control (bildförhållandekontroll): Justerar bildförhållandet till "Full", "4:3" och "16:9" (endast för XG35VQ). • ASCR: Välj ON (På) eller OFF (Av) för att aktivera eller inaktivera dynamiskt kontrastförhållande, ASCR är inaktiverat när ELMB är på. • ELMB: Markera för att minska rörelseoskärpa och minimera spökbilder när objekt rör sig snabbt på skärmen. ELMB inaktiveras när ingångskällan HDMI väljs.
5. PIP/PBP Setting (PIP/PBP-inställning) (endast för XG35VQ) Med PIP-/PBP-inställningarna kan du öppna ett annat underfönster anslutet till en annan videokälla än huvudfönstret för den ursprungliga videokällan.
6. Input Select (ingångsval) Välj ingångskälla: • HDMI, DisplayPort och Mini DisplayPort. (för XG32VQ) • HDMI-1 (v2.0), HDMI-2 (v2.0) och DisplayPort. (för XG32VQR) • DisplayPort, HDMI-1 (v2.0) och HDMI-2.
7. System Setup (systeminställning) Justerar systemkonfigurationen.
8. • USB Hub: Slå på/stänga av USB-hubbfunktionen i standbyläge. • OSD Setup (OSD-inställningar): Justerar OSD Timeout (tidsgräns), DDC/CI och Transparency (genomsynlighet) för OSD-skärmen. • Language (språk): Välj OSD-språk. Valen är: Engelska, franska, tyska, spanska, italienska, nederländska, ryska, Polen, Tjeckien, Kroatien, Ungern, Rumänien, Portugal, Turkiet, förenklad kinesiska, traditionell kinesiska, japanska, koreanska, persiska, thailändska, och indonesiska.
3.2 Aura AURA är en programvara som kontrollerar färgrika LED-lampor på enheter som stöds, exempelvis bildskärmar, moderkort, grafikkort, stationära datorer osv. Aura låter dig justera färgen på RGB LED-lamporna för dessa enheter, samt välja olika ljuseffekter. Du kan även korrigera eller justera färgen på LED-lampor genom att kalibrera dem. För att aktivera Aura: 1. Slå PÅ funktionen Aura Sync i skärmmenyn. 2. Anslut USB 3.0 uppströmsporten på bildskärmen till USB-porten på din dator. 3.
5 Klicka för att använda ändringarna. Om USB uppåtströmsanslutningen mellan bildskärmen och datorn kopplas från och du vill återuppta Aura-funktionen, måste du återansluta USB 3.0 uppåtströmsporten på bildskärmen till datorn och sedan starta om datorn.
3.3 Specifikationer Modell Panelstorlek Högsta upplösning 2560x1440 Ljusstyrka (typ.) 300cd/m2 Inbäddat kontrastförhållande (typ.) 3000:1 Betraktningsvinkel (CR>10) 178°(H); 178°(V) Skärmfärger Svarstid Ljud från HDMI HDMI-ingång DisplayPort-ingång Mini DP1.2 USB3.0-port Hörlurar Strömförbrukning PÅ Chassifärg Energisparläge Avstängningsläge Lutning 16,7 M 4 ms (G till G) Ja HDMI 2.
Modell Panelstorlek XG32VQR 31,5”W (80,1 cm) Högsta upplösning 2560x1440 Ljusstyrka (typ.) 450cd/m2 Inbäddat kontrastförhållande (typ.) 3000:1 Betraktningsvinkel (CR>10) 178°(H); 178°(V) Skärmfärger Svarstid Ljud från HDMI HDMI-ingång DisplayPort-ingång USB3.0-port Hörlurar Strömförbrukning PÅ Chassifärg ≥ 16,7 M 4 ms (G till G) Ja HDMI 2.
Modell Panelstorlek 35”W (88,9 cm) Högsta upplösning 3440x1440 Ljusstyrka (typ.) 300cd/m2 Inbäddat kontrastförhållande (typ.) 2500:1 Betraktningsvinkel (CR>10) 178°(H); 178°(V) Skärmfärger Svarstid Ljud från HDMI HDMI-ingång DisplayPort-ingång USB3.0-port Hörlurar Strömförbrukning PÅ Chassifärg 16,7 M 4 ms (G till G), 1 ms (MPRT) Ja HDMI 1.4x1, HDMI 2.
3.4 Felsökning (FAQ) Problem Möjlig lösning Strömindikatorn är inte PÅ • Tryck på -knappen för att kontrollera om skärmen är PÅ. • Kontrollera att strömkabeln är korrekt ansluten till skärmen och eluttaget. • Kontrollera strömindikator-funktionen i OSDhuvudmenyn. Välj "ON" (på) för att slå på strömindikatorn. Strömindikatorn lyser gult och ingen bild syns • Kontrollera att skärmen och datorn är PÅ. • Se till att signalkabeln är korrekt ansluten till skärmen och datorn.
3.5 Timinglista som stöds Datorstödd primörtid XG32VQ 3-16 Timinglista HDMI 2.0 DisplayPort 1.
XG32VQR Timinglista HDMI 2.0 DisplayPort 1.
XG35VQ 3-18 Timinglista HDMI 1.4 HDMI 2.0 DisplayPort 1.
Video Timing (Videotiming) XG32VQ Timinglista HDMI 2.0 DisplayPort 1.
XG35VQ Timinglista HDMI 1.4 HDMI 2.0 DisplayPort 1.