Υπερ-ευρεία Οθόνη Gaming
Πίνακας περιεχομένων Σημειώσεις................................................................................................... iii Πληροφορίες ασφαλείας............................................................................. iv Φροντίδα & Καθαρισμός............................................................................. vi 1.1 Καλώς ορίσατε.............................................................................. 1-1 1.2 Περιεχόμενα συσκευασίας...........................................
Σημειώσεις Επισήμανση της Ομοσπονδιακής Επιτροπής Επικοινωνιών (FCC) Η παρούσα συσκευή συμμορφώνεται με τις απαιτήσεις που ορίζονται στο Τμήμα 15 του Κανονισμού FCC. H λειτουργία υπόκειται στις ακόλουθες δύο συνθήκες: • • Η συσκευή αυτή δεν θα προκαλέσει επιβλαβείς παρεμβολές. Η συσκευή αυτή πρέπει να αποδέχεται παρεμβολές, συμπεριλαμβανομένων των παρεμβολών που μπορούν να προκαλέσουν μη επιθυμητές λειτουργίες.
Πληροφορίες ασφαλείας iv • Πριν εγκαταστήσετε την οθόνη, διαβάστε προσεκτικά όλη την τεκμηρίωση που περιλαμβάνεται στη συσκευασία. • Για να μειώσετε τον κίνδυνο πυρκαγιάς ή ηλεκτροπληξίας, μην εκθέτετε ποτέ τη συσκευή αυτή σε βροχή η υγρασία. • Μην προσπαθήσετε ποτέ να ανοίξετε το περίβλημα της οθόνης. Οι επικίνδυνα υψηλές τάσεις στο εσωτερικό της οθόνης μπορεί να οδηγήσουν σε σοβαρό σωματικό τραυματισμό. • Αν το καλώδιο παροχής ρεύματος πάθει βλάβη, μην προσπαθήσετε να το διορθώσετε μόνοι σας.
• Η έξοδος υποδοχής θα τοποθετηθεί κοντά στον εξοπλισμό και θα είναι εύκολα προσβάσιμη. • Αν αντιμετωπίσετε τεχνικά προβλήματα με την οθόνη, επικοινωνήστε με έναν κατάλληλα εκπαιδευμένο τεχνικό. • Εξασφαλίστε μια γειωμένη σύνδεση πριν η πρίζα τροφοδοσίας συνδεθεί στο ηλεκτρικό δίκτυο. Και σε περίπτωση αποσύνδεσης της γειωμένης σύνδεσης, φροντίστε πρώτα να αφαιρέσετε την πρίζα τροφοδοσίας από το ηλεκτρικό δίκτυο. • Χρησιμοποιήστε το ADP-150CH B του προσαρμογέα DELTA.
Φροντίδα & Καθαρισμός • • • Πριν ανασηκώσετε ή αλλάξετε θέση στην οθόνη σας, είναι καλύτερα να αποσυνδέσετε τα καλώδια και το καλώδιο τροφοδοσίας. Ακολουθείτε τις σωστές τεχνικές ανασήκωσης όταν τοποθετείτε την οθόνη. Όταν ανασηκώνετε ή μεταφέρετε την οθόνη, να την κρατάτε από τις άκρες της. Μην ανασηκώνετε την οθόνη από τη βάση στήριξης ή το καλώδιο. Καθαρισμός. Απενεργοποιήστε την οθόνη και αποσυνδέστε το καλώδιο τροφοδοσίας. Καθαρίστε την επιφάνεια της οθόνης με ένα απαλό πανί που δεν χαράσσει.
Πού θα βρείτε περισσότερες πληροφορίες Ανατρέξτε στις ακόλουθες πηγές για πρόσθετες πληροφορίες και για αναβαθμίσεις του προϊόντος και του λογισμικού. 1. Διαδικτυακές τοποθεσίες της ASUS Οι διαδικτυακές τοποθεσίες της ASUS παρέχουν την πιο πρόσφατη ενημέρωση για τα προϊόντα υλικού και λογισμικού της ASUS. Ανατρέξτε στη διεύθυνση http://www.asus.com 2. Προαιρετική τεκμηρίωση Η συσκευασία του προϊόντος σας μπορεί να περιλαμβάνει προαιρετικά έντυπα τα οποία ενδέχεται να έχουν προστεθεί από τον αντιπρόσωπο.
1.1 Καλώς ορίσατε Ευχαριστούμε για την αγορά της οθόνης LCD ASUS®! Η πλέον πρόσφατη οθόνη LCD της ASUS παρέχει καθαρότερη, ευρύτερη και φωτεινότερη εικόνα, συν μια σειρά δυνατοτήτων που βελτιώνουν την οπτική σας εμπειρία. Με αυτές τις δυνατότητες, μπορείτε να απολαύσετε την άνεση και την ευχάριστη οπτική εμπειρία που σας φέρνει η οθόνη! 1.
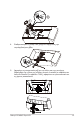
1.3 Συναρμολόγηση της οθόνης Για να συναρμολογήσετε την οθόνη: • Κατά τη συναρμολόγηση του βραχίονα/βάσης της οθόνης, συνιστούμε να κρατήσετε την οθόνη μέσα στη συσκευασία EPS (Χαρτονένιο κουτί) της. 1. Βγάλτε όλα τα εξαρτήματα από το ανάποδο EPS. 2. Βγάλτε το ανάποδο EPS από το χαρτονένιο κουτί και ύστερα πιέστε να ανοίξει η οπή συναρμολόγησης της βάσης στήριξης. 1 2 3. 1-2 Ευθυγραμμίστε την οπή της βίδας στην οθόνη με την περιλαμβανόμενη βίδα στον βραχίονα.
2 1 3 4. Σταθεροποιήστε τη βάση στον βραχίονα σφίγγοντας την περιλαμβανόμενη βίδα. 5. Αφαιρέστε τη συσκευασία μαζί με την οθόνη και, στη συνέχεια, βεβαιωθείτε ότι η βάση της οθόνης μπορεί να σταθεί με ασφάλεια σε επίπεδο δάπεδο ή επιφάνεια. Τέλος, αφαιρέστε το προστατευτικό και τη χάρτινη συσκευασία.
1.4 Σύνδεση καλωδίων 1.4.1 Πίσω πλευρά της οθόνης LCD 9 1 1-4 2 3 1. Θύρα κατωφέρειας USB3.0 2. Θύρα ανωφέρειας USB3.0 3. Θύρα κατωφέρειας USB3.0 4. Θύρα HDMI2.0 5. Θύρα HDMI2.0 6. DisplayPort 7. Υποδοχή ακουστικού 8. Θύρα DC-IN 9.
1.5 Εισαγωγή στην οθόνη 1.5.1 Χρήση των στοιχείων ελέγχου Χρησιμοποιήστε το πλήκτρο ελέγχου στη βάση της οθόνης για να προσαρμόσετε τις ρυθμίσεις της οθόνης. Input Select Menu Close GamePlus GameVisual Volume Power Off 1. Power Indicator (Ένδειξη τροφοδοσίας): • Η επεξέγηση των χρωμάτων της λυχνίας ένδειξης τροφοδοσίας είναι αυτή που αναφέρεται στον παρακάτω πίνακα. 2. Κατάσταση Περιγραφή Λευκό ΕΝΕΡΓ. Πορτοκαλί Κατάσταση αναμονής ΑΠΕΝΕΡΓ. ΑΠΕΝΕΡΓ.
• Ενεργοποιήστε τη λειτουργία Crosshair (Σταυρόνημα), Timer (Χρονόμετρο). FPS Counter (Μετρητής FPS) ή Display Alignment (Ευθυγράμμιση Οθόνης). • Μετακινήστε το πατήστε Πιέστε έξοδο. • κουμπί πάνω/κάτω για να επιλέξτε και για να επιβεβαιώστε τη χρειαζούμενη λειτουργία. για να αποχωρήσετε και να πραγματοποιήσετε Τα Crosshair (Σταυρόνημα)/Timer (Χρονόμετρο)/FPS Counter (Μετρητής FPS) είναι κινητά πατώντας το κατευθύνσεων.
2.1 Προσαρμογή της οθόνης • Για βέλτιστη θέαση, συνιστούμε να κοιτάτε σε ολόκληρη την επιφάνεια της οθόνης, στη συνέχεια ρυθμίστε την οθόνη στη γωνία που είναι η πιο άνετη για σας. • Κρατήστε τη βάση στήριξης για να αποτρέψετε τυχόν πτώση της οθόνης όταν αλλάζετε τη γωνία της. • Μπορείτε να ρυθμίσετε τη γωνία της οθόνης από -5º έως 20º και επιτρέπει την προσαρμογή της περιστροφής είτε προς τα αριστερά είτε προς τα δεξιά κατά 16°. Μπορείτε επίσης να προσαρμόσετε το ύψος της οθόνης μεταξύ +/- 12 cm.
2.
2.3 Αφαίρεση του βραχίονα/βάσης στήριξης (για επιτοίχια στήριξη τύπου VESA) • Αποφύγετε τις ζημιές στην επιφάνεια της οθόνης. Όσο αφαιρείτε τη βάση στήριξης της οθόνης, κρατήστε πάντα στην οθόνη μέσα στη συσκευασία EPS. Η αποσπώμενη βάση αυτής της οθόνης έχει σχεδιαστεί ειδικά για την επιτοίχια στήριξη VESA. Για να αφαιρέσετε το βραχίονα/βάση στήριξης 1. Αποσυνδέστε τα καλώδια τροφοδοσίας και σήματος. Τοποθετήστε προσεκτικά την οθόνη κοιτώντας προς τα κάτω στη συσκευασία EPS της. 2.
3.1 Μενού OSD (επί της οθόνης) 3.1.1 Διαμόρφωση DisplayPort 3840x1200@120Hz Racing Mode ROG Strix XG43V HDR OFF + GameVisual Scenery Mode GamePlus Racing Mode Color Cinema Mode Image RTS/RPG Mode PBP Setting FPS Mode Input Select sRGB Mode System Setup MOBA Mode MyFavorite User Mode MOVE/ENTER BACK EXIT 1. Πατήστε το κεντρικό από το κουμπί πέντε κατευθύνσεων για να εμφανίσετε το μενού OSD. 2. Πιέστε τα κουμπιά Πάνω και Κάτω για εναλλαγή μεταξύ των επιλογών του μενού.
3.1.2 1. Εισαγωγή στις λειτουργίες του μενού επί της οθόνης (OSD) GameVisual DisplayPort 3840x1200@120Hz Racing Mode ROG Strix XG43V HDR OFF + GameVisual Scenery Mode GamePlus Racing Mode Color Cinema Mode Image RTS/RPG Mode PBP Setting FPS Mode Input Select sRGB Mode System Setup MOBA Mode MyFavorite User Mode MOVE/ENTER • • • • • • • • EXIT Scenery Mode (Λειτουργία τοπίου): Αυτή είναι η καλύτερη επιλογή για προβολή φωτογραφιών τοπίου με την Τεχνολογία ευφυούς βίντεο GameVisual™.
2. GamePlus DisplayPort 3840x1200@120Hz Racing Mode ROG Strix XG43V HDR OFF + GameVisual Crosshair GamePlus Timer Color FPS Counter Image Display Alignment PBP Setting Input Select System Setup MyFavorite MOVE/ENTER BACK EXIT • Crosshair (Σταυρόνημα): Ενεργοποιήστε τη λειτουργία Crosshair (Σταυρόνημα). • Timer (Χρονόμετρο): Ενεργοποιήστε τη λειτουργία Timer (Χρονόμετρο). • FPS Counter (Μετρητής FPS): Ενεργοποιήστε τη λειτουργία FPS Counter (Μετρητής FPS).
3. Color (Χρώμα) Με αυτή τη λειτουργία επιλέγετε το χρώμα της εικόνας που προτιμάτε. DisplayPort 3840x1200@120Hz Racing Mode ROG Strix XG43V HDR OFF + GameVisual Brightness 90 GamePlus Contrast 80 Saturation Color Color Temp. Image Gamma PBP Setting Input Select System Setup MyFavorite MOVE/ENTER EXIT • Brightness (Φωτεινότητα): Το εύρος ρύθμισης είναι από 0 έως 100. • Contrast (Αντίθεση): Το εύρος ρύθμισης είναι από 0 έως 100.
4. Image (Εικόνα) Μπορείτε να προσαρμόσετε τις ρυθμίσεις Sharpness (Ευκρίνεια), OD, Aspect Control (Έλεγχος αναλογίας εικόνας), ASCR, Adaptive-Sync/FreeSync, Blue Light Filter (Φίλτρο μπλε φωτός), HDR, Shadow Boost (Ενίσχυση σκιών) και ELMB από αυτή τη βασική λειτουργία.
• • • • • 3-6 Adaptive-Sync/FreeSync: Μπορεί να επιτρέψει σε μια πηγή γραφικών που υποστηρίζεται από την λειτουργία Adaptive-Sync/FreeSync να προσαρμόσει τον ρυθμό ανανέωσης της οθόνης με βάση τους τυπικούς ρυθμούς καρέ περιεχομένου για εξοικονόμηση ενέργειας, χωρίς τρεμόπαιγμα της οθόνης και με χαμηλή κατανάλωση ενημέρωσης. Ο FreeSync (Ελεύθερος Συγχρονισμός) υποστηρίζει 48-120Hz σε λειτουργία HDMI. O FreeSync (Ελεύθερος Συγχρονισμός) υποστηρίζει 48-120Hz σε λειτουργία DP.
Ανατρέξτε στη συνέχεια για να περιορίσετε την καταπόνηση των ματιών: • Οι χρήστες θα πρέπει να απομακρύνονται για λίγο από την οθόνη, εάν δουλεύουν πολλές ώρες. Συνιστάται να κάνετε μικρά διαλείμματα (τουλάχιστον 5 λεπτών) μετά από περίπου 1 ώρα συνεχόμενης εργασίας στον υπολογιστή. Τα σύντομα και συχνά διαλείμματα είναι πιο αποτελεσματικά σε σχέση με ένα μεγαλύτερο διάλειμμα.
• PBP Source (Πηγή PBP): Επιλέγει την πηγή εισόδου βίντεο μεταξύ “HDMI-1”, “HDMI-2” ή “DisplayPort”. • Color setting (Ρύθμιση χρώματος): Θέστε τη λειτουργία GameVisual για κάθε παράθυρο PBP. • 6. Η λειτουργία PBP υποστηρίζεται κάτω από τα 60Hz.
7. System Setup (Ρύθμιση συστήματος) Ρύθμιση της διαμόρφωσης του συστήματος.
• • • • • • 8. Information (Πληροφορίες):Εμφανίζονται οι πληροφορίες της οθόνης. Key Lock (Κλείδωμα πλήκτρων): Απενεργοποίηση όλων των λειτουργιών πλήκτρων. Πιέστε το κάτω κουμπί για περισσότερο από πέντε δευτερόλεπτα, για να απενεργοποιήσετε τη λειτουργία κλειδώματος πλήκτρων. Power Indicator (Ένδειξη τροφοδοσίας): Ενεργοποιείστε/ απενεργοποιείστε την ένδειξη LED τροφοδοσίας.
3.2 Τεχνικές προδιαγραφές Μοντέλο Μέγεθος οθόνης Μέγ. ανάλυση Φωτεινότητα (Τυπ.) Εγγενής αναλογία αντίθεσης (Τυπ.) Γωνία θέασης (CR>10) Χρώματα οθόνης Χρόνος απόκρισης Ήχος από ΗDMI Είσοδος HDMI XG43VQ 43,4" W (110,24 cm) 3840 x 1200 450 nits (τυπικό) 3000:1 178° (Καθ.)/178° (Ορ.) 16,7Μ 4 ms (Γκρι σε Γκρι) 1ms (MPRT) Ναι HDMI2.0 x 2 Είσοδος DisplayPort Ναι PBP Ναι Θύρα USB3.
3.3 Αντιμετώπιση προβλημάτων (FAQ) Πρόβλημα 3-12 Πιθανή λύση Η λυχνία (LED) ένδειξης λειτουργίας δεν ανάβει • Πατήστε το κουμπί για να ελέγξετε αν η οθόνη είναι σε κατάσταση ενεργοποίησης (ON). • Ελέγξτε αν το καλώδιο τροφοδοσίας ρεύματος είναι συνδεδεμένο σωστά στην οθόνη και στην πρίζα παροχής ρεύματος. • Ελέγξτε τη λειτουργία ένδειξης τροφοδοσίας στο βασικό μενού OSD. Επιλέξτε “ON (ΕΝΕΡΓ.)” για να ενεργοποιήσετε την ένδειξη LED τροφοδοσίας.
Δεν υπάρχει ήχος ή ο ήχος • Προσαρμόστε τις ρυθμίσεις έντασης τόσο στην είναι πολύ χαμηλός οθόνη όσο και στον υπολογιστή. • Σιγουρευτείτε ότι το πρόγραμμα οδήγησης της κάρτας ήχου είναι σωστά εγκατεστημένο και ενεργοποιημένο. • Ελέγξτε τη πηγή ήχου. Οι λειτουργίες AdaptiveSync/FreeSync (Προσαρμοζόμενος συγχρονισμός/Ελεύθερος συγχρονισμός), PBP Mode (Λειτουργία PBP), ASCR, και ELMB απενεργοποιούνται. • Μόνο μία από τις ακόλουθες λειτουργίες μπορεί να ενεργοποιηθεί κάθε φορά.
3.
Χρονισμός PC Χρονισμός PC Χρονισμός βίντεο Χρονισμός βίντεο Χρονισμός βίντεο Χρονισμός βίντεο Χρονισμός βίντεο Χρονισμός βίντεο Χρονισμός βίντεο Χρονισμός βίντεο Χρονισμός βίντεο Χρονισμός βίντεο Χρονισμός βίντεο Χρονισμός βίντεο Χρονισμός βίντεο Χρονισμός βίντεο 3840 1200 100 3840 1200 120 O O O O O O (Προεπιλογή) (Προεπιλογή) (Προεπιλογή) 640 480P 59,94/60 O O O 720 480P 59,94/60 O O O 720 576P 50 O O O 1280 720P 50 O O O 1280 720P 59,94/60 O O O 1440 480P 59,94/60