Segunda Edição Novembro de 2020 Direitos de autor © 2020 ASUSTeK COMPUTER INC. Todos os Direitos Reservados. Nenhuma parte deste manual, incluindo produtos e software descritos no mesmo, poderá ser reproduzida, transmitida, transcrita, armazenada num sistema de recuperação, ou traduzida para qualquer idioma de qualquer forma ou por qualquer meio, excepto a documentação conservada pelo comprador para fins de cópia de segurança, sem o expresso consentimento por escrito da ASUSTeK COMPUTER INC. (“ASUS”).
Conteúdo Notificações................................................................................................. iv Informação de segurança............................................................................ v Cuidados e limpeza..................................................................................... vi Takeback Services...................................................................................... vii Capítulo 1: Apresentação do produto 1.1 Bem-vindo!.................
Notificações Declaração da Comissão Federal de Comunicações Este dispositivo está conforme à parte 15 dos Regulamentos FCC. O funcionamento depende das seguintes duas condições: • Este dispositivo não poderá causar interferências prejudiciais e • Este dispositivo deverá aceitar qualquer interferência recebida, incluindo interferência que possa causar um funcionamento indesejado.
Cet appareil numérique de la classe B respecte toutes les exigences du Réglement sur le matériel brouiller du Canada. Informação de segurança • Antes de montar o monitor, leia cuidadosamente toda a documentação fornecida na embalagem. • Para prevenir riscos de incêndio ou electrocussão, não exponha o monitor a chuva ou humidade. • Nunca tente abrir a caixa do monitor. As altas tensões no interior do monitor são perigosas e podem causar ferimentos graves.
• O ajuste do controlo de volume, assim como o equalizador e outras definições que não sejam da posição central, pode aumentar a voltagem de saída ao nível auricular/auscultador e, desse modo, aumentar o nível de pressão sonora. • O adaptador deve ser utilizado apenas para este monitor e não para outro propósito. O seu dispositivo utiliza um dos seguintes fornecimentos de energia: - Fabricante: Delta Electronics Inc.
Convenções utilizadas neste guia AVISO: Informação para prevenir ferimentos ao utilizador no decorrer de uma tarefa. PRECAUÇÃO: Informação para prevenir danos aos componentes no decorrer de uma tarefa. IMPORTANTE: Informação que o utilizador DEVERÁ seguir para levar a cabo uma tarefa. NOTA: Sugestões e informação adicional para auxiliar na conclusão de uma tarefa. Onde encontrar mais informações Consulte as seguintes fontes para informações adicionais e para actualizações de produto e software. 1.
viii
1.1 Bem-vindo! Obrigado por ter adquirido o monitor LCD da ASUS®! O mais recente monitor LCD panorâmico da ASUS produz uma exibição mais ampla, mais nítida e límpida, bem como um conjunto de funções que potenciam a sua experiência de visualização. Com estas funções poderá desfrutar da conveniência e experiência visual maravilhosa que este monitor permite! 1.
1.3 Apresentação do monitor 1.3.1 Vista frontal/lateral 6 1 2 3 4 5 1. Botão ( 5 direcções) • Liga o menu OSD. Executa o item do menu OSD seleccionado. • Aumenta/diminui o valor ou desloca a sua selecção para cima/baixo/ esquerda/direita. • Liga o menu OSD quando o monitor entra em modo de espera ou exibe a mensagem “SEM SINAL”. 2. Botão • Sai do item do menu OSD. • Alterna a função Bloqueio de teclas entre ligado e desligado, premindo por 5 segundos.
4. Botão • Predefinição: GameVisual. • Para alterar o funcionamento do atalho, aceda ao menu Atalho > Atalho 2. • Liga o menu OSD quando o monitor entra em modo de espera ou exibe a mensagem “SEM SINAL”. 5. Botão/Indicador de energia • Liga/desliga o monitor. • A definição das cores do indicador de energia é indicada abaixo: Estado Descrição Branco LIGAR DESLIGAR DESLIGAR Amarelo ULMB/ ULMB+HDR Âmbar a piscar A entrar no modo de espera 6.
6. Portas a jusante USB 3.0. Estas portas destinam-se a ligar dispositivos USB como teclados/ratos USB, unidades flash USB, etc. 7. Porta a jusante USB 3.0 (porta vemelha) com NVIDIA Reflex Latency Analyzer. Esta porta é para ligação a dispositivos USB, como teclado/rato USB, unidade flash USB, etç. Esta porta está serve especificamente para ligação com o seu rato com ou sem fios, para ativar o NVIDIA Reflex Latency Analyzer. 8. Conector de auricular.
Menu principal GamePlus GamePlus — Mira GamePlus GamePlus — Temporizador GamePlus GamePlus — Contador de FPS GamePlus GamePlus FPS Mira (Modo de prática) Temporizador Cronómetro FPS Contador de FPS Alinhamento do ecrã NEXT 1.3.4 BACK/EXIT NEXT BACK/EXIT NEXT BACK/EXIT NEXT BACK/EXIT Função GameVisual A função GameVisual ajuda-o a escolher entre os vários modos de imagem de forma prática. Para ativar o GameVisual: 1. Prima o botão de atalho GameVisual 2. Mova o botão desejada.
1.3.5 • No Modo de Corrida, a(s) seguinte(s) função(ões) não é(são) configurável(eis) pelo utilizador: Saturação de seis eixos. • No Modo sRGB, a(s) seguinte(s) função(ões) não é(são) configurável(eis) pelo utilizador: Temp. da cor, Brilho, Contraste, Gamma, Saturação de seis eixos. • No Modo de Cenário/Cinema, a(s) seguinte(s) função(ões) não é(são) configurável(eis) pelo utilizador: Gama, Intensificação de escuro. G-SYNC HDR O monitor suporta o formato HDR.
Monitor LCD ASUS 360Hz da série PG259QN/PG259QNR 1-7
1-8 Capítulo 1: Apresentação do produto
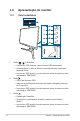
2.1 Montar o/a braço/base do monitor 1. Insira a base no braço. 2. Fixe a base ao braço apertando o parafuso incluído. Recomendamos cobrir a superfície da mesa com um pano macio para evitar danos ao monitor. Tamanho do parafuso da base: M6 x 15 mm.
2.2 Usar a Grampo tipo C (para PG259QNR) A Grampo tipo C prende o monitor a superfícies de até 8 cm de espessura. Antes de começar, certifique-se que tem espaço suficiente para acomodar toda grampo e que a superfície é robusta e plana. Siga as ilustrações abaixo para montar o monitor. 3 2 1 4cm 6cm 2 3 8cm 1 *Desaperte o parafuso antes de remover o suporte interno do grampo. 4 5 6 1 2 Recomendamos cobrir a superfície da mesa com um pano macio para evitar danos ao monitor.
2.3 Gestão de cabos Poderá organizar os cabos com a ajuda da tampa da porta de entrada/saída. • Organizar os cabos • Usar a tampa da porta de entrada/saída: a tampa pode estar acoplada ou desacoplada. 2.4 Ajustar o monitor • Para uma visualização ideal, recomendamos que olhe para o ecrã completo do monitor e depois o ajuste para o ângulo mais confortável para si. • Segure o suporte para impedir que o monitor caia durante o ajuste do ângulo.
É normal o monitor abanar ligeiramente enquanto ajusta o ângulo de visualização. Girar o monitor 1. Erga o monitor até à posição mais alta. 2. Incline o monitor até ao ângulo máximo. 3. Gire o monitor para a direita até ao ângulo pretendido. 0° -5° ~ +20° 90° 0° 90° É normal o monitor abanar ligeiramente enquanto ajusta o ângulo de visualização.
2.5 Desencaixar o braço (para o kit de montagem na parede VESA) O braço removível deste monitor foi especialmente concebido para o kit de montagem na parede VESA. Para remover o braço: 1. Coloque a parte frontal do monitor virada para baixo numa mesa. 2. Use uma chave de fendas para remover as tampas onde o monitor e braço se juntam. 3. Desaperte os quatro parafusos na parte posterior do monitor e remova o braço/base.
2.6 Ligar os cabos Ligue os cabos conforme as seguintes instruções: Apenas para serviço PG259QNR PG259QN • • Para ligar o cabo de alimentação: a. Ligue o adaptador de alimentação firmemente à entrada DC IN do monitor. b. Ligue uma extremidade do cabo de alimentação ao adaptador de alimentação e a outra extremidade a uma tomada de alimentação. Para ligar o cabo DisplayPort/HDMI: a. Ligue uma extremidade do cabo DisplayPort/HDMI à porta DisplayPort/ HDMI do monitor. b.
Monitor LCD ASUS 360Hz da série PG259QN/PG259QNR 2-7
2-8 Capítulo 2: Configuração
3.1 Menu OSD (visualização no ecrã) 3.1.1 Como reconfigurar Modo Normal DisplayPort 1920x1080@360 Hz HDR Desligado Modo G-SYNC Esports Mouse Detected ROG Swift 360Hz PG259QNR ® G-SYNC Processor NVIDIA Reflex Latency Analyzer Jogos NVIDIA ULMB Imagem ULMB Pulse Width Cor Seleccionar entrada Atalho Efeito de luz Config. Sistema MOVE/ENTER ( BACK EXIT 1. Prima o botão 2. Mova o botão ( ) para cima/baixo para navegar pelas funções.
3.1.2 1. Apresentação das funções do OSD G-SYNC® Processor Modo Normal DisplayPort 1920x1080@360 Hz HDR Desligado Modo G-SYNC Esports Mouse Detected ROG Swift 360Hz PG259QNR ® G-SYNC Processor NVIDIA Reflex Latency Analyzer Jogos NVIDIA ULMB Imagem ULMB Pulse Width Cor Seleccionar entrada Atalho Efeito de luz Config.
* Monitoring Rectangle Location: Ajusta manualmente a localização do retângulo de monitorização usando o botão ( 5 direcções). * Monitoring Rectangle Size: Ajusta manualmente o tamanho do retângulo de monitorização usando o botão ( 5 direcções). Pode também transferir e instalar GeForce Experience para desfrutar da experiência completa da análise de latência do sistema. Os passos de configuração da GeForce Experience são os seguintes: a. Instale a GeForce Experience. b.
Esta função apenas está disponível quando NVIDIA ULMB está ativado. • GamePlus: Consulte 1.3.3 Função GamePlus para detalhes. • GameVisual: Consulte 1.3.4 Função GameVisual para detalhes. • Intensificação de escuro: Melhoramento de cor escura que ajusta a curva gama do monitor para enriquecer os tons escuros numa imagem, tornando cenas e objetos escuros mais fáceis de ver. 3.
Consulte o seguinte para aliviar o esforço ocular: 4. • O utilizador deverá passar algum tempo longe do ecrã se trabalhar longas horas. Recomenda-se que faça pequenas pausas (pelo menos 5 minutos) após 1 hora de trabalho contínuo ao computador. Fazer pausas curtas e frequentes é mais eficaz do que uma pausa maior. • Para minimizar o cansaço ocular e secura dos olhos, o utilizador deverá descansar periodicamente os olhos focando-se em objectos ao longe.
5. Seleccionar entrada Nesta funçao, pode seleccionar a fonte de entrada desejada e comutar a função de mudança automática entre ligada e desligada. Modo Normal DisplayPort 1920x1080@360 Hz HDR Desligado Modo G-SYNC Esports Mouse Detected ROG Swift 360Hz PG259QNR ® G-SYNC Processor DisplayPort Jogos HDMI Imagem Interruptor Auto de Entrada Cor Seleccionar entrada Atalho Efeito de luz Config. Sistema BACK MOVE/ENTER 6.
• 8. Aura RGB: Nesta função pode selecionar um efeito de luz Aura RGB para o monitor e mudar as definições para o efeito de luz. Selecione “DESLIG.” caso deseje desligar o efeito de luz Aura RGB. • Se a função Aura Sync estiver LIGADA, a função Aura RGB ficará indisponível. • Consulte a “3.2 Aura” para informações sobre como personalizar os efeitos de luz Aura a partir do seu computador. Config. Sistema Permite-lhe ajustar o sistema.
3-8 • Bloqueio de teclas: desactiva todas as teclas de função. Prima de 5 segundos para cancelar a função de bloqueio de teclas. • Posição - OSD: Ajusta a posição horizontal (Posição - H)/posição vertical (Posição - V) do OSD. • Tempo limite do OSD: Ajusta o tempo limite do OSD de 10 a 120 segundos. • Transparência: Ajusta o fundo do OSD de opaco a transparente. • Informação: Exibe a informação do monitor. • Repor tudo: “Sim” permite restaurar as definições predefinidas.
3.2 Aura Armoury Crate é um programa que controla as LED coloridas em dispositivos compatíveis, como monitores, motherboards, placas gráficas, PCs desktop, etç. Aura permite ajustar a cor das LEDs RGB nestes dispositivos e selecionar diferentes efeitos de luz. Pode também corrigir ou ajustar a cor das LEDs calibrando-as. Para ativar Aura: 1. LIGUE a função Aura Sync no menu OSD. 2. Ligue a porta de envio USB 3.0 do monitor à porta USB do seu computador. 3.
3.3 Resumo das especificações Tipo de painel TFT LCD Tamanho do painel Ecrã panorâmico de 24,5"W (16:9, 62,18 cm) Resolução máx 1920 x 1080 Densidade de pixels 0,2829 mm x 0,2802 mm Brilho (tip.) 400 cd/m2 Rácio de contraste (tip.) 1000:1 Ângulo de visualização (H/V) CR > 10 178˚/178˚ Cores do ecrã 16,7 M Tempo de resposta 1 ms (cinzento a cinzento) Selecção de temperatura da cor 8 temperaturas de cor Entrada analógica Não Entrada digital DisplayPort v1.4 x 1, HDMI v2.
Peso (estim.
3.4 Dimensões exteriores ASUS PG259 Outline Dimension *Unit: mm(inch) Pivot: +90 Degree 9 0° 20° 5° 161.78 [6.37] 203.02 [7.99] 7.06 [0.28] 151.31 [5.96] 557.29 [21.94] 543.17 (21.38)-Active-Area 271.59 [10.69] 536.53 [21.12] 19.95 [0.79] 6.77 [0.27] 246.74 [9.71] 302.62 (11.91)-Active-Area 330.34 [13.01] 168.86 [6.65] 499.20 [19.65] 25° Swivel: +/-25 Degree 87.95 [3.46] 15.75 [0.62] 27.51 [1.08] 120.00 [4.72] 221.12 [8.71] 411.52 [16.20] 168.86 [6.65] 25° 89.60 [3.53] 116.95 [4.
3.5 Resolução de problemas (FAQ) Problema Solução possível O LED de energia não está ligado • Prima o botão de alimentação para verificar se o monitor se encontra no modo LIG. • Verificar se o cabo de alimentação está correctamente ligado ao monitor e à tomada de alimentação. O LED de energia emite cor branca e não há qualquer imagem no ecrã • Verificar se o monitor e o computador estão no modo LIG. • Certificar-se de que o cabo de sinal está correctamente ligado ao monitor e ao computador.
3.6 Modo de funcionamento suportados Entrada HDMI Frequência de resolução 640 x 480 800 x 600 1024 x 768 1920 x 1080 1920 x 1080 Frequência de actualização 60Hz 60Hz 60Hz 60Hz 144Hz 1920 x 1080 240Hz Comentário Não suportado quando o formato de cor é RGB/YUV444 com profundidade de cor de 10-bit ou 12-bit. Nota : Não é compatível com interlaçar e gamut de cor YUV420.
Monitor LCD ASUS 360Hz da série PG259QN/PG259QNR 3-15