Druhé vydání Listopad 2020 Copyright © 2020 ASUSTeK COMPUTER INC. Všechna práva vyhrazena. Žádná část této příručky, včetně produktů a softwaru popsané v ní, nesmí být reprodukována, přenášena, přepisována, ukládána do systému pro opětovné zpřístupnění nebo překládána do jakéhokoli jazyka v jakékoli formě nebo jakýmkoli způsobem, kromě dokumentace uchovávané zákazníkem pro účely zálohování, bez výslovného předchozího písemného souhlasu společnosti ASUSTeK COMPUTER INC. („ASUS“).
Obsah Oznámení...................................................................................................... iv Bezpečnostní informace.............................................................................. v Péče a údržba............................................................................................... vi Takeback Services...................................................................................... vii Kapitola 1: Úvod k výrobku 1.1 Vítejte!........................
Oznámení Vyjádření Federální komise pro komunikace (FCC) Toto zařízení splňuje podmínky části 15 směrnic FCC. Provoz podléhá následujícím dvěma podmínkám: • Zařízení nesmí způsobovat škodlivé rušení a • Zařízení musí přijmout jakékoli přijaté rušení, včetně rušení, které může způsobit nežádoucí provoz. Toto zařízení bylo vyzkoušeno a bylo ověřeno, že odpovídá omezením pro digitální zařízení třídy B podle části 15 předpisů FCC.
Bezpečnostní informace • Před instalací monitoru si pečlivě přečtěte veškerou dokumentaci dodanou v balení. • Monitor nikdy nevystavuje dešti ani vlhkosti, abyste předešli nebezpečí požáru nebo úrazu elektrickým proudem. • Nikdy se nepokoušejte otevřít skříň monitoru. Nebezpečná vysoká napětí uvnitř monitoru mohou způsobit vážné poranění. • Pokud se rozbije napájení, nepokoušejte se to opravit sami. Obraťte se na kvalifikovaného servisního technika nebo na váš maloobchod.
Péče a údržba • Před zvedáním nebo přemísťováním monitoru raději odpojte kabely a napájecí kabel. Při usazování monitoru používejte správný způsob zvedání. Při zvedání nebo přenášení uchopte monitor za jeho okraje. Displej nezvedejte za podstavec nebo kabel. • Čištění. Vypněte monitor a odpojte napájecí kabel. Povrch monitoru čistěte měkkým hadříkem, který nepouští vlas. Těžko odstranitelné skvrny lze odstranit hadříkem navlhčeným v jemném čisticím prostředku.
Kde najdete další informace Další informace a aktualizace týkající se produktu a software najdete v těchto zdrojích. 1. Internetové stránky ASUS Internetové stránky ASUS po celém světě poskytují aktualizované informace o produktech v oblasti hardware a software značky ASUS. Podívejte se na http://www.asus.com 2. Další dokumentace Balení vašeho produktu může obsahovat další dokumentaci, kterou tam mohl přidat váš prodejce. Tyto dokumenty nejsou součástí standardního balení.
viii
1.1 Vítejte! Děkujeme za zakoupení monitoru LCD ASUS®! Nejnovější monitor LCD v širokoúhlém formátu od společnosti ASUS nabízí širší, jasnější a křišťálově čistý displej a řadu funkcí, které umocňují váš zážitek z prohlížení. Díky těmto funkcím si můžete užívat komfort a mít skvělý vizuální zážitek, který monitor přináší! 1.
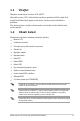
1.3 Úvod k monitoru 1.3.1 Pohled zepředu/ze strany 6 1 2 3 4 5 1. Tlačítko ( 5směrové) • Zapíná nabídku OSD. Aktivuje vybranou položku nabídky OSD. • Zvyšuje/snižuje hodnoty nebo posunuje výběr nahoru/dolů/vlevo/vpravo. • Zapne nabídku OSD, když monitor vstoupí do pohotovostního režimu nebo se zobrazí sdělení „NENÍ SIGNÁL“. 2. Tlačítko • Ukončení položky nabídky OSD. • Přepíná funkci Zámku kláves mezi zapnout a vypnout dlouhým stisknutím po dobu 5 sekund.
4. Tlačítko • Výchozí: GameVisual. • Pro změnu funkce zástupce přejděte na nabídku Zástupce > Zástupce 2. • Zapne nabídku OSD, když monitor vstoupí do pohotovostního režimu nebo se zobrazí sdělení „NENÍ SIGNÁL“. 5. Tlačítko a indikátor napájení • Zapnutí/vypnutí monitoru. • Definici barvy indikátoru napájení ukazuje tabulka dole. Stav Popis Bílá ZAP. VYP. VYP. Žlutá ULMB/ ULMB+HDR Oranžové blikání Přechod do pohotovostního režimu 6.
6. Vstupní porty USB. Tyto porty slouží k propojení se zařízením USB, jako jsou klávesnice/myši USB, jednotky USB flash atd. 7. Vstupní port USB 3.0 (červený port) s NVIDIA Reflex Latency Analyzer. Tento port je určen pro připojení k zařízením USB, jako je klávesnice/ myš USB, USB flash disk atd. Tento port je speciálně určen pro připojení vaší kabelové nebo bezdrátové myši pro povolení NVIDIA Reflex Latency Analyzer. 8. Konektor pro sluchátka.
Hlavní nabídka GamePlus GamePlus — Vlasový kříž GamePlus — Časovač GamePlus GamePlus GamePlus GamePlus — Počítadlo FPS GamePlus FPS Vlasový kříž (Zkušební režim) Časovač Stopky FPS Počítadlo FPS Zarovnání zobrazení NEXT 1.3.4 BACK/EXIT NEXT BACK/EXIT NEXT BACK/EXIT NEXT BACK/EXIT Funkce GameVisual Funkce GameVisual vám pomáhá vybírat mezi různými režimy obrazu praktickým způsobem. Aktivace GameVisual: 1. Stiskněte tlačítko zástupce GameVisual. 2. Přesunutím tlačítka nastavení. 3.
1.3.5 • V režimu Závod nelze následující funkce uživatelsky konfigurovat: Šestiosá sytost. • Ve režimu sRGB nelze následující funkce uživatelsky konfigurovat: Teplota barev, Jas, Kontrast, Gamma, Šestiosá sytost. • Ve režimu Krajina/Kino nelze následující funkce uživatelsky konfigurovat: Gamma, Posílení tmavé. G-SYNC HDR Monitor podporuje formát HDR. Při zjišťování obsahu HDR se zobrazí zpráva „HDR zap.“ na v nabídce OSD.
360Hz monitor LCD ASUS řady PG259QN/PG259QNR 1-7
1-8 Kapitola 1: Úvod k výrobku
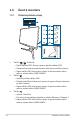
2.1 Montáž ramene/podstavce monitoru 1. Vložte podstavec do ramene. 2. Připevněte podstavec k rameni pomocí dodaného šroubu. Doporučujeme přikrýt povrch stolu měkkou látkou, abyste zabránili poškození monitoru. Velikost šroubů základny: M6 x 15 mm.
2.2 Používání C svorky (pro PG259QNR) C svorka připevňuje monitor k povrchům o tloušťce až 8 cm. Před spuštěním se ujistěte, že máte dostatek místa, aby se vešla celá svorka, a povrch je pevný a rovný. Při instalaci monitoru postupujte podle níže uvedených obrázků. 3 2 1 4cm 6cm 2 3 8cm 1 *Před odstraněním vnitřního držáku svorky povolte šroub. 4 5 6 1 2 Doporučujeme přikrýt povrch stolu měkkou látkou, abyste zabránili poškození monitoru.
2.3 Uspořádání kabelů Kabely si můžete uspořádat pomocí krytu vstupních/výstupních portů. • Uspořádání kabelů • Používání krytu vstupních/výstupních portů: tento kryt lze připevnit nebo odendat. 2.4 Nastavení monitoru • Pro optimální komfort při sledování doporučujeme dívat se na celou plochu monitoru a potom upravit úhel tak, jak je to pro vás nejpohodlnější. • Při změně úhlu přidržte podstavec, abyste zabránili pádu monitoru.
Je běžné, že se monitor při nastavování úhlu pohledu nepatrně třese. Otočení monitoru 1. Vysuňte monitor do nejvyšší polohy. 2. Nakloňte monitor v maximálním úhlu. 3. Otočte monitor ve směru hodinových ručiček v požadovaném úhlu. 0° -5° ~ +20° 90° 0° 90° Je běžné, že se monitor při nastavování úhlu pohledu nepatrně třese.
2.5 Sejmutí ramene (pro montáž na zeď VESA) Odnímatelné rameno tohoto monitoru je speciálně navrženo pro montáž na zeď VESA. Pro sejmutí ramene: 1. Položte monitor na stůl přední stranou dolů. 2. Pomocí šroubováku sejměte kryty tam, kde se spojuje monitor a rameno. 3. Povolte čtyři šrouby na zadní straně monitoru a sejměte rameno/podstavec. 1 2 3 4 Doporučujeme přikrýt povrch stolu měkkou látkou, abyste zabránili poškození monitoru.
2.6 Připojení kabelů Připojte kabely podle následujících pokynů: Pouze pro servis PG259QNR PG259QN • • Připojení napájecího kabelu: a. Zapojte napájecí adaptér pevně do vstupu DC IN monitoru. b. Jeden konec napájecího kabelu zapojte do napájecího adaptéru a druhý konec do elektrické zásuvky. Připojení kabelu DisplayPort/HDMI: a. Jeden konec kabelu DisplayPort/HDMI zapojte do konektoru DisplayPort/ HDMI na monitoru. b.
360Hz monitor LCD ASUS řady PG259QN/PG259QNR 2-7
2-8 Kapitola 2: Nastavování
3.1 Nabídka OSD (On-Screen Display) 3.1.1 Změna konfigurace Normální režim DisplayPort 1920x1080@360 Hz HDR vyp. Režim G-SYNC Esports Mouse Detected ROG Swift 360Hz PG259QNR ® G-SYNC Processor NVIDIA Reflex Latency Analyzer Hry NVIDIA ULMB Obraz ULMB Pulse Width Barva Výběr vstupu Zástupce Efekt osvětlení Nastavení systému MOVE/ENTER BACK EXIT 1. Pro otevření nabídky OSD stiskněte tlačítko 2. Přesunutím tlačítka ( ) nahoru/dolů můžete procházet funkcemi.
3.1.2 1. Úvod k funkci OSD G-SYNC® Processor Normální režim DisplayPort 1920x1080@360 Hz HDR vyp. Režim G-SYNC Esports Mouse Detected ROG Swift 360Hz PG259QNR ® G-SYNC Processor NVIDIA Reflex Latency Analyzer Hry NVIDIA ULMB Obraz ULMB Pulse Width Barva Výběr vstupu Zástupce Efekt osvětlení Nastavení systému MOVE/ENTER • BACK EXIT NVIDIA Reflex Latency Analyzer (pouze pro PG259QNR) „Monitorovací obdélník“ musíte umístit tam, kde dochází k téměř okamžité změně osvícení.
* Monitoring Rectangle Size: Ručně upraví velikost monitorovacího obdélníku pomocí tlačítka ( 5směrové). Můžete si také stáhnout a nainstalovat GeForce Experience, abyste mohli plně využívat analýzu latence systému. Kroky pro nastavení GeForce Experience: a. Nainstalujte GeForce Experience. b. Ujistěte se, že je monitor nastaven na 360Hz na NVIDIA Control Panel (Ovládacím panelu NVIDIA). c.
• GamePlus: Podrobnosti viz v části 1.3.3 Funkce GamePlus. • GameVisual: Podrobnosti viz v části 1.3.4 Funkce GameVisual. • Posílení tmavé: Vylepšení tmavých barev upraví křivku gama monitoru za účelem obohacení tmavých tónů v obrazu a díky tomu budou tmavé scény a předměty mnohem snadněji vidět. 3. Obraz Normální režim DisplayPort 1920x1080@360 Hz HDR vyp.
Pro snížení únavy očí viz následující: 4. • Pokud uživatelé pracují u zobrazovacího zařízení dlouhou dobu, měli by si dát pauzu. Doporučujeme dělat krátké přestávky (nejméně 5 minut) přibližně po 1 hodině nepřetržité práce u počítače. Krátké a časté přestávky jsou efektivnější než jedna dlouhá pauza. • Pro minimalizování únavy očí a pocitu suchých očí by uživatelé měli pravidelně nechat oči odpočinout tak, že se zaměří na vzdálené předměty. • Ke snížení únavy očí mohou přispět cviky na oči.
5. Výběr vstupu V této funkci můžete vybrat požadovaný vstupní zdroj a přepínat funkci vstupního automatického přepínače mezi zapnuto a vypnuto. Normální režim DisplayPort 1920x1080@360 Hz HDR vyp. Režim G-SYNC Esports Mouse Detected ROG Swift 360Hz PG259QNR ® G-SYNC Processor DisplayPort Hry HDMI Obraz Aut. přepnutí vstupu Barva Výběr vstupu Zástupce Efekt osvětlení Nastavení systému BACK MOVE/ENTER 6. EXIT Zástupce Normální režim DisplayPort 1920x1080@360 Hz HDR vyp.
• 8. Aura RGB: V této funkci můžete vybrat světelný efekt Aura RGB pro monitor a změnit nastavení pro světelný efekt. Vyberte „VYPNUTO“, pokud chcete světelný efekt Aura RGB vypnout. • Pokud je funkce Aura Sync nastavená na ZAPNUTO, nebude funkce Aura RGB k dispozici. • V části "3.2 Aura" najdete informace o tom, jak přizpůsobit světelné efekty Aura z počítače. Nastavení systému Umožňuje nastavovat systém. Normální režim DisplayPort 1920x1080@360 Hz HDR vyp.
Pokud není možné monitor probudit z režimu hlubokého spánku, postupujte takto: - Na monitoru stiskněte libovolné tlačítko (kromě tlačítka napájení) a probudíte jej. - Zakažte funkci Hluboký spánek. 3-8 • Zámek kláves: K zakázání všech funkčních kláves. Stiskněte než 5 sekund, abyste zrušili funkci zámku kláves. • OSD-pozice: Upravuje horizontální pozici (H-pozice) a vertikální pozici (V-pozice) OSD. • Časový interval OSD: Slouží k úpravám nastavení časového intervalu OSD od 10 do 120 sekund.
3.2 Aura Armoury Crate je softwarový program, který ovládá barevné LED na podporovaných zařízeních, jako jsou monitory, základní desky, grafické karty, stolní počítače atd. Aura vám umožňuje upravit barvu LED RGB u těchto zařízení a vybrat různé světelné efekty. Barvu LED lze také opravit nebo upravit kalibrací. Aktivace programu Aura: 1. Nastavte funkci Aura Sync na ZAPNUTO v nabídce OSD. 2. Propojte výstupní port USB 3.0 monitoru s portem USB počítače. 3.
3.3 Souhrn specifikací Typ panelu TFT LCD Velikost panelu 24,5" (16:9, 62,18 cm) široká obrazovka Maximální rozlišení 1920 x 1080 Rozteč pixelů 0,2829 mm x 0,2802 mm Jas (typ.) 400 cd/m2 Kontrastní poměr (typ.) 1000:1 Úhel sledování (H/V) CR > 10 178˚/178˚ Barvy zobrazení 16,7 M Doba reakce 1 ms (šedá - šedá) Výběr teploty barev 8 teploty barev Analogový vstup Ne Digitální vstup DisplayPort v1.4 x 1, HDMI v2.
Hmotnost (odh.
3.4 Vnější rozměry ASUS PG259 Outline Dimension *Unit: mm(inch) Pivot: +90 Degree 9 0° 20° 5° 161.78 [6.37] 203.02 [7.99] 7.06 [0.28] 151.31 [5.96] 557.29 [21.94] 543.17 (21.38)-Active-Area 271.59 [10.69] 536.53 [21.12] 19.95 [0.79] 6.77 [0.27] 246.74 [9.71] 302.62 (11.91)-Active-Area 330.34 [13.01] 168.86 [6.65] 499.20 [19.65] 25° Swivel: +/-25 Degree 87.95 [3.46] 15.75 [0.62] 27.51 [1.08] 120.00 [4.72] 221.12 [8.71] 411.52 [16.20] 168.86 [6.65] 25° 89.60 [3.53] 116.95 [4.60] 100.
3.5 Odstraňování potíží (Časté otázky) Problém Možné řešení Indikátor LED napájení není zapnut • Stiskněte tlačítko napájení a zkontrolujte, zda je monitor v režimu ZAPNUTO. • Zkontrolujte, zda je napájecí kabel řádně zapojen do monitoru a elektrické zásuvky. Indikátor napájení LED svítí bíle a na obrazovce není žádný obraz • Zkontrolujte, zda je monitor a počítač v režimu ZAPNUTO. • Ujistěte se, že kabel signálu je správně zapojen do monitoru a počítače.
3.6 Podporovaný provozní režim Vstup HDMI Frekvence rozlišení 640 x 480 800 x 600 1024 x 768 1920 x 1080 1920 x 1080 Obnovovací frekvence 60Hz 60Hz 60Hz 60Hz 144Hz 1920 x 1080 240Hz Poznámka Není podporováno, když je barevný formát RGB/YUV444 v barevnou hloubkou 10 bitů nebo 12 bitů. Poznámka: Nepodporuje prokládaný signál a barevný rozsah YUV420.
360Hz monitor LCD ASUS řady PG259QN/PG259QNR 3-15