UŽ I VAT E L S K Á P Ř Í R U Č KA
Obsah Upozornění................................................................................................... iii Bezpečnostní informace............................................................................. iv Péče a údržba............................................................................................... ix 1.1 Vítejte............................................................................................. 1-1 1.2 Obsah balení.................................................
Upozornění Prohlášení pro Federální komunikační komisi Toto zařízení vyhovuje části 15 předpisů FCC. Provoz vyžaduje splnění následujících dvou podmínek: • Toto zařízení nesmí způsobovat škodlivé rušení. • Toto zařízení musí přijmout veškeré přijaté rušení, včetně rušení, které by mohlo způsobit nežádoucí činnost. Toto zařízení bylo testováno a bylo shledáno, že vyhovuje omezením pro digitální zařízení třídy B, dle části 15 pravidel Federální komunikační komise (FCC).
Prohlášení pro kanadské Ministerstvo komunikací Toto digitální zařízení nepřekračuje limity třídy B pro vyzařování v rádiovém pásmu z digitálních zařízení, jak je stanoví předpisy o rádiovém rušení kanadského Ministerstva komunikací. Toto digitální zařízení třídy B vyhovuje kanadské normě ICES-003. Toto digitální zařízení třídy B splňuje všechny požadavky kanadských předpisů pro zařízení způsobují rušení.
• Zabraňte vniknutí předmětů a kapalin do otvorů/výřezů na krytu monitoru. • V zájmu dobré funkce připojujte monitor jen k počítačům se schválením UL vybaveným správně konfigurovanou zásuvkou označenou 100 až 240 V AC. • Používaná elektrická zásuvka se musí nacházet v blízkosti zařízení a musí být snadno přístupná. • V případě technických potíží s monitorem kontaktujte kvalifikovaného opravce. • Před připojením zástrčky k elektrické zásuvce připojte uzemnění.
NIKDY nepokládejte výrobek na nestabilní místo. NIKDY výrobek neumisťujte na vysoký nábytek (například skříň nebo knihovnu) bez zajištění nábytku a výrobku pomocí vhodné podpěry. NIKDY výrobek neumisťujte na textil nebo jiné materiály, které by mohly být mezi výrobkem a nábytkem. NIKDY na výrobek ani nábytek, na kterém se výrobek nachází, neumisťujte předměty, které by mohly lákat děti k tomu, aby pro ně lezly (například hračky nebo dálkové ovladače).
Likvidace použitých elektrických a elektronických výrobků pro domácnosti v zemích EU Tento symbol na výrobku nebo na jeho balení označuje, že je zakázáno výrobek likvidovat společně s komunálním odpadem. Použitý elektrický nebo elektronický výrobek jste povinni odevzdat na vyhrazeném sběrném místě k další recyklaci.
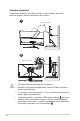
Zabraňte přepadnutí Při používání displeje jej upevněte ke zdi šňůrou nebo řetězem, které udrží hmotnost monitoru, aby bylo zabráněno pádu monitoru. 1 Šroub M4 nebo M6 Kabel 2 Kabel nebo řetěz viii • Provedení displeje se může lišit od ilustrací. • Instalaci musí provést kvalifikovaný odborník. Další informace získáte od dodavatele. • Pro modely s čistou hmotností >= 7 kg. Vyberte vhodný způsob, kterým zabráníte přepadnutí.
Péče a údržba • Před zvednutím nebo přemístěním monitoru je lepší odpojit signálový a napájecí kabel. Při zvedání monitoru dodržujte postupy správného zvedání. Při zvedání nebo přenášení držte monitor za okraje. Nezvedejte monitor za stojan nebo kabel. • Čištění. Vypněte monitor a odpojte napájecí kabel. Povrch monitoru čistěte hadříkem, který nedře a nepouští vlákna. Odolné skvrny lze odstranit hadříkem navlhčeným v jemném čistícím prostředku.
Kde najdete další informace Další informace a aktualizace produktu a softwaru jsou dostupné z níže uvedených zdrojů. x 1. Web ASUS Celosvětový web ASUS nabízí aktualizované informace o hardwaru a softwaru ASUS. Viz http://www.asus.com 2. Volitelná dokumentace S produktem může být dodávána volitelná dokumentace, poskytovaná prodejcem. Tyto dokumenty nejsou standardní součástí balení.
1.1 Vítejte Děkujeme, že jste zakoupili LCD monitor ASUS®! Nejnovější širokoúhlý LCD monitor firmy ASUS poskytuje čistší, širší a jasnější zobrazení a navíc řadu funkcí zlepšujících váš zážitek z obrazu. Díky bohaté nabídce funkcí si můžete vychutnat pohodlí a krásné zobrazení, kterým se tento monitor vyznačuje! 1.2 Obsah balení Překontrolujte, zda jste obdrželi všechny součásti: LCD monitor Podstavec monitoru Stručná příručka Záruční list 1x napájecí kabelu 1x kabel HDMI 2.
1.3 Sestavení monitoru Pokyny pro sestavení monitoru: • Během sestavování ramene/základny monitoru doporučujeme udržovat monitor v jeho polystyrenovém obalu (EPS, Expanded Polystyrene). 1. Zorientujte otvor pro šroubek na rameni s dodaným šroubkem na základně. Potom zasuňte základnu do ramene. 2. Připevněte základnu k ramenu utažením dodaného šroubku. 3. Vyjměte monitor z obalu EPS. Nastavte sklon monitoru, který vám nejvíce vyhovuje.
1.4 Připojení kabelů 1.4.1 Zadní strana LCD monitoru 9 DCIN 1 2 3 4 HDMI-2 HDMI-1 5 6 1. Port vstupu stejnosměrného napájení 2. Port USB 3.0 pro připojení k počítači 3. Port USB 3.0 pro připojení zařízení 4. Port USB 3.0 pro připojení zařízení 5. Port HDMI 2.1 6. Port HDMI 2.1 7. DisplayPort 8. Sluchátkový konektor 9.
1.5 Představení monitoru 1.5.1 Používání ovládacího tlačítka Nastavte monitor pomocí ovládacího tlačítka na zadní části monitoru. 6 6 5 5 4 4 3 3 2 2 1 1. Indikátor napájení: • 2. Stav Popis Bílá ZAPNUTO Oranžová Režim připravenosti VYPNUTO VYPNUTO Tlačítko Napájení: • 3. Stiskem tohoto tlačítka zapnete/vypnete monitor. Když je monitor vypnutý, stisknutím tohoto tlačítka jej zapnete.
• Stisknutím tlačítka GamePlus vstupte do hlavní nabídky GamePlus. • Slouží k aktivaci funkcí Vlasový kříž, Časovač, Počítadlo FPS nebo Zarovnání zobrazení. • Pohybem tlačítka nahoru/dolů vyberte a stisknutím tlačítka potvrďte požadovanou funkci. Stisknutím tlačítka zavřete nabídku. • Vlasový kříž/Časovač/Počítadlo FPS lze posouvat stisknutím 5směrového tlačítka. • Chcete-li aktivovat režim Ostřelovač, musíte v zařízení vypnout HDR.
2.1 Nastavení monitoru • V zájmu optimálního pozorování doporučujeme podívat se tak, abyste viděli celou plochu monitoru, a pak nastavit sklon, který vám nejvíc vyhovuje. • Při nastavování sklonu držte stojan, aby monitor nespadl. • Sklon monitoru můžete nastavit v rozmezí 20˚ až -5˚ a také je možné natočení 25˚ ve směru vlevo/vpravo. Můžete také nastavit výšku monitoru v rozmezí +/- 10 cm. -5 ~ 20 10cm 25° 25° Je normální, že se monitor při nastavování úhlu mírně třese.
2.
2.3 Odpojení ramena/stojanu (pro upevnění na stěnu VESA) • Zabraňte poškození povrchu monitoru. Při odpojování stojanu monitoru vždy udržujte monitoru v jeho polystyrenovém (EPS) obalu. Odnímatelný stojan monitoru je speciálně navržen pro upevnění na stěnu VESA. Odpojení ramena/stojanu 1. Odpojte napájecí a signálové kabely. Opatrně položte monitor obrazovkou dolů na polystyrenový obal monitoru. 2. Sejměte kryty ze spoje monitoru a ramene. 3.
3.1 Nabídka OSD (On-Screen Display) 3.1.1 Změna konfigurace DisplayPort 3840x2160@144Hz Režim Krajina Aura Off ROG Swift PG32UQ HDR OFF Hry Přetaktování Obraz Proměnné OD Barva Adaptive-Sync Výběr vstupu ELMB/ELMB SYNC Nastavení PIP/PBP Efekt osvětlení GamePlus GameVisual MyFavorite Shadow Boost Nastavení systému MOVE/ENTER BACK EXIT 1. Stisknutím středu 5směrného tlačítka zobrazte nabídku OSD. 2. Stisknutím tlačítek Nahoru a Dolů přepínejte možnosti v nabídce.
3.1.2 1. Představení funkcí OSD Hry DisplayPort 3840x2160@144Hz Režim Krajina Aura Off ROG Swift PG32UQ HDR OFF Hry Přetaktování Obraz Proměnné OD Barva Adaptive-Sync Výběr vstupu ELMB/ELMB SYNC Nastavení PIP/PBP Efekt osvětlení GamePlus GameVisual MyFavorite Shadow Boost Nastavení systému MOVE/ENTER EXIT • Přetaktování: Tato funkce umožňuje upravit obnovovací kmitočet. • Proměnné OD: Možnost zrychlení odezvy funkce Over Drive. Obsahuje Úroveň 0~Úroveň 5.
2. Obraz V této hlavní funkci můžete upravit položky Jas, Kontrast, HDR, VividPixel, Dynamické ztmavení, ASCR, Nastavení poměru stran a Filtr Modrého Světla. DisplayPort 3840x2160@144Hz Režim Krajina Aura Off ROG Swift PG32UQ HDR OFF Hry Jas 90 Obraz Kontrast 80 Barva HDR Výběr vstupu Vividpixel Nastavení PIP/PBP Dynamické ztmavení Efekt osvětlení ASCR MyFavorite Nastavení poměru stran Nastavení systému Filtr Modrého Světla MOVE/ENTER BACK EXIT • Jas: Rozsah nastavení je 0 až 100.
• Když je aktivován Filtr Modrého Světla, budou automaticky naimportována výchozí nastavení Režim Závod. • Mezi Úroveň 1 a Úroveň 3 může funkci Jas konfigurovat uživatel. • Úroveň 4 je optimalizované nastavení. Splňuje podmínky certifikátu TUV pro nízké vyzařování modrého světla. Funkci Jas nelze konfigurovat. Pro uvolnění zatížení zraku dodržujte následující zásady: 3-4 • Během vícehodinového používání displeje musí uživatelé dělat přestávky.
3. Barva Tato funkce umožňuje nastavit barvu obrazu. DisplayPort 3840x2160@144Hz Režim Krajina Aura Off ROG Swift PG32UQ HDR OFF Hry Teplota barev Obraz Gamma Barva Sytost Výběr vstupu Nastavení PIP/PBP Efekt osvětlení MyFavorite Nastavení systému • Teplota barev: Obsahuje tři přednastavené barevné režimy (Studené, Normální, Teplé) a Uživatelský režim. • Gamma: Obsahuje tři režimy gamma: 1.8, 2.2, 2.5. • Sytost: Rozsah nastavení je 0 až 100. • 4.
5. Nastavení PIP/PBP Nastavení PIP/PBP umožňuje otevřít menší okno(a) s obrazem z libovolného zdroje videa. DisplayPort 3840x2160@144Hz Režim Krajina Aura Off ROG Swift PG32UQ HDR OFF Hry Režim PIP/PBP Obraz Zdroj PIP/PBP Barva Nastavení barev Výběr vstupu Velikost PIP Nastavení PIP/PBP Efekt osvětlení MyFavorite Nastavení systému MOVE/ENTER EXIT • Režim PIP/PBP: Vyberte PIP, PBP nebo funkci vypněte. • Zdroj PIP/PBP: Slouží k výběru vstupního zdroje obrazu z možností „HDMI-1 (v2.
• Aura RGB: V této funkci můžete vybrat světelný efekt Aura RGB pro monitor a měnit jeho nastavení. Chcete-li světelný efekt Aura RGB vypnout, vyberte možnost „VYPNUTO“. • 7. Pokud je funkce Aura Sync nastavena na „ON“, funkce Aura RGB není k dispozici. MyFavorite Z této hlavní funkce lze nastavit položky Zástupce a Vlastní Nastavení.
8. Nastavení systému Nastavení konfigurace systému.
• Nastavení OSD: Slouží k úpravám nastavení Časový interval OSD, DDC/CI a Průhlednost obrazovky OSD. • Datový tok DisplayPort: Pokud vaše grafická karta není kompatibilní s verzí DP 1.4, vyberte nastavení DP 1.2. • DSC: Komprese streamu zobrazení DisplayPort. • Informace: Zobrazí informace o monitoru. • Obnovit vše: Výběrem „Ano“ obnovíte výchozí tovární hodnoty všech nastavení.
3.2 Specifikace Model Velikost panelu Max. rozlišení Jas (typ.) Intrinsický kontrastní poměr (typ.) Pozorovací úhel (CR>10) 3840 x 2160 při 144 Hz 400 nitů (typicky), 600 nitů (špičkově) 1000:1 178° (V) / 178° (H) Zobrazované barvy 1,07 miliardy Doba odezvy 1 ms (MPRT) Zvuk z HDMI Ano Vstup HDMI HDMI 2.1 x 2 Vstup DisplayPort PBP Port USB3.0 Sluchátka Příkon při zapnutí Barvy skříně Režim úspory energie Režim vypnutí Sklon Fyz. Rozměry se stojánkem (ŠxVxH) Fyz.
3.3 Řešení potíží (FAQ) Problém Možné řešení LED kontrolka napájení nesvítí • Stisknutím tlačítka ověřte, zda je monitor zapnutý. • Zkontrolujte, zda je dobře zapojen napájecí kabel mezi monitor a zásuvku elektrické sítě. • Zkontrolujte funkci indikátoru napájení v hlavní nabídce OSD. Výběrem „ZAPNUTO“ zapnete indikátor LED napájení. Kontrolka napájení • Ověřte, zda je monitor a počítač zapnutý.
3.
Časování obrazu Časování obrazu Časování obrazu Časování obrazu Časování obrazu Časování obrazu Časování obrazu Časování obrazu Časování obrazu O O O O O 720P 59,94/60 O O O 1440 480P 59,94/60 O O O 1440 576P 50 O O O 1920 1080P 50 O O O 1920 1080P 59,94/60 O O O 1920 1080 119,88/120 O O O 3840 2160 24 O O O Časování obrazu 3840 2160 25 O O O Časování obrazu 3840 2160 30 O O O Časování obrazu 3840 2160 50 O O O 3840 2160 60 O O O 3840 21