PG32UQ US ER MA NUAL
Table of contents Notices.......................................................................................................... iii Safety information....................................................................................... iv Care & Cleaning......................................................................................... viii 1.1 Welcome........................................................................................ 1-2 1.2 Package contents..............................
Notices Federal Communications Commission Statement This device complies with Part 15 of the FCC Rules. Operation is subject to the following two conditions: • This device may not cause harmful interference. • This device must accept any interference received including interference that may cause undesired operation. This equipment has been tested and found to comply with the limits for a Class B digital device, pursuant to Part 15 of the FCC Rules.
Canadian Department of Communications Statement This digital apparatus does not exceed the Class B limits for radio noise emissions from digital apparatus set out in the Radio Interference Regulations of the Canadian Department of Communications. This class B digital apparatus complies with Canadian ICES-003. This Class B digital apparatus meets all requirements of the Canadian Interference -Causing Equipment Regulations.
• Never push objects or spill liquid of any kind into the slots on the monitor cabinet. • To ensure satisfactory operation, use the monitor only with UL listed computers which have appropriate configured receptacles marked between 100 ~ 240V AC. • The socket-outlet shall be installed near the equipment and shall be easily accessible • If you encounter technical problems with the monitor, contact a qualified servicer. • Provide an earthing connection before the mains plug is connected to the mains.
NEVER place a product in an unstable location. NEVER place the product on tall furniture (for example, cupboards or bookcases) without anchoring both the furniture and the product to a suitable support. NEVER place the product on cloth or other materials that may be located between the product and supporting furniture. NEVER place items that might tempt children to climb, such as toys and remote controls, on the top of the product or furniture on which the product is placed.
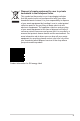
Disposal of waste equipment by user in private household in the European Union This symbol on the product or on its packaging indicates that this product must not be disposed of with your other household waste. Instead, it is your responsibility to dispose of your waste equipment by handing it over to a designated collection point for the recycling of waste electrical and electronic equipment.
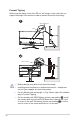
Prevent Tipping When using the display, fasten the LCD to a wall using a cord or chain that can support the weight of the monitor in order to prevent the monitor from falling. 1 M4 or M6 Screw Cord 2 Cord or chain viii • Display design may differ from those illustrated. • Installing must be done by a qualified technician , and please contact your supplier for more information. • For the Models with net weight >=7kg. Please select the suitable way to Prevent Tipping.
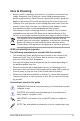
Care & Cleaning • Before you lift or reposition your monitor, it is better to disconnect the cables and power cord. Follow the correct lifting techniques when positioning the monitor. When lifting or carrying the monitor, grasp the edges of the monitor. Do not lift the display by the stand or the cord. • Cleaning. Turn your monitor off and unplug the power cord. Clean the monitor surface with a lint-free, non-abrasive cloth. Stubborn stains may be removed with a cloth dampened with mild cleaner.
Where to find more information Refer to the following sources for additional information and for product and software updates. 1-2 1. ASUS websites The ASUS websites worldwide provide updated information on ASUS hardware and software products. Refer to http://www.asus.com 2. Optional documentation Your product package may include optional documentation that may have been added by your dealer. These documents are not part of the standard package.
1.1 Welcome Thank you for purchasing the ASUS® LCD monitor! The latest widescreen LCD monitor from ASUS provides a crisper, broader, and brighter display, plus a host of features that enhance your viewing experience. With these features, you can enjoy the convenience and delightful visual experience that the monitor brings you! 1.
1.3 Assembling the monitor To assemble the monitor: • While assembling the monitor arm/base, we recommend that you keep the monitor inside its EPS (Expanded Polystyrene) packaging. 1. Align the screw hole on the arm with the bundled screw on the base. Then insert the base into the arm. 2. Fix the base to the arm by fastening the bundled screw. 3. Remove the monitor from its EPS packaging. Adjust the monitor to the angle that is most comfortable for you.
1.4 Connect cables 1.4.1 Rear of the LCD monitor 9 DCIN 1 2 3 1. DC-IN Port 2. USB3.0 Upstream Port 3. USB3.0 Downstream Port 4. USB3.0 Downstream Port 5. HDMI2.1 Port 6. HDMI2.1 Port 7. DisplayPort 8. Earphone Jack 9.
1.5 Monitor introduction 1.5.1 Using the Controls button Use the control button on the back of the monitor to adjust the monitor settings. 6 6 5 5 4 4 3 3 2 2 1 1. Power Indicator: • 2. Status Description White ON Amber Standby mode OFF OFF Power Button: • 3. Press this button to turn the monitor on/off. Press this key to turn on the monitor when monitor is power off. GameVisual: • 4.
• Press GamePlus Button to enter the GamePlus main menu. • Activate Crosshair, Timer, FPS Counter or Display Alignment function. • Move the button up/down to select and press confirm the function needed. Press to to go off, and exit. • Crosshair/Timer/FPS Counter is movable by pressing 5-way key. • To activate Sniper, you need to disable HDR on your device. GamePlus main menu GamePlus-Crosshair GamePlus-Timer GamePlus-Sniper 5. Close Button: • 6. 2-1 Exit the OSD menu.
2.1 Adjusting the monitor • For optimal viewing, we recommend that you look at the full face of the monitor, then adjust the monitor to the angle that is most comfortable for you. • Hold the stand to prevent the monitor from falling when you change its angle. • You can adjust the monitor’s angle from -5˚ to 20˚ and it allows 25˚ swivel adjustment from either left or right. You can also adjust the monitor’s height within +/- 10 cm.
2.
2.3 Detaching the arm/stand (for VESA wall mount) • Avoid damaging the monitor surface. While detaching the monitor stand, always keep the monitor inside its EPS packaging. The detachable stand of this monitor is specially designed for VESA wall mount. To detach the arm/stand 1. Disconnect power and signal cables. Carefully put the monitor facedown on its EPS packaging. 2. Remove the covers on where the monitor and the arm meet. 3.
3.1.1 How to reconfigure DisplayPort 2560x1440@165Hz Scenery Mode Aura Off ROG Swift PG32UQ HDR OFF Gaming Overclocking Image Variable OD Color Adaptive-Sync Input Select ELMB/ELMB SYNC PIP/PBP Setup GamePlus Lighting Effect GameVisual MyFavorite Shadow Boost System Setup MOVE/ENTER 3-2 EXIT BACK 1. Press the Central of 5-way button to display the OSD menu. 2. Press the Up and Down keys to switch the options in the menu.
3.1.2 1. OSD Function Introduction Gaming DisplayPort 2560x1440@165Hz Scenery Mode Aura Off ROG Swift PG32UQ HDR OFF Gaming Overclocking Image Variable OD Color Adaptive-Sync Input Select ELMB/ELMB SYNC PIP/PBP Setup GamePlus Lighting Effect GameVisual MyFavorite Shadow Boost System Setup MOVE/ENTER BACK EXIT • Overclocking: This function allows you to adjust the refresh rate. • Variable OD: Speeds up the response time by Over Drive technology. Including Level 0~Level 5.
2. Image You can adjust Brightness, Contrast, HDR, VividPixel ,Dynamic Dimming, ASCR, Aspect Control and Blue Light Filter from this main function. DisplayPort 2560x1440@165Hz Scenery Mode Aura Off ROG Swift PG32UQ HDR OFF Gaming Brightness 90 Image Contrast 80 Color HDR Input Select Vivldplxel PIP/PBP Setup Dynamic Dimming Lighting Effect ASCR MyFavorite Aspect Control System Setup Blue Light Filter MOVE/ENTER • Brightness: The adjusting range is from 0 to 100.
• When Blue Light Filter is activated,the default settings of Racing Mode will be automatically imported. • Between Level 1 to Level 3, the Brightness function is userconfigurable. • Level 4 is optimized setting. It is compliance with TUV Low Blue Light Certification. The Brightness function is not userconfigurable. Please refer to the following to alleviate eye strains: • Users should take some time away from the display if working for long hours.
3. Color Select the image color you like from this function. DisplayPort 2560x1440@165Hz Scenery Mode Aura Off ROG Swift PG32UQ HDR OFF Gaming Color Temp. Image Gamma Color Saturation Input Select PIP/PBP Setup Lighting Effect MyFavorite System Setup • Color Temp.: Contains three preset color modes (Cool, Normal, Warm) and User Mode. • Gamma: Contains three gamma modes including 1.8, 2.2, 2.5. • Saturation: The adjusting range is from 0 to 100. • 4.
5. PIP/PBP Setup The PIP/PBP Setting allows you to open up sub-window(s) connected from any video source. DisplayPort 2560x1440@165Hz Scenery Mode Aura Off ROG Swift PG32UQ HDR OFF Gaming PIP/PBP Mode Image PIP/PBP Source Color Color setting Input Select PIP Size PIP/PBP Setup Lighting Effect MyFavorite System Setup MOVE/ENTER • PIP/PBP Mode: Select PIP, PBP or turn it off. • PIP/PBP Source: Selects the video input source among, “HDMI-1 (v2.1)”, “HDMI-2 (v2.1)” or “DisplayPort”.
• Aura RGB: In this function you can select an Aura RGB light effect for the monitor and change settings for the light effect. Select “OFF“ if you want to turn the Aura RGB light effect off. • 7. If the Aura Sync function is turned ON, the Aura RGB function will become unavailable. MyFavorite You can adjust Shortcut and Customized Setting from this main function.
DisplayPort 2560x1440@165Hz Scenery Mode Aura Off ROG Swift PG32UQ HDR OFF Gaming Language Image Sound Color USB Hub Input Select Power Indicator PIP/PBP Setup Power Key Lock Key Lock Lighting Effect OSD Setup MyFavorite DisplayPort Stream System Setup EXIT BACK MOVE/ENTER DisplayPort 2560x1440@165Hz Scenery Mode Aura Off ROG Swift PG32UQ HDR OFF Gaming DSC Model Name Image Information Color Depth Color All Reset Format PG32UQ 8 bps RGB 444 Input Select Range PIP/PBP Setup EO
3-10 • DSC:DisplayPort Display Stream Compression. • Information:Displays the monitor information. • All Reset: Selects “Yes” to revert all settings to the factory default mode.
3.2 Specifications Model PG32UQ Panel Size 32” W (81.3 cm) Max. Resolution 3840x2160@144Hz Brightness (Typ.) 400 nits(Typ.) , 600 nits(Peak) Intrinsic Contrast Ratio (Typ.) 1000:1 178°(V) /178°(H) Viewing Angle (CR>10) Display Colors 1.07B Response Time 1 ms (MPRT ) Sound from HDMI Yes HDMI input HDMI2.1 x 2 DisplayPort input Yes PBP Yes USB3.
Problem Power LED is not ON The power LED lights amber and there is no screen image Screen image is too light or dark Screen image bounces or a wave pattern is present in the image Screen image has color defects (white does not look white) No sound or sound is low 3-12 Possible Solution • Press the button to check if the monitor is in the ON mode. • Check if the power cord is properly connected to the monitor and the power outlet. • Check Power Indicator function in main menu OSD.
3.4 Supported Timing List Timing H Pixels V Pixels Frame Rate Display Port O O O O O O O O O O O O O O O O O O O O 480 60 480 67 480 72 75 480 400 70 600 56 60 600 600 72 600 75 768 60 768 70 768 75 75 864 720 60 960 60 1024 60 75 1024 900 60 1050 60 1080 60 480P 59.94/60 480P 59.94/60 576P 50 720P 50 O 720P 59.94/60 O 480P 59.94/60 O 576P 50 O 1080P 50 O 1080P 59.94/60 O 1080 119.
Video Timing Video Timing Detail timing 3840 3840 1920 2160 2160 2160 60 120 60 O Detail timing 2560 1440 120 O Detail timing Detail timing 2560 3840 1440 2160 144 60 O O Detail timing 3840 2160 100 O Detail timing 3840 2160 120 O Detail timing 3840 2160 144 O Detail timing 3840 1600 144 O Detail timing 3840 2160 155 O O O O O O O O O (OverClock) (OverClock) O O O O O O (OverClock) (OverClock) O O (OverClock) (OverClock) O O (OverClock) (OverClock) O (Over