B R UKS AN V I S N I N G
Innehållsförteckning Meddelanden................................................................................................ iii Säkerhetsinformation.................................................................................. iv Underhåll och rengöring............................................................................. ix 1.1 Välkommen.................................................................................... 1-1 1.2 Förpackningens innehåll.....................................
Meddelanden Meddelande från Federal Communications Commission Denna enhet uppfyller del 15 av FCC-reglerna. Användning får ske under följande två villkor: • Enheten får inte orsaka skadliga störningar. • Denna enhet måste acceptera alla mottagna störningar, inklusive störningar som kan orsaka oönskade funktioner. Denna utrustning har testats och befunnits överensstämma med gränserna för en digital enhet av Klass B, enligt del 15 av FCC-reglerna.
Meddelande från kanadensiska kommunikationsdepartementet Denna digitala apparat överstiger inte Klass B-gränsvärden för utsläpp av radiobrus från digitala apparater som fastställts i bestämmelserna gällande radiostörningar från kanadensiska kommunikationsdepartementet. Denna digitala klass B-apparat överensstämmer med direktiv Canadian ICES-003. Denna digitala apparat av klass B uppfyller alla krav i de kanadensiska förordningarna om interferensutrustning.
• Tryck aldrig in föremål eller spill vätska i öppningarna på skärmens hölje. • För att garantera tillfredsställande funktioner, använd endast skärmen med UL-märkta datorer med lämpligt konfigurerade uttag märkta 100~240 V växelström. • Eluttaget ska installeras nära utrustningen och vara lätt att komma åt. • Om du får tekniska problem med bildskärmen, kontakta en kvalificerad servicetekniker. • Se till att ha en jordanslutning innan stickkontakten ansluts till elnätet.
Placera ALDRIG produkten på en ostadig plats. Placera ALDRIG produkten på höga möbler (exempelvis skåp eller bokhyllor) utan att förankra både möbeln och produkten med ett lämpligt stöd. Placera ALDRIG produkten på tyg eller andra material som kan placeras mellan produkten och möbeln den står på. Placera ALDRIG föremål som kan locka barn att klättra, exempelvis leksaker och fjärrkontroller, ovanpå produkten eller möbeln som den står på.
Avfallshantering av utrustning för användare i privata hushåll i Europeiska unionen Denna symbol på produkten eller på förpackningen indikerar att denna produkt inte får kasseras med ditt andra hushållsavfall. Istället är det ditt ansvar att kassera din utrustning genom att överlämna den till en utsedd uppsamlingsplats för återvinning av elektronisk utrustning.
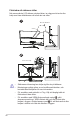
Förhindra att skärmen välter När man använder LCD-skärmen ska den fästas i en vägg med ett snöre eller kedja som klarar bildskärmens vikt så att den inte välter. 1 M4- eller M6-skruv Snöre 2 Snöre eller kedja viii • Skärmens utformning kan skilja sig från de på bilderna. • Monteringen måste göras av en kvalificerad tekniker, och kontakta återförsäljaren för mer information. • För modeller med nettovikt >=7 kg. Välj ett lämpligt sätt att förhindra att den välter.
Underhåll och rengöring • Innan du lyfter eller flyttar på skärmen är det bäst att först koppla ifrån kablar och nätsladd. Använd korrekt lyftteknik vid placering av skärmen. När du lyfter eller bör skärmen, håll i dess kanter. Lyft inte skärmen via stativet eller kabeln. • Rengöring. Stäng av projektorn och dra ur nätsladden. Rengör skärmytan med en dammfri, mjuk trasa. Svåra fläckar kan tas bort med en tygduk som är fuktad med ett milt rengöringsmedel.
Vart man hittar mer information Se följande källor för ytterligare information och för produkt- och programuppdateringar. x 1. ASUS webbplatser ASUS webbplatser ger uppdaterad information över hela världen för ASUS hårdvaru- och programprodukter. Se http://www.asus.com 2. Ytterligare dokumentation Produktförpackningen kan innehålla ytterligare dokumentation som lagts till av din återförsäljare. Dessa dokument är inte en del av den vanliga förpackningen.
1.1 Välkommen Tack för att du köpt ASUS® LCD-skärm! Den senaste LCD-skärmen från ASUS ger en tydligare, bredare och ljusstarkare bild tillsammans med en mängd egenskaper som förbättrar din visningsupplevelse. Med dessa egenskaper kan du njuta av den praktiska och njutbara visuella upplevelsen som skärmen ger dig! 1.2 Förpackningens innehåll Kontrollera att förpackningen innehåller följande objekt: LCD-skärm Skärmfot Snabbstartsguide Garantikort 1x Strömsladd 1x HDMI 2.
1.3 Sätta ihop bildskärmen För att sätta ihop bildskärmen: • Vid montering av skärmens arm/bas rekommenderar vi att du förvarar skärmen i dess polystyrenlåda (EPS). 1. Justera skruvhålet på armen med den medföljande skruven på basen. Sätt sedan in basen i armen. 2. Fäst basplattan till armen genom att skruva åt den medföljande skruven. 3. Ta ut skärmen från polystyrenförpackningen. Justera skärmen till den vinkel som känns mest bekväm.
1.4 Kabelanslutning 1.4.1 LCD-skärmens baksida 9 DCIN 1 2 3 1. Likströmsingångsport 2. USB3.0 uppströmsport 3. USB3.0 nedströmsport 4. USB3.0 nedströmsport 5. HDMI 2.1 port 6. HDMI 2.1 port 7. DisplayPort 8. Hörlursuttag 9.
1.5 Introduktion till skärmen 1.5.1 Använda kontrollknapparna Använd kontrollknapparna på skärmens baksida för att justera skärminställningarna. 6 6 5 5 4 4 3 3 2 2 1 1. Strömindikator: • 2. Status Beskrivning Vit PÅ Gul Standbyläge AV AV Power (ström)-knapp: • Tryck på den här knappen för att sätta på eller stänga av bildskärmen. Tryck på denna knappen för att starta bildskärmen när den är avstängd.
• • Tryck på knappen GamePlus för att gå till GamePlushuvudmeny. Aktivera funktionerna Crosshair (Korshår), Timer, FPS Counter (FPS-räknare) eller Display Alignment (Visningsjustering). • Flytta knappen • för att bekräfta önskad funktion. Tryck på för att stänga av och avsluta. Crosshair (korshår)/Timer/FPS Counter (FPS-räknare) kan • flyttas genom att trycka på 5-vägsknappen. För att aktivera Sniper måste du inaktivera HDR på din enhet.
2.1 Justera skärmen • För optimal visning rekommenderar vi att du tittar på hela skärmytan och sedan justerar vinkeln till den vinkel du finner bekvämast. • Håll i foten för att förhindra att skärmen faller när du ändrar vinkeln. • Du kan ställa in skärmens vinkel från -5˚ till 20˚ och den tillåter 25˚ vridningsinställning åt antingen höger eller vänster. Du kan också justera skärmens höjd inom +/- 10 cm.
2.
2.3 Ta bort armen/stativet (för VESAväggmontering) • Undvik att skada skärmens yta. Under montering av skärmstativet förvara alltid skärmen inuti dess polystyrollåda. Den avskiljbara ställningen för denna skärm är speciellt konstruerad för VESA väggmontering. Ta bort armen/stället 1. Koppla ifrån nätsladd och signalkablar. Placera skärmen försiktigt nedåt i dess polystyrollåda. 2. Ta bort locket där skärmen och armen möts. 3. Ta bort de fyra skruvarna (4) som håller fast armen på skärmens baksida.
3.1 Skärmmeny (OSD) 3.1.1 Hur man konfigurerar om DisplayPort 3840x2160@144Hz Scenery Mode Aura Off ROG Swift PG32UQ HDR OFF Gaming Overclocking Image Variable OD Color Adaptive-Sync Input Select ELMB/ELMB SYNC PIP/PBP Setup GamePlus Lighting Effect GameVisual MyFavorite Shadow Boost System Setup MOVE/ENTER BACK EXIT 1. Tryck på mittpunkten på 5-vägsknappen för att visa OSD-menyn. 2. Tryck på upp- och nedknapparna för att ändra alternativen i menyn.
3.1.2 1. Introduktion för funktioner i skärmmenyn Gaming (Spel) DisplayPort 3840x2160@144Hz Scenery Mode Aura Off ROG Swift PG32UQ HDR OFF Gaming Overclocking Image Variable OD Color Adaptive-Sync Input Select ELMB/ELMB SYNC PIP/PBP Setup GamePlus Lighting Effect GameVisual MyFavorite Shadow Boost System Setup MOVE/ENTER EXIT • Överklockning: Funktionen ger dig möjlighet att justera uppdateringsfrekvensen. • Variable OD (Variabel OD): Skyndar på svarstiden med Over Drive-teknik.
2. Image (Bild) Du kan justera Brightness (Ljusstyrka), Contrast (Kontrast), HDR, VividPixel, Dynamic Dimming (Dynamisk nedtoning), ASCR, Aspect Control (Bildförhållandekontroll) och Blue Light Filter (Filter för blått ljus) från denna huvudfunktion.
• När Blue Light Filter (Filter för blått ljus) aktiveras kommer standardinställningarna för Racing Mode (racing-läget) att importeras automatiskt. • Mellan funktionerna Level 1 (Nivå 1) och Level 3 (Nivå 3) kan Brightness (Ljusstyrka) konfigureras av användaren. • Level 4 (Nivå 4) är optimerad inställning. Den överensstämmer med TUV-certifiering för lågt blått ljus. Funktionen Brightness (Ljusstyrka) kan inte konfigureras av användaren.
3. Color (Färg) Välj den bildfärg som du gillar i denna funktion. DisplayPort 3840x2160@144Hz Scenery Mode Aura Off ROG Swift PG32UQ HDR OFF Gaming Color Temp. Image Gamma Color Saturation Input Select PIP/PBP Setup Lighting Effect MyFavorite System Setup • Color Temp. (färgtemperatur): Har tre förinställda färglägen (Cool (sval), Normal, Warm (varm)) och User Mode (användarläge). • Gamma: Innehåller tre gammalägen inklusive 1.8, 2.2, 2.5.
5. PIP/PBP Setup (PIP/PBP-inställning) Med PIP/PBP-inställningen kan du öppna delfönster som är anslutna från vilken som helst videokälla. DisplayPort 3840x2160@144Hz Scenery Mode Aura Off ROG Swift PG32UQ HDR OFF Gaming PIP/PBP Mode Image PIP/PBP Source Color Color setting Input Select PIP Size PIP/PBP Setup Lighting Effect MyFavorite System Setup MOVE/ENTER EXIT • PIP/PBP Mode (PIP-/PBP-läge): Välj PIP, PBP eller stäng av den.
• Aura RGB: I denna funktion kan du välja en Aura RGB-ljuseffekt för skärmen och ändra inställningarna för ljuseffekten. Välj “OFF (Av)” om du vill stänga av Aura RGB-ljuseffekten. • 7. Om Aura Sync-funktionen är PÅ, kommer Aura RGBfunktionen inte att vara tillgänglig. MyFavorite Man kan justera Genväg och Anpassad inställning från denna huvudfunktion.
8. System Setup (Systeminställning) Justerar systemkonfigurationen.
• OSD Setup (OSD-inställningar): Justerar OSD Timeout (tidsgräns), DDC/CI och Transparency (genomsynlighet) för OSD-skärmen. • DisplayPort Stream (Dataström från DisplayPort): Välj DP 1.2 om ditt grafikkort inte är kompatibelt med DP 1.4. • DSC: DisplayPort Display Stream Compression. • Information: Visar information om bildskärmen. • All Reset (Återställ alla): Väljer "Yes (ja)" för att återställa alla inställningar till fabriksinställningarna.
3.2 Specifikationer Modell Panelstorlek Högsta upplösning Ljusstyrka (typ.) 3840x2160@144Hz 400 cd/m² (norm.), 600 cd/m² (topp) Inbäddat kontrastförhållande (typ.) 1000:1 Betraktningsvinkel (CR>10) 178°(V); 178°(H) Skärmfärger Svarstid Ljud från HDMI HDMI-ingång DisplayPort-ingång PBP USB3.0 port Hörlurar Strömförbrukning På Chassifärg Energisparläge Avstängningsläge Lutning Fys. Dimension med fot (BxHxD) Fys. Dimension utan fot (BxHxD) Förpackningens mått (BxHxD) 1,07B 1 ms (MPRT) Yes (Ja) HDMI2.
3.3 Felsökning (FAQ) Problem Möjlig lösning Strömindikatorn är inte PÅ • Tryck på -knappen för att kontrollera om skärmen är PÅ. • Kontrollera att strömkabeln är korrekt ansluten till skärmen och eluttaget. • Kontrollera strömindikator-funktionen i OSDhuvudmenyn. Välj "ON (PÅ)" för att slå på strömindikatorn. Strömindikatorn lyser gult • Kontrollera att skärmen och datorn är PÅ. och ingen bild syns • Se till att signalkabeln är korrekt ansluten till skärmen och datorn.
3.
Videotidtagning 640 480P 59,94/60 O O Videotidtagning 720 480P 59,94/60 O O Videotidtagning 720 576P 50 O O Videotidtagning 1280 720P 50 O O O Videotidtagning 1280 720P 59,94/60 O O O Videotidtagning 1440 480P 59,94/60 O O O Videotidtagning 1440 576P 50 O O O Videotidtagning 1920 1080P 50 O O O Videotidtagning 1920 1080P 59,94/60 O O O 119,88/120 O O O Videotidtagning 1920 1080 Videotidtagning 3840 2160 24 O O O Videotidtagning 3840 2160 25 O O