K U L L ANI M K I L AV U Z U
İçindekiler Tablosu Bildirimler..................................................................................................... iii Güvenlik bilgileri.......................................................................................... iv Bakım ve Temizlik........................................................................................ ix 1.1 Hoşgeldiniz.................................................................................... 1-1 1.2 Paketin içeriği............................
Bildirimler Federal İletişim Komisyonu Beyanı Bu cihaz, FCC Kurallarının 15. Bölümü ile uyumludur. Kullanım, aşağıdaki iki şarta bağlıdır: • Bu aygıt zararlı parazite neden olmamalıdır. • Bu cihaz, istenmeyen işlemlere neden olabilecek parazitler dahil olmak üzere alınan tüm parazitleri kabul etmelidir. Bu ekipman test edilmiş ve Federal İletişim Komisyonu (FCC) Kurallarının 15. Bölümü uyarınca, B Sınıfı dijital cihazlarla ilgili kısıtlamalara uygun olduğu tespit edilmiştir.
Kanada İletişim Dairesi Beyanı Bu dijital cihaz, Kanada İletişim Dairesinin Radyo Parazitleri Düzenlemesinde belirlenen, dijital cihazdan yayılan radyo gürültüsü için B Sınıfı limitlerini aşmamaktadır. Bu B sınıfı dijital cihaz, Kanada'daki ICES-003 standardıyla uyumludur. Bu B Sınıfı dijital cihaz, Kanada Girişime Neden Olan Ekipman Yönetmeliğinin tüm gereksinimlerini karşılar. Cet appareil numérique de la classe B respecte toutes les exigences du Réglement sur le matériel brouiller du Canada.
• Monitör kapağı üzerindeki deliklere asla herhangi bir nesne sokmayın veya herhangi bir sıvı damlatmayın. • Tatminkar kullanımı sağlamak için, monitörü, yalnızca 100 ~ 240V AC arasında uygun yapılandırılmış girişleri olan UL listesine dahil bilgisayarlarla kullanın. • Elektrik prizi ekipmanın yakınına takılmalı ve kolayca erişebilmelidir. • Monitörde teknik sorunlar yaşarsanız yetkili bir servis teknisyeniyle iletişime geçin.
Bir ürünü ASLA dengesiz bir yere yerleştirmeyin. Ürünü hem mobilyayı hem de ürünü uygun bir desteğe sabitlemeden ASLA yüksek mobilyaların (örneğin dolaplar veya kitaplıklar) üzerine yerleştirmeyin. Ürünü ASLA ürün ile destekleyen mobilya arasında bulunabilecek kumaş veya diğer malzemelerin üzerine yerleştirmeyin. Ürünün veya ürünün üzerine yerleştirildiği mobilyaların üzerine ASLA çocukları tırmanmaya teşvik edebilecek oyuncak ve uzaktan kumanda gibi eşyalar koymayın.
Avrupa Birliği'nde evlerde atık ekipmanın kullanıcı tarafından bertaraf edilmesi Ürünün veya ambalajının üzerindeki bu simge, bu ürünün diğer ev atıklarıyla birlikte atılmaması gerektiğini belirtir. Atık ekipmanınızı, atık elektrikli ve elektronik ekipmanların geri dönüşümü için belirlenmiş bir toplama noktasına teslim ederek atmak sizin sorumluluğunuzdadır.
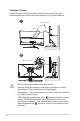
Takılmayı Önleme Ekranı kullanırken, monitörün düşmesini önlemek için monitörün ağırlığını destekleyebilecek bir kordon veya zincir kullanarak LCD’yi duvara sabitleyin. 1 M4 veya M6 Vida Kablo 2 Kablo veya zincir viii • Ekran tasarımı gösterilenlerden farklı olabilir. • Kurulum yetkili bir teknisyen tarafından yapılmalıdır ve daha fazla bilgi için lütfen tedarikçinizle iletişime geçin. • Net ağırlığı> = 7kg olan modeller için. Lütfen Takılmayı Önlemek için uygun yöntemi seçin.
Bakım ve Temizlik • • • Monitörünüzü kaldırmadan veya yeniden yerleştirmeden önce, kablolarını ve elektrik kablosunu çıkarmanız iyi olur. Monitörü yerleştirirken doğru kaldırma teknikleri kullanın. Monitörü kaldırıken veya taşırken, kenarlarından kavrayın. Ekranı altlığından veya kablosundan tutarak kaldırmayın. Temizleme. Monitörünüzü kapatın ve elktrik kablosunu prizden çıkarın. Monitör yüzeyini, tüy bırakmayan, aşındırmayan bir bezle temizleyin.
Bilgilerin bulunabileceği yerler Ek bilgiler ve ürün ve yazılım güncellemeleri için aşağıdaki kaynaklara başvurun. x 1. ASUS web siteleri Dünya çapındaki ASUS web siteleri, ASUS donanım ve yazılım ürünleri hakkında güncel bilgiler sunar. http://www.asus.com adresini ziyaret edin 2. İsteğe bağlı belgeler Ürün paketinizde, bayiiniz tarafından eklenmiş olabilecek isteğe bağlı belgeler bulunabilir. Bu belgeler, standart paketin bir parçası değildir.
1.1 Hoşgeldiniz ® ASUS LCD monitörü aldığınız için teşekkürler! ASUS'un en yeni geniş ekran LCD monitörü, daha canlı, daha geniş ve daha parlak bir görüntünün yanı sıra görüntüleme deneyiminizi geliştirecek pek çok özellik sunmaktadır. Bu özellikler sayesinde, monitörün size getirdiği kolaylığın ve zevk veren görsel deneyimin tadını çıkarabilirsiniz! 1.
1.3 Monitörün monte edilmesi Monitörü monte etmek için: • Monitör kolunu/tabanını monte ederken, monitörü EPS (Genleşmiş Polisitren) ambalajının içinde tutmanızı öneririz. 1. Kolun üzerindeki vida deliğini altlığın üzerindeki vidayla hizalayın. Ardından altlığı kola yerleştirin. 2. Birlikte verilen vidayı sıkarak tabanı kola sabitleyin. 3. Monitörü EPS ambalajından çıkarın. Monitörü en rahat edeceğiniz açıya ayarlayın.
1.4 Kabloları bağlama 1.4.1 LCD monitörün arkası 9 DCIN 1 2 3 4 HDMI-2 HDMI-1 5 6 1. DC-IN Bağlantı Noktası 2. USB3.0 Akış Yukarı Bağlantı Noktası 3. USB3.0 Akış Aşağı Bağlantı Noktası 4. USB3.0 Akış Aşağı Bağlantı Noktası 5. HDMI 2.1 Bağlantı Noktası 6. HDMI 2.1 Bağlantı Noktası 7. DisplayPort 8. Kulaklık Jakı 9.
1.5 Monitöre giriş 1.5.1 Kontroller düğmesini kullanma Monitörün arkasındaki kontrol düğmesini monitör ayarlarını yapmak için kullanın. 6 6 5 5 4 4 3 3 2 2 1 1. Güç Göstergesi: • 2. Durum Açıklama Beyaz AÇIK Sarı Bekleme modu KAPALI KAPALI Güç Düğmesi: • Monitörü açıp kapatmak için bu düğmeye basın. Monitör kapalıyken monitörü açmak için bu tuşa basın.
• • • GamePlus ana menüsüne giriş yapmak için GamePlus Düğmesine basın. Hedef artısı, Zamanlayıcı, FPS Sayacı veya Görüntü Hizalama işlevini etkinleştirin. Gerekl işlevi doğrulamak için yönde basarak için • • düğmesine yukarı/aşağı düğmesine basın. Kapatmak ve çıkmak öğesine basın. Hedef artısı/Zamanlayıcı/FPS Sayacı, 5 yönlü tuşa basılarak hareket ettirilebilir. Keskin nişancı’i etkinleştirmek için, cihazınızda HDR özelliğini devre dışı bırakmanız gerekir.
2.1 Monitörü ayarlama • Optimum bir görüntüleme için, monitörün bütün yüzüne bakmanızı ve ardından monitörü sizin için en rahat olan açıya ayarlamanızı öneririz. • Açısını değiştirirken monitörün düşmesini önlemek için ayaklığı tutun. • Monitörün açısını -5˚ ila 20˚ arasına ayarlayabilirsiniz ve soldan veya sağdan 25˚ dönüş ayarlamasına izin verir. Ayrıca monitörünüzün yüksekliğini +/- 10 cm dahilinde ayarlayabilirsiniz.
2.
2.3 Kolu/statifi ayırma (VESA standardında duvar montajı için) • Monitör yüzeyine zarar vermekten kaçının. Monitör standını sökerken, monitörü daima EPS ambalajının içinde tutun. Bu monitörün ayrılabilir statifi özellikle VESA duvar montajı için tasarlanmıştır. Kolu/statifi ayırmak için 1. Güç ve sinyal kablolarını çıkarın. Monitörü, ön yüzü aşağı bakacak şekilde EPS ambalajına yerleştirin. 2. Monitör ve kolun birleştiği yerdeki kapakları çıkarın. 3.
3.1 OSD (Ekran Göstergesi) menüsü 3.1.1 Yeniden yapılandırma DisplayPort 3840x2160@144Hz Manzara Modu Aura Off ROG Swift PG32UQ HDR OFF Oyun Hız aşırtma Resim Değişken OD Renk Adaptive-Sync Giriş Seçimi ELMB/ELMB SYNC PIP/PBP Kurulumu Aydınlatma Efekti GamePlus GameVisual MyFavorite Shadow Boost Sistem Kurulumu MOVE/ENTER BACK EXIT 1. OSD menüsünü görüntülemek için 5 yönlü tuşun ortasına basın. 2. Menüdeki seçenekleri değiştirmek için Yukarı ve Aşağı tuşlarına basın.
3.1.2 1. OSD İşlevlerine Giriş Oyun DisplayPort 3840x2160@144Hz Manzara Modu Aura Off ROG Swift PG32UQ HDR OFF Oyun Hız aşırtma Resim Değişken OD Renk Adaptive-Sync Giriş Seçimi ELMB/ELMB SYNC PIP/PBP Kurulumu Aydınlatma Efekti GamePlus GameVisual MyFavorite Shadow Boost Sistem Kurulumu MOVE/ENTER EXIT • Hız aşırtma: Bu işlev, yenileme hızını ayarlamanıza olanak tanır. • Değişken OD: Over Drive teknolojisini kullanarak tepki süresini azaltır. Düzey 0~Düzey 5 dahildir.
2. Resim Parlaklık, Kontrast, HDR, VividPixel, Dinamik Karartma, ASCR, Görünüş Kontrolü ve Mavi Işık Filtresi bu ana işlevden ayarlayabilirsiniz. DisplayPort 3840x2160@144Hz Manzara Modu Aura Off ROG Swift PG32UQ HDR OFF Oyun Parlaklık 90 Resim Kontrast 80 Renk HDR Giriş Seçimi Vividpixel PIP/PBP Kurulumu Dinamik Karartma Aydınlatma Efekti ASCR MyFavorite Görünüş Kontrolü Sistem Kurulumu Mavi Işık Filtresi MOVE/ENTER BACK EXIT • Parlaklık: Ayar aralığı 0 - 100 arasındadır.
• Mavi Işık Filtresi etkinleştirildiğinde, Yarış Modu varsayılan ayarları otomatik olarak alınacaktır. • Düzey 1 ila Düzey 3 arasında, Parlaklık işlevi kullanıcı tarafından yapılandırılabilir. • Düzey 4 en uygun duruma getirilmiş ayardır. TUV Düşük Mavi Işık Onayıyla uyumludur. Parlaklık işlevi kullanıcı tarafından yapılandırılamaz. Göz yorgunluklarını azaltmak için lütfen aşağıdaki bilgilere başvurun: 3-4 • Saatler boyunca çalışılması durumunda, kullanıcılar ekrandan bir süreliğine uzaklaşmalıdır.
3. Renk Bu işlev üzerinden istediğiniz görüntü rengini seçin. DisplayPort 3840x2160@144Hz Manzara Modu Aura Off ROG Swift PG32UQ HDR OFF Oyun Renk Sıcaklığı Resim Gama Renk Renk Doygunluğu Giriş Seçimi PIP/PBP Kurulumu Aydınlatma Efekti MyFavorite Sistem Kurulumu • Renk Sıcaklığı: Üç ön ayarlı renk modu (Soğuk, Normal, Sıcak) ve Kullanıcı Modu bulunur. • Gama: 1.8, 2.2, 2.5 olmak üzere üç gama modu içerir. • Renk Doygunluğu: Ayar aralığı 0 - 100 arasındadır. • 4.
5. PIP/PBP Kurulumu PIP/PBP Ayarları, herhangi bir video kaynağından bağlı altpencere(ler)i açmanıza izin verir. DisplayPort 3840x2160@144Hz Manzara Modu Aura Off ROG Swift PG32UQ HDR OFF Oyun PIP/PBP Modu Resim PIP/PBP Kaynağı Renk Renk Ayarı Giriş Seçimi PIP Boyut PIP/PBP Kurulumu Aydınlatma Efekti MyFavorite Sistem Kurulumu MOVE/ENTER • PIP/PBP Modu: PIP, PBP’yi seçer veya kapatır. • PIP/PBP Kaynağı: Video giriş kaynağını “HDMI-1 (v2.1)”, “HDMI2 (v2.1)” veya “DisplayPort” arasından seçer.
• Aura RGB: Bu işlevde, monitör için bir Aura RGB ışık efekti seçebilir ve ışık efekti ayarlarını değiştirebilirsiniz. Aura RGB ışık efektini kapatmak istiyorsanız “KAPALI” seçeneğini seçin. • 7. Aura Sync işlevi AÇIK konuma getirildiğinde, Aura RGB işlevi kullanılamaz duruma gelir. MyFavorite Kısayol ve Özelleştirilen Ayar ayarlarını bu ana işlevden yapabilirsiniz.
8. Sistem Kurulumu Sistem yapılandırmasını ayarlar.
• DisplayPort Akışı: Ekran kartınız DP 1.4 ile uyumlu değilse DP 1.2’yi seçin. • DSC: DisplayPort Görüntü Akışı Sıkıştırma. • Bilgi: Monitör bilgilerini görüntüler. • Tümünü Sıfırla: Tüm ayarları fabrika varsayılan moduna geri döndürmek için “Evet” seçimini yapın.
3.2 Teknik Özellikler Model Panel Boyutu En Yüksek Çözünürlük Parlaklık (Tipik) 3840x2160@144Hz 400 nit(Tip), 600 nit(Pik) Doğal Kontrast Oranı (Tipik) 1000:1 Görüntüleme Açısı (CR>10) 178°(D) /178°(Y) Ekran Renkleri Tepki Süresi HDMI'dan Ses HDMI girişi DisplayPort girişi PBP USB3.0 Bağlantı Noktası Kulaklık Güç Açıkken Tüketim Kasa Renkleri 1,07B 1 ms (MPRT) Evet HDMI2.
3.3 Sorun giderme (SSS) Sorun Güç LED'i AÇIK değil Güç LED'i ışıkları amber renginde ve ekranda hiç bir görüntü yok. Ekran görüntüsü çok açık veya çok karanlık Ekran görüntüsü zıplıyor veya görüntüde bir dalga deseni oluşuyor Ekran görüntüsünde renk hataları var (beyaz, beyaz gibi görünmüyor) Ses yok veya düşük BIOS ekranı görüntülenemiyor ASUS LCD Monitör PG Serisi Olası Çözüm • Monitörün AÇIK modda olup olmadığını anlamak için düğmesine basın.
3.
Video Zamanlaması 3840 2160 25 O O O Video Zamanlaması 3840 2160 30 O O O Video Zamanlaması 3840 2160 50 O O O 3840 2160 60 O O O 3840 2160 120 O O 1920 2160 60 O O O 2560 1440 120 O O (Hız aşırtma) O (Hız aşırtma) 2560 1440 144 O O O 3840 2160 60 O O O Ayrıntılı zamanlama 3840 2160 100 O O (Hız aşırtma) O (Hız aşırtma) Ayrıntılı zamanlama 3840 2160 120 O Ayrıntılı zamanlama 3840 2160 144 O Ayrıntılı zamanlama 3840 1600 144 O O (H