Première édition Février 2021 Copyright © 2021 ASUSTeK COMPUTER INC. Tous droits réservés. Aucune partie de cette publication, y compris les produits et logiciels y étant décrits, ne peut être reproduite, transmise, transcrite, stockée dans un système d’interrogation ou traduite dans une langue quelconque sous quelque forme et par quelque moyen que ce soit, exception faite de la documentation conservée par l’acheteur à des fins de sauvegarde, sans l’autorisation écrite expresse de ASUSTeK COMPUTER INC.
Table des matières Table des matières...................................................................................... iii Avertissements............................................................................................ iv Informations de sécurité.............................................................................. v Soin & Nettoyage......................................................................................... vi Takeback Services...........................................
Avertissements Déclaration de la Commission Fédérale des Télécommunications (FCC) Cet appareil est conforme à la section 15 du règlement de la FCC. Son fonctionnement est sujet aux deux conditions suivantes : • Cet appareil ne doit pas causer d’interférences nuisibles, et • Cet appareil doit être capable d’accepter toutes les interférences, y compris les interférences pouvant provoquer un fonctionnement indésirable.
This Class B digital apparatus meets all requirements of the Canadian Interference - Causing Equipment Regulations. Cet appareil numérique de la classe B respecte toutes les exigences du Réglement sur le matériel brouiller du Canada. Informations de sécurité • Avant d’installer le moniteur, lisez attentivement toute la documentation qui accompagne la boîte. • Pour éviter tout incendie ou électrocution, n'exposez jamais le moniteur à la pluie ni à l'humidité.
• Pour assurer un fonctionnement satisfaisant, utilisez le moniteur uniquement avec des ordinateurs listés UL, qui ont des réceptacles configurés de façon appropriée et marqués 100-240 V AC. • Si vous rencontrez des problèmes techniques avec le moniteur, contactez un technicien de réparation qualifié ou votre revendeur.
Conventions utilisées dans ce guide ATTENTION : Informations pour éviter de vous blesser en essayant de terminer un travail. AVERTISSEMENT : Informations pour éviter d’endommager les composants en essayant de terminer un travail. IMPORTANT : Informations que vous DEVEZ suivre pour terminer une tâche. REMARQUE : Astuces et informations supplémentaires pour aider à terminer un tâche.
viii
1.1 Bienvenue ! Merci d’avoir acheté le moniteur LCD d’ASUS® ! Le dernier moniteur à écran LCD large d’ASUS offre un affichage plus large, plus lumineux et d’une clarté cristalline, en plus de toute une gamme de fonctions qui améliorent votre séance de visionnage. Avec ces fonctions du moniteur, vous pouvez profiter du confort et vous régaler d’une expérience visuelle ! 1.
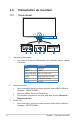
1.3 Présentation du moniteur 1.3.1 Vue de devant 6 1. 3. 3 2 1 Les couleurs du témoin d’alimentation sont indiquées dans le tableau ci-dessous. État Description Blanc MARCHE ARRÊT ARRÊT Orange clignotant Entre en mode veille Orange Mode Veille/Aucun signal Vert Rouge HDR/HDR+G-SYNC G-SYNC Raccourci (droite) • Active le moniteur quand le moniteur entre en mode veille ou affiche le message « PAS DE SIGNAL ».
4. • Appuyez sur ce bouton pour entrer dans le menu OSD. • Utilise l’élément du menu OSD sélectionné. • Bascule la fonction Serrure entre activée et désactivée avec un appui long pendant 5 secondes. Raccourci (gauche) 5. • Active le moniteur quand le moniteur entre en mode veille ou affiche le message « PAS DE SIGNAL ». • Valeur par défaut : Raccourci GamePlus • Pour modifier la fonction du raccourci, allez dans le menu Raccourci > Raccourci (gauche). Panneau OLED LiveDash • 6.
6. Ports USB en aval. Ces ports permettent de connecter des appareils USB, comme un clavier/une souris USB, un lecteur de mémoire flash USB, et. 7. Prise casque. 8. Fente de verrouillage Kensington. 9. Fente de ventilation (sortie de l’air chaud). Ne couvrez pas les fentes de ventilation du moniteur. L’accumulation de chaleur peut réduire la durée de vie de votre moniteur et s’avérer dangereuse. 10. Trou de vis (pour la vis du trépied). 11. Capteur de lumière. 12.
Menu principal GamePlus GamePlus — Viseur Crosshair GamePlus OFF Crosshair Timer Stopwatch FPS FPS Counter Display Alignment GamePlus — Minuterie Timer GamePlus — Compteur de FPS FPS FPS Counter OFF OFF 30:00 001 Number Bar Graph 40:00 50:00 60:00 90:00 1.3.4 Fonction GameVisual La fonction GameVisual vous aide à sélectionner facilement les différents modes d'affichage. Pour activer GameVisual : 1. Appuyez le bouton de raccourci GameVisual. 2.
4. Appuyez le bouton Quitter pour quitter. Retour pour revenir en arrière ou sur le bouton • Mode Paysage : Ceci est le meilleur choix pour l’affichage de photos de paysage avec la technologie d’amélioration vidéo de GameVisualTM. • Mode course : Ceci est le meilleur choix pour les jeux de course avec la technologie d’amélioration vidéo de GameVisualTM. • Mode cinéma : Ceci est le meilleur choix pour regarder les films avec la technologie d’amélioration vidéo de GameVisualTM.
Moniteur LCD Série PG32UQX d’ASUS 1-7
1-8 Chapitre 1 : Présentation du produit
2.1 Fixer le bras/la base Pour assembler la base du moniteur : 1. Insérez la base dans le bras (Figure 1). 2. Assurez la base au bras en serrant la vis. (Figure 2). 3. Retirez le capuchon en caoutchouc situé au bas de la base. (Figure 2). 4. Fixez le couvercle de projection LED sur le support. (Figure 3). (Figure 1)  1 3 2 (Figure 3) (Figure 2) Pour changer le film sur le couvercle de projection LED, suivez l'illustration ci-dessous.
2.2 Gestion des câbles Vous pouvez organiser les câbles à l’aide du couvercle du port entrée/sortie. 2-2 • Organiser les câbles • Utiliser couvercle du port entrée/sortie : le couvercle peut être installé ou retiré.
2.3 Démontage du bras/de la base (montage mural VESA) Le bras détachable de ce moniteur, est spécialement conçu pour une installation murale VESA. Pour démonter le bras : 1. Couchez le moniteur sur une table face vers le bas. 2. Utilisez un tournevis pour retirer les couvercles là où le moniteur et le bras se rejoignent. 3. Desserrez les quatre vis à l’arrière du moniteur et enlevez le bras/la base. 4. Serrez les vis de montage mural.
2.4 Réglage du moniteur • Pour une vision optimale, il est recommandé d'avoir une vision de face sur le moniteur, ensuite réglez l'angle du moniteur pour qu'il soit confortable. • Tenez le pied pour empêcher le moniteur de tomber quand vous le changez d’angle. • Vous pouvez régler l’angle du moniteur, de +20˚ à -5˚ et le faire pivoter de 20˚ vers la gauche ou vers la droite. Vous pouvez également ajuster la hauteur du moniteur, de +/- 70 mm.
2.5 Branchement des câbles Branchez les câbles selon les instructions suivantes : Pour le service uniquement  • • Pour brancher le cordon d’alimentation : a. Connectez l’adaptateur d’alimentation sur l’entrée DC IN du moniteur. b. Connectez une extrémité du cordon d’alimentation à l’adaptateur d’alimentation et l’autre extrémité à une prise électrique. Pour connecter le câble HDMI/DisplayPort : a. Branchez une extrémité du câble HDMI/DisplayPort sur la prise HDMI/ DisplayPort du moniteur. b.
2.6 • Allumer/Éteindre le moniteur Pour allumer le moniteur : Appuyez sur n’importe quel bouton. Voir page 1-2 pour l’emplacement des boutons. Le témoin d’alimentation s’allume en blanc pour indiquer que le moniteur est allumé. • Pour éteindre le moniteur : Tournez la molette OSD vers la droite pour mettre bouton OK.
Moniteur LCD Série PG32UQX d’ASUS 2-7
2-8 Chapitre 2 : Installation
3.1 Menu OSD (affichage à l’écran) 3.1.1 Comment faire pour reconfigurer GameVisual Mode course Sélection Entrée HDMI-1 HDR Arrêt OD Jeux GamePlus Image Couleur GamrVisual Optimisation des noirs Sélection Entrée Raccourci 1. Une fois le moniteur allumé, tournez la molette OSD vers la gauche/droite pour sélectionner Menu et appuyez le bouton OK pour activer le menu OSD. 2. Tournez la molette OSD vers la gauche/droite pour naviguer dans les fonctions.
3.1.2 1. Présentation des fonctions OSD Jeux GameVisual Mode course Sélection Entrée HDMI-1 HDR Arrêt OD Jeux GamePlus Image Couleur GamrVisual Optimisation des noirs Sélection Entrée Raccourci • OD : Améliore le temps de réponse du niveau de gris du panneau LCD. Il contient 3 modes comprenant Extrême, Normal et Arrêt. • GamePlus : Voir 1.3.3 Fonction GamePlus pour des détails. • GameVisual : Voir 1.3.4 Fonction GameVisual pour des détails.
• Contraste : La plage de réglage est de 0 à 100. • Rétroéclairage variable : Active ou désactive le fonctionnement avec le rétroéclairage variable. Les options sont Rapide (de préférence pour les expériences de jeu), Moyen et Graduel (de préférence pour les situations professionnelles ou le traitement de texte). • Contrôle de l’aspect : Définit le rapport d’aspect à Plein écran ou Format. • Filtre de lumière bleue * Niveau 0 : Aucun changement.
3. Couleur GameVisual Mode course Sélection Entrée HDMI-1 HDR Arrêt Température Couleur Jeux Saturation sur six axes Image Couleur Gamma DP SDR YCbCr sRGB Gamma HDMI SDR YCbCr sRGB Gamma Sélection Entrée Raccourci 4. • Température Couleur : Contient 8 modes notamment 4000K, 5000K, 6500K, 7500K, 8200K, 9300K, 10000K et Mode Utilisateur. • Saturation sur six axes : Règle la saturation pour R, V, B, C, M, Y. • Gamma : Vous permet de paramétrer le mode couleur sur 2,6, 2,4, 2,2, 2,0 ou 1,8.
5. Raccourci GameVisual Mode course Sélection Entrée HDMI-1 HDR Arrêt Raccourci (droite) Jeux Raccourci (gauche) Image Couleur Sélection Entrée Raccourci • Raccourci (droite)/Raccourci (gauche) : Définit les fonctions de raccourci pour les boutons de raccourci. Quand une certaine fonction est sélectionnée ou activée, votre bouton de raccourci peut ne pas la prendre en charge.
• 7. • Si la fonction Aura Sync est réglée sur Marche, la fonction Aura RGB deviendra indisponible. • Voir « 3.2 Aura » pour plus d’informations sur comment personnaliser les effets de lumière Aura de votre ordinateur. LUMIÈRE EN MOUVEMENT : Sélectionne le niveau de luminosité de la lumière sur le support. La plage de réglage est de « Niveau 0 » à « Niveau 3 ».
Si le moniteur ne peut pas se réveiller après être entré en veille prolongée, procédez d’une des manières suivantes : - Appuyez un bouton sur le moniteur pour le réveiller. - Désactivez la fonction Veille prolongée. • Serrure : Pour désactiver toutes les touches de fonction. Appuyez le bouton OK pendant plus de 5 secondes pour désactiver la fonction de verrouillage du clavier.
3.2 Aura Armoury Crate est un logiciel qui contrôle les DÉL colorées sur les périphériques pris en charge, comme les moniteurs, les cartes mères, les cartes graphiques, les PC de bureau, etc. Aura vous permet d’ajuster la couleur des DÉL RVB sur ces périphériques et de sélectionner différents effets de lumière. Vous pouvez également corriger ou ajuster la couleur des DÉL en les étalonnant. Le panneau OLED LiveDash est également contrôlé par ce logiciel. 1.
3.3 Résumé des spécifications Type d’affichage Taille de l’écran Résolution max. Taille des pixels Luminosité Rapport de contraste (Typ.) Rapport de contraste (Max.
Accessoires Conformité et normes Guide de mise en route, carte de garantie, adaptateur d’alimentation, cordon d’alimentation, câble HDMI, Câble DisplayPort, câble USB, carte de bienvenue ROG avec enveloppe, rapport de test du calibrage des couleurs, couvercle du port entrée/sortie, vis de montage mural, vis du trépied, couvercle de projection LED et films interchangeables, autocollant ROG cTUVus, CB, CE, FCC, CCC, BSMI, CU, VCCI, J-MOSS, RoHS, WEEE, PSE, KCC, ICES-3, ErP, CEL, ISO 9241-307, UkrSEPRO, RCM,
3.
3.5 Guide de dépannage (FAQ) Problème Solution possible Le voyant DEL d'alimentation n’est • Appuyez n’importe quel bouton pour vérifier si le pas ALLUMÉ moniteur est en mode ALLUMÉ. • Vérifiez si le cordon d'alimentation est correctement branché sur le moniteur et sur la prise de courant. • Vérifiez que l’interrupteur d’alimentation est en position ALLUMÉ. Le voyant DEL d’alimentation • Vérifiez si le moniteur et l’ordinateur sont en mode est de couleur orange et il n’y a ALLUMÉ.
3.6 Modes de fonctionnement pris en charge Résolution Fréquence HDMI DisplayPort 640 x 480 800 x 600 1024 x 768 1920 x 1080 2560 x 1440 2560 x 1440 2560 x 1440 3840 x 2160 3840 x 2160 3840 x 2160 3840 x 2160 3840 x 2160 3840 x 2160 3840 x 2160 Taux de rafraîchissement (Hz) 59,9 60,3 60 60 120 144 60 - Taux de rafraîchissement (Hz) 60 60 60 144 144 24 30 60 72 96 120 144 Lorsque le moniteur fonctionne en mode vidéo (c.-à-d.
3-14 Chapitre 3 : Menu OSD (affichage à l’écran)
Moniteur LCD Série PG32UQX d’ASUS 3-15
3-16 Chapitre 3 : Menu OSD (affichage à l’écran)