Inhalt Hinweise....................................................................................................... iii Sicherheitshinweise.................................................................................... iv Pflege und Reinigung.................................................................................. vi 1.1 Willkommen................................................................................... 1-1 1.2 Lieferumfang.......................................................
Hinweise FCC-Hinweis Dieses Gerät erfüllt Teil 15 der FCC-Regularien. Der Betrieb unterliegt den folgenden beiden Voraussetzungen: • Dieses Gerät darf keine Funkstörungen verursachen. • Dieses Gerät muss jegliche empfangenen Funkstörungen hinnehmen, einschließlich Störungen, die zu unbeabsichtigtem Betrieb führen können. Dieses Gerät wurde getestet und als mit den Grenzwerten für Digitalgeräte der Klasse B gemäß Teil 15 der FCC-Regularien übereinstimmend befunden.
Sicherheitshinweise • • • • • • • • • • • • • • • • iv Es empfiehlt sich, vor dem Aufstellen des Monitors die mitgelieferte Dokumentation aufmerksam durchzulesen. Um Brände oder einen Stromschlag zu verhindern, darf der Monitor nicht Regen oder Feuchtigkeit ausgesetzt werden. Versuchen Sie nicht, das Monitorgehäuse zu öffnen. Die gefährliche Hochspannung im Geräteinnern kann zu schweren Verletzungen führen.
• Verwenden Sie ADP-120RH B des DELTA-Adapters. WARNUNG Die Nutzung anderer als der angegebenen Kopf- oder Ohrhörer kann aufgrund übermäßiger Geräuschpegel zu Hörverlust führen.
Pflege und Reinigung • • • Vor Hochheben oder Versetzen des Monitors sollten sämtliche Kabel herausgezogen werden. Halten Sie sich beim Aufstellen des Monitors an die Hinweise zum Anheben des Geräts. Fassen Sie das Gerät beim Heben oder Tragen an den Kanten. Heben Sie das Display nicht am Ständer oder am Kabel an. Reinigung. Schalten Sie den Monitor aus und ziehen Sie das Stromkabel heraus. Reinigen Sie die Oberfläche mit einem fusselfreien, weichen Tuch.
So finden Sie weitere Informationen Folgende Informationsquellen liefern weitere Hinweise sowie Updates für Produkte und Software: 1. ASUS-Internetseiten Die ASUS-Internetseiten des Unternehmens für die einzelnen Länder liefern aktualisierte Informationen über Hardware und Software von ASUS. Siehe http://www.asus.com 2. Weitere Dokumentation Das Gerätepaket enthält u. U. vom Händler beigelegte Zusatzdokumentation. Diese ist nicht Teil des Standardpakets.
1.1 Willkommen Vielen Dank, dass Sie diesen ASUS® LCD-Monitor gekauft haben! Dieser neueste Widescreen LCD-Monitor von ASUS verfügt über ein schärferes, breiteres und helleres Display als seine Vorgänger plus eine Reihe von Funktionen, die das Arbeiten mit dem Gerät noch angenehmer und die Darstellung noch natürlicher machen. Diese Funktionen und Merkmale sorgen für die augenfreundliche und brillante Bildwiedergabe des Monitors! 1.
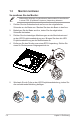
1.3 Monitor montieren So montieren Sie den Monitor: • Während der Montage von Monitorarm/-basis sollten Sie den Monitor in seiner EPS- (Expanded Polystrene) Verpackung belassen. 1. Richten Sie das Schraubenloch am Arm an der mitgelieferten Schraube an der Basis aus. Stecken Sie dann die Basis in den Arm. 2. Befestigen Sie die Basis am Arm, indem Sie die mitgelieferte Schraube festziehen. 3. Richten Sie die dreieckigen Markierungen an der Monitorbasis und an der LED-Projektionsabdeckung aus.
1.4 Kabelverwaltung Sie können die Kabel mit Hilfe der Eingangs-/Ausgangsportabdeckung organisieren. • Kabel anordnen • Eingangs-/Ausgangsportabdeckung verwenden: Die Abdeckung kann angebracht oder abgenommen werden.
1.5 Kabel anschließen 1.5.1 Rückseite des LCD-Monitors 7 1 1-4 2 1. DisplayPort 2. HDMI1.4-Port 3. Kopfhöreranschluss 4. USB-Upstream-Port 5. USB-Downstream-Port 6. Netzeingang 7.
1.6 Einführung 1.6.1 Steuertaste verwenden Verwenden Sie die Steuertaste an der Rückseite des Monitors zum Anpassen der Monitoreinstellungen. 6 6 5 5 4 4 3 3 2 1 1. Betriebsanzeige: • 2. Die Farbe der LED hat folgende Bedeutung: Status Beschreibung Weiß EIN Blinkt gelb Aufrufen des Bereitschaftsmodus Gelb Bereitschaftsmodus / kein Signal AUS AUS Rot G-SYNC Leistung-taste: • 3. Taste zum Ein- und Ausschalten des Geräts.
• Drücken Sie zum Aufrufen des GamePlus-Hauptmenüs die GamePlus-Taste. • Aktivieren Sie die Crosshair (Fadenkreuz), Timer oder FPS Counter (FPS-Zähler). • Bewegen Sie die Taste ( ) zur Auswahl nach oben/ unten, drücken Sie zum Bestätigen der erforderlichen Funktion ( ). Mit das Menü. • brechen Sie den Vorgang ab und verlassen Crosshair (Fadenkreuz), Timer oder FPS Counter (FPSZähler) durch Betätigung der 5-Wege-Taste.
2.1 • Einstellen des Monitors Für eine optimale Draufsicht sollten Sie direkt auf das Display schauen und dabei den Neigungswinkel des Monitors so einstellen, dass Sie das Display bequem ansehen können. • Halten Sie den Monitorfuß während der Einstellung des Winkels fest. • Sie können den Monitorwinkel zwischen +20 ° und -5 ° einstellen und um 50 ° nach links oder rechts schwenken. Zudem können Sie die Monitorhöhe um +/- 10cm anpassen.
2.
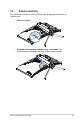
2.3 Abnehmen des Schwenkarms/Fußes (zur VESA-Wandmontage) • Beschädigen Sie die Monitoroberfläche nicht. Achten Sie beim Lösen des Monitorständers immer darauf, den Monitor in seiner EPSVerpackung zu belassen. Der abnehmbare Ständer dieses Monitors wurde speziell zur VESAWandmontage entwickelt. Der Schwenkarm/Fuß wird wie folgt abgenommen 1. Ziehen Sie das Stromkabel und die Signalkabel heraus. Platzieren Sie den Monitor vorsichtig mit der Bildschirmseite nach unten in seiner EPS-Verpackung. 2.
3.1 OSD-Menü (Bildschirmmenü) 3.1.1 Erneut konfigurieren Normaler Modus DisplayPort 3440x1440@ 60Hz Rennmodus Aura-statisch ROG Swift PG349Q Over Clocking EIN Blaulichtfilter Farbe Bildeinrichtung Eingangswahl System-Einstellungen Verschieben/Eingeben Zurück Beenden 1. Blenden Sie das OSD-Menü mit der Mitte der 5-Wege-Taste ein. 2. Drücken Sie zum Umschalten zwischen den Menüoptionen die Aufwärts- oder Abwärtstaste.
3.1.2 1. Die OSD-Funktionen Over Clocking Diese Funktion ermöglicht Ihnen die Anpassung der Bildwiederholfrequenz. Normaler Modus DisplayPort 3440x1440@ 60Hz Rennmodus Aura-statisch ROG Swift PG349Q Over Clocking EIN Blaulichtfilter Farbe Bildeinrichtung Eingangswahl System-Einstellungen Verschieben/Eingeben • 3-2 Zurück Beenden Max Aktualisierungsrate 120 Hz: ermöglicht Ihnen die Auswahl einer maximalen Bildwiederholfrequenz von 105->110->115>120Hz (nur bei DisplayPort-Eingang).
2. Blaulichtfilter Passen Sie die Intensität des von der LED-Hintergrundbeleuchtung ausgegebenen blauen Lichts an. Normaler Modus DisplayPort 3440x1440@ 60Hz Rennmodus Aura-statisch ROG Swift PG349Q Over Clocking Stufe 0 Blaulichtfilter Stufe 1 Farbe Stufe 2 Bildeinrichtung Stufe 3 Eingangswahl Stufe 4 System-Einstellungen Verschieben/Eingeben Zurück Beenden • Stufe 0: Keine Änderung. • Stufe 1 – 4: Je höher die Stufe, desto stärker wird das blaue Licht reduziert.
3. Farbe Mit dieser Funktion wählen Sie die gewünschte Bildfarbe. Normaler Modus DisplayPort 3440x1440@ 60Hz Rennmodus Aura-statisch ROG Swift PG349Q Over Clocking Helligkeit 80 Blaulichtfilter Kontrast 50 Farbe Sättigung 50 Bildeinrichtung Farbtemp. Eingangswahl Gamma System-Einstellungen Verschieben/Eingeben Beenden • Helligkeit: Möglich sind Werte zwischen 0 und 100. • Kontrast: Möglich sind Werte zwischen 0 und 100. • Sättigung: Möglich sind Werte zwischen 0 und 100. • Farbtemp.
4. Bildeinrichtung Über diese Hauptfunktion OD, Adaptive Kontrastregelung, Shadow Boost können Sie anpassen. Normaler Modus DisplayPort 3440x1440@ 60Hz Rennmodus Aura-statisch ROG Swift PG349Q OD Over Clocking Blaulichtfilter Adaptive Kontrastregelung Farbe Shadow Boost Bildeinrichtung Eingangswahl System-Einstellungen Verschieben/Eingeben Zurück Beenden • OD: Zur Beschleunigung der Reaktionszeit in der OverdriveTechnologie. Inklusive Stufe 0 bis Stufe 5.
5.
6. System-Einstellungen Funktion zum Einstellen der Systemkonfiguration.
• 3-8 Aura RGB: In dieser Funktion können Sie einen Aura RGBLichteffekt für den Monitor wählen und Einstellungen für den Lichteffekt ändern. Wählen Sie „Aus“, wenn Sie den Aura RGBLichteffekt ausschalten möchten. • Falls die Aura-Sync-Funktion eingeschaltet ist, ist die Aura RGBFunktion nicht verfügbar. • Informationen zum Anpassen von Aura-Lichteffekten von Ihrem Computer finden Sie auf Seite 3-9. • Klang: Wählen Sie zum Anpassen der Ausgabelautstärke „Lautstärke“.
3.2 Aura AURA ist ein Softwareprogramm, dass die farbigen LEDs an unterstützten Geräten, wie Monitoren, Motherboards, Grafikkarten, Desktop-PCs usw., unterstützt. Aura ermöglicht Ihnen die Anpassung der Farbe von RGBLEDs an diesen Geräten und die Auswahl verschiedener Lichteffekte. Zudem können Sie die Farbe der LEDs durch deren Kalibrierung korrigieren oder anpassen. So aktivieren Sie Aura: 1. Schalten Sie die Funktion Aura Sync im OSD-Menü ein. 2. Verbinden Sie den USB-3.
3 Zum Aktivieren der Standardeinstellungen anklicken. 4 Zum Rückgängigmachen der Änderungen anklicken. 5 Zum Anwenden der Änderungen anklicken. Falls die USB-Upstream-Verbindung zwischen Monitor und Computer getrennt wird, müssen Sie zum Fortsetzen der AuraFunktion den USB-3.0-Upstream-Port des Monitors erneut mit dem Computer verbinden und dann den Computer neu starten.
3.3 Technische Daten Modell Aktive Bildschirmgröße Maximale Auflösung Helligkeit (typisch) Eigenkontrastverhältnis (typisch) Betrachtungswinkel (CR>10) PG349Q 34,14 in (86,72 cm) (Seitenverhältnis 21:9) 3440 x 1440 300 cd/m2 1000:1 178 ° (V), / 178 ° (H) Anzeigefarben 16.7M Reaktionszeit 4 ms (Grau zu Grau) Ton von HDMI Ja HDMI-Eingang HDMI1.4 x 1 DisplayPort-Eingang USB-3.
3.3 Problembeseitigung (FAQ) Problem 3-12 Lösungsvorschläge Betriebsanzeige leuchtet nicht. • Drücken Sie , um festzustellen, ob der Monitor eingeschaltet ist. • Vergewissern sich, dass das Netzkabel richtig an Display und Steckdose angeschlossen ist. • Prüfen Sie die Betriebsanzeige-Funktion im Hauptmenü. Wählen Sie zum Einschalten der Betriebs-LED „EIN“. Die Strom-LED leuchtet bernsteinfarben, doch auf dem Display ist nichts zu sehen. • Überprüfen Sie, ob PC und Monitor eingeschaltet sind.
3.
Videotiming Timingliste HDMI DisplayPort 640 x 480P bei 59,94 Hz V X 640 x 480P bei 60 Hz V X 720 x 480p bei 59,94 Hz V X 720 x 480p bei 60 Hz V X 720 x 576p bei 50 Hz V X 1280 x 720p bei 50 Hz V X 1280 x 720p bei 59,94 Hz V X 1280 x 720p bei 60 Hz V X 1920 x 1080p bei 50 Hz V X 1920 x 1080p bei 59,94 Hz V X 1920 x 1080p bei 60 Hz V X * Die nicht oben aufgelisteten Modi werden u. U. nicht unterstützt.