RS300-E7/RS4 Configuration Guide
E7412 First Edition V1 June 2012 Copyright © 2012 ASUSTeK COMPUTER INC. All Rights Reserved. No part of this manual, including the products and software described in it, may be reproduced, transmitted, transcribed, stored in a retrieval system, or translated into any language in any form or by any means, except documentation kept by the purchaser for backup purposes, without the express written permission of ASUSTeK COMPUTER INC. (“ASUS”).
Contents Revision history........................................................................................... III Safety information....................................................................................... IV Chapter 1: Product introduction 1.1 Key features................................................................................... 1-2 1.3 Front panel features...................................................................... 1-4 1.2 1.4 1.5 System overview.....
Safety information Electrical Safety • • • • Before installing or removing signal cables, ensure that the power cables for the system unit and all attached devices are unplugged. To prevent electrical shock hazard, disconnect the power cable from the electrical outlet before relocating the system. When adding or removing any additional devices to or from the system, contact a qualified service technician or your dealer.
This chapter describes the key features of RS300-E7/RS4. It includes the product overview and general specifications.
1.1 Key features Green 1U Rack-Mount Server with More Expandability & Flexibility The ASUS RS300-E7/RS4 is a 1U rack-mount server based on new generation Intel® Xeon® Ivy Bridge processor, providing immediate performance up-scaling, high expandability and upgradability.
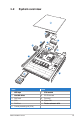
1.2 System overview 9 8 3 7 5 10 4 6 11 11 2 1 Items Items 1. HDD ��������� trays 7. ������������ CPU heatsink 2. Hard ���������������� disk drives 8. PCI-E riser card 3. PIKE card 9. Top cover 4. CPU 10. System FAN 5. FAN Duct 11. ��������������������������� Friction rackmount rail kit 6.
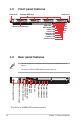
1.3 Front panel features Hot-swap HDD bays Rack screw Rack screw 2 USB ports HDD Access LED LAN2/4 LED LAN1/3 LED Message LED Reset button Location LED Location switch Optical drive(Optional) 1.4 1 Power button Power LED Rear panel features • The rear I/O ports do not appear on the rear panel if motherboard is not present. • The port is for ASUS ASMB6-iKVM controller card only.
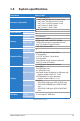
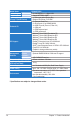
1.5 System specifications Model Name Processor / System Bus Core Logic ASUS Features Memory Smart Fan ASWM2.
Model Name RS300-E7/RS4 4 x Intel 82574L + 1 x Mgmt LAN Networking LAN Aspeed AST2050 16MB Graphic VGA 1 x Slim-type optical Device Bay Auxiliary Storage Device Bay Options: No Device / DVD-RW (Floppy / Optical Device) 1 x External Serial Port 5 x RJ-45 ports (1 for ASMB5-iKVM) 4 x USB 2.
This chapter lists the key components and optional accessories for the server system.
2.1 Upgrading CPU and CPU heatsink The motherboard comes with a surface mount LGA 1155 Socket designed for the Intel® Sandy Bridge and Ivy Bridge series processors.
Order P/N Description 90-S000U0A21T (single pack) Intel Xeon E3-1230 3.1G 90-S000U09Y1T (single pack) 90-S000U0A41T (single pack) 90-S000U0A71T (single pack) 90-S000U0A91T (single pack) 90-S000U0CG0T (single pack) 90-S000U0CH0T (single pack) 90-S000U0CI0T (single pack) 90-S000U0CJ0T (single pack) 90-S000U0CK0T (single pack) 90-S000U0CL0T (single pack) ASUS RS300-E7/RS4 Intel Xeon E3-1220 3.1G Intel Xeon E3-1240 3.1G Intel Xeon E3-1270 3.1G Intel Xeon E3-1280 3.1G Intel Xeon E3-1290 V2 3.
2.2 Upgrading system memory The motherboard comes with six (6) Double Data Rate 3 (DDR3) Dual Inline Memory Modules (DIMM) sockets. 1 DIMM_A1 2 DIMM_A2 3 DIMM_B1 4 DIMM_B2 1 2 3 4 Recommended memory configurations UDIMM DIMM Slot DIMM Populated DIMM Type Per Channel per Channel 2 1 2 2 • DDR3 1600 can only be supported with Intel® Xeon E3-1200 V2 processor. • Start installing the DIMMs from slot A2 and B2 (orange). • Always install DIMMs with the same CAS latency.
2.3 Upgrading hard disk drives The system supports four hot-swap SATAII/SAS hard disk drives. We recommend that you install identical drives of the same model and capacity for RAID configuration.
2.4 Installing ASUS PIKE RAID module The barebone server comes with a riser card bracket. You need to remove the bracket if you want to install PCI Express x8 or x16 expansion cards. 2 1 SATA1 SATA2 SATA3 SATA4 4 3 SATA 3 SATA 4 SATA 1 SATA 2 5 1. 2. 3. 4. 5. P/N Locate the PIKE RAID card slot on the motherboard, then remove the screw at the end of the PIKE slot on the motherboard. Tighten the screw to secure the PIKE card on the motherboard.
2.5 Installing an expansion card to the riser card bracket Follow the steps below to install an optional ASUS RAID card on your motherboard.
2.6 Upgrading power supply unit 450W 1+1 hot-swap redundant power supply eliminate system and application downtime by redundancy power backup 1 2 Order P/N 90-S00PW0230T Description 1U RPS 450W Module Remove the dummy power supply module before installing the second redundant power supply.
2.
2.8 Friction rail kit Front end Rack rails Rear end 1 2 4 3 2-10 P/N Description 90-S00SP1360T FRICTION RAIL KIT V2.
2.9 OS support list Operating System Microsoft Windows Red Hat Enterprise Linux SuSE Linux Enterprise Server Linux Virtualization Version Windows Server 2008 Foundation R2 Windows Server 2008 Enterprise SP2 Windows Server 2008 Enterprise R2 Windows Server 2003 Enterprise R2 SP2 32/64 bit RHEL Enterprise AS 4.0 UP8 32/64 bit RHEL AS 5.0 UP3 32/64 bit RHEL AS 6.0 32/64 bit SuSE Enterprise 10 SP3 32/64 bit SuSE Enterprise 11 32/64 bit SuSE Enterprise 11 SP1 32/64 bit CentOS 5.0 U5 32/64 bit Free BSD 8.
2-12 Chapter 2: Components