
Installation Guide


1
E21630
Tool-less Friction Rail Kit Installation Guide
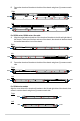
Package contents
Installing the tool-less friction rail
Fixing latches
Tool-less friction rails
Set of screws
Latch screws
Rail Washers Rail screws
• Ensure that the rack rail cabinet and the rack posts are stable and standing firmly on a level
surface.
• We strongly recommend that at least two able-bodied persons perform the steps described in this
guide.
• We recommend the use of an appropriate lifting tool or device, if necessary.
The tool-less design of the rail kit allows you to easily install the rack rails into the server rack without
the need for additional tools. The kit also comes with a metal stopping bracket that can be installed to
provide additional support and stability to the server.
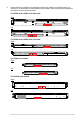
1. (optional) Install the chassis rail bracket onto the server chassis if the chassis rail bracket is not
pre-installed. The steps to install the chassis rail bracket may differ between systems, please
refer to the following
Step 1 only applies to RS7X0 series, RS5X0 series, and RS300 series system models.
For RS7X0 series, RS5X0 series 2U models
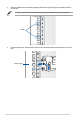
A. Align the screw holes and notches of the chassis rail brackets to the left and right sides of
the chassis. Take note of the front and rear of the chassis, the chassis rail brackets should
be installed towards the front of the chassis.
Left
Right
Rear Front
Front Rear