¨ RT-AC1900P 3x3 Wireless-AC 1900 同步雙頻無線路由器 1900P 快速使用指南 EC15894 / 第三版 / 2019 年 9 月
Table of contents English............................................................................................................ 3 簡體中文.....................................................................................................
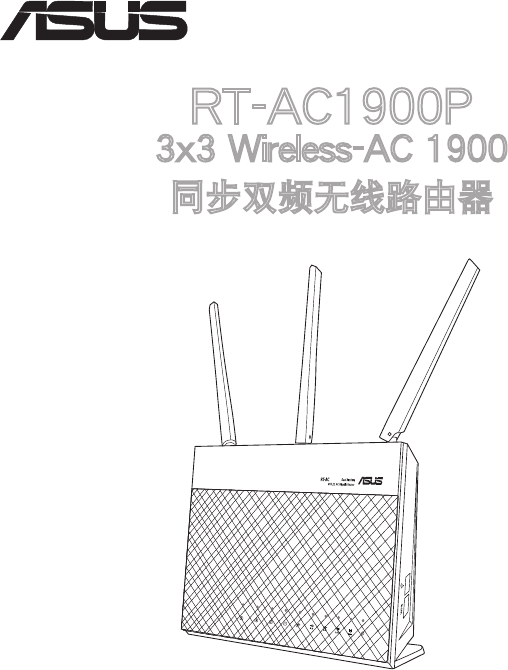
RT-AC1900P Network cable (RJ-45) AC adapter Quick Start Guide English English Package contents NOTE: If any of the items is damaged or missing, contact your retailer. A quick look at your RT-AC1900P 1900P 15 1 2 3 4 5 6 1) LAN 1~4 LED 7 8 9 10 11 12 13 6) Power LED 14 11) USB 3.0/2.0 ports 2) WAN (Internet) LED 7) WPS button 12) WAN port 3) USB 3.0/2.0 LED 8) Wi-Fi On/Off button 13) LED On/Off button 4) 2.
NOTES: English • USB External HDD/Flash disk: • T he wireless router works with most USB HDDs/Flash disks up to 2TB and supports read-write access for FAT16, FAT32, EXT2, EXT3, and NTFS. • T o safely remove the USB disk, launch the web GUI (http://192.168.1.1), then in the Network Map page's upper right corner, click the USB icon and click Eject USB 3.0 / USB 2.0. • Incorrect removal of the USB disk may cause data corruption.
Installing your router 1. Position your wireless router. For the optimal wireless transmission between the wireless router and connected wireless devices, ensure that you: • Place the wireless router in a centralized area for a maximum wireless coverage for the network devices. • Keep the wireless router away from metal obstructions and away from direct sunlight. • Keep the wireless router away from 802.11g or 20MHz only Wi-Fi devices, 2.
2. Prepare your modem. English a. Unplug the AC adapter from the power outlet and disconnect it from your cable/ADSL modem. b. Disconnect the network cable from your cable/ADSL modem. c. Reboot your computer (recommended). Modem c OFF! a b WARNING! Before disconnecting the wires/cables, ensure that your cable/ADSL modem has been turned off for at least two minutes. If your modem has a backup battery, remove it as well. 3. Set up your wireless environment.
NOTE: You can also set up RT-AC1900P using a mobile device such as smartphone or tablet PC. To do this, go to Setup your router using a mobile device for details. 4. Disable some settings on your computer. a. Disable the proxy server, if enabled. b. Set the TCP/IP settings to automatically obtain an IP address. c. Disable the dial-up connection, if enabled. NOTE: For more details on disabling your computer settings, refer to Frequently Asked Questions (FAQs). 7 English a.
Setting up your router using the Quick Internet Setup Wizard English To set up your router using QIS ((Quick Internet Setup): 1. Press the power button at the back of your router. Ensure that the Power, LAN and WAN LEDs are on. 2. Launch your web browser such as Internet Explorer, Firefox, Google Chrome, or Safari. 1900P NOTE: If QIS does not launch automatically, enter http://192.168.1.1 or http://router.asus.com in the address bar and refresh the browser again. 3.
Setup of router (RT-AC68U) administrator password English Login name: Login password: 4. The wireless router’s Quick Internet Setup (QIS) feature automatically detects if your ISP connection type is Dynamic IP, PPPoE, PPTP, L2TP, and Static IP. Please obtain the necessary information about your Internet connection type from your Internet Service Provider (ISP). If your connection type is Dynamic IP (DHCP), QIS wizard will automatically direct you to the next step.
English 5. Assign the network name (SSID) and security key for your 2.4GHz and 5GHz wireless connection. Click Apply when done. 6. Your Internet and wireless settings are displayed. Click Next to continue. 7. Read the wireless network connection tutorial. When done, click Finish. NOTES: • You can assign a network name with up to 32 characters. • Watch the setup tutorial video if needed.
You can also use your mobile device such as a smartphone or a tablet PC to set up RT-AC1900P through QIS wizard. The QIS wizard will automatically switch to the mobile version if you use a smartphone or a tablet PC to launch it. To set up your router using a mobile device: 1. Turn on RT-AC1900P. 2. Enable Wi-Fi function of your mobile device. 3. Search for the SSID ASUS, which is the default SSID of your RT-AC1900P wireless network.
6. The QIS feature automatically detects if your ISP connection type is Dynamic IP, PPPoE, PPTP, L2TP, and Static IP. Enter the necessary information that your Internet Service Provider (ISP) has provided. If your connection type is Dynamic IP (DHCP), QIS wizard will automatically direct you to the next step. English NOTE: If your connection type is Static IP, choose Static IP and click Next. Enter the IP address, subnet mask, default gateway and DNS server information provided by your ISP.
8. Your Internet and wireless settings are displayed. Click Next to continue. 9. Read the wireless network connection tutorial. When done, click Finish. English NOTES: You can assign a network name with up to 32 characters. Connect to the wireless network There are two ways for your wireless clients (notebook, tablet PC, smartphone and so on) to connect to RT-AC1900P’s wireless network. Connect to the wireless network manually To connect to the wireless network manually: 1.
Managing the router via the ASUSWRT web GUI English Your wireless router comes with the intuitive ASUSWRT web graphical user interface. ASUSWRT allows you to easily configure its various features through a web browser such as Internet Explorer, Firefox, Safari, or Google Chrome. NOTE: Use the search bar on the bottom of the interface to get more information from ASUS technical support site http://support.asus.com. IMPORTANT: • For more details on using your router's Web GUI, refer to the user manual.
ASUS AiCloud app provides you with access to your data wherever and whenever you have an Internet connection. It also allows you to access your ASUS WebStorage account via the AiCloud mobile app on your iOS or Android device, or via a web browser. To install AiCloud: 1. Ensure that your router’s firmware version is the latest one and supports AiCloud. 2. Download AiCloud app from Google Play or App Store. 3. Install your USB storage device to your router.
Frequently Asked Questions (FAQs) English After following the steps, I still cannot access the wireless router’s web graphics user interface (web GUI) to configure the wireless router settings. Ensure that your PC's proxy settings are disabled and your PC'S IP address is obtained from the DHCP server automatically. for details on disabling the proxy settings, visit the ASUS Support site at http://support.asus.com.
Check if the ADSL or Cable connection is correct. Retry using another Ethernet cable. If the ADSL “LINK” light blinks continuously or stays off, Internet access is not possible - the Router is unable to establish a connection with the ADSL network. • • • Ensure that all your cables are all properly connected . Disconnect the power cord from the ADSL or cable modem, wait a few minutes, then reconnect the cord. If the ADSL light continues to blink or stays OFF, contact your ADSL service provider.
包裝內容物 簡体中文 RT-AC1900P 無線路由器 電源適配器 RJ45 網線 快速使用指南 注意:若以上列出的任何一項配件有損壞或是短缺的情形,請儘快 聯繫您的經銷商。 認識您的 RT-AC1900P 無線路由器 1900P 15 1 2 3 4 5 6 7 8 9 10 11 12 13 14 1) LAN 1~4 指示燈 6) 電源指示燈 11) U SB 3.0/2.0 接口 2) W AN(互聯網)指 示燈 7) WPS 按鈕 12) WAN 接口 3) USB 3.0/2.0 指示燈 8) W i-Fi 開啟 / 關閉 按鈕 13) 指 示燈開啟 / 關閉 按鈕 4) 2.
注意: • 此無線路由器兼容大多數容量高達 2TB 的 USB 硬盤 / 閃存盤, 並支持 FAT16、FAT32、EXT2、EXT3 與 NTFS 的讀寫。 • 欲 安 全 移 除 U S B 磁 盤 , 登 入 網 頁 圖 形 用 戶 界 面 (http://192.168.1.1),然後在“網絡地圖”頁面的右上角點擊 USB 圖標並選擇【退出 USB 磁盤】。 • 錯誤移除 USB 磁盤將會導致數據丟失。 • 請訪問 http://event.asus.com/networks/disksupport 獲得此無線 路由器所支持的文件系統與硬盤磁區列表。 • 請訪問 http://event.asus.
安裝您的路由器 重要!安裝路由器之前,請確認互聯網連接可用。 簡体中文 1. 放置您的路由器 為獲得無線路由器與所連接的網絡設別之間的最佳無線傳輸信號,請確認以 下幾點: • 建議將路由器放置在中心區域,以覆蓋所有無線移動設備。 • 請勿將裝置放在靠近金屬物品與陽光直射的地方。 • 請遠離其它 802.11g 或 20MHz Wi-Fi 設備、2.4GHz 電腦外圍設備、藍 牙設備、無線室內電話、傳送器、重型發動機、日光燈、微波爐、電冰箱 與其他工業裝置,以防止信號干擾或丟失。 • 請按照下圖所示擺放路由器上的三根可拆卸式天線以獲得最佳前後信號覆 蓋。 • 請經常更新至最新版本固件。您可以登錄華碩官網 http://www.asus.com.
2. 準備調製解調器 a. 拔掉 AC 電源適配器的電源並斷開與有線 / ADSL 調製解調器的連接。 簡体中文 b. 拔掉您有線 / ADSL 調製解調器的網線。 c. 重啟您的電腦(建議執行)。 Modem c OFF! a b 警告!請在斷開電源線或數據線之前,確認您的有線 / ADSL 已關 閉超過兩分鐘。若您的調製解調器有備用電池,請一併移除。 3.
a. 將無線路由器的 AC 適配器插入電源輸入口(DC-IN)並插上電源。 b. 用另一根網線將您的調製解調器連接至無線路由器的 WAN 接口。 c. 將調製解調器的 AC 適配器插入電源輸入口(DC-IN)並插上電源。 簡体中文 d. 使用附贈的網線將您的電腦連接至您的無線路由器的 LAN 接口。 注意:您也可以使用移動設備來設置 RT-AC1900P,如,智能手機 或平板電腦。要進行此操作,參考“使用移動設備設置路由器”部 分的說明。 4. 關閉電腦中的某些設置 a. 關閉代理服務器。 b. 設置 TCP/IP 自動取得 IP 地址。 c.
使用網絡設置嚮導(QIS)設置路由器 1. 按下路由器後側的電源按鈕。確定電源指示燈、LAN 指示燈以及 WAN 指 示燈亮起。 2. 開啟一個網絡瀏覽器,如 Internet Explorer、Firefox、Safari 或 Google Chrome。 1900P 注意:若網絡設置嚮導(QIS)未能自動開啟,請在您的網路瀏覽器 中輸入 http://192.168.1.1 或 http://router.asus.com 並刷新頁面。 3.
Setup of router (RT-AC68U) administrator password 登錄名稱: 簡体中文 登錄密碼: 3.
簡体中文 5. 指定網路名稱(SSID)與安全密鑰以連接 2.4GHz 與 5GHz 無線網絡。 完成後點擊【Apply】。 6. 畫面將顯示您的網絡與無線設置。點擊【Next】繼續。 7.
使用移動設備設置路由器(選用) 簡体中文 您也可以通過網絡設置嚮導(QIS)使用移動設備來設置 RT-AC1900P,如,智 能手機或平板電腦。若您使用智能手機或平板電腦登錄,網絡設置嚮導(QIS) 會自動切換為移動版本。 1. 開啟 RT-AC1900P。 2. 開啟移動設備的 Wi-Fi 功能。 3. 搜索 SSID 為“ASUS”的無線網絡,該名稱為 RT-AC1900P 無線網絡的默認 SSID。點擊此 SSID 進行連接,並等待顯示 Wi-Fi 連接狀態。 4. 開啟移動設備的網絡瀏覽器。 注 意:若 網 絡 設 置 嚮 導(Q I S )未 能 自 動 開 啟,請 在 您 的 網 絡 瀏 覽 器 中 輸 入 http://192.168.1.1 或 http://router.asus.com 並刷新頁面。 5.
注意:若您的網絡連接類型為固定 IP,請選擇“Static IP”並點擊 【Next】。輸入 IP 地址、子網掩碼、默認網關以及 DNS 服務器信 息。點擊【Next】繼續。 7. 設置網絡名稱 (SSID) 與安全密鑰以連接 2.4GHz 與 5GHz 無線網絡。完 成後點擊【Apply】。 27 簡体中文 6.
8. 畫面將顯示您的網絡與無線設置。點擊【Next】繼續。 9. 閱讀無線網絡連接教程。完成後點擊【Finish】。 簡体中文 注意:您可以設置一個多達 32 字符的網絡名稱。 連接到無線網絡 無線客戶端(筆電、平板電腦以及智能手機等)可以通過兩種方式連接到 RT-AC1900P 的無線網絡。 手動連接到無線網絡 1. 開啟移動設備的 Wi-Fi 功能,並搜索可用的無線網絡。 2. 選擇您指定給 RT-AC1900P 網絡的 SSID 或網絡名稱。 3. 輸入密碼,並點擊【Connect】。 通過 WPS 連接到無線網絡 RT-AC1900P 路由器具備一個 WPS 按鈕,無需輸入密碼您就可以連接無線 客戶端至 RT-AC68 的網絡。 1. 按下 RT-AC1900P 後側的 WPS 按鈕。參考“認識您的 RT-AC1900P 無 線路由器”部分的說明找到 WPS 按鈕的具體位置。 2. 在兩秒內按下無線客戶端的 WPS 按鈕,或按照無線客戶端附贈的 WPS 說明操作。通過 WPS 連接時,路由器上的電源指示燈快速閃爍。 3.
連接到無線網絡 簡体中文 您的無線路由器配備一個直觀的 ASUSWRT 網頁圖形用戶界面。 ASUSWRT允許您通過網頁瀏覽器 (如,Internet Explorer、Firefox、 Safari 或 Google Chrome)輕鬆設 置各項功能。 注 意:點 擊 用 戶界 面 底部的搜索欄可從 ASUS 技術支持網站 http://support.asus.
AiCloud 簡体中文 ASUS AiCloud 應用程序可讓您在有互聯網連接的情況下隨時隨地讀寫您的 數據。您可以通過 iOS 或 Android 設備上的 AiCloud 移動應用程序訪問您的 ASUS WebStorage 帳戶。 按照以下步驟安裝 AiCloud: 1. 確定您的路由器固件為最新版本,且支持 AiCloud。 2. 從 豌豆莢 或 App Store 下載 AiCloud 應用程序。 3. 將 USB 存儲設備連接到路由器。請參考“認識您的 RT-AC1900P 無線 路由器”部分的說明找到 USB 接口的具體位置。 4. 將 iOS 或 Android 設備通過 Wi-Fi 連接到路由器。AiCloud 應用程序將自 動引導您進行設置。 5.
按照以上步驟執行後,我依然無法獲得無線路由器的網頁圖形用戶界 面(web GUI)以設置無線路由器。 確定關閉您電腦上的代理設置,並且您的電腦的 IP 地址為自動從 DHCP 服 務器獲得。關於關閉代理設置的詳細信息,請訪問 ASUS 支持網站 https:// www.asus.com.
• 檢查加密設置。 • 檢查您所使用的 ADSL 或有線調製解調器是否連接至正確的網路接口。 • 重新更換另一根以太網線來連接。 簡体中文 當 ADSL 調製解調器“Link”(連接)指示燈持續閃爍或熄滅,這表 示無法連接至互聯網 - 路由器無法與 ADSL 網絡建立連接。 • 請確認網路線已有正確連接。 • 請將 ASDL 或有線調製解調器的電源線拔除,並等待幾分鐘後,再重新 接上電源。 • 若 ADSL 調製解調器燈號持續閃爍或為熄滅(顯示 OFF)的狀態,請與 您的網絡服務供應商聯繫。 忘記網絡名稱或密鑰密碼。 • 嘗試再次通過有線連接來設置無線的加密動作。 • 按住位於路由器後側的復位(Reset)按鈕超過 5 秒鐘後,進行硬件復位 的動作。 • 出廠默認值設置: 用戶名 / 密碼: admin / admin IP 地址: 192.168.1.1 SSID: ASUS 哪裡可以找到更多的無線路由器信息? • 技術支持網址:https://www.asus.com.
安全說明: - 請在溫度為 0°C (32°F) 至 40°C (104°F) 之間的環境中使用本產品。 - 請依照產品上的電源功率貼紙說明使用正確的電源適配器,如果試用錯誤規格的 電源適配器可能會造成內部零件的損壞。 - 請勿將產品放置於不平坦或不穩定的表面,若產品的外殼損壞,請聯繫維修服務 人員。 - 請勿在產品上放置其他物品,請勿將任何物品塞入產品內,以避免引起組件短路 或電路損壞。 - 請保持机器在干燥的環境下使用,雨水、濕氣、液体等含有礦物質會腐蝕電子線 路,請勿在雷電天气下使用調製解調器。 - 請勿堵塞產品的通風孔,以避免因散熱不良而導致系統過熱。 - 請勿使用破損的電源線、附件或其他周邊產品。 - 如果電源已損壞,請不要嘗試自行修復,請將其交給專業技術服務人員或經銷商 來處理。 - 為了防止電擊風險,在搬動主機前,請先將電源線插頭暫時從電源插座上拔除。 電子電氣產品有害物質限制使用標識要求:圖中之數字為產品之環保使 用期限。僅指電子電氣產品中含有的有害物質不致發生外洩或突變從而 對環境造成污染或對人身、財產造成嚴重損害的期限。 產品中有害物質的名稱及含量 有害
ASUS Recycling/Takeback Services ASUS recycling and takeback programs come from our commitment to the highest standards for protecting our environment. We believe in providing solutions for you to be able to responsibly recycle our products, batteries, other components, as well as the packaging materials. Please go to http://csr.asus.com/english/Takeback.htm for the detailed recycling information in different regions.
Prohibition of Co-location This device and its antenna(s) must not be co-located or operating in conjunction with any other antenna or transmitter. IMPORTANT NOTE: Radiation Exposure Statement: This equipment complies with FCC radiation exposure limits set forth for an uncontrolled environment. End users must follow the specific operating instructions for satisfying RF exposure compliance.
This device has been certi ed for use in Canada. Status of the listing in the Industry Canada’s REL (Radio Equipment List) can be found at the following web address: http://www.ic.gc.ca/app/sitt/reltel/srch/nwRdSrch.do?lang=eng Additional Canadian information on RF exposure also can be found at the following web http://www.ic.gc.ca/eic/site/smt-gst.nsf/eng/sf08792.html Canada, avis d’Industry Canada (IC) Cet appareil numérique de classe B est conforme aux normes canadiennes ICES-003 et RSS-210.
Networks Global Hotline Information Area Country / Region Service Hours 09:00-13:00 ; 14:00-18:00 Mon-Fri 09:00-18:00 Mon-Fri Cyprus 800-92491 France Hungary 0033-170949400 0049-1805010920 0049-1805010923 (component support) 0049-2102959911 (Fax) 0036-15054561 Italy 199-400089 Greece 00800-44142044 Austria Netherlands/ Luxembourg Belgium Norway Sweden Finland Denmark Poland Spain Portugal Slovak Republic Czech Republic Switzerland-German Switzerland-French Switzerland-Italian United Kingdom Irel
Area Country / Region Australia New Zealand Hotline Number 1300-278788 0800-278788 0800-1232787 Japan Korea Thailand Asia-Pacific Singapore Malaysia Philippine India India(WL/NW) Indonesia Americas 0081-473905630 (Non-Toll Free) 0082-215666868 0066-24011717 1800-8525201 0065-64157917 0065-67203835 (Repair Status Only) 0060-320535077 1800-18550163 1800-2090365 0062-2129495000 500128 (Local Only) Vietnam 1900-555581 Hong Kong USA Canada Mexico 00852-35824770 1-812-282-2787 001-8008367847 Service H
Area Middle East + Africa Country / Region Egypt Saudi Arabia UAE Turkey South Africa Israel Romania Bosnia Herzegovina Bulgaria Balkan Countries Croatia Montenegro Serbia Slovenia Estonia Latvia Lithuania-Kaunas Lithuania-Vilnius Hotline Number 800-2787349 800-1212787 00971-42958941 0090-2165243000 0861-278772 *6557/0097239142800 *9770/0097235598555 0040-213301786 Service Hours 09:00-18:00 Sun-Thu 09:00-18:00 Sat-Wed 09:00-18:00 Sun-Thu 09:00-18:00 Mon-Fri 08:00-17:00 Mon-Fri 09:00-18:30 Mon-Fri 00