Benutzerhandbuch RT-AC5300 Wireless-AC5300 Tri-band Gigabit Router
G10304 Erste Ausgabe Juni 2015 Copyright © 2015 ASUSTeK Computer Inc. Alle Rechte vorbehalten. Kein Teil dieses Handbuchs, einschließlich der darin beschriebenen Produkte und Software, darf ohne ausdrückliche, schriftliche Genehmigung von ASUSTeK COMPUTER INC. (“ASUS”) in irgendeiner Form, ganz gleich auf welche Weise, vervielfältigt, übertragen, abgeschrieben, in einem Wiedergewinnungssystem gespeichert oder in eine andere Sprache übersetzt werden.
Inhaltsverzeichnis 1 1.1 1.2 1.3 1.4 1.5 1.6 Kennenlernen Ihres drahtlosen Routers 7 Willkommen!...................................................................................7 Packungsinhalt...............................................................................7 Der drahtlose Router....................................................................8 Router Aufstellen........................................................................ 10 Einrichtungsvoraussetzungen.......................
Inhaltsverzeichnis 3.5 USB-Anwendungen verwenden........................................... 42 3.5.1 AiDisk verwenden.....................................................................42 3.5.2 Servercenter verwenden.....................................................44 3.5.3 3G/4G.........................................................................................49 3.6 AiCloud 2.0 verwenden........................................................... 50 3.6.1 Cloud-Laufwerk.........................
Inhaltsverzeichnis 4.4 4.5 4.6 IPv6.................................................................................................. 83 VPN-Server.................................................................................... 84 Firewall........................................................................................... 85 4.6.1 4.6.2 4.6.3 4.6.4 4.6.5 4.7 Administration............................................................................ 89 4.7.1 4.7.2 4.7.3 4.7.4 92 4.8 4.
6.1 6.2 Fehlerbehebung 114 Allgemeine Problemlösung.................................................114 Häufig gestellte Fragen (FAQ) .............................................116 Anhänge 125 Hinweise.....................................................................................................125 ASUS Kontaktinformationen...............................................................139 Globale Netzwerk-Hotlines..................................................................
1 Kennenlernen Ihres drahtlosen Routers 1.1 Willkommen! Vielen Dank für den Kauf Ihres neuen WLAN-Routers ASUS RTAC5300! Der extradünne und elegante RT-AC5300 bietet 2.4GHz und 5GHz Dual-Bands für ein unvergleichliches drahtloses HDStreaming; SMB Server, UPnP AV Server und FTOP Server für eine Dateifreigabe rund um die Uhr.; Bearbeitungsfähigkeit von 300,000 Arbeitsvorgängen; und grüne Netzwerktechnologie von ASUS – eine Lösung für bis zu 70% Energieersparnis. 1.
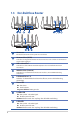
1.3 Der drahtlose Router Stromtaste Mit dieser Taste können Sie Ihr System ein-/ausschalten. Stromanschluss (DC-IN) Verbinden das mitgelieferte Netzteil mit diesem Anschluss und schließen Sie den Router an eine Stromversorgung an. USB 3.0-Anschluss Verbinden Sie USB 3.0-Geräte wie USB-Festplatten oder -Flashlaufwerke mit diesen Anschlüssen. WAN-Anschluss (Internet) Verbinden Sie ein Netzwerkkabel mit diesem Anschluss, um eine WAN-Verbindung einzurichten.
WAN LED (Internet) us: Kein Strom oder keine physische Verbindung. A An: Physische Verbindung mit WAN (Wide Area Network). LAN LED A us: Kein Strom oder keine physische Verbindung. A n: Physische Verbindung mit LAN (Lokales Netzwerk). WPS-LED Aus: Keine WPS-Verbindung. An: Die WPS-Verbindung ist hergestellt. USB 2.0 port Insert USB 2.0 devices such as USB hard disks or USB flash drives into this port. LED-Einschalttaste Drücken Sie die Taste auf dem Panel zurm Ein-/Ausschlaten der LED.
1.4 Router Aufstellen Für beste Funksignalübertragung zwischen dem drahtlosen Router und damit verbundenen Netzwerkgeräten sollten Sie: • Den drahtlosen Router in einem zentralen Bereich für maximale Funkabdeckung der Netzwerkgeräte aufestellen. • Das Gerät von Metallhindernissen oder direkten Sonnenlicht fernhalten. • Das Gerät von 802.11g oder nur 20MHz Wi-Fi-Geräten, 2.
1.5 Einrichtungsvoraussetzungen Zur Netzwerkeinrichtung benötigen Sie einen oder zwei Computer, die folgende Systemvorraussetzungen erfüllen: • Ethernet RJ-45 (LAN)-Anschluss (10Base-T/100BaseTX/1000BaseTX) • IEEE 802.11a/b/g/n/ac Drahtlosfunktion • Verfügbarer TCP/IP-Dienst • Ein Webbrowser wie Internet Explorer, Firefox, Safari, oder Google Chrome HINWEISE: • Falls Ihr Computer über keine integrierte Drahtlosfunktion verfügt, können Sie einen IEEE 802.
1.6 Router einrichten WICHTIG! • • Nutzen Sie zur Einrichtung Ihres WLAN-Routers eine Kabelverbindung, damit die Einrichtung problemlos vonstatten geht. Bevor Sie den drahtlosen ASUS Router aufbauen, sollten Sie: • • • en aktuellen Router vom Netzwerk trennen (falls vorhanden). D Alle Kabel/Leitungen der aktuellen Modem-Konfiguration trennen. Entfernen Sie auch jegliche Batterien (falls vorhanden). Starten Sie den Computer neu (empfohlen). 1.6.
2. Verwenden Sie das mitgelieferte Netzwerkkabel, um den LANAnschluss des Routers mit dem Computer zu verbinden. WICHTIG! Die LAN LED sollte blinken. 3 Verwenden Sie ein anderes Netzwerkkabel, um den WANAnschluss des Routers mit dem Modem zu verbinden. 4. Verbinden Sie das Netzteil des Modems mit dem Stromanschluss (DC-IN) sowie mit der Stromversorgung. 1.6.2 Drahtlose Verbindung Computer RT-AC5300 1 WAN Modem 3 Internet 2 So richten Sie eine drahtlose Verbindung ein: 1.
3. Verbinden Sie das Netzteil des Modems mit dem Stromanschluss (DC-IN) sowie mit der Stromversorgung. 4. Installieren Sie einenIEEE 802.11a/b/g/n/ac WLAN-Adapter auf Ihrem Computer. HINWEISE: 14 • Für Details zur Verbindung zu einem Drahtlosnetzwerk beziehen Sie sich auf das Handbuch Ihres WLAN-Adapters. • Zur Einrichtung der Sicherheitseinstellungen für Ihr Netzwerk beziehen Sie sich auf den Abschnitt Einrichten der DrahtlosSicherheitseinstellungen im Kapitel 3 in diesem Benutzerhandbuch.
2 Erste Schritte 2.1 Anmeldung im Web-GUI Ihr drahtloser ASUS Router ist mit einer intuitiven webbasierten grafischen Oberfläche (GUI) ausgerüstet, um Ihnen die Einrichtung seiner vielseitigen Funktion durch einen Webbrowser wie Internet Explorer, Firefox, Safari oder Google Chrome zu erleichtern. HINWEIS: Der Funktionsumfang kann je nach unterschiedlichen Firmware-Versionen variieren. So melden Sie sich bei der Web-GUI an: 1. Geben Sie in Ihren Browser die IP-Adresse192.168.1.
Quick Internet Setup (QIS) mit autom. Erkennung Die Funktion Quick Internet Setup (QIS) führt Sie schnell durch die Einrichtung Ihrer Interentverbindung. HINWEIS: Wenn Sie das eine Internetverbindung zum ersten Mal einrichten, drücken Sie die Reset-Taste, um den drahtlosen Router auf dessen Werkseinstellungen zurückzusetzen. So verwenden Sie QIS mit autom. Erkennung: 1. Melden Sie sich an der grafischen Benutzeroberfläche an. Die ISE-Seite öffnet sich automatisch.
2. Der drahtlose Router erkennt automatisch, ob die Verbindungsart Ihres Internet Dienstanbieters (ISP) Dynamische IP (Dynamic IP), PPPoE, PPTP, L2TP oder Statische IP (Static IP) ist. Geben Sie zusätzlich die nötigen Daten Ihrer Verbindung ein. WICHTIG! Beziehen Sie die nötigen Informationen zur Ihrer Verbindungsart von Ihrem Internet-Dienstanbieter (ISP).
HINWEISE: • Die autom. Erkennung der Verbindungsart Ihres ISP wird bei der ersten Konfiguration des drahtlosen Routers oder nach dem Reset (Zurücksetzen) Ihres drahtlosen Routers zu seinen Standardeinstellungen durchgeführt. • Falls QIS Ihre Verbindungsart nicht erkennt, klicken Sie auf Manuelle Einstellung (Skip to manual setting; Siehe Abbildung in Schritt 1) und konfigurieren Sie die Verbindungseinstellungen manuell. 3. Weisen Sie einen Netzwerknamen (SSID) und einen Sicherheitsschlüssel für Ihre 2.
2.3 Mit Ihrem WLAN-Netzwerk verbinden Nachdem Sie Ihren WLAN-Router über ISE eingerichtet haben, können Sie Ihren Computer und andere kompatible Geräte mit Ihrem WLAN-Netzwerk verbinden. So verbinden Sie sich mit Ihrem Netzwerk: 1. Am Computer klicken Sie auf das Netzwerksymbol im Benachrichtigungsbereich: Verfügbare WLAN-Netzwerke werden angezeigt. 2. Wählen Sie das WLAN-Netzwerk aus der Liste, mit dem Sie sich verbinden möchten, klicken Sie dann auf Connect (Verbinden). 3.
3 Allgemeine Einstellungen konfigurieren 3.1 Netzwerkübersicht verwenden Über die Netzwerkübersicht können Sie die Sicherheitseinstellungen Ihres Netzwerks konfigurieren, Ihre Netzwerk-Clients verwalten und Ihre USB-Geräte überwachen.
3.1.1 Einrichten der Drahtlos-Sicherheit Um Ihr Netzwerk vor unautorisierten Zugriff zu schützen, müssen Sie dessen Sicherheitseinstellungen einrichten. So richten Sie die Drahtlos-Sicherheitseinstellungen ein: 1. Wechseln Sie vom Navigationspanel zu General (Allgemein)> Network Map (Netzwerkübersicht). 2. Im Fenster Network Map (Netzwerkübersicht) wählen Sie das Symbol System status (Systemstatus), um DrahtlosSicherheitseinstellungen wie SSID, Sicherheitsstufe und Verschlüsselungseinstellungen anzuzeigen.
3. Geben Sie im Feld Wireless name (Drahtlos-Kennung, SSID) Ihrem drahtlosen Netzwerk einen individuellen Namen. 4. Wählen Sie aus der Authentication Method (Authentifizierungsverfahren)-Auswahlliste das Authentifizierungsverfahren für Ihr Drahtlosnetzwerk. Falls Sie WPA-Personal oder WPA-2 Personal als Authentifizierungsverfahren wählen, geben Sie den WPA-PSKSchlüssel oder das Sicherheitskennwort ein. WICHTIG! Der IEEE 802.
3.1.2 Verwalten der Netzwerk-Clients So verwalten Sie die Netzwerk-Clients: 1. Wechseln Sie vom Navigationspanel zu General (Allgemein) > Network Map tab (Netzwerkübersicht-Register). 2. Wählen Sie im Fenster Network Map (Netzwerkübersicht) das Symbol Client Status (Clientstatus), um Informationen über Ihre Netzwerk-Clients anzuzeigen. 3. Wenn Sie den Netzwerkzugriff eines Clients blockieren möchten, wählen Sie den Client aus und klicken anschließend auf block (blockieren).
3.1.3 Überwachen der USB-Geräte Der ASUS-WLAN-Router bietet zwei USB 2.0-Ports zum Anschluss von USB-Geräten oder USB-Druckern; so können Sie Dateien und Drucker mit Clients in Ihrem Netzwerk teilen. HINWEISE: 24 • Um diese Funktion zu verwenden, müssen Sie einen USB-Datenträger wie ein USB-Laufwerk oder USB-Flashlaufwerk mit dem USB 3.0/ 2.0-Anschluss auf der Rückseite Ihres drahtlosen Routers verbinden. Stellen Sie sicher, dass der USB-Datenträger richtig formatiert und partitioniert wurde.
WICHTIG! Wenn Sie anderen Netzwerk-Clients per FTP-Site/ Drittanbieter-FTP-Clients, Servercenter, Samba oder AiCloud Zugriff auf das USB-Gerät gewähren möchten, müssen Sie zunächst ein Freigabekonto und dessen Berechtigungen/Zugriffsrechte einrichten. Weitere Hinweise dazu finden Sie in den Abschnitten 3.5 USBAnwendungen verwenden und 3.6 AiCloud verwenden in dieser Bedienungsanleitung. So überwachen Sie die USB-Geräte: 1.
USB-Laufwerk sicher trennen WICHTIG: Ein falsches Trennen des USB-Laufwerks kann zu Datenverlusten führen. So trennen Sie das USB-Laufwerk auf sichere Weise: 1. Wechseln Sie vom Navigationspanel zu General (Allgemein)> Network Map (Netzwerkübersicht). 2. Klicken Sie in der oberen rechten Ecke auf > Eject USB disk (USB-Laufwerk trennen). Wenn das USB-Laufwerk erfolgreich getrennt wurde, wird als USB-Status Unmounted (Getrennt) angezeigt.
3.2 Erstellen eines Gästenetzwerkes Das Gästenetzwerk ermöglicht zeitweiligen Besuchern den Zugriff auf das Internet. Dazu werden separate SSIDs oder Netzwerke verwendet, die keinen Zugang zu Ihrem privaten Netzwerk ermöglichen. HINWEIS: Der RT-AC5300 unterstützt bis zu sechs SSIDs (drei 2,4-GHzund drei 5-GHz-SSIDs). So erstellen Sie ein Gästenetzwerk: 1. Wechseln Sie vom Navigationspanel zu General (Allgemein) > Guest Network (Gästenetzwerk). 2.
4. Wenn Sie zusätzliche Optionen konfigurieren möchten, klicken Sie auf Modify (Modifizieren). Klicken Sie im GästenetzwerkBildschirm auf Entfernen. 5. Legen Sie im Feld Network Name (SSID) (Netzwerkname (SSID)) einen Namen für Ihr temporäres Netzwerk fest. 6. Wählen Sie ein Authentication Method (Autentisierungsverfahren). 7. Wählen Sie eine Verschlüsselungsmethode. 8. Legen Sie die Access time (Zugangszeiten) fest oder wählen Sie Limitless (Unbeschränkt). 9.
3.3 AiProtection AiProtection bietet Echtzeitüberwachung, die Malware, Spyware und unerwünschten Zugriff erkennt. Es filtert außerdem unerwünschte Webseiten und Apps und ermöglicht die Festlegen einer Zeit, zu der ein verbundenes Gerät auf das Internet zugreifen kann.
3.3.1 Network Protection (Netzwerkschutz) Network Protection (Netzwerkschutz) verhindert Netzwerksicherheitslücken und schützt Ihr Netzwerk vor unerwünschten Zugriff. Network Protection (Netzwerkschutz) konfigurieren So konfigurieren Sie Network Protection (Netzwerkschutz): 1. Wählen Sie über den Navigationsbereich General (Allgemein) > AiProtection. 2. Klicken Sie auf der AiProtection-Hauptseite auf Network Protection (Netzwerkschutz). 3.
WICHTIG! Mit Yes (Ja) auf der Seite Router Security Assessment (Router-Sicherheitsbewertung) markierte Elemente gelten als sicher. Mit No (Nein), Weak (Schwach) oder Very Weak (Sehr schwach) markierte Elemente sollten unbedingt konfiguriert werden. 4. (Optional) Konfigurieren Sie auf der Seite Router Security Assessment (Router-Sicherheitsbewertung) manuell die mit No (Nein), Weak (Schwach) oder Very Weak (Sehr schwach) markierten Elemente. Gehen Sie dazu wie folgt vor: a. Klicken Sie auf ein Element.
Malicious Sites Blocking (Blockierung schädlicher Seiten) Diese Funktion beschränkt den Zugriff auf bekannte bedrohliche Webseiten in der Cloud-Datenbank, damit der Schutz immer auf dem neuesten Stand ist. HINWEIS: Diese Funktion wird automatisch aktiviert, wenn Sie Router Weakness Scan (Suche nach Schwächen des Routers) ausführen. So aktivieren Sie Malicious Sites Blocking (Blockierung schädlicher Seiten): 1. Wählen Sie über den Navigationsbereich General (Allgemein) > AiProtection. 2.
Infected Device Prevention and Blocking (Prävention und Blockierung infizierter Geräte) Diese Funktion verhindert, dass infizierte Geräte persönliche Informationen oder den infizierten Status an externe Parteien kommunizieren. HINWEIS: Diese Funktion wird automatisch aktiviert, wenn Sie Router Weakness Scan (Suche nach Schwächen des Routers) ausführen. So aktivieren Sie Vulnerability protection (Schutz vor Schwachstellen): 1. Wählen Sie über den Navigationsbereich General (Allgemein) > AiProtection. 2.
3.3.2 Parental Controls (Jugendschutz) einrichten Mit Parental Controls (Jugendschutz) können Sie die Zeiten für Internetzugriff oder die Dauer für die Netzwerknutzung eines Clients festlegen. So rufen Sie die Parental Controls(Jugendschutz)-Hauptseite auf: 1. Wählen Sie über den Navigationsbereich General (Allgemein) > AiProtection. 2. Klicken Sie auf der AiProtection-Hauptseite auf das Register Parental Controls (Jugendschutz).
Web & Apps Filters (Web- und App-Filter) Web & Apps Filters (Web- und App-Filter) ist eine Parental Controls (Jugendschutz)-Funktion, mit der Sie den Zugriff auf unerwünschte Webseiten oder Applikationen blockieren können. So konfigurieren Sie Web & Apps Filters (Web- und App-Filter): 1. Wählen Sie über den Navigationsbereich General (Allgemein) > AiProtection. 2.
Time Scheduling (Zeitplanung) Time Scheduling (Zeitplanung) ermöglicht die Festlegung eines Zeitlimits für die Netzwerknutzung eines Clients. HINWEIS: Stellen Sie sicher, dass Ihre Systemzeit mit dem NTP-Server synchronisiert ist. So konfigurieren Sie Time Scheduling (Zeitplanung): 1. Wählen Sie über den Navigationsbereich General (Allgemein) > AiProtection > Parental Controls (Jugendschutz) > Time Scheduling (Zeitplanung). 2.
3. Geben Sie in der Spalte Clients Name (Client-Name) durch Auswahl aus der Liste oder Eingabe den Client-Namen an. HINWEIS: Sie können die MAC-Adresse des Clients auch in die Client MAC Address (Client-MAC-Adresse)-Spalte eintragen. Achten Sie darauf, dass der Name des Clients keine Sonderzeichen oder Leerzeichen enthält; andernfalls können Fehlfunktionen des Routers auftreten. 4. Klicken Sie zum Hinzufügen des Client-Profils auf . 5. Klicken Sie zum Speichern der Einstellungen auf Apply (Übernehmen).
3.4 Adaptive QoS 3.4.1 Bandwidth Monitor (Bandbreitenüberwachung) Diese Funktion ermöglicht Ihnen die Überwachung der WAN/LANBandbreite und zeigt die Upload- und Download-Geschwindigkeit Ihrer Verbindung. Apps analysis (App-Analyse) So aktivieren Sie Apps analysis (App-Analyse): Rufen Sie im Register Bandwidth Monitor (Bandbreitenüberwachung) den Bereich Apps Analysis (AppAnalyse) auf, klicken Sie dann auf ON (Ein).
3.4.2 QoS Diese Funktion sichert Bandbreite für bevorzugte Aufgaben und Applikationen. So aktivieren Sie die QoS-Funktion: 1. Wählen Sie über den Navigationsbereich General (Allgemein) > Adaptive QoS > QoS-Register. 2. Klicken Sie im Bereich Enable Smart QoS (Intelligente QoS aktivieren) auf ON (Ein). 3. Füllen Sie die Felder zur Upload- und Download-Bandbreite aus. HINWEIS: Sie erhalten die Bandbreiteninformationen von Ihrem Internetanbieter. Alternativ können Sie unter http://speedtest.
3.4.3 Web History (Webverlauf) Diese Funktion zeigt Verlauf und Details der Seiten oder URLs, die der Client besucht hat. So rufen Sie Web History (Webverlauf) auf: 1. Wählen Sie über den Navigationsbereich General (Allgemein) > Adaptive QoS > Web History (Webverlauf)-Register. 2. (Optional) Klicken Sie zum Leeren der Liste auf Refresh (Aktualisieren).
3.4.4 Traffic Monitor (Datenverkehrsüberwachung) Über die Funktion zur Datenverkehrsüberwachung können Sie die Bandbreitennutzung von Internet, Kabel- und WLAN-Netzwerken abrufen. Dabei können Sie den Netzwerkverkehr in Echtzeit oder auf täglicher Basis überwachen. Zudem gibt es eine Option zur Anzeige des Netzwerkverkehrs innerhalb der letzten 24 Stunden. So konfigurieren Sie Traffic Monitor (Datenverkehrsüberwachung): 1.
3.5 USB-Anwendungen verwenden Die USB-Erweiterungsfunktion bietet AiDisk-, Servers Center-, Netzwerkdrucker-Server- und Download Master-Untermenüs an. WICHTIG! Zum Einsatz der Serverfunktionen müssen Sie ein USBSpeichergerät (beispielsweise USB-Festplatte oder USB-Flash-Laufwerk) an den USB 2.0-Port an der Rückwand Ihres WLAN-Routers anschließen. Sorgen Sie dafür, dass das USB-Speichergerät formatiert und richtig partitioniert ist.
3. Wählen Sie die Zugriffsrechte, die Sie den Clients, welche auf Ihre freigegebenen Daten zugreifen, zuweisen wollen. 4. Um mit dem ASUS DDNS-Dienst eine eigene Domäne für Ihre FTP-Seite einzurichten, wählen Sie I will use the service and accept the Terms of service (Ich werde den Dienst nutzen und die Nutzungsbedingungen akzeptieren) und geben Sie den Domänennamen ein. Klicken Sie dann auf Next.
3.5.2 Servercenter verwenden Mit dem Servercenter können Sie Mediendateien des USBLaufwerks über einen Medienserver-Ordner, den Samba- oder FTP-Freigabedienst teilen. Außerdem können Sie im Servercenter auch weitere Einstellungen des USB-Laufwerks konfigurieren. Medienserver verwenden Ihr WLAN-Router ermöglicht DLNA-kompatiblen Geräten den Zugriff auf Multimediadateien, die auf dem an Ihren WLAN-Router angeschlossenen USB-Laufwerk gespeichert sind.
Wechseln Sie zum Aufrufen der Medienserver-Einstellungseite zum Register General (Allgemein) > USB application (USBApplikation) > Media Services and Servers (Mediendienste und -server) > Media Servers (Medienserver)-Register. Hier eine Beschreibung der einzelnen Felder: • iTunes-Server aktivieren?: Mit Ein/Aus aktivieren/ deaktivieren Sie den iTunes-Medienserver. • DLNA-Medienserver aktivieren: Mit Ein/Aus aktivieren/ deaktivieren Sie den DLNA-Medienserver.
2. Führen Sie die Schritte zum Zufügen, Löschen oder Modifizieren eines Kontos aus. So erstellen Sie ein neues Konto: a) Klicken Sie zum Zufügen eines neuen Kontos auf . b)Geben Sie Namen und Kennwort Ihres Netzwerk-Clients in die Felder Account (Konto) und Password (Kennwort) ein. Geben Sie das Kennwort zur Bestätigung noch einmal ein. Klicken Sie zum Zufügen des Kontos zur Liste auf Add (Zufügen). So löschen Sie ein vorhandenes Konto: a) Wählen Sie das Konto, das Sie löschen möchten.
3. Wählen Sie in der Liste der Dateien/Ordner die Art von Zugriffsrechten, die Sie bestimmten Dateien/Ordnern zuweisen möchten: • R/W: Wählen Sie diese Option, um Lese-/Schreibezugriff für bestimmte Datei/Ordner zuzuweisen. • L: Diese Option wählen Sie zum schreibgeschützten Zugriff. • No: Wählen Sie diese Option, wenn Sie bestimmte Datei/ Ordner nicht freigeben möchten. 4. Zum Anwenden klicken Sie auf Apply (Übernehmen).
So nutzen Sie den FTP-Freigabedienst: HINWEISE: Sorgen Sie dafür, dass Sie FTP-Server über AiDisk eingerichtet wurde. Mehr Details dazu finden Sie im Abschnitt 3.5.1 AiDisk verwenden. 1. Wechseln Sie vom Navigationspanel zum Register General (Allgemein) > USB application (USB-Anwendungen)> edia Services and Servers (Mediendienste und -server) > FTP Share (FTP-Freigabe). 2.
3.5.3 3G/4G 3G/4G-USB-Modems lassen sich zum Internetzugriff mit dem RTAC5300 verbinden. HINWEIS: Eine Liste nachweislich funktionierender USB-Modems finden Sie hier: http://event.asus.com/2009/networks/3gsupport/ So richten Sie den 3G/4G-Internetzugriff ein: 1. Klicken Sie im Navigationspanel auf General (Allgemein)> USB application (USB-Anwendungen)> 3G/4G (3G/4G). 2. Im Feld Enable USB Modem (USB-Modem aktivieren) wählen Sie Yes (Ja) aus. 3.
3.6 AiCloud 2.0 verwenden AiCloud2.0ist eine Cloud-Anwendung, mit der Sie Ihre Dateien speichern, synchronisieren teilen und abrufen können. So nutzen Sie AiCloud: 1. Laden Sie die ASUS AiCloud-App vom Google Play Store oder Apple Store auf Ihr kompatibles Gerät herunter, installieren Sie die Anwendung. 2. Verbinden Sie ihr kompatibles Gerät mit dem Netzwerk. Schließen Sie die AiCloud-Einrichtung gemäß den Hinweisen auf dem Bildschirm ab.
3.6.1 Cloud-Laufwerk So erstellen Sie ein Cloud-Laufwerk: 1. Schließen Sie ein USB-Speichergerät an den WLAN-Router an. 2. Schalten Sie Cloud Disk (Cloud-Laufwerk) ein. 3. R ufen Sie die Internetseite https://router.asus.com auf, geben Sie Router-Anmeldekonto und Kennwort ein. Damit alles reibungslos funktioniert, empfehlen wir die Internetbrowser Google Chrome oder Firefox.
4. N un können Sie mit Geräten im Netzwerk auf die Dateien des Cloud-Laufwerks zugreifen. HINWEIS: Wenn Sie auf Netzwerkgeräte zugreifen möchten, müssen Sie den Gerätenamen und das Kennwort manuell eingeben, da diese Daten aus Sicherheitsgründen nicht von AiCloud gespeichert werden.
3.6.2 Intelligenter Zugriff Die Intelligenter-Zugriff-Funktion ermöglicht Ihnen, über den Domänennamen Ihres Routers problemlos auf Ihr Heimnetzwerk zuzugreifen. HINWEISE: • Einen Domänennamen Ihres Routers können Sie mit ASUS DDNS erstellen. Weitere Informationen dazu finden Sie im Abschnitt 4.3.5 DDNS. • Per Vorgabe arbeitet AiCloud mit einer sicheren HTTPS-Verbindung. Geben Sie zur besonders sicheren Nutzung mit Cloud-Laufwerk und intelligentem Zugriff https://[Ihr-ASUS-DDNS-Name].asuscomm.com ein.
3.6.3 Intelligente Synchronisierung So nutzen Sie die intelligente Synchronisierung: 1. Starten Sie AiCloud, klicken Sie auf Smart Sync (Intelligente Synchronisierung)> Go (Los). 2. Wählen Sie ON (Ein) zum Aktivieren der intelligenten Synchronisierung. 3. Klicken Sie auf Add new account (Neues Konto hinzufügen). 4. Geben Sie das Kennwort Ihres ASUS WebStorage-Kontos ein, wählen Sie den Ordner, den Sie mit WebStorage synchronisieren möchten. 5. Klicken Sie auf Apply (Übernehmen).
4 Konfigurieren der erweiterten Einstellungen 4.1 WLAN 4.1.1 General (Allgemein) Im Allgemein-Register können Sie WLAN-Grundeinstellungen konfigurieren. So konfigurieren Sie die WLAN-Grundeinstellungen: 1. Wechseln Sie vom Navigationspanel zum Register Advanced Settings (Erweiterte Einstellungen)> Wireless (WLAN) > General (Allgemein). 2. Wählen Sie 2,4 GHz oder 5 GHz als Frequenzband Ihres WLANNetzwerks. 3.
4. Weisen Sie einen eindeutigen Namen zu, der aus bis zu 32 Zeichen bestehen darf. Dieser Name ist die SSID oder der Netzwerkname Ihres WLAN-Netzwerks. WLAN-Geräte können das WLAN-Netzwerk über die von Ihnen zugewiesene SSID identifizieren und sich damit verbinden. Die SSIDs im Infobanner werden aktualisiert, sobald eine neue SSID gespeichert wird. HINWEIS: Sie können den 2,4-GHz- und 5-GHz-Frequenzbändern unterschiedliche SSIDs zuweisen. 5.
4.1.2 WPS WPS (Wi-Fi Protected Setup) ist ein WLAN-Sicherheitsstandard, der einfache Geräteverbindungen zu einem WLAN-Netzwerk ermöglicht. Sie können die WPS-Funktion über den PIN-Code oder die WPS-Taste konfigurieren. HINWEIS: Überzeugen Sie sich davon, dass die Geräte WPS unterstützen. So aktivieren Sie WPS in Ihrem WLAN-Netzwerk: 1. Wechseln Sie vom Navigationspanel zum Register Advanced Settings (Erweiterte Einstellungen) > Wireless (WLAN ) > WPS (WPS). 2.
Hinweis: WPS unterstützt Authentisierung per Open System, WPAPersonal und WPA2-Personal. WPS unterstützt keine WLAN-Netzwerke, die mit den Verschlüsselungsverfahren Shared Key, WPA-Enterprise, WPA2-Enterprise oder RADIUS arbeiten. 3. Im WPS Method (WPS-Methode)-Feld wählen Sie Push Button (Taste) oder Client PIN code (Client-PIN-Code). Wenn Sie sich für Push Button (Taste) entscheiden, fahren Sie mit Schritt 4 fort. Wenn Sie Client PIN code (Client-PIN-Code) wählen, machen Sie bei Schritt 5 weiter. 4.
4.1.3 Brücke Eine Brücke oder WDS (Wireless Distribution System) ermöglicht Ihrem ASUS-WLAN-Router exklusive Verbindungen zu anderen WLAN-APs; dabei verhindert das System, dass andere WLANGeräte oder -Stationen auf Ihren ASUS-WLAN-Router zugreifen können. Diese Funktion lässt sich auch mit einem WLAN-Repeater (Reichweitenverstärker) vergleichen, wobei Ihr ASUS-WLANRouter als Vermittlungsstelle zwischen einem anderen AP und anderen WLAN-Geräten auftritt. So richten Sie die WLAN-Brücke ein: 1.
3. Wählen Sie im Feld AP Mode (AP-Modus) aus den folgenden Optionen: • Nur AP: Deaktiviert die WLAN-Brückenfunktion. • Nur WDS: Aktiviert die WLAN-Brücke, verhindert jedoch, dass sich andere WLAN-Geräte/-Stationen mit dem Router verbinden können.• HYBRID: Aktiviert die WLAN-Brücke und ermöglicht, dass sich andere WLAN-Geräte/-Stationen mit dem Router verbinden können. HINWEIS: Im Hybridmodus erhalten mit dem ASUS-WLANRouter verbundene WLAN-Geräte lediglich die halbe Übertragungsgeschwindigkeit des APs. 4.
4.1.4 WLAN-MAC-Filter Der WLAN-MAC-Filter ermöglicht die Kontrolle über Pakete, die an eine bestimmte MAC-Adresse in Ihrem WLAN-Netzwerk gesendet werden. So richten Sie den WLAN-MAC-Filter ein: 1. Wechseln Sie vom Navigationspanel zum Register Advanced Settings (Erweiterte Einstellungen) > Wireless (WLAN) > Wireless MAC Filter (WLAN-MAC-Filter). 2. Wählen Sie im Feld Frequency (Frequenz) das Frequenzband aus, das Sie für die WLAN-MAC-Filterfunktion nutzen möchten. 3.
4.1.5 RADIUS-Einstellungen Die RADIUS-Einstellungen (Remote Authentication Dial In User Service) bieten eine zusätzliche Sicherheitsschicht, wenn Sie WPA-Enterprise, WPA2-Enterprise oder Radius mit 802.1x als Authentisierungsverfahren wählen. So richten Sie die WLAN-RADIUS-Einstellungen ein: 1. Vergewissern Sie sich, dass das Authentisierungsverfahren des WLAN-Routers auf WPA-Enterprise, WPA2-Enterprise oder Radius mit 802.1x eingestellt ist.
4.1.6 Professionell Im Professionell-Bildschirm finden Sie erweiterte Konfigurationsoptionen. HINWEIS: Wir empfehlen, die Standardeinstellungen auf dieser Seite möglichst nicht zu verändern. Im Bildschirm Professional Settings (Professionelle Einstellungen) können Sie Folgendes konfigurieren: • Frequenz: Hier wählen Sie das Frequenzband, auf das die professionellen Einstellungen angewendet werden sollen. • Sender aktivieren: Wählen Sie Yes (Ja) zum Aktivieren des WLAN-Netzwerks.
• Senderaktivität-Tage (Wochenende): Hier können Sie festlegen, an welchen Tagen des Wochenendes das WLANNetzwerk aktiv sein soll. • Senderaktivität-Uhrzeiten: Hier geben Sie einen Zeitraum zur Senderaktivität am Wochenende an. • AP isolieren: Die AP-isolieren-Einstellung verhindert die Kommunikation von WLAN-Geräten im Netzwerk untereinander. Diese Funktion ist zum Beispiel dann nützlich, wenn viele Gäste Ihr Netzwerk besuchen oder verlassen.
• DTIM-Intervall: Das DTIM-Intervall („Delivery Traffic Indication Message“ oder Meldung über anliegenden Datenverkehr) oder die „Data Beacon Rate“, also Datenbakenrate, definieren die Zeit, die vergeht, bevor ein WLAN-Gerät im Schlafmodus über ein zur Abholung bereitstehendes Datenpaket informiert wird. Der Standardwert liegt bei 3 ms. • Bakenintervall: Das Bakenintervall definiert die Zeitspanne zwischen den einzelnen DTIMs. Der Standardwert liegt bei 100 ms.
• Universal Beamforming (Universal-Beamforming): Bei alten WLAN-Netzwerkadaptern, die Beamforming nicht unterstützen, schätzt der Router den Kanal und ermittelt die Steuerungsrichtung zur Verbesserung der DownlinkGeschwindigkeit. • Sendeleistung anpassen: Sie können die Sendeleistung des WLAN-Routers in gewissen Grenzen anpassen; die Angabe erfolgt in Milliwatt (mW). Geben Sie einen Wert zwischen 0 und 100 ein.
4.2.2 DHCP-Server Ihr WLAN-Router nutzt DHCP zur automatischen Zuweisung von IP-Adressen im Netzwerk. Sie können den IP-Adressbereich festlegen und bestimmen, wie lange Clients im Netzwerk eine IPAdresse zugewiesen bleibt. So richten Sie einen DHCP-Server ein: 1. Vom Navigationspanel gehen Sie zu Advanced Settings>LAN>DHCP Server. 2. Klicken Sie im Feld Enable the DHCP Server? (DHCP-Server aktivieren?) auf die Auswahl Yes (Ja).
3. Geben Sie in das Domain Name (Domänenname)-Textfeld einen Domänennamen für Ihren WLAN-Router ein. 4. Geben Sie im Feld IP Pool Starting Address (IP-Pool Startadresse) die IP-Startadresse ein. 5. Geben Sie im Feld IP Pool Ending Address (IP-Pool Endadresse) die IP-Endadresse ein. 6. Geben Sie im Feld Lease Time (Lease-Zeitraum) die Ablaufzeit für die IP-Adressen ein, damit der drahtlose Router Ihren Clients im Netzwerk automatisch neue IP-Adressen zuweisen kann.
4.2.3 Route Falls Sie mehr als einen WLAN-Router in Ihrem Netzwerk einsetzen, können Sie eine Routentabelle konfigurieren und so dieselbe Internetverbindung nutzen. HINWEIS: Wir empfehlen, die Standard-Routeneinstellungen nicht zu verändern, sofern Sie nicht über umfassendes Wissen über Routentabellen verfügen. So konfigurieren Sie die LAN-Routentabelle: 1. Wechseln Sie vom Navigationspanel zum Register Advanced Settings (Erweiterte Einstellungen) > LAN > Route (Route). 2.
4.2.4 IPTV Der WLAN-Router kann sich per Internet oder LAN mit IPTV-Diensten verbinden. Im IPTV-Register finden Sie Konfigurationseinstellungen, die Sie zum Einrichten von IPTV, VoiP, Multicasting und UDP benötigen. Weitere Details erhalten Sie von Ihrem Internetanbieter.
4.3 WAN 4.3.1 Internetverbindung Der Internetverbindung-Bildschirm ermöglicht Ihnen die Konfiguration von Einstellungen unterschiedlicher WANVerbindungstypen. So konfigurieren Sie die WAN-Verbindungseinstellungen: 1. Wechseln Sie vom Navigationspanel zum Register Advanced Settings (Erweiterte Einstellungen) > WAN > Internet Connection (Internetverbindung). 2. Konfigurieren Sie die folgenden Einstellungen. Klicken Sie zum Abschluss auf Apply (Übernehmen).
• NAT aktivieren: NAT (Network Address Translation, Netzwerkadressenumsetzung) ist ein System, bei dem eine öffentliche IP (WAN-IP) eingesetzt wird, um Netzwerk-Clients mit einer privaten-IP-Adresse im LAN Internetzugriff zu ermöglichen. Die private IP-Adresse der einzelnen Netzwerk-Clients wird in einer NAT-Tabelle gespeichert und zum Umleiten ankommender Datenpakete eingesetzt.
• MAC-Adresse: Die MAC-Adresse (Media Access Control, Medienzugriffssteuerung) ist eine eindeutige Kennung Ihres Netzwerkgerätes. Einige Internetanbieter überwachen die MAC-Adressen von Netzwerkgeräten, die Verbindungen zu Ihren Diensten herstellen, und weisen Verbindungsversuche unbekannter Geräte ab.
4.3.2 Dual-WAN Ihr WLAN-Router von ASUS bietet Dual-WAN-Unterstützung. Sie können die Dual-WAN-Funktion auf einen dieser beiden Modi einstellen: • Failover Mode (Ausfallschutz-Modus): Wählen Sie diesen Modus zur Nutzung des zweiten WAN als Reservenetzwerkzugriff. • Load Balance Mode (Lastausgleich-Modus): Wählen Sie diesen Modus zum Optimieren der Bandbreite, zum Minimieren der Reaktionszeit und zur Verhinderung einer Datenüberlastung für primäre und sekundäre WANVerbindungen.
4.3.3 Portauslösung Die Portbereichauslösung öffnet eine begrenzte Zeit lang einen zuvor festgelegten Eingangsport, wenn ein Client im lokalen Netzwerk eine abgehende Verbindung über einen bestimmten Port aufbaut. Die Portauslösung wird in folgenden Szenarien genutzt: • Mehr als ein lokaler Client benötigt eine Portweiterleitung für dieselbe Anwendung zu einem unterschiedlichen Zeitpunkt. • Eine Anwendung benötigt spezielle Eingangsport, die nicht mit den Ausgangsports übereinstimmen.
4. Geben Sie in der Tabelle Trigger Port List (Auslöserportliste) die folgenden Informationen ein: • Auslösungsport: Hier legen Sie einen Auslösungsport zum Öffnen des Eingangsports fest. • Protokoll: Wählen Sie das Protokoll, TCP oder UDP. • Eingangsport: Legen Sie einen Eingangsport zum Empfang ankommender Daten aus dem Internet fest. • Protokoll: Wählen Sie das Protokoll, TCP oder UDP. 5.
4.3.3 Virtueller Server/Portweiterleitung Die Portweiterleitung ist ein Verfahren zum Umleiten von Netzwerkverkehr aus dem Internet an einen bestimmten Port oder bestimmten Portbereich zu einem oder mehreren Geräten im lokalen Netzwerk. Wählen Sie die Portweiterleitung an Ihrem Router einrichten, können PCs außerhalb des Netzwerks auf bestimmte Dienste zugreifen, die von einem PC in Ihrem eigenen Netzwerk bereitgestellt werden.
3. Wählen Sie im Feld Famous Server List (Liste bekannter Server) den Servicetyp, auf den Sie zugreifen möchten. 4. Wählen Sie im Feld Famous Game List (Liste bekannter Spiele) die bekannten Spiele, auf die Sie zugreifen möchten. Dieses Element listet den erforderlichen Port auf, der zur Ausführung Ihres ausgewählten Online-Spiels erforderlich ist. 5. Geben Sie in der Tabelle Port Forwarding List (Portweiterleitungsliste) die folgenden Informationen ein: • Dienstname: Geben Sie einen Dienstnamen ein.
• Lokaler Port: Tragen Sie einen bestimmten Port zum Empfang weitergeleiteter Pakete ein. Lassen Sie dieses Feld leer, wenn die ankommenden Pakete zu einem bestimmten Portbereich umgeleitet werden sollen. • Protokoll: Wählen Sie das Protokoll. Falls Sie unsicher sein sollten, wählen Sie BOTH (Beide). So prüfen Sie, ob die Portweiterleitung erfolgreich konfiguriert wurde: • Vergewissern Sie sich, dass Ihr Server oder Ihre Anwendung richtig eingerichtet und gestartet wurden.
4.3.4 DMZ Die virtuelle DMZ (DMZ steht für demilitarisierte Zone) ermöglicht einem Client, sämtliche eingehenden Pakete zu empfangen, die an Ihr lokales Netzwerk gerichtet sind. Ankommender Datenverkehr aus dem Internet wird gewöhnlich verworfen und nur dann zu einem bestimmten Client geleitet, wenn eine Portweiterleitung oder Portauslösung im Netzwerk konfiguriert wurde. Bei einer DMZ-Konfiguration empfängt ein Netzwerk-Client sämtliche ankommenden Pakete.
4.3.5 DDNS Durch die Einrichtung eines DDNS (dynamischer DNS) können Sie von außerhalb auf den Router im Netzwerk zugreifen; dies geschieht beispielsweise über den ASUS-DDNS-Dienst oder einen anderen DDNS-Anbieter. So richten Sie DDNS ein: 1. Wechseln Sie vom Navigationspanel zum Register Advanced Settings (Erweiterte Einstellungen) > WAN > DDNS. 2. Konfigurieren Sie die folgenden Einstellungen. Klicken Sie zum Abschluss auf Apply (Übernehmen).
• Platzhalter aktivieren: Hier können Sie Platzhalter aktivieren, wenn diese von Ihrem DDNS-Dienst benötigt werden. HINWEISE: Unter folgenden Bedingungen funktioniert der DDNS-Dienst nicht: • Der WLAN-Router nutzt eine private WAN-IP-Adresse (192.168.x.x, 10.x.x.x oder 172.16.x.x); dies wird durch gelben Text signalisiert. • Der Router befindet sich in einem Netzwerk, das mit mehreren NATTabellen arbeitet. 4.3.
4.4 IPv6 Der WLAN-Router unterstützt IPv6-Adressierung; ein System, das mehr IP-Adresse als zuvor ermöglicht. Dieser Standard wird noch nicht flächendeckend eingesetzt. Fragen Sie bei Ihrem Internetanbieter nach, ob Ihr Internetzugang IPv6 unterstützt. So richten Sie IPv6 ein: 1. Wechseln Sie vom Navigationspanel zu Advanced Settings (Erweiterte Einstellungen). 2. Wählen Sie Ihren Connection Type (Verbindungstyp). Die Konfigurationsoptionen variieren je nach ausgewähltem Verbindungstyp. 3.
4.5 VPN-Server Ein VPN (virtuelles privates Netzwerk) ermöglicht sichere Kommunikation mit externen Computern oder Netzwerken über öffentliche Netzwerke wie dem Internet. HINWEIS: Bevor Sie eine VPN-Verbindung einrichten, benötigen Sie die IP-Adresse oder den Domänennamen des VPN-Servers, auf den Sie zugreifen möchten. So richten Sie den Zugriff auf einen VPN-Server ein: 1. Wechseln Sie vom Navigationspanel zu Advanced Settings (Erweiterte Einstellungen )> VPN Server (VPN-Server). 2.
4.6 Firewall Sie können den WLAN-Router als Hardware-Firewall in Ihrem Netzwerk einsetzen. HINWEIS: Die Firewall-Funktion ist per Vorgabe bereits aktiv. 4.6.1 Allgemein So richten Sie grundlegende Firewall-Einstellungen ein: 1. Wechseln Sie vom Navigationspanel zum Register Advanced Settings (Erweiterte Einstellungen)> Firewall > General (Allgemein). 2. Im Feld Enable Firewall (Firewall aktivieren) wählen Sie Yes (Ja). 3.
So richten Sie einen URL-Filter ein: 1. Wechseln Sie vom Navigationspanel zum Register Advanced Settings (Erweiterte Einstellungen) > Firewall > URL Filter (URL-Filter). 2. Wählen Sie im Feld Enable URL Filter (URL-Filter aktivieren) die Option Enabled (Aktiviert). 3. Geben Sie eine URL ein, klicken Sie anschließend auf die Schaltfläche . 4. Klicken Sie auf Apply (Übernehmen). 4.6.3 Schlüsselwortfilter Der Schlüsselwortfilter blockiert Internetseiten, die bestimmte Ausdrücke enthalten.
3. Geben Sie ein Wort oder einen Ausdruck ein, klicken Sie dann auf die Add (Hinzufügen)- Schaltfläche. 4. Klicken Sie auf Apply (Übernehmen). HINWEISE: • Der Schlüsselwortfilter basiert auf einer DNS-Abfrage. Falls ein Netzwerk-Client zuvor bereits auf eine Internetseite wie http://www. abcxxx.com zugriff, wird die jeweilige Internetseite nicht blockiert (ein DNS-Puffer im System speichert zuvor besuchte Seiten).
So richten Sie einen Netzwerkdienstefilter ein: 1. Wechseln Sie vom Navigationspanel zum Register Advanced Settings (Erweiterte Einstellungen)> Firewall > Network Service Filter (Netzwerkdienstefilter). 2. Wählen Sie im Feld Enable Network Services Filter (Netzwerkdienstefilter aktivieren) die Option Yes (Ja). 3. Wählen Sie den Filtertabellentyp. Die Black List (Schwarze Liste) blockiert die angegebene Netzwerkdienste. Die White List (Weiße Liste) beschränkt den Zugriff auf die angegebene Netzwerkdienste.
4.7 Administration 4.7.1 Betriebsmodus Auf der Betriebsmodus-Seite können Sie den passenden Betriebsmodus Ihres Netzwerkes festlegen. So richten Sie den Betriebsmodus ein: 1. Wechseln Sie vom Navigationspanel zum Register Advanced Settings (Erweiterte Einstellungen) > Administration > Operation Mode (Betriebsmodus). 2.
• Medienbrücke: Bei dieser Konfiguration werden zwei WLANRouter benötigt. Der zweite Router dient als Medienbrücke, über die mehrere Geräte wie internetfähige Fernsehgeräte und Spielkonsolen per Ethernet (LAN) verbunden werden können. 3. Klicken Sie auf Apply (Übernehmen). HINWEIS: Nach einer Betriebsmodusänderung startet der Router neu. 4.7.2 System Auf der System-Seite konfigurieren Sie die Einstellungen Ihres WLANRouters. So nehmen Sie Systemeinstellungen vor: 1.
• Nur bestimmte IP zulassen: Klicken Sie auf Yes (Ja), wenn Sie IPAdressen von Geräten festlegen möchten, die aus dem WAN auf die grafische Benutzeroberfläche des WLAN-Routers zugreifen dürfen. • Client-Liste: Geben Sie die WAN-IP-Adresse von Netzwerkgeräten ein, die auf die Einstellungen des WLAN-Routers zugreifen dürfen. Diese Liste wird genutzt, wenn Sie unter Only allow specific IP (Nur bestimmte IP zulassen) auf Yes (Ja) geklickt haben. 3. Klicken Sie auf Apply (Übernehmen). 4.7.
4.7.4 Wiederherstellen/Speichern/Hochladen der Einstellungen So werden die Einstellungen wiederhergestellt/gespeichert/ hochgeladen: 1. Wechseln Sie vom Navigationspanel zum Register Advanced Settings (Erweiterte Einstellungen) > Administration > Restore/Save/Upload Setting (Einstellungen wiederherstellen/ speichern/hochladen). 2.
4.8 Systemprotokoll Das Systemprotokoll enthält Aufzeichnungen der Netzwerkaktivitäten. HINWEIS: Das Systemprotokoll wird bei einem Neustart und beim Abschalten des Routers rückgesetzt. So zeigen Sie das Systemprotokoll an: 1. Wechseln Sie vom Navigationspanel zu Advanced Settings (Erweiterte Einstellungen) > System Log (Systemprotokoll). 2.
4.9 Smart Connect (Schnellverbindung) Smart Connect (Schnellverbindung) dient der automatischen Steuerung von Clients an eine von drei Funkverbindungen (2,4 GHz, Low-Band/5 GHz, High-Band/5 GHz) zur Maximierung des gesamten WLAN-Durchsatzes. 4.9.1 Smart Connect (Schnellverbindung) einrichten Sie können Smart Connect (Schnellverbindung) über die Webbenutzeroberfläche aktivieren, indem Sie eine der beiden Methoden befolgen: • Über den Bildschirm Wireless (WLAN) 1.
• Über den Bildschirm Network Map (Netzwerkübersicht) 1. Befolgen Sie die ersten beiden Schritte im obigen Abschnitt zur Anmeldung an der Webbenutzeroberfläche. 2. Wählen Sie über den Navigationsbereich General (Allgemein) > Network Map (Netzwerkübersicht). 3. Bewegen Sie den Regler am Bildschirm Network Map (Netzwerkübersicht) unter System status (Systemstatus) im Feld Smart Connect (Schnellverbindung) auf ON (Ein).
Wenn Smart Connect (Schnellverbindung) aktiviert ist, passt Ihr Router WLAN-Modus, Kanalbandbreite, Steuerungsbandbreite und Erweiterungskanaleinstellungen automatisch entsprechend Ihren Netzwerkbedingungen an. Sie können die Änderungen über den Bildschirm Wireless (WLAN) prüfen.
4.9.2 Smart Connect Rule (Schnellverbindungsregel) ASUSWRT bietet Standardbedingungseinstellungen zur Auslösung des Umschaltmechanismus. Sie können die Auslösebedingungen auch entsprechend Ihrer Netzwerkumgebung ändern. Rufen Sie zum Ändern der Einstellungen das Register Smart Connect Rule (Regeln der Schnellverbindung) am Bildschirm Network Tools (Netzwerkwerkzeuge) auf.
Steering Trigger Condition (Zustand Steuerungsauslöser) Diese Auswahl an Bedienelementen legt die Kriterien zur Ausführung der Bandsteuerung fest. • Bandwidth Utilization (Bandbreitennutzung) Wenn die Bandbreitennutzung diesen Prozentsatz übersteigt, greift die Steuerung. Die Broadcom-Dokumentation liefert keine Informationen darüber, wie die Nutzung gemessen wird. • Enable Load Balance (Lastausgleich aktivieren) Dies steuert den Lastausgleich.
STA Selection Policy (STA-Auswahlrichtlinie) Sobald die Steuerung ausgelöst wurde, befolgt ASUSWRT die STA Selection Policy (STA-Auswahlrichtlinie) zur Auswahl eines Clients (STA), der zum geeignetsten Band gesteuert wird. Interface Select and Qualify Procedures (Schnittstellenauswahl und Qualifizierungsverfahren) Diese Bedienelemente legen fest, wo der gesteuerte Client landet. Die Bedienelemente Target Band (Zielband) geben die erste und zweite Wahl der Steuerungsziele an.
5 Verwenden der Hilfsprogramme HINWEISE: • Laden Sie die Hilfsprogramme von der ASUS-Webseite herunter und installieren Sie sie: • Device Discovery v1.4.7.1 unter http://dlcdnet.asus.com/pub/ ASUS/LiveUpdate/Release/Wireless/Discovery.zip. • Firmware Restoration v1.9.0.4 unter http://dlcdnet.asus.com/pub/ ASUS/LiveUpdate/Release/Wireless/Rescue.zip. • Windows Printer Utility v1.0.5.5 unter http://dlcdnet.asus.com/ pub/ASUS/LiveUpdate/Release/Wireless/Printer.zip. 5.
5.2 Firmware Restoration Firmware Restoration (Firmware-Wiederherstellung) wird bei einem drahtlosen ASUS Router verwendet, welches während des Aktualisierungsprozesses ausfällt. Es lädet die von Ihnen angegebenen Firmware hoch. Der Vorgang kann drei bis vier Minuten dauern. WICHTIG: Bevor sie die Anwendung Firmware Restoration verwenden, starten Sie den Rettungsmodus. HINWEIS: Diese Funktion wird unter Mac OS nicht unterstützt.
3. Legen Sie eine statische IP am Computer fest, nutzen Sie folgende Daten zum Einrichten Ihrer TCP/IP-Einstellungen: IP-Adresse: 192.168.1.x Subnetzmaske: 255.255.255.0 4. Klicken Sie in Ihrem Computer-Desktop auf: Start > All Programs (Alle Programme) > ASUS Utility RT-N56U Wireless Router > Firmware Restoration. 5. Geben Sie eine Firmware-Datei an und klicken Sie auf Upload (Hochladen).
HINWEIS: Druckerserverfunktionen werden unter Windows® XP, Windows® Vista und Windows® 7 unterstützt. So richten Sie die EZ-Druckerfreigabe ein: 1. Wechseln Sie vom Navigationspanel zu General > USB Application > Network Printer Server (Allgemein > USBAnwendungen > Netzwerk-Druckerserver). 2. Klicken Sie zum Herunterladen der Netzwerkdruckersoftware auf Download Now! (Jetzt herunterladen!). HINWEIS: Die Netzwerkdruckersoftware wird nur unter Windows® XP, Windows® Vista und Windows® 7 unterstützt.
4. Folgen Sie den Bildschirmanweisungen, um Ihre Hardware einzurichten und klicken Sie dann auf Weiter. 5. Warten Sie ein paar Minuten auf den Abschluss der Basiseinrichtung und klicken Sie dann auf Weiter. 6. Klicken Sie auf Fertigstellen, um die Installation abzuschließen.
7. Folgen Sie den Anweisungen des Windows® Betriebssystems, um den Druckertreiber zu installieren. 8. Nachdem die Installation der Druckertreiber abgeschlossen ist, können die Netzwerk-Clients darauf zugreifen.
5.3.2 LPR zur Druckerfreigabe verwenden Sie können einen Drucker für Computer mit Windows®- und MacBetriebssystemen per LPR/LPD (Line Printer Remote/Line Printer Daemon) freigeben. LPR-Drucker freigeben So geben Sie einen LPR-Drucker frei: 1. Klicken Sie auf dem Windows®-Desktop auf Start > Geräte und Drucker (Devices and Printers) > Drucker hinzufügen (Add a printer) ; der Drucker hinzufügen (Add Printer Wizard) -Assistent öffnet sich. 2.
3. Wählen Sie Create a new port ( Neuen Anschluss ) erstellen,stellen Sie dann den Type of Port ( Anschlusstyp ) auf Standard TCP/IP Port (Standard TCP/IP Port ) ein. Klicken Sie auf New Port (Neuer Anschluss). 4. Tragen Sie die IP-Adresse des WLAN-Routers in das Feld Hostname oder IP address ( IP-Adresse ) ein, klicken Sie dann auf Next ( Weiter).
5. Wählen Sie Custom ( Benutzerdefiniert ), klicken Sie dann auf Settings ( Einstellungen ). 6. Stellen Sie das Protocol ( Protokoll ) auf LPR ein. Tragen Sie LPRServer in das Feld Warteschlangenname ein, klicken Sie dann zum Fortsetzen auf OK.
7. Klicken Sie zum Abschluss der Standard-TCP/IPPorteinstellungen auf Next ( Weiter ). 8. Installieren Sie den Druckertreiber aus der Anbieterliste. Falls der Drucker nicht in der Liste aufgeführt wird, klicken Sie zur manuellen Installation der Druckertreiber von CD oder aus einer Datei auf Have Disk ( Datenträger ).
9. Übernehmen Sie den Standardnamen des Druckers durch einen Klick auf Next ( Weiter ). 10. Klicken Sie zum Abschluss der Installation auf Finish ( Fertig stellen ).
5.4 Download Master Download Master ist eine Software, die Sie beim Herunterladen von Dateien unterstützt, selbst wenn Ihre Notebooks oder andere Geräte abgeschaltet sind. HINWEIS: Um Download Master nutzen zu können, muss ein USB-Gerät an den WLAN-Router angeschlossen sein. So verwenden Sie Download Master: 1. Klicken Sie zum automatischen Herunterladen und Installieren auf General(Allgemein)> USB application(USBAnwendungen)> Download Master (Download Master).
5. Nutzen Sie das Navigationspanel zur Konfiguration der erweiterten Einstellungen. 5.4.1 BitTorrent-Download-Einstellungen konfigurieren So konfigurieren Sie BitTorrent-Download-Einstellungen: 1. Klicken Sie im Download Master-Navigationspanel auf Bit Torrent (BitTorrent); die Seite Bit Torrent Setting (BitTorrentEinstellungen) öffnet sich. 2. Wählen Sie einen spezifischen Port für Ihre Download-Aufgabe. 3.
5.4.2 NZB-Einstellungen Sie können einen USENET-Server zum Herunterladen von NZBDateien einrichten. Klicken Sie nach der Eingabe der USENETEinstellungen auf Apply (Übernehmen).
6 Fehlerbehebung In diesem Kapitel finden Sie Lösungen zu Problemen, die eventuell mit Ihrem Router auftreten können. Falls Sie auf Probleme stoßen sollten, die nicht in diesem Kapitel behandelt werden, besuchen Sie die ASUS-Kundendienstseiten: http://support.asus.com/ – Hier finden Sie weitere Produktinformationen und Möglichkeiten zur Kontaktaufnahme mit dem technischen ASUS-Kundendienst. 6.
Prüfen Sie, ob die Netzwerkkabel richtig angeschlossen sind. • Wenn das Netzwerkkabel, welches den Router mit dem Modem verbindet, richtig angeschlossen ist, leuchtet die WAN-LED. • Wenn das Netzwerkkabel, welches den eingeschalteten Computer mit dem Router verbindet, richtig angeschlossen ist, leuchtet die entsprechende LAN-LED. Vergewissern Sie sich, dass die WLAN-Einstellungen zu den Einstellungen Ihres Computers passen.
6.2 Häufig gestellte Fragen (FAQ) Ich kann per Webbrowser nicht auf die grafische Benutzeroberfläche des Routers zugreifen • Wenn Ihr Computer per Kabel angeschlossen wurde, überprüfen Sie die Netzwerkkabelverbindung und den LEDStatus, wie im vorherigen Abschnitt beschrieben. • Vergewissern Sie sich, dass Sie die richtigen Anmeldedaten eingeben. Ab Werk wurde als Anmeldename und als Kennwort der Begriff „admin“ eingestellt.
Der Router lässt sich nicht über einen Webbrowser konfigurieren. HINWEIS: Falls Sie Schwierigkeiten bei der Verbindung mit einem 5-GHz-Netzwerk auftreten, überzeugen Sie sich davon, dass Ihr WLANGerät 5-GHz- oder Dualbandbetrieb unterstützt • Außerhalb der Reichweite: • Stellen Sie den Router näher an den drahtlosen Client. • Stellen Sie die Antennen des Routers optimal ein; schauen Sie sich dazu den Abschnitt 1.4 Router aufstellen an. • DHCP-Server wurde deaktiviert: 1.
• Die SSID wurde verborgen. Falls Ihr Gerät die SSIDs von anderen Routern, nicht jedoch die SSID Ihres Routers erkennen kann, wechseln Sie zu Advanced Settings (Erweiterte Einstellungen) > Wireless > General (Allgemein), wählen No (Nein) bei Hide SSID (SSID verbergen), anschließend wählen Sie Auto bei Control Channel (Steuerkanal). • Wenn Sie einen WLAN-Adapter verwenden, überzeugen Sie sich davon, dass die genutzten Kanäle mit den in Ihrem Land zulässigen Kanälen übereinstimmen.
Das Internet ist nicht zugänglich. • Vergewissern Sie sich, dass sich Ihr Router mit der WAN-IPAdresse Ihres Internetanbieters verbinden kann. Dazu rufen Sie die grafische Benutzeroberfläche auf, klicken auf General (Allgemein) > Network Map (Netzwerkübersicht) und prüfen den Internet Status (Internetstatus).
Wie stellt man die Standardeinstellungen für das System wieder her? • Wechseln Sie zu Administration > Restore/Save/Upload Setting (Einstellungen wiederherstellen/speichern/hochladen), klicken Sie anschließend auf Restore (Wiederherstellen). Die werkseigenen Standardeinstellungen sind wie folgt: Benutzername: admin Kennwort: admin DHCP-Aktivierung: Ja (wenn das WAN-Kabel angeschlossen ist). IP-Adresse: http://router.asus.com (or 192.168.1.
Grafische Benutzeroberfläche lässt sich nicht aufrufen Bevor Sie den drahtlosen Router konfigurieren, folgen Sie bei Ihren Host-Computer und Netzwerk-Clients den Anweisungen in diesem Abschnitt. A. Proxyserver deaktivieren (falls aktiviert) Windows® 7 1. Klicken Sie auf Start > Internet Explorer, um den Webbrowser zu starten. 2. Klicken Sie auf Extras (Tools) > Internetoptionen (Internet options) > Auswahl Verbindungen (Connections) > LAN-Einstellungen (LAN settings). 3.
MAC OS 1. Klicken Sie in der Menüleiste auf Safari > Einstellungen... (Preferences...) > Erweitert (Advanced) Einstellungen Ändern... (Change Settings...). 2. Deaktivieren Sie in der Protokollliste FTP Proxy und Web Proxy (HTTP). 3. Wenn abgeschlossen, klicken Sie auf Jetzt Anwenden (Apply Now). HINWEIS: Für Details zur Deaktivierung eines Proxyserver beziehen Sie sich auf die Hilfe Ihres Browsers. B. TCP/IP-Einstellungen für automatische IP-Erkennung Windows® 7 1.
3. Um eine iPv4-Adresse automatisch zu beziehen, wählen Sie IP-Adresse automatisch beziehen (Obtain an IP address automatically). Um eine iPv6-Adresse automatisch zu beziehen, wählen Sie IPv6-Adresse automatisch beziehen (Obtain an IPv6 address automatically). 4. Wenn abgeschlossen, klicken Sie auf OK. MAC OS 1. Klicken links oben im Bildschirm sie auf das Apple-Symbol . 2. Klicken Sie auf Systemeinstellungen... (System Preferences) > Netzwerk (Network) Konfigurieren (Configure). 3.
C. DFÜ-Verbindung deaktivieren (falls vorhanden) Windows® 7 1. Klicken Sie auf Start > Internet Explorer, um den Browser zu starten. 2. Klicken Sie auf Extras (Tools) > Internetoptionen (Internet options) > Auswahl Verbindungen (Connections). 3. Wählen Sie Keine Verbindung wählen (Never dial a connection). 4. Wenn abgeschlossen, klicken Sie auf OK. HINWEIS: Für Details zur Deaktivierung einer DFÜ-Verbindung beziehen Sie sich auf die Hilfe Ihres Browsers.
Anhänge Hinweise ASUS Recycling/Takeback Services ASUS recycling and takeback programs come from our commitment to the highest standards for protecting our environment. We believe in providing solutions for you to be able to responsibly recycle our products, batteries, other components, as well as the packaging materials. Please go to http://csr.asus. com/english/Takeback.htm for the detailed recycling information in different regions.
This equipment generates, uses and can radiate radio frequency energy and, if not installed and used in accordance with the instructions, may cause harmful interference to radio communications. However, there is no guarantee that interference will not occur in a particular installation.
Prohibition of Co-location This device and its antenna(s) must not be co-located or operating in conjunction with any other antenna or transmitter except in accordance with FCC multi-transmitter product procedures. Safety Information To maintain compliance with FCC’s RF exposure guidelines, this equipment should be installed and operated with minimum distance 25 cm between the radiator and your body. Use on the supplied antenna.
This equipment may be operated in AT, BE, CY, CZ, DK, EE, FI, FR, DE, GR, HU, IE, IT, LU, MT, NL, PL, PT, SK, SL, ES, SE, GB, IS, LI, NO, CH, BG, RO, RT. Canada, Industry Canada (IC) Notices This device complies with Industry Canada license-exempt RSS standard(s). Operation is subject to the following two conditions: (1) this device may not cause interference, and (2) this device must accept any interference, including interference that may cause undesired operation of the device.
WARNING! • Under Industry Canada regulations, this radio transmitter may only operate using an antenna of a type and maximum (or lesser) gain approved for the transmitter by Industry Canada. To reduce potential radio interference to other users, the antenna type should be chosen so that the equivalent isotropically radiated power (e.i.r.p) is not more than that necessary for successful communication.
WARNING! • For product available in the USA/Canada market, only channel 1~11 can be operated. Selection of other channels is not possible. • Pour les produits disponibles aux États-Unis / Canada du marché, seul le canal 1 à 11 peuvent être exploités. Sélection d'autres canaux n'est pas possible. • This device and it's antennas(s) must not be co-located or operating in conjunction with any other antenna or transmitter except in accordance with IC multi-transmitter product procedures.
GNU General Public License Licensing information This product includes copyrighted third-party software licensed under the terms of the GNU General Public License. Please see The GNU General Public License for the exact terms and conditions of this license. We include a copy of the GPL with every CD shipped with our product. All future firmware updates will also be accompanied with their respective source code. Please visit our web site for updated information.
pieces of it in new free programs; and that you know you can do these things. To protect your rights, we need to make restrictions that forbid anyone to deny you these rights or to ask you to surrender the rights. These restrictions translate to certain responsibilities for you if you distribute copies of the software, or if you modify it. For example, if you distribute copies of such a program, whether gratis or for a fee, you must give the recipients all the rights that you have.
be distributed under the terms of this General Public License. The “Program”, below, refers to any such program or work, and a “work based on the Program” means either the Program or any derivative work under copyright law: that is to say, a work containing the Program or a portion of it, either verbatim or with modifications and/or translated into another language. (Hereinafter, translation is included without limitation in the term “modification”.) Each licensee is addressed as “you”.
c) If the modified program normally reads commands interactively when run, you must cause it, when started running for such interactive use in the most ordinary way, to print or display an announcement including an appropriate copyright notice and a notice that there is no warranty (or else, saying that you provide a warranty) and that users may redistribute the program under these conditions, and telling the user how to view a copy of this License.
b) Accompany it with a written offer, valid for at least three years, to give any third party, for a charge no more than your cost of physically performing source distribution, a complete machine-readable copy of the corresponding source code, to be distributed under the terms of Sections 1 and 2 above on a medium customarily used for software interchange; or, c) Accompany it with the information you received as to the offer to distribute corresponding source code.
modify or distribute the Program or its derivative works. These actions are prohibited by law if you do not accept this License. Therefore, by modifying or distributing the Program (or any work based on the Program), you indicate your acceptance of this License to do so, and all its terms and conditions for copying, distributing or modifying the Program or works based on it. 6.
range of software distributed through that system in reliance on consistent application of that system; it is up to the author/ donor to decide if he or she is willing to distribute software through any other system and a licensee cannot impose that choice. This section is intended to make thoroughly clear what is believed to be a consequence of the rest of this License. 8.
NO WARRANTY 11 BECAUSE THE PROGRAM IS LICENSED FREE OF CHARGE, THERE IS NO WARRANTY FOR THE PROGRAM, TO THE EXTENT PERMITTED BY APPLICABLE LAW. EXCEPT WHEN OTHERWISE STATED IN WRITING THE COPYRIGHT HOLDERS AND/OR OTHER PARTIES PROVIDE THE PROGRAM “AS IS” WITHOUT WARRANTY OF ANY KIND, EITHER EXPRESSED OR IMPLIED, INCLUDING, BUT NOT LIMITED TO, THE IMPLIED WARRANTIES OF MERCHANTABILITY AND FITNESS FOR A PARTICULAR PURPOSE. THE ENTIRE RISK AS TO THE QUALITY AND PERFORMANCE OF THE PROGRAM IS WITH YOU.
ASUS Kontaktinformationen ASUSTeK COMPUTER INC. Adresse 15 Li-Te Road, Peitou, Taipei, Taiwan 11259 Webseite www.asus.com.tw Technische Unterstützung Telefon +886228943447 Support-Fax +886228907698 Online-Support support.asus.com ASUS COMPUTER INTERNATIONAL (Amerika) Adresse 800 Corporate Way, Fremont, CA 94539, USA Telefon +15107393777 Fax +15106084555 Webseite usa.asus.com Online-Support support.asus.com ASUS COMPUTER GmbH (Deutschland & Österreich) Adresse Harkort Str.
Globale Netzwerk-Hotlines Region Land 140 Servicezeiten 09:00-13:00 ; 14:00-18:00 Mon-Fri 09:00-18:00 Mon-Fri Cyprus 800-92491 France Hungary 0033-170949400 0049-1805010920 0049-1805010923 ( component support ) 0049-2102959911 ( Fax ) 0036-15054561 Italy 199-400089 Greece 00800-44142044 Austria Netherlands/ Luxembourg Belgium Norway Sweden Finland Denmark Poland Spain Portugal Slovak Republic Czech Republic Switzerland-German Switzerland-French Switzerland-Italian United Kingdom Ireland Russia
Globale Netzwerk-Hotlines Region Land Australia New Zealand Japan Korea Thailand Singapore Asia-Pacific Malaysia Philippine India India(WL/NW) Indonesia Americas Hotline-Nummer 1300-278788 0800-278788 0800-1232787 0081-473905630 ( Non-Toll Free ) 0082-215666868 0066-24011717 1800-8525201 0065-64157917 0065-67203835 ( Repair Status Only ) 0060-320535077 1800-18550163 1800-2090365 0062-2129495000 500128 (Local Only) Vietnam 1900-555581 Hong Kong USA Canada Mexico 00852-35824770 1-812-282-2787 001-8008
Globale Netzwerk-Hotlines Region Middle East + Africa Land Egypt Saudi Arabia UAE Turkey South Africa Israel Romania Bosnia Herzegovina Bulgaria Balkan Countries Croatia Montenegro Serbia Slovenia Estonia Latvia Lithuania-Kaunas Lithuania-Vilnius Hotline-Nummer 800-2787349 800-1212787 00971-42958941 0090-2165243000 0861-278772 *6557/00972-39142800 *9770/00972-35598555 0040-213301786 Servicezeiten 09:00-18:00 Sun-Thu 09:00-18:00 Sat-Wed 09:00-18:00 Sun-Thu 09:00-18:00 Mon-Fri 08:00-17:00 Mon-Fri 08:00-1