
User guide


ASUS TS110-E8-PI4
4-3
3. Press <Tab> to switch to the Driveeld.
4. PresstheUp/DownarrowkeystondtheUSBashdiskthatcontainsthelatestBIOS
then press <Enter>.
5. Press <Tab> to switch to the Folder Infoeld.
6. PresstheUp/DownarrowkeystondtheBIOSlethenpress<Enter>.
7. Reboot the system when the update process is done.
4.1.2 ASUS EzFlash Utility
TheASUSEzFlashUtilityfeatureallowsyoutoupdatetheBIOSusingaUSBashdisk
without having to use a DOS-based utility.
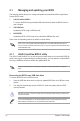
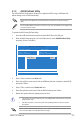
ASUS Tek. EzFlash Utility
[Up/Down/Left/Right]:Switch [Enter]:Choose [q]:Exit
FS0
System Volume Information <DIR>
P9D-X Bios <DIR>
Windows <DIR>
P9D-X Bios
Current Platform
Platform : P9D-X
Version : 0060
Build Date :12/03/2014
New Platform
Platform : P9D-X
Version : 0077
Build Date :01/31/2014
The succeeding BIOS screens are for reference only. The actual BIOS screen displays may
not be the same as shown.
To update the BIOS using EzFlash Utility:
1. InserttheUSBashdiskthatcontainsthelatestBIOSletotheUSBport.
2. Enter the BIOS setup program. Go to the Tool menu to select ASUS EzFlash Utility
and press <Enter> to enable it.
Download the latest BIOS from the ASUS website at www.asus.com before using this
utility.
<DIR>
• ThisfunctioncansupportdevicessuchasaUSBashdiskwithFAT32/16formatand
single partition only.
• DONOTshutdownorresetthesystemwhileupdatingtheBIOStopreventsystem
boot failure!
Ensure to load the BIOS default settings to ensure system compatibility and stability. Press
<F5> and select Yes to load the BIOS default settings.