
User Manual
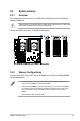


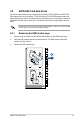
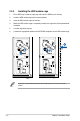
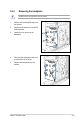
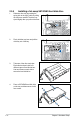
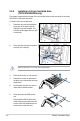
Table Of Contents
- Safety information
- Chapter 1: Product Introduction
- Chapter 2: Hardware Information
- Chapter 3: Installation Options
- Chapter 4: Motherboard Information
- Chapter 5: BIOS Setup
- 5.1 Managing and updating your BIOS
- 5.2 BIOS setup program
- 5.3 Main menu
- 5.4 Ai Tweaker menu
- 5.5 Performance Tuning menu
- 5.6 Advanced menu
- 5.6.1 Trusted Computing
- 5.6.2 ACPI Settings
- 5.6.3 SMART Self Test
- 5.6.4 Super IO Configuration
- 5.6.5 Serial Port Console Redirection
- 5.6.6 Onboard LAN Configuration
- 5.6.7 APM
- 5.6.8 PCI Subsystem Settings
- 5.6.9 Network Stack Configuration
- 5.6.10 CSM Configuration
- 5.6.11 NVMe Configuration
- 5.6.12 USB Configuration
- 5.6.13 iSCSI Configuration
- 5.6.14 Intel(R) Virtual RAID on CPU
- 5.7 Platform Configuration menu
- 5.8 Socket Configuration menu
- 5.9 Event Logs menu
- 5.10 Server Mgmt menu
- 5.11 Monitor menu
- 5.12 Security menu
- 5.13 Boot menu
- 5.14 Tool menu
- 5.15 Save & Exit menu
- Chapter 6: RAID Configuration
- Chapter 7: Driver Installation
- Appendix

Chapter 2: Hardware Setup
2-14
2. Firmly hold the tray lever and pull the
drive tray out of the bay.
3. Take note of the drive tray holes.
Each side has three holes to fit
different types of hard disk drives.
Use two screws on each side to
secure the hard disk drive.
4. Place a SATA/SAS hard disk drive
on the tray, and then secure it with
four screws.
2.5.4 Installing a hot-swap SATA/SAS hard disk drive
1. Release a drive tray by pushing the
spring lock to the right, and then pulling
the tray lever outward. The drive tray
ejects slightly after you pull out the lever.