سری VG249 نمایشگر LCD راهنمای کاربر
فهرست مطالب تذکرات iii مراقبت و تمیز کردن v.................................................................................................... 1-1 خوش آمدید! 1-1.......................................................................................... 2-1 محتویات بسته 1-1........................................................................................ 3-1 سرهم بندی کردن نمایشگر2-1..........................................................................
تذکرات بیانیه کمیته ارتباطات فدرال این دستگاه از بخش 15قوانین FCCتبعیت می کند .کارکرد تحت دو شرط زیز قرار دارد: •این دستگاه نباید تداخل مضر ایجاد کرده ،و •این وسیله باید هر نوع تداخل دریافتی ،حتی تداخلی که سبب ایجاد عملکرد نامطلوبی شود را بپذیرد. این دستگاه مورد آزمایش قرار گرفته و با محدودیت های دستگاه دیجیتال کالس Bو همچنین بخش 15از قوانین FCCمطابقت دارد .
اطالعات ایمنی •قبل از راه اندازی نمایشگر ،همه اسناد ارائه شده به همراه بسته بندی محصول را به دقت مطالعه کنید. •برای جلوگیری از بروز آتش سوزی یا هرگونه شوک ،هرگز نمایشگر را در مقابل بارندگی یا رطوبت قرار ندهید. •هرگز قاب دور نمایشگر را باز نکنید .ولتاژ زیاد و خطرناک داخل نمایشگر ممکن است باعث بروز جراحت فیزیکی خطرناک شود. •اگر منبع برق قطع شده است ،هرگز آن را شخصاً تعمیر نکنید .با متخصص تعمیرکار مجاز یا فروشنده تان تماس بگیرید.
هشدار استفاده از هدفون یا گوشی هایی بجز موارد مشخص شده به دلیل باال بودن فشار صوتی ،باعث ایجاد نقص در شنوایی می شود. مراقبت و تمیز کردن •قبل از بلند کردن یا تغییر محل نمایشگر ،بهتر است کابل ها و سیم های برق را جدا کنید .هنگامی که نمایشگر را در محل مربوطه قرار می دهید ،از روش های مناسب بلند کردن آن پیروی کنید. وقتی نمایشگر را بلند می کنید یا جابجا می کنید ،لبه های دستگاه را در دست بگیرید .نمایشگر را با پایه یا سیم بلند نکنید. •تمیز کردن .
از کجا به اطالعات بیشتر دسترسی پیدا کنید برای کسب اطالعات بیشتر و دسترسی به روز رسانی های محصول و نرم افزار ،به منابع زیر مراجعه کنید. 1وبسایت های ASUSوبسایت جهانی ASUSحاوی اطالعات به روز رسانی شده درباره سخت افزار و نرم افزار ASUSاست .به http://www.asus.comمراجعه کنید 2اسناد اختیاریبسته بندی محصول ممکن است حاوی اسناد اختیاری باشد که توسط فروشنده اضافه شده اند .این اسناد بخشی از بسته بندی استاندارد محصول نیستند.
1-1 خوش آمدید! متشکریم که نمایشگر ASUS® LCDرا خریداری کردید! جدیدترین نمایشگر صفحه گسترده LCDارائه شده از طرف ،ASUSصفحه نمایشی باریک تر ،پهن تر و شفاف تر را ارائه می کند ،همراه با تعداد زیادی از ویژگی ها که تجربه مشاهده شما را بهبود می بخشد.
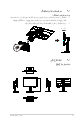
3-1 سرهم بندی کردن نمایشگر برای سرهم بندی نمایشگر: - 1نمایشگر را به صورت صاف روی یک پارچه روی میز بگذارید ،سپس کف آن را به دسته وصل کنید و پیچ ها را محکم کنید تا سفت شوند .می توانید به راحتی پیچ ها را با انگشتتان بپیچانید. - 2زاویه نمایشگر را طوری تنظیم کنید که راحت ترین حالت برایتان باشد.
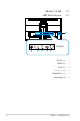
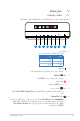
5-1 کابل ها را وصل کنید 1-5-1 قسمت پشت نمایشگر LCD ۶ VGA VG249Q ۴ - 1پورت AC-IN - 2درگاه HDMI - 3درگاه VGA - 4پورت ورودی صدا - 5پورت DisplayPort - 6قفل Kensington نمایشگر LCD ASUSسری VG249 ٣ HDMI ۵ ٢ ١ 111
6-1 معرفی نمایشگر 1-6-1 استفاده از دکمه کنترل از دکمه های کنترل موجود در پشت نمایشگر برای انجام تنظیمات تصویر استفاده کنید. ٣ ٢ ١ - ۵ ۴ ۶ ٨ ٧ 1نشانگر برق: •مفهوم رنگی نشانگر برق مانند جدول زیر است. وضعيت - 2 - 3دکمه شرح سفيد روشن کهربایی حالت آماده به کار خاموش خاموش دکمه برق: •این دکمه را برای روشن یا خاموش کردن نمایشگر فشار دهید. :MENU •این دکمه را فشار دهید تا وارد منوی OSDشوید.
برای فعال کردن :GamePlus •دکمه GamePlusرا فشار دهید تا به منوی اصلی GamePlusوارد شوید. •عملکرد عطاقتم طوطخ ،رمیات یا رگشرامشامش یا شیامن هحفص زارت را فعال کنید. •دکمههای و را برای انتخاب عملکردهای مورد نیاز و دهید .را برای غیرفعال کردن و خروج فشار دهید.
- 7 - 8 کلید میانبر :1 •این یک کلید میانبر است .تنظیم پیشفرض GameVisualاست. کلید میانبر 2 •این یک کلید میانبر است .تنظیم پیش فرض یبآ رون رتلیف است.
1-2 جدا کردن دسته/پایه (برای اتصال VESAبه دیوار) پایه جداشدنی این نمایشگر به گونه ای خاص برای اتصال دیواری VESAطراحی شده است. برای جدا کردن دسته/پایه - 1کابل های برق و سیگنال را جدا کنید .قسمت جلوی نمایشگر را به دقت به صورت وارونه روی یک میز تمیز قرار دهید. - 2برای جدا کردن چهار پیچ از دسته (تصویر )1از آچار استفاده کنید و سپس دسته/پایه را از نمایشگر جدا کنید (تصویر .
2-2 تنظیم نمایشگر •برای اینکه بهترین مشاهده را داشته باشید ،توصیه می کنیم به صفحه کامل نمایشگر نگاه کنید، سپس نمایشگر را در زاویه ای تنظیم کنید که برایتان راحت تر باشد. •پایه را بگیرید تا نمایشگر در حین تغییر زاویه زمین نخورد. •می توانید زاویه نمایشگر را از 20+تا 5-تنظیم کنید. ٢٠ ~ ۵- اگر نمایشگر در حین تنظیم زاویه دید کمی می لرزد این حالت طبیعی است.
1-3 منوی روی صفحه ()OSD 1-1-3 نحوه پیکربندی ASUS VG249 DisplayPort 1920 x 1080 @ 144Hzﺣﺎﻟت ﻣﺳﺎﺑﻘﮫ GameVisual ﺣﺎﻟت ﺻﺣﻧﮫ ﺣﺎﻟت ﻣﺳﺎﺑﻘﮫ ﺣﺎﻟت ﺳﯾﻧﻣﺎ ﺣﺎﻟت RTS/RPG ﺣﺎﻟت FPS ﺣﺎﻟت sRGB ﺣﺎﻟت MOBA - 1دکمه منو را فشار دهید تا منوی OSDفعال شود. - 2دکمه و را فشار دهید تا بین گزینه های موجود در منو جابجا شوید .وقتی از یک نماد به نمادی دیگر جابجا می شوید ،نام گزینه پررنگ می شود.
2-1-3 -1 معرفی عملکرد OSD GameVisual این عملکرد حاوی هفت عملکرد فرعی است که می توانید به دلخواه خودتان انتخاب کنید .هر حالت دارای انتخاب بازنشانی است که به شما امکان می دهد تنظیم را حفظ کرده یا به حالت پیش تنظیم برگردید.
-2 یبآ رون رتلیف سطح انرژی نور آبی ساطع شده از پس زمینه LEDرا تنظیم کنید. ASUS VG249 DisplayPort 1920 x 1080 @ 144Hzﺣﺎﻟت ﻣﺳﺎﺑﻘﮫ ﻓﯾﻠﺗر ﻧور آﺑﯽ ﺳطﺢ ۰ ﺳطﺢ ۱ ﺳطﺢ ۲ ﺳطﺢ ۳ ﺳطﺢ ۴ • حطسس :بدون تغییر. •سطح :4~1هرچه سطح باالتر باشد ،نور آبی کمتر خواهد شد. •اگر یبآ رون رتلیف فعال باشد ،تنظیمات پیشفرض درادناتسا تلاح به طور خودکار وارد میشود. •از حطسس تا حطسس ،کاربر میتواند عملکرد یيانشور را پیکربندی کند. • حطسس تنظیم بهینه است .
-3 گنر رنگ تصویر مورد نظر را از این عملکرد انتخاب کنید. ASUS VG249 DisplayPort 1920 x 1080 @ 144Hzﺣﺎﻟت ﻣﺳﺎﺑﻘﮫ رﻧﮓ روﺷﻧﺎﯾﯽ ﮐﻧﺗراﺳت اﺷﺑﺎع دﻣﺎی رﻧﮓ رﻧﮓ ﭘوﺳﺗﮫ •یيانشور :محدوده قابل تنظیم از 0تا 100است. •تسارتنک :محدوده قابل تنظیم از 0تا 100است. •عابشا :محدوده قابل تنظیم از 0تا 100است. •گنر یامد :دارای سه حالت رنگ از پیش تنظیمشده (درس ،یداع ،مرگ) و ربراک تلاح است.
-4 ریوصت می توانید حوضو ،ASCR ،VividPixel ،داعبا لرتنک،Trace Free ، ،Adaptive-Sync/FreeSync ،ELMBهیاس یاقترا ،تيعقوم (فقط ،)VGAسوکوف (فقط )VGAو راکدوخ ميظنت (فقط )VGAرا از این عملکرد اصلی تنظیم کنید.
• :Adaptive-Sync/FreeSyncبه منابع گرافیکی پشتیبانی شده Adaptive-Sync/FreeSyncامکان می دهد به صورت پویا سرعت نوسازی نمایش را بر اساس سرعت فریم محتوای معمول تنظیم کند تا به روز رسانی صفحه نمایش با مصرف کمتر برق ،بدون شاتر دیداری و با میزان ماتی کمتر صفحه همراه باشد. • :ELMBاین گزینه را عالمت بزنید تا میزان ماتی تصاویر متحرک کاهش یابد و زمانی که اجسام به سرعت روی صفحه حرکت می کنند حالت شبح مانند ایجاد نشود .آن را میتوان فقط در 80Hzیا باالتر فعال کرد.
•ادص نازيم :میزان صدای خروجی را تنظیم کنید. •دص یب :صدای خروجی را قطع کنید. •عبنم :منبع صدا را روی طخ یدورو یا HDMIتنظیم می کند (فقط برای ورودی HDMIقابل استفاده است)؛ منبع صدا را روی طخ یدورو یا DisplayPortتنظیم می کند (فقط برای ورودی DisplayPortقابل استفاده است). -5 یدورو باختنا منبع ورودی را از بین سیگنال های ورودی VGA، HDMI، DisplayPortانتخاب کنید.
ASUS VG249 DisplayPort 1920 x 1080 @ 144Hzﺣﺎﻟت ﻣﺳﺎﺑﻘﮫ ﺗﻧظﯾم ﺳﯾﺳﺗم ﭘﺷت ﻧﺷﺎﻧﮕر ﺑرق ﻗﻔل ﺻﻔﺣﮫ ﮐﻠﯾد ﻗدرت ﺑﺎزﻧﺷﺎﻧﯽ ھﻣﮫ • GGameVisual Demo Modeحالت نمایش را برای عملکرد GameVisualفعال می کند. • :QuickFitسه الگو دارد )1( :شبکه ( )2اندازه کاغذ ( )3اندازه عکس. - 1الگوی شبکه :به طراحان و کاربران کمک می کند محتوا و طرح کلی را روی یک صفحه سازماندهی کنند و شکل ظاهری و حس هماهنگی ایجاد کنند.
- 5x7 3اندازه عکس :به عکاسان و سایر کاربران امکان می دهد به دقت عکس ها را در اندازه واقعی روی صفحه مشاهده کرده و ویرایش کنند. 8x10 2x2 3x5 4x6 • :ECO Modeحالت دوستدار محیط را برای صرفه جویی در مصرف انرژی فعال کنید. • ميظميظ :هفقوفقو DDC/CI ،و تيفافش صفحه OSDرا تنظیم میکند. •نابز :زبان OSDرا انتخاب کنید .
-7 ربنایم این گزینه را انتخاب کنید تا بتوانید دو کلید میانبر تنظیم کنید. ASUS VG249 DisplayPort 1920 x 1080 @ 144Hzﺣﺎﻟت ﻣﺳﺎﺑﻘﮫ ﻣﯾﺎﻧﺑر ﻓﯾﻠﺗر ﻧور آﺑﯽ ﻣﯾﺎﻧﺑر ۱ GameVisual ﻣﯾﺎﻧﺑر ۲ روﺷﻧﺎﯾﯽ ﺗﻧظﯾم ﺧودﮐﺎر ﮐﻧﺗراﺳت دﻣﺎی رﻧﮓ ﻣﯾزان ﺻدا QuickFit • ربنایمم :کاربر میتواند یکی از گزینههای یبآ رون رتلیف ،GameVisual ،یيانشور، راکدوخ ميظنت ،تسارتنک ،گنر یامد ،ادص نازيم و QuickFitرا انتخاب کند و به عنوان کلید میانبر تنظیم کند .
2-3 مشخصات مدل اندازه صفحه حداکثر وضوح روشنایی (معمول) نسبت ابعادی کنتراست (معمول) زاویه مشاهده ()CR>10 رنگ های نمایش زمان پاسخ VG249Q عرض 23.8اینچ ( 60.45سانتیمتر) 144Hz @ 1080 × 1920 250cd/m2 1:1000 178درجه (افقی) 178/درجه (عمودی) 16.
3-3 عیب یابی (سؤال های متداول) مشکل 12-3 راهکار احتمالی LEDبرق روشن نیست •دکمه است. •بررسی کنید سیم برق به درستی به نمایشگر و خروجی برق وصل باشد. •عملکرد نشانگر برق را در منوی OSDاصلی بررسی کنید. "روشن" را انتخاب کنید تا LEDروشن شود. چراغ LEDبه رنگ کهربایی روشن می شود و هیچ تصویری روی صفحه نیست. •بررسی کنید آیا نمایشگر و کامپیوتر روشن هستند. •بررسی کنید کابل سیگنال به درستی به نمایشگر و کامپیوتر وصل باشد.
4-3 لیست زمانبندی پشتیبانی شده زمانبندی اولیه پشتیبانی شده کامپیوتر وضوح تصویر میزان بازیابی فرکانس افقی 480×640 60هرتز 31.469کیلوهرتز 480×640 72هرتز 37.861کیلوهرتز 480×640 75هرتز 37.5کیلوهرتز 600×800 56هرتز 35.156کیلوهرتز 600×800 60هرتز 37.879کیلوهرتز 600×800 72هرتز 48.077کیلوهرتز 600×800 75هرتز 46.875کیلوهرتز 768×1024 60هرتز 48.
900×1440 )RB(1050×1680 1080×1920 75هرتز 60هرتز 60هرتز 70,635کیلوهرتز 64.674کیلوهرتز 66.