VG32V-sarja Nestekidenäyttö Käyttöopas
Sisällysluettelo Tiedoksiantoja.............................................................................................. iii Turvallisuustietoja....................................................................................... iv Huolto ja puhdistus..................................................................................... vi 1.1 Tervetuloa!..................................................................................... 1-1 1.2 Pakkauksen sisältö..................................
Tiedoksiantoja FCC-lausunto Tämä laite on FCC sääntöjen kohdan 15 mukainen. Käyttö täyttää seuraavat kaksi ehtoa: • Tämä laite ei saa aiheuttaa haitallista häiriötä, ja • Tämän laitteen tulee hyväksyä kaikki vastaanotettu häiriö, mukaan lukien häiriö, joka voi aiheuttaa ei-toivottuja toimintoja. Tämä laite on testattu ja sen on havaittu toimivan digitaalilaitteiden luokan B rajoissa, jotka on määritelty FCC:n sääntöjen kohdassa 15.
Turvallisuustietoja iv • Lue huolellisesti kaikki toimitukseen kuuluvat asiakirjat ennen näytön asettamista. • Estääksesi tulipalon tai sähköiskun vaaran älä koskaan altista näyttöä sateelle tai kosteudelle. • Älä koskaan yritä avata näytön koteloa. Näytön sisällä oleva vaarallisen korkea jännite voi johtaa vakavaan fyysiseen vammaan. • Jos virtalähde on rikkoutunut, älä yritä korjata sitä itse. Ota yhteys pätevään huoltoteknikkoon tai jälleenmyyjään.
VAROITUS Muiden kuin määritettyjen kuulokkeiden tai korvanappien käyttö voi johtaa kuulon menetykseen liiallisten äänenpaineiden vuoksi.
Huolto ja puhdistus • Ennen kuin nostat tai sijoitat näytön uuteen paikkaan, on parempi irrottaa kaapelit ja virtajohto. Sijoita näyttö uuteen paikkaan oikealla nostotekniikalla. Kun nostat tai kannat näyttöä, pidä kiinni näytön reunoista. Älä nosta näyttöä telineestä tai virtajohdosta. • Puhdistus. Sammuta näyttö ja irrota virtajohto. Puhdista näytön pinta nukkaamattomalla, hankaamattomalla liinalla. Piintyneet tahrat voi poistaa miedolla puhdistusaineliuoksella kostutetulla liinalla.
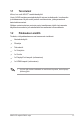
Lisätietojen saaminen Katso seuraavista lähteistä lisätietoja sekä tuote- ja ohjepäivityksiä. 1. ASUS-verkkosivustot ASUS-yrityksen maailmanlaajuiset verkkosivustot tarjoavat päivitettyjä tietoja ASUS-laitteisto ja -ohjelmistotuotteista. Katso http://www.asus.com 2. Valinnaiset asiakirjat Tuotteen pakkaus saattaa sisältää jälleenmyyjän lisäämiä valinnaisia asiakirjoja. Nämä asiakirjat eivät sisälly vakiopakkaukseen.
1.1 Tervetuloa! Kiitos, kun ostit ASUS®-nestekidenäytön! Uusin ASUS-laajakuvanestekidenäyttö tarjoaa terävämmän, leveämmän ja kirkkaamman näytön sekä joukon ominaisuuksia, jotka parantavat katselukokemustasi. Näiden ominaisuuksien ansiosta pystyt nauttimaan näytön tarjoamasta käyttömukavuudesta ja ihastuttavasta visuaalisesta kokemuksesta. 1.
1.3 Monitorin kokoaminen Monitorin kokoaminen: • Kun kokoat näytön varren/alustan, on suositeltavaa pitää näyttö styroxpakkauksensa sisällä. 1. Kohdista varren ruuvinreikä toimitukseen kuuluvan alustan ruuvin kanssa. Liitä sitten alusta varteen. 2. Kiinnitä alusta varteen kiristämällä toimitukseen kuuluva ruuvi.
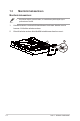
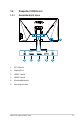
1.4 Kaapelien liittäminen 1.4.1 Nestekidenäyttö takaa 6 5 1. DC-IN-portti 2. DisplayPort 3. HDMI-1-portti 4. HDMI-2-portti 5. Kuulokelähtöportti 6.
1.5 Näytön johdanto 1.5.1 Ohjauspainikkeen käyttö Käytä näytön pohjassa olevaa ohjauspainiketta kuva-asetusten säätämiseen. 6 6 5 5 4 4 3 3 2 2 1 1. Virran merkkivalo: • 2. Tila Kuvaus Valkoinen Päällä Keltainen Valmiustila Pois päältä Pois päältä Power (Virta)-painike: • Kytke tätä näppäintä painamalla näytön virta päälle/pois.
GamePlus-ominaisuuden aktivointi: • Paina GamePlus-painiketta siirtyäksesi GamePlus-päävalikkoon. • Aktivoi Crosshair (hiusristikko), Timer (Ajastin), FPS Counter (FPSlaskuri) tai Display Alignment (Näytä kohdistus) -toiminto. • Siirrä ( )-painiketta ylös/alas valitaksesi ja vahvista tarvittava toiminto painamalla ( ). Paina lopettaaksesi ja poistuaksesi. • Crosshair (Hiusristikkoa)/Timer (Ajastin)/FPS Counter (FPS-laskuria) voi siirtää painamalla 5-suuntaista näppäintä.
2.1 Näytön säätäminen • Suosittelemme optimaalisen katselukulman säätämistä varten, että katsot ensin pystysuorassa olevaa näyttöä ja säädät sen sitten itsellesi parhaiten sopivaan kulmaan. • Pidä kiinni jalustasta estääksesi näyttöä kaatumasta katselukulmaa vaihtaessasi. • Voit säätää näytön kulmaa välillä +20˚ - -5˚ ja kääntöä on mahdollistaa säätää 62˚ vasempaan tai oikeaan. Voit myös säätää monitorin korkeutta +/- 14cm.
2.2 Varren/jalustan irrottaminen (VESAseinäkiinnitys) Tämän näytön irrotettava jalusta on suunniteltu erityisesti VESAseinäkiinnitystä varten. Varren/jalustan irrottaminen 2-2 1. Irrota virta- ja signaalikaapelit. Aseta näyttö varovasti alassuin sen EPS-pakkauksen päälle. 2. Poista ruuvien kannet. 3. Poista neljä (4) ruuvia, jotka kiinnittävät varren näytön taakse. 4. Irrota jalusta (varsi ja alusta) näytöstä. • VESA-seinäkiinnityssarja (100 x 100 mm) on hankittava erikseen.
2.
3.1 Kuvaruutu (OSD) -valikko 3.1.1 Uudelleenmääritys GameVisual ASUS VG32V HDR OFF Racing Mode DisplayPort 1920x1080@120Hz Scenery Mode Racing Mode Cinema Mode RTS/RPG Mode FPS Mode sRGB Mode MOBA Mode 1. Aktivoi OSD-valikko painamalla 5-suuntaisen painikkeen keskikohtaa. 2. Paina - ja -painikkeita vaihtaaksesi valikkovalintojen välillä. Kun siirryt kuvakkeesta toiseen, valinnan nimi näkyy korostettuna. 3. Valitaksesi valikossa korostetun kohteen, paina Keskinäppäintä. 4.
3.1.2 1. Kuvaruutuvalikon johdanto GameVisual Tämä toiminto sisältää seitsemän alitoimintoa, joista voit valita tarpeesi mukaan. Kussakin tilassa on nollausvalinta, joka mahdollistaa asetuksesi säilyttämisen tai paluun esiasetettuun tilaan.
2. Blue Light Filter (Sinisen valon suodatin) Säätää LED-taustavalon säteilemän sinisen valon energiatasoa. Blue Light Filter ASUS VG32V HDR OFF Racing Mode DisplayPort 1920x1080@120Hz Level 0 Level 1 Level 2 Level 3 Level 4 • Level 0 (Taso 0): Ei muutosta. • Level 1–4 (Tasot 1–4): Mitä korkeampi taso, sitä enemmän sininen valo vähenee. • Kun Blue Light Filter (Sinisen valon suodatin) on aktivoitu, Racing Mode (Kilpa-ajotilan) oletusasetukset tuodaan automaattisesti.
3. Color (Väri) Valitse haluamasi kuvan väri tällä toiminnolla. Color ASUS VG32V HDR OFF Racing Mode DisplayPort 1920x1080@120Hz Brightness Contrast Saturation Color Temp. Skin Tone • Brightness (Kirkkaus): Säätöalue on 0-100. • Contrast (Kontrasti): Säätöalue on 0-100. • Saturation (Värikylläisyys): Säätöalue on 0-100. • Color Temp. (Värilämpötila): Sisältää kolme esiasetettua väritilaa (Cool (Kylmä), Normal (Normaali), Warm (Lämmin)) ja yhden User Mode (Käyttäjätila).
4. Image (Kuva) Voit säätää kuvan HDR-, Sharpness (Terävyys) -, VividPixel-, Adaptive-Sync/FreeSync-, ELMB SYNC -, Shadow Boost (Varjon tehostus) -, Aspect Control (Kuvasuhde) -, ASCR- ja Trace Free -toimintoja tästä päätoiminnosta.
• Aspect Control (Kuvasuhde): Voit säätää kuvasuhteeksi "Full (Täysi)", "4:3" ja "OverScan". • ASCR: Valitse ON (Päälle) tai OFF (Pois) ottaaksesi käyttöön tai pois käytöstä dynaaminen kontrastisuhde -toiminnon. ASCR on pois käytöstä, kun ELMB on päällä. • Trace Free: Nopeuttaa vasteaikaa Over Drive -teknologialla. Säätöalue on hitaimmasta 0:sta nopeimpaan 100:aan. • 5. 4:3 on käytettävissä vain, kun tulolähde on 4:3-muotoa. OverScan on käytettävissä vain HDMI-tulolähteellä.
System Setup ASUS VG32V HDR OFF Racing Mode DisplayPort 1920x1080@120Hz Back Power Indicator Power Key Lock All Reset • GameVisual Demo Mode: Aktivoi GameVisual-toiminnon esittelytilan. • Volume (Äänenvoimakkuus): Säätää lähtevän äänenvoimakkuuden tason. • ECO Mode: Aktivoi ekologia-tilan virransäästöä varten. • OSD Setup (Kuvaruutuvalikon asetus): Säädä OSD Timeout (OSD:n aikatkaisu) -, DDC/CI- ja OSD-näytön Transparency (Läpikuultavuus) -asetusta.
7. MyFavorite Lataa/Tallenna kaikki monitorin asetukset.
3-2 Tekniset tiedot Malli VG32VQ Paneelin koko Leveys 31,5" (80,1cm) Maksimiresoluutio 2560 x 1440 @ 144 Hz Kirkkaus (Tyyp.) Sisäinen kontrastisuhde (Tyyp.) Katsomiskulma (CR=10) Näyttövärit Väri Värikylläisyys Vasteaika Satelliittikaiutin 400 cd/m2 3000:1 178° (V) /178° (H) 16,7 M (True 8-bittinen) 72% NTSC 4ms (harmaasta harmaaseen), 1ms MPRT 2 W x 2 stereo Kuulokelähtö Kyllä Ääni HDMI:stä Kyllä HDMI-tulo Kyllä DisplayPort-tulo Virta päällä -virrankulutus (maks.
3.3 Vianmääritys (Usein kysytyt kysymykset) Ongelma 3-10 Mahdollinen ratkaisu Virran merkkivalo ei pala • Paina -painiketta tarkistaaksesi onko näyttä ON (Päällä) -tilassa. • Tarkista onko virtajohto liitetty oikein näyttöön ja pistorasiaan. • Tarkista Virran merkkivalo -toiminto pää-OSDvalikossa. Valitse "ON" (Päälle) kytkeäksesi virran LED-merkkivalon päälle. Virran merkkivalo palaa keltaisena eikä näytössä näy kuvaa • Tarkista ovatko näyttö ja tietokone ON (Päällä) -tilassa.
3.4 Tuettu ajoitusluettelo HDMI2.0/DP1.2-tulon PC-ajoitusluettelo Resoluutio HDMI1(2.0) HDMI2(2.