English ® HZ-1 USB 3.
English Table of contents English....................................................................................................................... 1 Français................................................................................................................... 18 Deutsch................................................................................................................... 29 Português..............................................................................................
ASUSTeK Computer Inc. Address Telephone Fax E-mail Web site Technical Support Telephone Online support 15 Li-Te Road, Peitou, Taipei, Taiwan 11259 +886-2-2894-3447 +886-2-2890-7798 info@asus.com.tw www.asus.com.tw +86-21-38429911 support.asus.com ASUS Computer International (America) Address Telephone Fax Web site Technical Support Telephone Support fax Online support 800 Corporate Way, Fremont, CA 94539, USA +1-510-739-3777 +1-510-608-4555 usa.asus.
English Conventions used in this guide To ensure that you perform certain tasks properly, take note of the following symbols used throughout this manual. DANGER/WARNING: Information ����������������������������������������������������������� to prevent injury to yourself when trying to �� ����������������� complete a task.
Federal Communications Commission Interference Statement This equipment has been tested and found to comply with the limits for a Class B digital device, pursuant to Part 15 of the FCC Rules. These limits are designed to provide reasonable protection against harmful interference in a residential installation. This equipment generates, uses, and can radiate radio frequency energy and, if not installed and used in accordance with the instructions, may cause harmful interference to radio communications.
English REACH Complying with the REACH (Registration, Evaluation, Authorisation, and Restriction of Chemicals) regulatory framework, we published the chemical substances in our products at ASUS REACH website at http://green.asus.com/english/REACH.htm. CAUTION: Do not throw this product in municipal waste. This product has been designed to enable proper reuse of parts and recycling.
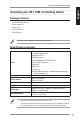
HZ-1 USB 3.0 Docking Station User Guide English Knowing your HZ-1 USB 3.0 docking station Package contents • ASUS Docking Station x1 • Power adapter x1 • Driver CD x1 • USB 3.0 cable x1 • User Guide x1 If any of the items is damaged or missing, contact your retailer. Specifications summary Ports Security solution Power adapter Physical dimensions Weight USB 3.0 downstream port for a USB 3.
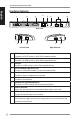
HZ-1 USB 3.0 Docking Station User Guide English Hardware features 1 2 3 4 5 6 7 8 Back view 8 9 Left side view 1 2 3 4 5 6 7 8 9 10 7 10 8 Right side view DVI-D (Single Link) port Connects to a DVI-D monitor or other DVI-D compatible devices. HDMI port Connects to an HDMI monitor or other HDMI compatible devices. VGA port Connects to a VGA monitor or other VGA compatible devices. 10/100/1000Mbps LAN (RJ-45) port Connects to a cable/DSL modem or a local area network (LAN).
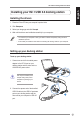
HZ-1 USB 3.0 Docking Station User Guide English Installing your HZ-1 USB 3.0 docking station Installing the drivers 1. Place the Driver CD into your computer's optical drive. 2. Click Setup.exe. 3. Select your language and click I Accept. 4. Wait until the drivers are installed successfully in your computer. • It is normal if your computer screen goes black or flashes temporarily during the driver installation process.
HZ-1 USB 3.0 Docking Station User Guide English Using your HZ-1 USB 3.0 docking station While using your docking station, keep it connected to a power outlet. Otherwise, the devices connected to it will not function properly. Connecting an external monitor Use a VGA, an HDMI, or a DVI-D cable to connect an external monitor to your docking station.
English HZ-1 USB 3.0 Docking Station User Guide The following table shows the HZ-1 USB 3.
HZ-1 USB 3.0 Docking Station User Guide English Controlling the display When the devices are attached, an icon appears in the taskbar. This gives you access to the DisplayLink manager menu. 12 1. From the taskbar, click the Show hidden icons arrow. 2. Click the to show the docking station’s menu list.
HZ-1 USB 3.0 Docking Station User Guide Menu DisplayLink Manager Check for updates ASUSTEK USB Docking Station English Docking station's functions Function Click to open and manage your displays using the Windows utility. Click to check and download the latest driver version from the update server. Click to view and use a list of submenus to enhance the settings of your docking station: • Screen Resolution: Click to select the screen resolution.
HZ-1 USB 3.0 Docking Station User Guide English Extending your desktop to an external monitor Use an external monitor to extend your desktop and have an additional workspace. This allows you to: • Display one document or application across your computer monitor and external monitor. • Use each monitor to display a different document or application. It is normal for your computer screen to go black or flashes temporarily after you change the display mode of your external monitor.
HZ-1 USB 3.0 Docking Station User Guide English Mirroring your desktop to an external monitor Use an external monitor to duplicate your desktop area. NOTE: It is normal if your computer screen goes black or flashes temporarily after you change the display mode of your external monitor. To mirror your desktop to an external monitor: 1. Right-click in the notification area to open the DisplayLink menu. 2. Click ASUSTEK USB Docking Station. 3. Click Mirror.
HZ-1 USB 3.0 Docking Station User Guide English Connecting to the Internet Use an RJ-45 cable to connect your docking station to a local area network (LAN) (A) or a DSL/cable modem (B). The yellow LED on the LAN port lights up when there is an Internet connection. The green LED lights up when there is Internet activity.
HZ-1 USB 3.0 Docking Station User Guide English Disconnecting your HZ-1 USB 3.0 docking station You can connect and disconnect the docking station while your computer is running. • DO NOT disconnect the docking station while data is being transferred between your computer and the docking station. Wait until data transfer has completed. • DO NOT disconnect the docking station while you are connecting to the Internet via its LAN port. Disconnect the Internet connection first. To disconnect your USB 3.
Guide de l'utilisateur pour station d'accueil USB 3.0 HZ-1 Présentation de votre station d’accueil USB 3.0 HZ-1 Contenu de l'emballage • Station d’accueil ASUS x 1 • Adaptateur secteur x 1 • CD de pilotes x 1 Français • Câble USB 3.0 x 1 • Guide de l’utilisateur x 1 Si un de ces éléments est endommagé ou manquant, contactez votre revendeur. Résumé des caractéristiques Port de liaison descendante USB 3.0 pour un périphérique USB 3.
Guide de l'utilisateur pour station d'accueil USB 3.0 HZ-1 Caractéristiques matérielles 1 2 3 4 5 6 7 8 Français Vue de dos 8 9 Vue de gauche 1 2 3 4 5 6 7 8 9 10 7 10 8 Vue de droite Port DVI-D (Liaison unique) Permet de connecter un moniteur DVI-D ou toute autre périphérique compatible DVI-D. Port HDMI Permet de connecter un moniteur HDMI ou tout autre périphérique compatible HDMI. Port VGA Permet de connecter un moniteur VGA ou un autre périphérique compatible VGA.
Guide de l'utilisateur pour station d'accueil USB 3.0 HZ-1 Installation de votre station d’accueil USB 3.0 HZ-1 Installer les pilotes 1. Placez le CD de pilotes dans le lecteur optique de votre ordinateur. 2. Cliquez sur Setup.exe. Français 3. Sélectionnez la langue puis cliquez sur I Accept. 4. Patientez durant l'installation des pilotes sur votre ordinateur. • Il est normal que l'écran devienne noir ou clignote durant l'installation des pilotes.
Guide de l'utilisateur pour station d'accueil USB 3.0 HZ-1 Utilisation de votre station d’accueil USB 3.0 HZ-1 Lorsque vous utilisez votre station d'accueil, gardez celle-ci connectée à une prise de courant. Sinon, les périphériques connectés ne fonctionneront pas correctement. Connecter un moniteur externe Français Utilisez un câble VGA,un HDMI ou DVI-I pour connecter un moniteur externe à votre station d'accueil.
Guide de l'utilisateur pour station d'accueil USB 3.0 HZ-1 Le tableau qui suit montre la connexion de la station d’accueil USB 3.
Guide de l'utilisateur pour station d'accueil USB 3.0 HZ-1 Contrôle de l’écran Lorsque les périphériques sont branchés, une icône s’affiche sur la barre des tâches. Elle vous permet d’accéder au menu du gestionnaire DisplayLink. À partir de la barre des tâches, cliquez sur la flèche Show hidden icon (Afficher les icônes cachées). 2. Cliquez sur Français 1. pour afficher la liste de menus de la station d’accueil.
Guide de l'utilisateur pour station d'accueil USB 3.0 HZ-1 Fonctions de la station d’accueil Menu Gestionnaire DisplayLink Chercher des mises à jour Station d’accueil USB ASUSTEK Fonction Cliquez ici pour ouvrir et gérer vos écrans à l’aide de l’utilitaire Windows. Cliquez ici pour chercher et télécharger la dernière version du pilote à partir du serveur de mise à jour.
Guide de l'utilisateur pour station d'accueil USB 3.0 HZ-1 Etendre l'affichage de votre ordinateur vers un moniteur externe Utilisez un moniteur externe pour étendre l'affichage de votre ordinateur pour obtenir un espace de travail supplémentaire. Ceci vous permet : • D’afficher un document sur les deux écrans; • D’utiliser chaque écran pour afficher un document différent.
Guide de l'utilisateur pour station d'accueil USB 3.0 HZ-1 Obtenir un double affichage de votre écran sur un moniteur externe Uilisez un moniteur externe pour obtenir un double affichage sur deux écrans. NOTE : Il est normal que l'écran devienne noir ou clignote lorsque vous modifiez le mode d'affichage de votre moniteur externe. Pour obtenir un double de l'affichage de votre écran sur un moniteur externe : Français 1. Faites un clic droit sur l'icône DisplayLink.
Guide de l'utilisateur pour station d'accueil USB 3.0 HZ-1 Se connecter à Internet Utilisez un câble RJ-45 pour connecter votre station d’accueil à un LAN (réseau local) (A) ou à un modem DSL/câble (B). Français La LED jaune du port LAN s'allume lorsqu'une connexion à Internet est établie. LA LED verte s'allume en cas d'activité sur Internet.
Guide de l'utilisateur pour station d'accueil USB 3.0 HZ-1 Déconnecter votre station d’accueil USB 3.0 HZ-1 Vous pouvez connecter ou déconnecter la station d'accueil lorsque votre ordinateur est allumé. Français • NE DECONNECTEZ PAS la station d'accueil lorsque des données sont en cours de transfert entre votre ordinateur et la station d'accueil. Veuillez patienter le temps que le transfert des données soit terminé.
HZ-1 USB 3.0 Docking Station Benutzerhandbuch Kennenlernen Ihrer HZ-1 USB 3.0 Docking Station Packungsinhalt • 1x ASUS Docking Station • 1x Netzteil • 1x Treiber-CD • 1x USB 3.0-Kabel • 1x Benutzerhandbuch Wenn ein Teil fehlt oder beschädigt ist, kontaktieren Sie bitte umgehend Ihren Händler. Sicherungslösung Netzteil Abmessungen Gewicht Unterstützte Betriebssysteme CPU-Anforderungen USB 3.0 Downstream-Anschluss für USB 3.
HZ-1 USB 3.0 Docking Station Benutzerhandbuch Hardware-Funktionen 1 2 3 4 5 6 7 8 Rückseitenansicht 8 9 Deutsch Linke Seitenansicht 1 2 3 4 5 6 7 8 9 10 30 7 10 8 Rechte Seitenansicht DVI-D (Single Link) -Anschluss Anschluss für einen DVI-I-Monitor oder andere DVI-I-Geräte. HDMI-Anschluss Anschluss für einen HDMI-Monitor oder andere HDMI-Geräte. VGA-Anschluss Anschluss für einen VGA-Monitor oder andere VGA-Geräte.
HZ-1 USB 3.0 Docking Station Benutzerhandbuch Installieren Ihrer HZ-1 USB 3.0 Docking Station Installieren der Treiber 1. Legen Sie die Treiber-CD in das optische Laufwerk Ihres Computers. 2. Klicken Sie auf Setup.exe. 3. Wählen Sie Ihre Sprache und klicken Sie dann auf I Accept. 4. Warten Sie, bis die Treiber erfolgreich in Ihren Computer installiert wurden. • Es ist normal, dass der Bildschirm schwarz wird oder kurzzeitig flackert, wenn die Treiber installiert werden.
HZ-1 USB 3.0 Docking Station Benutzerhandbuch Benutzen Ihrer HZ-1 USB 3.0 Docking Station Belassen Sie die Docking Station während der Benutzung an der Stromversorgung, anderenfalls funktionieren die daran angeschlossenen Geräte nicht richtig. Anschließen eines externen Monitors Benutzen Sie ein VGA-, HDMI- oder DVI-I-Kabel, um einen externen Monitor mit Ihrer Docking Station zu verbinden.
HZ-1 USB 3.0 Docking Station Benutzerhandbuch Die folgende Tabelle zeigt Ihnen die Anschlussmöglichkeiten Ihrer HZ-1 USB 3.
HZ-1 USB 3.0 Docking Station Benutzerhandbuch Steuern der Anzeige Wenn die Geräte angschlossen sind erscheint ein Symbol in der Taskleiste. Dieses gibt Ihnen Zugang zu den DisplayLink-Managermenü. Deutsch 34 1. Klickne Sie in der Taskleite auf den Pfeil für Ausgeblendete Symbole anzeigen. 2. Klicken Sie auf , um die Menüliste der Docking Station anzuzeigen.
HZ-1 USB 3.0 Docking Station Benutzerhandbuch Funktionen Ihrer Docking Station Menü DisplayLink Manager Auf Updates überprüfen ASUSTEK USB Docking Station Funktion Verwalten Ihrer Anzeigen über das Windows-Hilfsprogramm. Überprüfen auf Updates und herunterladen der neusten Treiber. Anzeigen und benutzen der Liste der Untermenüs zur verbesserung der Einstellungen Ihrer Docking Station: • Bildschirmauflösung: Ändert die Bildschirmauflösung.
HZ-1 USB 3.0 Docking Station Benutzerhandbuch Erweitern der Anzeige Ihres Computers auf den externen Monitor Benutzen Sie einen externen Monitor, um die Anzeige Ihres Computers zu erweitern und so eine zusätzliche Arbeitsfläche zu schaffen. Damit können Sie: • Ein Dokument oder eine Anwendung auf den Monitor Ihres Computers und des externen Monitor aufteilen. • Jeden Monitor für verschiedene Dokumente oder Anwendungen verwenden.
HZ-1 USB 3.0 Docking Station Benutzerhandbuch Spiegeln der Anzeige Ihres Computers auf den externen Monitor enutzen Sie einen externen Monitor, um die Anzeige Ihres Computer zu spiegeln. Es ist normal, dass der Bildschirm schwarz wird oder kurzzeitig flackert, wenn Sie den Anzeigemodus Ihres externen Monitors ändern. So spiegeln Sie die Anzeige Ihres Computer auf einen externen Monitor: 1. Rechtsklicken Sie in der Taskleiste auf , um das DisplayLink-Menü zu öffnen. 2.
HZ-1 USB 3.0 Docking Station Benutzerhandbuch Verbinden mit dem Internet Benutzen Sie ein RJ-45-Kabel, um den LAN-Anschluss an Ihrer Docking Station mit einem lokalen Netzwerk (LAN) (A) oder einem Kabel-/DSL-Modem (B) zu verbinden. Die gelbe LED am LAN-Anschluss leuchtet auf, wenn eine Verbindung zum Internet besteht. Die grüne LED leuchtet auf, wenn Datenübertragung vom/zum Internet stattfindet.
HZ-1 USB 3.0 Docking Station Benutzerhandbuch Trennen Ihrer HZ-1 USB 3.0 Docking Station Sie können die Docking Station anschließen und trennen, während der Computer läuft. • Trennen Sie die Docking Station NICHT vom Computer, während Daten übertragen werden. Warten Sie, bis die Datenübertragung abgeschlossen ist. • Trennen Sie die Docking Station NICHT vom Computer, während Sie über deren LANAnschluss mit dem Internet verbunden sind. Trennen Sie zuerst die Internetverbindung.
Guia do utilizador da Estação de ancoragem USB 3.0 HZ-1 Conhecer a sua estação de ancoragem USB 3.0 HZ-1 Conteúdo da embalagem • Estação de ancoragem ASUS x1 • Transformador x1 • CD de controladores x1 • Cabo USB 3.0 x1 • Manual do Utilizador x1 Contacte o seu vendedor se algum dos itens estiver danificado ou em falta.
Guia do utilizador da Estação de ancoragem USB 3.0 HZ-1 Características do hardware 1 2 3 4 5 6 7 8 Vista traseira 8 9 Vista do lado esquerdo 2 3 4 5 6 7 8 9 10 8 Vista do lado direito Porta DVI-D (Ligação única) Para ligação a um monitor DVI-D ou a outros dispositivos DVI-D compatíveis. Porta HDMI Para ligação a um monitor HDMI ou a outros dispositivos HDMI compatíveis. Porta VGA Para ligação a um monitor VGA ou a outros dispositivos VGA compatíveis.
Guia do utilizador da Estação de ancoragem USB 3.0 HZ-1 Instalar a sua estação de ancoragem USB 3.0 HZ-1 Instalação dos controladores 1. Coloque o CD de Controladores na unidade óptica do computador. 2. Clique no ficheiro Setup.exe. 3. Seleccione o seu idioma e clique em I Accept (Aceito). 4. Aguarde que os controladores sejam instalados com sucesso no seu computador.
Guia do utilizador da Estação de ancoragem USB 3.0 HZ-1 Utilizar a sua estação de ancoragem USB 3.0 HZ-1 Mantenha a estação de ancoragem ligada a uma tomada eléctrica durante a sua utilização. Caso contrário, os dispositivos aí ligados poderão não funcionar correctamente. Ligar um monitor externo Português Utilize um cabo VGA, HDMI,ou DVI-I para ligar um monitor externo à sua estação de ancoragem.
Guia do utilizador da Estação de ancoragem USB 3.0 HZ-1 A tabela seguinte mostra as ligações da Estação de Ancoragem USB 3.
Guia do utilizador da Estação de ancoragem USB 3.0 HZ-1 Controlar o monitor Quando os dispositivos estiverem ligados, será apresentado um ícone na barra de tarefas. Esse ícone dar-lhe-á acesso ao menu do gestor DisplayLink. 1. Na barra de tarefas, clique na seta Show hidden icons (Mostrar ícones ocultos). Clique no ícone para mostrar a lista de menu da estação de ancoragem. Português 2.
Guia do utilizador da Estação de ancoragem USB 3.0 HZ-1 Funções da estação de ancoragem Menu Gestor DisplayLink Procurar actualizações Estação de Ancoragem USB ASUSTEK Função Clique para abrir e gerir os seus monitores utilizando o utilitário do Windows. Clique para procurar e transferir a versão mais recente do controlador a partir do servidor de actualizações.
Guia do utilizador da Estação de ancoragem USB 3.0 HZ-1 Expandir o seu ambiente de trabalho para um monitor externo Utilize um monitor externo para expandir o seu ambiente de trabalho e criar uma área de trabalho adicional. Isto permite-lhe: • Exibir um documento ou aplicação ao longo do seu monitor do computador e monitor externo; • Utilizar cada monitor para exibir diferentes documentos ou aplicações.
Guia do utilizador da Estação de ancoragem USB 3.0 HZ-1 Espelhar o seu ambiente de trabalho num monitor externo Utilize um monitor externo para duplicar o seu ambiente de trabalho. NOTA: É normal que o ecrã do seu computador fique preto ou intermitente temporariamente após alterar o modo de exibição do seu monitor externo. Para espelhar o seu ambiente de trabalho num monitor externo: 1. �������������������������������������� Clique com o botão direito do rato em� DisplayLink.
Guia do utilizador da Estação de ancoragem USB 3.0 HZ-1 Ligar à Internet Utilize um cabo RJ-45 para ligar a sua estação de ancoragem a uma rede local (LAN) (A) ou a um modem DSL/cabo (B). O LED amarelo na porta LAN acende quando existir um ligação à Internet. O LED verde acende quando existir actividade na ligação à Internet.
Guia do utilizador da Estação de ancoragem USB 3.0 HZ-1 Desligar a sua estação de ancoragem USB 3.0 HZ-1 Pode ligar e desligar a estação de ancoragem durante o funcionamento do seu computador. NÃO desligue a estação de ancoragem se estiverem a ser transferidos dados entre o seu computador e a estação de ancoragem. Aguarde até a transferência de dados termine. NÃO desligue a estação de ancoragem se estiver ligado à Internet através da sua porta LAN. Primeiro, termine a ligação à Internet.
Estación de acoplamiento USB 3.0 HZ-1 guía del usuario Familiarizarse con la estación de acoplamiento USB 3.0 HZ-1 Contenido del paquete • • • • • Base de conexiones ASUS x1 Adaptador de alimentación x1 CD con controladores x1 Cable USB 3.0 x1 Guía del usuario x1 Ai alguno de los artículos anteriores falta o está dañado, póngase en contacto son su distribuidor.
Estación de acoplamiento USB 3.0 HZ-1 guía del usuario Características de hardware 1 2 3 4 5 6 7 8 Vista posterior 8 9 Vista lateral izquierda 1 2 3 4 5 6 Español 7 8 9 10 52 7 10 8 Vista lateral derecha Puerto DVI-D (un solo enlace) Permite conectar un monitor DVI-D u otros dispositivos compatibles DVI-I. Puerto HDMI Permite conectar un monitor HDMI u otros dispositivos compatibles HDMI. Puerto VGA Permite conectar un monitor VGA u otros dispositivos compatibles VGA.
Estación de acoplamiento USB 3.0 HZ-1 guía del usuario Instalar la estación de acoplamiento USB 3.0 HZ-1 Instalar los controladores 1. Inserte el CD con los controladores en la unidad óptica del equipo. 2. Haga clic en Setup.exe. 3. Seleccione el idioma y haga clic en I Accept (Acepto). 4. Espere a que los controladores se instalen correctamente en el equipo. • Es normal que la pantalla del equipo se quede en blanco o parpadee temporalmente durante el proceso de instalación de los controladores.
Estación de acoplamiento USB 3.0 HZ-1 guía del usuario Usar la estación de acoplamiento USB 3.0 HZ-1 Cuando utilice la base de conexiones, manténgala conectada a una toma de corriente eléctrica. De lo contrario, los dispositivos conectados a ella no funcionarán correctamente.
Estación de acoplamiento USB 3.0 HZ-1 guía del usuario En la tabla siguiente se muestra la conexión de la estación de acoplamiento USB 3.
Estación de acoplamiento USB 3.0 HZ-1 guía del usuario Controlar la pantalla Cuando los dispositivos estén conectados, aparecerá un icono en la barra de tareas. Este icono le proporciona acceso al menú del administrador DisplayLink. Español 56 1. En la barra de tareas, haga clic en la flecha Show hidden icons (Mostrar iconos ocultos). 2. Haga clic en para mostrar la lista de menús de la estación de acoplamiento.
Estación de acoplamiento USB 3.0 HZ-1 guía del usuario Funciones de la estación de acoplamiento Menú Administrador DisplayLink Buscar actualizaciones Estación de acoplamiento USB ASUSTEK Función Haga clic para abrir y administrar las pantallas mediante Windows. Haga clic para buscar la versión de controlador más reciente y descargarla del servidor de actualización.
Estación de acoplamiento USB 3.0 HZ-1 guía del usuario Extender el escritorio con un monitor externo Utilice un monitor externo para extender el escritorio y tener un espacio de trabajo adicional. De esta forma puede: • Mostrar un documento o aplicación a través del monitor del equipo y del monitor externo; • Usar cada monitor para mostrar un documento o aplicación diferente.
Estación de acoplamiento USB 3.0 HZ-1 guía del usuario Reflejar el escritorio en un monitor externo Utilice un monitor externo para duplicar el área del escritorio. NOTA: es normal que la pantalla del equipo se quede en blanco o parpadee temporalmente después de cambiar el modo de visualización del monitor externo. Para reflejar el escritorio en un monitor externo: 1. Haga clic con el botón secundario en DisplayLink. en el área de notificación para abrir el menú 2.
Estación de acoplamiento USB 3.0 HZ-1 guía del usuario Conectarse a Internet Utilice un cable RJ-45 para conectar la base de acoplamiento a una red de área local (LAN) (A) o a un módem DSL o de cable (B). El LED amarillo del puerto LAN se ilumina cuando hay conexión a Internet. El LED verde se ilumina cuando hay actividad de Internet.
Estación de acoplamiento USB 3.0 HZ-1 guía del usuario Desconectar la estación de acoplamiento USB 3.0 HZ-1 Puede conectar y desconectar la base de conexiones mientras el equipo está en funcionamiento. • No desconecte la base de conexiones mientras se transfieren datos entre esta y su PC. Espere a que la transferencia termine. • NO desconecte la base de conexiones mientras está conectado a Internet a través de su puerto LAN. Desconecte primero la conexión a Internet.
Docking Station HZ-1 USB 3.0 - Guida Utente Descrizione della Docking Station HZ-1 USB 3.0 Contenuto della Confezione • ASUS Docking Station x1 • Adattatore di corrente x1 • CD Driver x1 • Cavo USB 3.0 x1 • Guida Utente x1 Per eventuali articoli danneggiati o mancanti, contattare il rivenditore. Specifiche Tecniche Porte Soluzione di sicurezza Adattatore di corrente Dimensioni Peso Supporto OS Requisiti CPU Italiano 62 Porta downstream USB 3.0 per un dispositivo USB 3.
Docking Station HZ-1 USB 3.0 - Guida Utente Descrizione Hardware 1 2 3 4 5 6 7 8 Lato posteriore 8 9 Lato sinistro 2 3 4 5 6 7 8 9 10 8 Lato destro Porta DVI-D (Single Link) Consente di collegare un monitor DVI-D o altri dispositivi compatibili DVI-D. Porta HDMI Consente di collegare un monitor HDMI o altri dispositivi compatibili HDMI. Porta VGA Consente di collegare un monitor VGA o altri dispositivi compatibili VGA.
Docking Station HZ-1 USB 3.0 - Guida Utente Installazione della Docking Station HZ-1 USB3.0 Installazione driver 1. Inserire il CD Driver nell'unità ottica del computer. 2. Cliccare Setup.exe. 3. Selezionare la lingua e cliccare I Accept. 4. Attendere che sia completata l'installazione dei driver nel computer. • E' normale che durante l'installazione dei driver lo schermo del computer lampeggi o diventi temporaneamente nero.
Docking Station HZ-1 USB 3.0 - Guida Utente Utilizzo della Docking Station HZ-1 USB 3.0 Quando in funzione,tenere sempre la docking station inserita in una presa di corrente, altrimenti i dispositivi ad essa collegati non funzionano correttamente. Connessione con un Monitor Esterno Per collegare un monitor esterno alla docking station, utilizzare un cavo VGA, HDMI oppure DVI-D.
Docking Station HZ-1 USB 3.0 - Guida Utente La seguente tabella mostra la connessione della Docking Station HZ-1 USB 3.
Docking Station HZ-1 USB 3.0 - Guida Utente Controllo Display Quando i dispositivi sono collegati, nella barra delle applicazioni appare un’icona, che consente di accedere al menu di DisplayLink Manager. 1. Dalla barra delle applicazioni, cliccare sulla freccia Show hidden icons. 2. Cliccare Italiano per visualizzare l’elenco del menu della docking station.
Docking Station HZ-1 USB 3.0 - Guida Utente Funzionalità della Docking Station Menu DisplayLink Manager Controllo aggiornamenti ASUSTEK USB Docking Station Funzione Consente di gestire contemporaneamente più schermi. Controlla e scarica dal server aggiornamenti la versione driver più recente. Permette di visualizzare e utilizzare un elenco di sottomenu per ottimizzare le impostazioni della docking station: • Screen Resolution: Cliccare per selezionare la risoluzione schermo.
Docking Station HZ-1 USB 3.0 - Guida Utente Estensione del Desktop su un Monitor Esterno Utilizzare un monitor esterno per estendere il desktop e godere di uno spazio in più. In questo modo, è possibile: • Visualizzare uno stesso documento o un’applicazione sia sullo schermo del computer che su un monitor esterno. • Utilizzare i due monitor per visualizzare documenti o applicazioni differenti.
Docking Station HZ-1 USB 3.0 - Guida Utente Mirror del Desktop su un Monitor Esterno Utilizzare un monitor esterno per duplicare l'area del desktop. E' normale che,dopo aver cambiato la modalità di visualizzazione del monitor esterno, lo schermo del computer lampeggi o diventi temporaneamente nero. Per eseguire il mirror del desktop su un monitor esterno: 1. Cliccare in area di notifica per aprire il menu DisplayLink. 2. Cliccare ASUSTEK USB Docking Station. 3. Cliccare Mirror.
Docking Station HZ-1 USB 3.0 - Guida Utente Connessione a Internet Utilizzare un cavo RJ-45 per collegare la porta LAN della docking station con una rete LAN (A) o con un modem DSL/via cavo (B). In presenza di una connessione a internet, il LED sulla porta LAN si illumina di giallo, mentre diventa verde per segnalare attività in internet.
Docking Station HZ-1 USB 3.0 - Guida Utente Disconnessione della Docking Station HZ-1 USB 3.0 E' possibile collegare e scollegare la docking station mentre il computer è in funzione. • NON disconnettere la docking station in fase di trasmissione dati con il computer. Attendere il termine del trasferimento dati, prima di procedere con la disconnessione. • NON disconnettere la docking station durante la connessione a Internet tramite la porta LAN. Interrompere prima la connessione a internet.
Українська Керівництво користувача до док-станції USB 3.0 HZ-1 Знайомство із USB 3.0 док-станцією HZ-1 До комплекту входять: • Док-станція ASUS х 1 • Адаптер живлення х 1 • Компакт-диск драйверів х 1 • Кабель USB 3.0 х 1 • Керівництво користувача х 1 Якщо будь-які предмети пошкоджені або відсутні, зверніться до розповсюджувача. Технічні характеристики Порти Порт входу потоку USB 3.0 для пристрою USB 3.
Керівництво користувача до док-станції USB 3.0 HZ-1 Українська Особливі характеристики апаратних засобів 1 2 3 4 5 6 7 8 Вигляд ззаду 8 9 Вигляд з лівого боку 74 7 10 8 Вигляд з правого боку 1 Порт DVI-D (єдиного сполучення) Для підключення монітора DVI-D або інших сумісних із DVI-D пристроїв. 2 Порт HDMI Для підключення монітора HDMI або іншого сумісного з HDMI пристрою. 3 Порт VGA Для підключення монітора VGA або іншого сумісного з VGА пристрою.
Українська Керівництво користувача до док-станції USB 3.0 HZ-1 Інсталяція USB 3.0 док-станції HZ-1 Інсталяція пристроїв 1. Вставте компакт-диск драйверів до оптичного дисководу комп'ютера. 2. Клацніть по Setup.exe. 3. Виберіть мову і клацніть по I Accept (Приймаю). 4. Почекайте, поки драйвери будуть успішно інстальовані на комп'ютері. • Якщо екран комп'ютера потемніє або тимчасово мерехтітиме під час інсталяції драйверів, це є нормальним явищем.
Керівництво користувача до док-станції USB 3.0 HZ-1 Українська Користування USB 3.0 док-станцією HZ-1 Користуючись док-станцією, залишайте її підключеною до джерела живлення. У протилежному випадку пристрої не працюватимуть як слід. Підключення зовнішнього монітора Кабелем VGA, HDMI або DVI-D підключіть зовнішній монітор до Вашої док-станції.
Українська Керівництво користувача до док-станції USB 3.0 HZ-1 У наступній таблиці показано підключення USB 3.
Керівництво користувача до док-станції USB 3.0 HZ-1 Українська Контроль дисплею Коли пристрої приєднані, на панелі задач з'являється піктограма. Це надає доступ до меню керування DisplayLink. 78 1. На панелі задач клацніть по стрілці Show hidden icons (Показати приховані піктограми). 2. Клацніть , щоб показати список меню док-станції.
Українська Керівництво користувача до док-станції USB 3.0 HZ-1 Функції док-станції Menu – меню Функція Пристрій керування DisplayLink Перевірити наявність поновлень Док-станція ASUSTEK USB Клацніть, щоб відкрити і керувати дисплеями утилітою Windows. Клацніть, щоб перевірити і завантажити останню версію драйверів з сервера поновлень. Клацніть, щоб переглянути і користуватися списком підменю, щоб підсилити ефективність налаштувань док-станції: • Чіткість екрану: Клацніть, щоб вибрати чіткість екрану.
Керівництво користувача до док-станції USB 3.0 HZ-1 Українська Розширення стаціонарного ПК на зовнішній монітор Користуйтеся зовнішнім монітором, щоб розширити стаціонарний ПК і отримати додаткове робоче місце. Це надає можливості: • ��������������������������������������������������������������������������� Показувати документ або задачу на всіх комп'ютерних і зовнішніх моніторах.
Українська Керівництво користувача до док-станції USB 3.0 HZ-1 Копіювання стаціонарного ПК на зовнішній монітор Користуйтеся зовнішнім монітором, щоб дублювати ділянку стаціонарного ПК. ПРИМІТКА: Якщо екран комп'ютера потемніє або тимчасово мерехтітиме після зміни режиму дисплею зовнішнього монітора, це є нормальним явищем. Щоб зробити відображення стаціонарного ПК на зовнішній монітор: 1. Правою кнопкою клацніть у ділянці повідомлень, щоб відкрити меню DisplayLink. 2.
Керівництво користувача до док-станції USB 3.0 HZ-1 Українська Підключення до Інтернет Кабелем підключіть док-станцію RJ-45 до локальної мережі (А) або до DSL/кабельного модему (В). Жовтий світлодіод на порті локальної мережі засвічується, коли встановлено підключення до Інтернет. Зелений світлодіод засвічується, коли йде передача даних в Інтернет.
Українська Керівництво користувача до док-станції USB 3.0 HZ-1 Відключення USB 3.0 док-станції HZ-1. Під час роботи комп'ютера можна підключати і відключати док-станцію. • НЕ ВІДКЛЮЧАЙТЕ док-станцію під час передачі даних між комп'ютером і док-станцією. Почекайте, поки буде закінчено передачу даних. • НЕ ВІДКЛЮЧАЙТЕ док-станції, поки Ви підключені до Інтернет через порт локальної мережі. Спочатку вимкніть підключення Інтернет. Щоб відключити USB 3.
Руководство для док-станции HZ-1 USB 3.0 Знакомство с док-станцией HZ-1 USB 3.0 Комплект поставки • ASUS Док-станция x1 • Блок питания x1 Русский • Компакт-диск с драйверами х 1 • Кабель USB 3.0 x1 • Руководство пользователя x1 Если какие-либо элементы комплекта поставки отсутствуют или повреждены, обратитесь к продавцу. Спецификация 84 Порты Порт USB 3.
Руководство для док-станции HZ-1 USB 3.0 Аппаратные функции 2 3 4 5 6 7 8 Русский 1 Вид снизу 8 9 7 10 Вид слева 8 Вид справа 1 Разъем DVI-D (Single Link) Подключение к DVI-D монитору или другому DVI-D-совместимому устройству. 2 Разъем HDMI Подключение к HDMI монитору или другому HDMI-совместимому устройству. 3 Разъем VGA Подключение к VGA монитору или другому VGA-совместимому устройству.
Руководство для док-станции HZ-1 USB 3.0 Установка док-станции Установка драйверов 1. Вставьте компакт-диск в оптический привод Вашего компьютера. 2. Нажмите Setup.exe. Русский 3. Выберите язык и нажмите I Accept. 4. Дождитесь завершения установки драйверов. • При установке драйверов экран может временно отключиться или мигать. • Убедитесь, что Вы установили драйвер до подключения док-станции к компьютеру. Установка док-станции Для установки док-станции выполните следующее: 1.
Руководство для док-станции HZ-1 USB 3.0 Использование док-станции При использовании док-станции, подключите ее к розетке. В противном случае подключенные устройства могут не работать. Русский Подключение внешнего монитора Подключите внешний монитор к док-станции с помощью VGA, HDMI или DVI кабеля. Для подключения внешнего монитора к док-станции, укажите режим подключения: • VGA + HDMI • HDMI + DVI-D • VGA / HDMI / DVI кабель и HDMI->DVI конвертер приобретаются отдельно.
Руководство для док-станции HZ-1 USB 3.
Руководство для док-станции HZ-1 USB 3.0 Управление дисплеем Когда устройство подключено в панели задач появится иконка. Нажмите стрелку Показать скрытые значки в панели задач. Русский 1. Нажмите стрелку Показать скрытые значки в панели задач. 2. Нажмите для отображения меню док-станции.
Руководство для док-станции HZ-1 USB 3.0 Функции док-станции Меню Функция DisplayLink Manager Нажмите для управления мониторами с помощью утилиты Windows. Проверка обновлений ASUSTEK USB Docking Station. ASUSTEK USB Docking Нажмите для просмотра и использования списка подменю для дополнительной Station настройки док-станции: • Screen Resolution: Нажмите для выбора разрешения экрана. Русский Вы можете установить разрешение только на основном мониторе.
Руководство для док-станции HZ-1 USB 3.0 Расширение рабочего стола компьютера на внешний монитор Используйте внешний монитор для расширения рабочего стола и получения дополнительного места на нем. Это позволит Вам: • Отобразить один документ или приложение на дисплее Вашего компьютера и внешнем мониторе. • Использовать каждый монитор для отображения различных документов или приложений. Русский При установке драйверов экран может временно отключиться или мигать.
Руководство для док-станции HZ-1 USB 3.0 Зеркальное отображение рабочего стола на внешний монитор Используйте внешний монитор для дублирования рабочего стола компьютера. ПРИМЕЧАНИЕ: При изменении параметров внешнего монитора экран может временно отключиться или мигать. Русский Для зеркального отражения рабочего стола компьютера на внешний монитор: 1. Щелчок правой кнопкой в области уведомлений для открытия меню DisplayLink. 2. Нажмите Mirror. 3. Нажмите Mirror.
Руководство для док-станции HZ-1 USB 3.0 Подключение к сети Интернет С помощью сетевого кабеля подключите LAN порт док-станции к локальной сети (LAN) (A) или кабельному/ DSL модему (B). Русский При наличии подключения к локальной сети или кабельному/DSL модему на LAN порте загорится желтый индикатор. Зеленый индикатор загорится при наличии активности между подключенными устройствами.
Руководство для док-станции HZ-1 USB 3.0 Отключение док-станции Не подключайте и не отключайте док-станцию при работающем компьютере. Русский • Не отключайте док-станцию во время передачи данных между ней и компьютером. Дождитесь завершения передачи данных. • Не отключайте док-станцию, если Вы подключены к Интернет через ее LAN порт. Сначала отключите подключение к Интернет.
HZ-1 USB 3.0 Doklama İstasyonu HZ-1 USB 3.0 takma istasyonunuzu tanıma Paket içeriği • ASUS Takma İstasyonu x1 ����� ������ ���������� �� • Güç adaptörü x1 ���� ��������� �� • Sürücü CD'si x1 • USB 3.0 kablosu x1 • Kullanım Kılavuzu x1 Türkçe Bileşenlerden herhangi biri hasar görmüş ya da eksik ise satıcınızla temasa geçin. Özelliklerin özeti Bağlantı Noktaları Bir USB 3.0 aygıtı için USB 3.
HZ-1 USB 3.0 Doklama İstasyonu Donanım özellikleri 1 2 3 4 5 6 7 8 Arkadan görünüm 8 9 Türkçe Soldan görünüm 96 7 10 8 Sağdan görünüm 1 DVI-D (Tekli Link) bağlantı noktası Bir DVI-D monitörüne veya diğer DVI-D uyumlu aygıta bağlanır. 2 HDMI bağlantı noktası Bir HDMI monitörüne veya diğer HDMI uyumlu aygıtlara bağlanır. 3 VGA bağlantı noktası VGA monitöre veya başka VGA uyumlu aygıtlara bağlanır.
HZ-1 USB 3.0 Doklama İstasyonu HZ-1 USB 3.0 takma istasyonunuzu yükleme Sürücüleri yükleme 1. Sürücü CD'sini bilgisayarınızın optik sürücüsüne yerleştirin. 2. Setup.exe üzerine tıklayın. 3. Dilinizi seçin ve I Accept'i (Kabul Ediyorum) tıklatın. 4. Sürücüler bilgisayarınıza başarılı bir şekilde yüklenene kadar bekleyin. Türkçe • ISürücü yüklemesi işlemi sırasında bilgisayarınızın ekranının geçici olarak kararması veya yanıp sönmesi normaldir.
HZ-1 USB 3.0 Doklama İstasyonu HZ-1 USB 3.0 takma istasyonunuzu kullanma akma istasyonunuzu kullanırken, prize takılı tutun. Aksi halde, bağlı aygıtlar düzgün çalışmaz. Harici bir monitör bağlama Takma istasyonunuza harici bir monitör bağlamak için bir HDMI veya bir DVI-I kablosu kullanın. Türkçe Harici monitörü dok istasyonunuza bağlamak için çift çıkış bağlantı modunu belirleyin: • VGA + HDMI • HDMI + DVI-D • VGA / HDMI/ DVI-D kablosu ve HDMI’dan DVI’a dönüştürücü ayrıca satın alınır.
HZ-1 USB 3.0 Doklama İstasyonu Aşağıdaki tablo HZ-1 USB 3.
HZ-1 USB 3.0 Doklama İstasyonu Ekranı Kontrol Etme When the devices are attached, an icon appears in the taskbar. This gives you access to the DisplayLink manager menu. Türkçe 100 �. Görev çubuğundan, Show hidden icons (Gizli simgeleri göster) okuna tıklayın. 2. Dok istasyonu menü listesinde görüntülemek için simgesine tıklayın.
HZ-1 USB 3.0 Doklama İstasyonu Dok istasyonu işlevleri Menü İşlev DisplayLink Manager Güncellemeleri kontrol edin ASUSTEK USB Dok istasyonu Windows programını kullanarak ekranınızı açmak ve yönetmek için tıklayın. Güncelleme sunucusundan en son sürücü sürümünü indirmek ve kontrol etmek için tıklayın Dok istasyonunuzun ayarlarını genişletmek için bir liste kullanmak ve görüntülemek üzere tıklayın: • Ekran çözünürlüğü: Ekran çözünürlüğünü seçmek için tıklayın.
HZ-1 USB 3.0 Doklama İstasyonu Masaüstünüzü harici bir monitöre genişletme Masaüstünüzü genişletmek ve ek bir çalışma alanına sahip olmak için harici bir monitör kullanın. Bu size şunları sağlar: • Bilgisayarınızın monitöründen ve harici monitörden bir belgeyi veya uygulamayı görüntüleme; • Her bir monitörü farklı bir belge veya uygulama görüntülemek için kullanma.
HZ-1 USB 3.0 Doklama İstasyonu Masaüstünüzü harici bir monitöre yansıtma Masaüstü alanınızı çoğaltmak için harici bir monitör kullanın. NOT: Harici monitörünüzün ekran modunu değiştirdikten sonra bilgisayar ekranınızın geçici olarak kararması veya yanıp sönmesi normaldir.. Masaüstünüzü harici bir monitöre yansıtmak için: 1. DisplayLink menüsünü açmak için bildirim alanında sağ tıklatın. 2. ASUSTEK USB Docking Station (ASUSTEK USB Dok İstasyonuna) tıklayın. 3. Mirror'ı (Yansıt) tıklatın�.
HZ-1 USB 3.0 Doklama İstasyonu Connecting to the Internet Dok istasyonunuza yerel bir alan ağına (LAN) (A) veya bir DSL/kablo modemine (B) bağlamak için bir RJ-45 kablosu kullanın. Bir Internet bağlantısı olduğunda LAN bağlantı noktasındaki sarı LED yanar. Internet etkinliği olduğunda yeşil LED yanar.
HZ-1 USB 3.0 Doklama İstasyonu HZ-1USB 3.0 takma istasyonunuzun bağlantısını kesme Bilgisayarınız çalışırken takma istasyonunuzu bağlayabilir veya bağlantısını kesebilirsiniz. • Veriler bilgisayarınız ve takma istasyonu arasında aktarılırken takma istasyonunun bağlantısını KESMEYİN. Veri aktarımı tamamlanıncaya kadar bekleyin. • Internet'e LAN bağlantı noktasıyla bağlanırken takma istasyonunun bağlantısını KESMEYİN. Önce Internet bağlantısını kesin..
HZ-1 USB 3.0 擴展基座用戶手冊 基座用戶手冊 認識您的 HZ-1 USB 3.0 擴展基座 基座 包裝�� �� • 華碩擴展基座 擴展基座 基座 x1 • 驅動程序光盤 程序光盤 x1 • • • 電源適配器 x1 USB 3.0 傳輸線 x1 用戶手冊 x1 注意:�上述任何物件損壞或是遺失,請立刻向當地經銷商聯繫� 規格表 簡体中文 連接端口 端口 安全防護 電源適配器 尺寸 重量 支持操作系統 操作系統 處理器要求 USB 3.0 下�連接端口,供 端口,供 ,供 USB 3.0 設備使用 使用 (Type A 插座)x3 麥克風連接端口 端口 x1 耳機連接端口 端口 x1 10/100/1000Mbps 網絡(RJ-45)連接端口 (RJ-45)連接端口 端口 x1 DV�-D (Single Link) 連接端口 端口 x1 VGA 連接端口 端口 x1 HDM� 連接端口 端口 x1 電源連接端口 端口 x1 USB 3.
HZ-1 USB 3.0 擴展基座用戶手冊 基座用戶手冊 硬件功能介紹 功能介紹 1 2 4 3 5 6 7 8 後視圖 8 9 10 左視圖 2 3 4 5 6 7 8 9 10 8 右視圖 DVI-D (Single Link) 連接端口 連接 DV�-D 顯示器或其他兼� DV�-D 的設備� HDMI 連接端口 連接 HDM� 顯示器或其他兼� HDM� 的設備� VGA 連接端口 端口 連接 VGA 顯示器或其他兼� 或其他兼� 兼� VGA 規格的設備� 設備� � 10/100/1000Mbps 網絡(RJ-45)連接端口 (RJ-45)連接端口 端口 連接線纜/DSL 數據機或局域網(LAN)� 局域網(LAN)� (LAN)� 耳機連接端口 端口 連接一對耳機或喇叭� 麥克風連接端口 端口 連接麥克風� 標準 USB 3.0 下�連接端口 端口 連接 USB 3.
HZ-1 USB 3.0 擴展基座用戶手冊 基座用戶手冊 安裝您的 HZ-1 USB 3.0 擴展基座 安裝驅動程序 程序 1. 將驅動程序光盤放入您電腦的光驅中� 2. 點擊 Setup.exe� 3. 選擇語言並點擊【同意】� 4. 請耐心等候直到驅動程序成功安裝至您的電腦� • 如果您的屏幕在驅動程序安裝過程中暫時變黑或閃爍是正常現 象� • 請先安裝驅動程序,然後再將擴展基座連接到電腦� 設置您的擴展基座 請依照下列步驟設置您的擴展基座: 簡体中文 1. 將隨附的電源適配器的一端連 接至擴展基座上的電源輸入連 接端口,然後將�一端連接至 100-240V 電源插座中� 注意:請使用產品隨 附的電源適配器�使 用其他電源適配器可 能會造成您的設備損 壞� 2. 將產品隨附 USB 3.0 傳輸線的 方頭端連接至擴展基座的 USB 3.0 上�連接端口,並將�一 端連接至電腦的的 USB 3.
HZ-1 USB 3.0 擴展基座用戶手冊 基座用戶手冊 使用您的 HZ-1 USB 3.0 擴展基座 重要:使用您的擴展基座時,請將其保持在連接至外部電源插座的 狀態�否則連接至擴展基座的設備可能無法正常運�� 連接外接顯示器 簡体中文 使用 VGA、HDM� 或 DV�-D 傳輸線將外接顯示器連接至您的擴展基座� �要將外接顯示器連接到您的擴展基座,請指定雙輸出連接模式: • VGA + HDM� • HDM� + DV�-D • VGA / HDM� / DV�-D 數據線與 HDM� 轉 DV� 轉接器需��購 買� • 請勿將多台顯示器同時連接到 VGA、HDM� 與 DV�-D 接口�這 樣可能會使顯示器設置產生�可預�的錯誤� • �多的擴展基座圖像功能說明,請參考驅動程序光盤中的 Release Note.
HZ-1 USB 3.0 擴展基座用戶手冊 基座用戶手冊 下表所示為 HZ-1 USB 3.
HZ-1 USB 3.0 擴展基座用戶手冊 基座用戶手冊 顯示控制 當�設備連接時,任務欄會出現一個圖標�您可以�過這個圖標進入 DisplayLink 管理器菜單� 1. 在任務欄中,點擊“顯示隱藏圖標"箭頭� 以顯示擴展基座菜單列表� 簡体中文 2.
HZ-1 USB 3.
HZ-1 USB 3.0 擴展基座用戶手冊 基座用戶手冊 將桌面延伸至外接顯示器 使用外接顯示器以延伸您的桌面,提供�大的工作空間�此功能可讓您: • • 跨越您的電腦屏幕與外接顯示器顯示同一文件文件或應用程序� 分別使用兩個顯示器顯示�同的文件文件或是應用程序� 說明:在您��外接顯示器的顯示模式後,您的電腦屏幕會暫時變 黑或閃爍皆屬正常現象� 將桌面延伸至外接顯示器: 說明:每次連接外接顯示器至擴展基座時,在 Windows ��區域 中便會出現一個 DisplayLink 程序圖標 �DisplayLink 軟件可讓您 連接並管理外接顯示器� 1. 在��區域的 圖標上點按鼠標右鍵以開啟 DisplayLink 程序菜單� 2. 點擊 ASUSTEK USB Docking Station� 3.
HZ-1 USB 3.0 擴展基座用戶手冊 基座用戶手冊 將您的桌面複製至外接顯示器 使用外接顯示器複製您的桌面區域� 說明:在您��外接顯示器的顯示模式後,您的電腦屏幕會暫時變 黑或閃爍皆屬正常現象� 將桌面複製至外接顯示器: 1. 在��區域的 圖標上點按鼠標右鍵以開啟 DisplayLink 程序菜單� 2. 點擊 ASUSTEK USB Docking Station� 3.
HZ-1 USB 3.0 擴展基座用戶手冊 基座用戶手冊 連接上網 用一根 RJ-45 網線將您的擴展基座連接到局域網(LAN)(A) 或一台 DSL/ Cable Modem (B)� 當網絡連線時,網絡連接端口的黃色 LED 燈便會亮起�當�網絡數據傳 輸時,綠色 LED 燈便會亮起� LAN RJ-45 RJ-45 A B 簡体中文 Modem 說明: • • �您在辦公室無法使用擴展基座連接上網,請詢問網絡管理員擴 展基座的 Mac 地址是否被您公司的防火牆所阻擋� 請至擴展基座底部檢查 MAC 地址�您也可以�過下列方式取得 MAC 地址: Windows® 操作系統: : 1.在 Windows® 桌面上,點擊 開始 > 所�程序 > Accessories > Command prompt� 2. 在 command prompt 中,輸入 ipconfig -all 然後按下 鍵� • 3.
HZ-1 USB 3.0 擴展基座用戶手冊 基座用戶手冊 移除您的 HZ-1 USB 3.0 擴展基座 您可以在您的電腦仍在運�時連接或移除擴展基座� 重要: • 當您的電腦與擴展基座進�數據傳輸時請勿拔除擴展基座�請等 到數據傳輸完成後再拔除擴展基座� • 當您正�過擴展基座的網絡連接端口連接上網時,請勿拔除擴展 基座�拔除擴展基座前,請先取消網絡連線� 拔除您的 USB 3.0 擴展基座: 1. 請使用��區域中的安全拔除硬件功能離開 USB-Ethernet 轉接器以及所 連接的設備,如 U 盤與 USB 硬盤� 2.
HZ-1 USB 3.0 擴充基座使用手冊 認識您的 HZ-1 USB 3.0 擴充基座 包裝內容 • x1 • • • • x1 USB 3.0 x1 x1 x1 注意 規格表 USB 3.0 x3 x1 x1 10/100/1000Mbps RJ-45 x1 DV�-D (Single Link) x1 VGA x1 HDM� x1 x1 USB 3.0 / Type B x1 x2 AC 100-240V DC 5V/4A 264 x 87 x 29 x x 299.5 Windows® XP (SP3) / Windows® Vista (32 bit/64 bit) / Windows® 7 (32 bit/64 bit) �ntel® (Atom N270 / / i3 / i5 / i7 / Core CPU) 繁體中文 USB 3.
HZ-1 USB 3.0 擴充基座使用手冊 硬體功能介紹 1 2 4 3 5 6 7 8 後視圖 8 10 9 左視圖 5 DVI-D (Single Link) 連接埠 DV�-D DV�-D HDMI 連接埠 HDM� HDM� VGA 連接埠 VGA VGA 10/100/1000Mbps 網路(RJ-45)連接埠 /DSL LAN 耳機連接埠 6 麥克風連接埠 7 8 標準 USB 3.0 下行連接埠 USB 3.0 安全鎖孔洞 9 USB 3.
HZ-1 USB 3.0 擴充基座使用手冊 安裝您的 HZ-1 USB 3.0 擴充基座 安裝驅動程式 1. 2. Setup.exe 3. 同意 4. • • 設定您的擴充基座 1. 100-240V 2. USB 3.0 3.0 USB 繁體中文 2 注意 1 USB 3.
HZ-1 USB 3.0 擴充基座使用手冊 使用您的 HZ-1 USB 3.0 擴充基座 重要 連接外接顯示器 VGA HDM� DV�-D 繁體中文 • VGA + HDM� • HDM� + DV�-D • VGA / HDM� / DV�-D • • • • 120 HDM� DV� VGA HDM� Release Note.
HZ-1 USB 3.0 擴充基座使用手冊 HZ-1 USB 3.
HZ-1 USB 3.0 擴充基座使用手冊 顯示控制 DisplayLink 1. 2.
HZ-1 USB 3.
HZ-1 USB 3.0 擴充基座使用手冊 將桌面延伸至外接顯示器 • • 說明 將桌面延伸至外接顯示器: 說明 1. 2. 3.
HZ-1 USB 3.0 擴充基座使用手冊 將您的桌面複製至外接顯示器 說明 將桌面複製至外接顯示器: 2. 3. ASUSTEK USB Docking Station DisplayLink Mirror 說明 • • Mirror ASUSTEK USB Docking Station Off(關閉 as Main Monitor(設為主顯示器) Set DisplayLink Manager(DisplayLink 管理員) Windows® 繁體中文 1.
HZ-1 USB 3.0 擴充基座使用手冊 連線上網 RJ-45 DSL/ LAN B LED LED LAN RJ-45 RJ-45 A Modem B 說明 繁體中文 • • Mac MAC 1. Windows® > Command prompt 2. • 126 3.
HZ-1 USB 3.0 擴充基座使用手冊 移除您的 HZ-1 USB 3.0 擴充基座 重要 • • 1. 2. USB USB USB-Ethernet 繁體中文 移除您的 USB 3.
Instrukcja użytkownika stacji dokującej HZ-1 USB 3.0 Poznanie stacji dokującej HZ-1 USB 3.0 Zawartość opakowania • Stacja dokująca ASUS x1 • Adapter zasilania x1 • Dysk CD ze sterownikiem x1 • Kabel USB 3.0 x1 • Instrukcja użytkownika x1 Jeśli którykolwiek z elementów jest uszkodzony lub go brakuje należy skontaktować się ze sprzedawcą. Podsumowanie specyfikacji Polski 128 Porty Port USB 3.0 pobierania danych dla urządzenia USB 3.
Instrukcja użytkownika stacji dokującej HZ-1 USB 3.0 Właściwości sprzętu 1 2 3 4 5 6 7 8 Widok z tyłu 9 7 10 Widok z lewej 8 Widok z prawej 1 Port DVI-D (Single Link) Połączenie z monitorem DVI-D lub z innymi zgodnymi urządzeniami DVI-D. 2 Port HDMI Połączenie z monitorem HDMI lub z innymi zgodnymi urządzeniami HDMI. 3 Port VGA Połączenie z monitorem VGA lub z innymi zgodnymi urządzeniami VGA.
Instrukcja użytkownika stacji dokującej HZ-1 USB 3.0 Instalacja stacji dokującej HZ-1 USB 3.0 Instalacja sterowników 1. Włóż płytę CD ze sterownikami do napędu optycznego komputera. 2. Kliknij Setup.exe. 3. Wybierz język i kliknij I Accept (Akceptuję). 4. Zaczekaj na pomyślne zainstalowanie sterowników w komputerze.
Instrukcja użytkownika stacji dokującej HZ-1 USB 3.0 Używanie stacji dokującej HZ-1 USB 3.0 Podczas używania stacji dokującej należy ją podłączyć do gniazda zasilania. W przeciwnym razie, nie będą działać prawidłowo, podłączone do niej urządzenia. Podłączenie zewnętrznego monitora Użyj kabla VGA, HDMI lub DVI-D do podłączenia do stacji dokującej zewnętrznego monitora.
Instrukcja użytkownika stacji dokującej HZ-1 USB 3.0 Następująca tabela pokazuje połączenie stacji dokującej HZ-1 USB 3.
Instrukcja użytkownika stacji dokującej HZ-1 USB 3.0 Sterowanie wyświetlaczem Po podłączeniu urządzeń, na pasku zadań pojawia się ikona. Zapewnia ona dostęp do menu menedżera DisplayLink. �. Na pasku zadań, kliknij strzałkę Show hidden icons (Pokaż ukryte ikony). 2. Kliknij Polski , aby pokazać listę menu stacji dokującej.
Instrukcja użytkownika stacji dokującej HZ-1 USB 3.0 Funkcje stacji dokującej Menu Funkcja Menedżer DisplayLink Kliknij, aby otworzyć i zarządzać wyświetlaczami poprzez program narzędziowy Windows. Sprawdź atualizacje Kliknij, aby sprawdzić i pobrać najnowszą wersję sterownika z serwera aktualizacji. Stacja dokująca USB Kliknij, aby przeglądać i wykorzystać listę podmenu w celu rozszerzenia ustawień ASUSTEK stacji dokującej: • Rozdzielczosć ekranu: Kliknij, aby wybrać rozdzielczość ekranu.
Instrukcja użytkownika stacji dokującej HZ-1 USB 3.0 Powiększanie pulpitu o zewnętrzny monitor: Użyj zewnętrzny monitor do powiększenia pulpitu i uzyskania dodatkowego miejsca roboczego. Umożliwia to: • ���������������������� ��������������������� Wyświetlenie jednego dokumentu lub aplikacji na monitorze komputera i na zewnętrznym ���������� ���� ���������� ��� ���������� ������������ ��������������� monitorze. • Użycie każdego monitora do wyświetlenia innego dokumentu lub aplikacji.
Instrukcja użytkownika stacji dokującej HZ-1 USB 3.0 Lustrzana kopia pulpitu na zewnętrznym monitorze: Użyj zewnętrzny monitor do wykonania duplikatu obszaru pulpitu. UWAGA: Po zmianie trybu wyświetlania zewnętrznego monitora, może wystąpić tymcza� sowe wyświetlenie czarnego obrazu lub miganie ekranu komputera. Aby uzyskać lustrzaną kopię pulpitu na zewnętrznym monitorze: 1. Kliknij prawym przyciskiem w obszarze powiadamiania, aby otworzyć menu DisplayLink. 2.
Instrukcja użytkownika stacji dokującej HZ-1 USB 3.0 Połączenie z Internetem Użyj kabel RJ-45 do połączenia stacji dokującej z siecią lokalną (LAN) (A) lub z modemem kablowym/DSL (B). Po nawiązaniu połączenia z Internetem, świeci żółte światło LED na porcie LAN. Zielone światło LED świeci, przy aktywności połączenia z Internetem.
Instrukcja użytkownika stacji dokującej HZ-1 USB 3.0 Odłączenie stacji dokującej HZ-1 USB 3.0 Stację dokująca można podłączać i odłączać w czasie uruchomienia komputera. • NIE należy odłączać stacji dokującej podczas transferu danych pomiędzy komputerem, a stacją dokującą. Należy zaczekać na zakończenie transferu danych. • NIE należy odłączać stacji dokującej w czasie połączenia z Internetem przez jej port LAN. Należy najpierw rozłączyć połączenie z Internetem. Aby odłączyć stację dokującą USB 3.
HZ-1 USB 3.0 dokovací stanice – uživatelská příručka Čeština Seznámení s HZ-1 USB 3.0 dokovací stanicí Obsah krabice • ASUS dokovací stanice x1 • Napájecí adaptér x1 • Disk CD s ovladači x1 • Kabel USB 3.0 x1 • Uživatelská příručka x1 Pokud je některá z položek poškozena nebo chybí, se obraťte na prodejce. Přehled technických údajů Porty Vstupní port USB 3.0 pro zařízení USB 3.
HZ-1 USB 3.0 dokovací stanice – uživatelská příručka Čeština Hardwarové funkce 1 2 3 4 5 6 7 8 Pohled zezadu 8 9 10 Pohled zleva 140 7 8 Pohled zprava 1 Port DVI-D (jednolinkový) Slouží k připojení monitoru DVI-D nebo jiných zařízení kompatibilních s rozhraním DVI-D. 2 Port HDMI Slouží k připojení monitoru HDMI nebo jiných zařízení kompatibilních s rozhraním HDMI. 3 Port VGA Slouží k připojení monitoru VGA nebo jiných zařízení kompatibilních s rozhraním VGA.
HZ-1 USB 3.0 dokovací stanice – uživatelská příručka Čeština Instalace HZ-1 USB 3.0 dokovací stanice Instalace ovladačů 1. Vložte disk CD s ovladači do optické jednotky počítače. 2. Klepněte na soubor Setup.exe. 3. Vyberte váš jazyk a klepněte na tlačítko I Accept (Souhlasím). 4. Počkejte, než budou ovladače úspěšně nainstalovány do počítače.
HZ-1 USB 3.0 dokovací stanice – uživatelská příručka Čeština Používání HZ-1 USB 3.0 dokovací stanice Během používání udržujte dokovací stanici připojenou k elektrické zásuvce. V opačném případě nebudou zařízení připojená ke stanici fungovat správně. Připojení externího monitoru Připojte externí monitor k dokovací stanici pomocí kabelu VGA, HDMI nebo DVI-D.
Čeština HZ-1 USB 3.0 dokovací stanice – uživatelská příručka Následující tabulka ukazuje připojení HZ-1 USB 3.
HZ-1 USB 3.0 dokovací stanice – uživatelská příručka Čeština Ovládání displeje Když jsou připojena zařízení, na hlavním panelu se zobrazí ikona. Získáte tak přístup do nabídky DisplayLink Manager. 144 �. Na hlavním panelu klepněte na šipku Show hidden icons (Zobrazit skryté ikony). 2. Klepnutím na zobrazíte seznam nabídky dokovací stanice.
HZ-1 USB 3.0 dokovací stanice – uživatelská příručka Nabídka DisplayLink Manager Vyhledat aktualizace ASUSTEK USB dokovací stanice Čeština Funkce dokovací stanice Funkce Klepnutím můžete otevřít a spravovat vaše zobrazovací zařízení pomocí nástroje operačního systému Windows. Klepnutím vyhledáte a stáhnete nejnovější verzi ovladače z aktualizačního serveru.
HZ-1 USB 3.0 dokovací stanice – uživatelská příručka Čeština Rozšíření pracovní plochy na externí monitor Použijte externí monitor pro rozšíření vaší pracovní plochy a získání dodatečného pracovního prostoru. Tato funkce umožňuje: • ���������������� ��������������� ��������� ����� ��������� ��� ��������� ����������� ������������ ��������� Zobrazit jeden dokument nebo aplikaci na monitoru počítače a na externím monitoru. • Zobrazit na každém monitoru jiný dokument nebo aplikaci.
HZ-1 USB 3.0 dokovací stanice – uživatelská příručka Čeština Zrcadlení pracovní plochy na externí monitor Použijte externí monitor k duplikování vaší pracovní plochy. POZNÁMKA: Po změně režimu zobrazení externího monitoru je normální, že obrazovka počítače zčerná nebo dočasně bliká. Pokyny pro zrcadlení pracovní plochy na externí monitor: 1. Klepnutím pravým tlačítkem na v oznamovací oblasti otevřete nabídku DisplayLink. 2.
HZ-1 USB 3.0 dokovací stanice – uživatelská příručka Čeština Připojení k Internetu Pomocí kabelu RJ-45 připojte vaší dokovací stanici k místní síti (LAN) (A) nebo k modemu DSL/ kabelovému modemu (B). Když je navázáno připojení k Internetu, svítí žlutý indikátor LED na portu LAN. V případě internetové aktivity svítí zelený indikátor LED.
HZ-1 USB 3.0 dokovací stanice – uživatelská příručka Čeština Odpojení HZ-1 USB 3.0 dokovací stanice Dokovací stanici lze připojit a odpojit, když je počítač spuštěný. • NEODPOJUJTE dokovací stanici během přenášení dat mezi počítačem a dokovací stanicí. Počkejte na dokončení přenášení dat. • NEODPOJUJTE dokovací stanici během připojování k Internetu prostřednictvím jejího portu LAN. Nejdříve odpojte připojení k Internetu. Pokyny pro odpojení USB 3.
HZ-1 USB 3.0 dokkoló állomás felhasználói útmutató Ismerkedés az HZ-1 USB 3.0 dokkoló állomással A csomag tartalma • ASUS dokkoló állomás x1 • Hálózati adapter x1 Magyar • Illesztőprogram-CD x1 • USB 3.0 kábel x1 • Felhasználói útmutató x1 Amennyiben a tételek közül bármelyik sérült vagy hiányzik, lépjen kapcsolatba a forgalmazóval. Műszaki adatok összefoglalása 150 Portok USB 3.0 downstream csatlakozó USB 3.
HZ-1 USB 3.0 dokkoló állomás felhasználói útmutató Hardverjellemzők 2 3 4 5 6 7 8 Magyar 1 Hátulnézet 8 9 7 10 Bal oldali nézet 8 Jobb oldali nézet 1 DVI-D (egyszeres) csatlakozó Ide csatlakoztathat DVI-D monitort vagy egyéb DVI-D kompatibilis eszközt. 2 HDMI-csatlakozó Ide csatlakoztathat HDMI-monitort vagy egyéb HDMI-kompatibilis eszközt. 3 VGA-csatlakozó Ide csatlakoztathat VGA-monitort vagy egyéb VGA-kompatibilis eszközt.
HZ-1 USB 3.0 dokkoló állomás felhasználói útmutató Az HZ-1 USB 3.0 dokkoló állomás üzembe helyezése Az illesztőprogramok telepítése 1. Helyezze az Illesztőprogram CD-t a számítógép optikai meghajtójába. Magyar 2. Kattintson a Setup.exe fájlra. 3. Válassza ki a nyelvet, majd kattintson az I Accept (Elfogadom) gombra. 4. Várjon, amíg sikeresen megtörténik az illesztőprogramok telepítése a számítógépre.
HZ-1 USB 3.0 dokkoló állomás felhasználói útmutató Az HZ-1 USB 3.0 dokkoló állomás használata A dokkoló állomás használata során tanácsos állandóan a konnektorhoz csatlakoztatva hagyni. Ellenkező esetben a hozzá csatlakoztatott eszközök nem működnek megfelelően. Magyar Külső monitor csatlakoztatása Használjon egy VGA-, HDMI- vagy DVI-D kábelt a külső monitor és a dokkoló állomás összekötéséhez.
HZ-1 USB 3.0 dokkoló állomás felhasználói útmutató Az alábbi táblázat szemlélteti az HZ-1 USB 3.
HZ-1 USB 3.0 dokkoló állomás felhasználói útmutató A megjelenítő vezérlése Eszközök csatlakoztatásakor ikon jelenik meg a tálcán. Ezzel elérheti a DisplayLink kezelő menüt. A tálcán kattintson a Show hidden icons (rejtett ikonok megjelenítése) nyílra. 2. Kattintson a Magyar �. ��������� elemre a dokkoló ���������������� állomás menülistájának megjelenítéséhez.
HZ-1 USB 3.0 dokkoló állomás felhasználói útmutató A dokkoló állomás funkciói Menü Funkció Frissítések keresése Kattintson rá, hogy letöltse a legújabb illesztőprogramot a frissítő szerverről. DisplayLink Manager Kattintson rá a megnyitásához és a kijelzők kezeléséhez a Windows segédprogramja segítségével.
HZ-1 USB 3.0 dokkoló állomás felhasználói útmutató Az asztal kiterjesztése külső monitorra Használjon egy külső monitort az asztal kiterjesztéséhez, hogy több munkaterülettel rendelkezzen. Ez a következőket teszi lehetővé: • ����������������� ���������������� ����������� ���������������� ����������� ��������������� ������ Dokumentum vagy alkalmazás megjelenítése a számítógép monitorán és a külső monitoron. • Más-más dokumentum vagy alkalmazás megjelenítése az egyes monitorokon.
HZ-1 USB 3.0 dokkoló állomás felhasználói útmutató Az asztal tükrözése külső monitorra Használjon egy külső monitort az asztal tükrözéséhez. MEGJEGYZÉS:Nem a meghibásodás jele, ha a számítógép képernyője ideiglenesen elsötétül vagy villog, miután módosítja a megjelenítési módot a külső monitoron. Az asztal külső monitorra történő tükrözéséhez: Magyar 1. Jobb egérgombbal kattintson az értesítési területen lévő megnyitásához. ikonra a DisplayLink menü 2.
HZ-1 USB 3.0 dokkoló állomás felhasználói útmutató Csatlakozás az internethez Használjon RJ-45 kábelt, hogy összekösse a dokkoló állomást a helyi hálózattal (LAN) (A) vagy egy DSL/kábelmodemmel (B). Magyar A LAN aljzat sárga LED-je kigyullad, ha van internetkapcsolat. A zöld LED világít, ha van internettevékenység.
HZ-1 USB 3.0 dokkoló állomás felhasználói útmutató Az HZ-1 USB 3.0 dokkoló állomás leválasztása A dokkoló állomást a számítógép kikapcsolása nélkül is csatlakoztathatja, illetve leválaszthatja. Magyar • NE válassza le a dokkoló állomást, miközben adatokat továbbít a számítógép és a dokkoló állomás között. Várjon, amíg befejeződik az adatátvitel. • NE válassza le a dokkoló állomást, miközben az internethez csatlakozik a LAN csatlakozóján keresztül. Előbb bontsa az internetkapcsolatot. Az USB 3.
Návod na obsluhu dokovacej stanice s rozhraním HZ-1 USB 3.0 Spoznajte svoju dokovaciu stanicu s rozhraním HZ1 USB 3.0 Obsah balenia • 1 x dokovacia stanica ASUS • 1 x sieťový adaptér • 1 x CD s ovládačmi • 1 x kábel USB 3.0 • 1 x návod na obsluhu Slovensky POZNÁMKA: Ak je ktorákoľvek z uvedených položiek poškodená alebo chýba, spojte sa s predajcom. Zhrnutie technických špecifikácií Porty USB 3.0 downstream port pre zariadenie s rozhraním USB 3.
Návod na obsluhu dokovacej stanice s rozhraním HZ-1 USB 3.0 Hardvérové funkcie 1 2 3 4 5 6 7 8 Pohľad zozadu Slovensky 8 9 Pohľad zľava 162 7 10 8 Pohľad sprava 1 Port DVI-D (jedna linka) Slúži na pripojenie DVI-D monitora alebo iných DVI-D kompatibilných zariadení. 2 Port HDMI Slúži na pripojenie HDMI monitora alebo iných HDMI kompatibilných zariadení. 3 Port VGA Pripája sa k nemu VGA monitor alebo iné VGA kompatibilné zariadenia.
Návod na obsluhu dokovacej stanice s rozhraním HZ-1 USB 3.0 Inštalácia dokovacej stanice s rozhraním HZ-1 USB 3.0 Inštalácia ovládačov 1. CD s ovládačmi vložte do optickej mechaniky počítača. 2. Kliknite na Setup.exe. 3. Zvoľte svoj jazyk a kliknite na I Súhlasím. 4. Počkajte, dokiaľ sa ovládače úspešne nainštalujú do vášho počítača. Slovensky • Je štandardným javom, že obrazovka vášho počítača dočasne zhasne alebo bude blikať počas procesu inštalácie ovládačov.
Návod na obsluhu dokovacej stanice s rozhraním HZ-1 USB 3.0 Používanie dokovacej stanice s rozhraním HZ-1 USB 3.0 Počas používania dokovacej stanice zabezpečte jej trvalé pripojenie k sieťovej zásuvke. V opačnom prípade nebudú k nej pripojené zariadenia fungovať správne. Pripojenie externého monitora Pomocou kábla VGA, HDMI alebo DVI-I pripojte k svojej dokovacej stanici externý monitor.
Návod na obsluhu dokovacej stanice s rozhraním HZ-1 USB 3.0 V nasledujúcej tabuľke je uvedené pripojenie dokovacej stanice HZ-1 s rozhraním USB 3.
Návod na obsluhu dokovacej stanice s rozhraním HZ-1 USB 3.0 Ovládanie displeja Keď sú pripojené zariadenia, na paneli úloh sa zobrazí ikona. Ponúka vám prístup k ponuke správcu DisplayLink. Slovensky 166 1. Na paneli úloh kliknite na šípku Show hidden icons (Zobraziť skryté ikony). 2. Kliknutím na sa zobrazí zoznam ponúk dokovacej stanice.
Návod na obsluhu dokovacej stanice s rozhraním HZ-1 USB 3.0 Funkcie dokovacej stanice Ponuka Funkcia Správca DisplayLink Po kliknutí otvoríte nástroj Windows a pomocou neho môžete spravovať svoje displeje. Vyhľadať aktualizácie Po kliknutí dôjde k vyhľadaniu a prevzatiu najnovšej verzie ovládača zo servera aktualizácií.
Návod na obsluhu dokovacej stanice s rozhraním HZ-1 USB 3.0 Rozšírenie pracovnej plochy na externý monitor Externý monitor použite na rozšírenie svojej pracovnej plochy, čím získate ďalší pracovný priestor. Umožní vám: • Zobraziť jeden dokument alebo aplikáciu v rámci monitora počítača a externého monitora; • Používať každý monitor na zobrazenie iného dokumentu alebo aplikácie.
Návod na obsluhu dokovacej stanice s rozhraním HZ-1 USB 3.0 Zrkadlové zobrazenie pracovnej plochy na externý monitor Externý monitor použite na vytvorenie presnej kópie svojej pracovnej plochy. POZNÁMKA: Je normálne, ak obrazovka počítača dočasne zhasne alebo bude blikať po zmene režimu zobrazenia na vašom externom monitore. Ak chcete zrkadlovo zobraziť svoju pracovnú plochu na externom monitore: 1. Pravým tlačidlom kliknite na v rámci oblasti oznámení a otvorte ponuku DisplayLink. 2.
Návod na obsluhu dokovacej stanice s rozhraním HZ-1 USB 3.0 Pripojenie k internetu Pomocou kábla RJ-45 pripojte svoju dokovaciu stanicu k miestnej počítačovej sieti (LAN) (A) alebo k DSL/káblovému modemu (B). Žltý LED indikátor na LAN porte sa v prípade internetového pripojenia rozsvieti. Zelený LED indikátor sa rozsvieti v prípade činnosti v rámci internetu.
Návod na obsluhu dokovacej stanice s rozhraním HZ-1 USB 3.0 Odpojenie dokovacej stanice s rozhraním HZ-1USB 3.0 Dokovaciu stanicu môžete počas chodu počítača odpojiť a pripojiť. • Dokovaciu stanicu NEODPÁJAJTE, pokiaľ prebieha prenos údajov medzi počítačom a dokovacou stanicou. Počkajte do ukončenia prenosu údajov�. • Dokovaciu stanicu NEODPÁJAJTE, pokiaľ ste k internetu pripojení pomocou portu LAN. Najprv odpojte pripojenie k internetu�.
Uporabniški priročnik za združitveno postajo HZ-1 USB 3.0 Spoznajte svojo združitveno postajo HZ-1 USB 3.0 Vsebina paketa • Združitvena postaja ASUS x1 • Napajalnik x1 • CD z gonilniki x1 • Kabel USB 3.0 x1 • Uporabniški priročnik x1 Če opazite, da je katerikoli od spodnjih elementov poškodovan ali manjka, stopite v stik s prodajalcem. Povzetek tehničnih lastnosti Slovenščina 172 Vrata Izhodna vrata USB 3.0 za napravo USB 3.
Uporabniški priročnik za združitveno postajo HZ-1 USB 3.0 Značilnosti strojne opreme 1 2 3 4 5 6 7 8 Pogled od zadaj 9 7 10 Pogled z leve 8 Pogled s strani 1 Vrata DVI-D (Single Link) Za povezavo z monitorjem DVI-D ali drugo z DVI-D združljivo napravo. 2 Vrata HDMI Za povezavo z monitorjem HDMI ali drugo s HDMI združljivo napravo. 3 Vrata VGA Za povezavo z monitorjem VGA ali drugo z VGA združljivo napravo.
Uporabniški priročnik za združitveno postajo HZ-1 USB 3.0 Nameščanje združitvene postaje HZ-1 USB 3.0 Nameščanje gonilnikov 1. Priloženi CD z gonilnikom vstavite v optični pogon računalnika. 2. Kliknite Setup.exe. 3. Izberite želeni jezik in kliknite I Accept (Sprejmem). 4. Počakajte, da se vsi gonilniki uspešno namestijo na vaš računalnik.
Uporabniški priročnik za združitveno postajo HZ-1 USB 3.0 Uporaba združitvene postaje HZ-1 USB 3.0 Med uporabo združitvene postaje naj bo ta priključena na napajanje. V nasprotnem primeru nanjo priključene naprave ne bodo pravilno delovale. Povezava z zunanjim monitorjem Slovenščina Monitor priključite na združitveno postajo s kablom VGA, HDMI ali kablom DVI-D.
Uporabniški priročnik za združitveno postajo HZ-1 USB 3.0 Naslednja tabela prikazuje povezavo združitvene postaje HZ-1 USB 3.0.
Uporabniški priročnik za združitveno postajo HZ-1 USB 3.0 Nadzorovanje zaslona Ko so naprave priključene, se v opravilni vrstici prikaže ikona. To vam omogoča dostop do menija upravitelja DisplayLink. �. V opravilni vrstici kliknite puščico Show hidden icons (Prikaži skrite ikone). 2. Kliknite Slovenščina , da se pokaže menijski seznam združitvene postaje.
Uporabniški priročnik za združitveno postajo HZ-1 USB 3.0 Funkcije združitvene postaje Meni Funkcija Upravitelj DisplayLink Kliknite, da odprete in da s pomočjo Windowsovega pripomočka upravljate z zasloni. Preverjanje Kliknite, da preverite in prenesete zadnje različice gonilnikov s strežnika za posodobitev posodobitve.
Uporabniški priročnik za združitveno postajo HZ-1 USB 3.0 Razširitev namizja na zunanji monitor Za razširitev namizja in za dodatni delovni prostor uporabite zunanji monitor. To vam omogoča: • � prikaz � ������������� ������������ enega dokumenta ali aplikacije preko monitorja računalnika in zunanjega monitorja. ���������� ���� ����������� ������ ���������� ������������������������� ���������� • uporabo vsakega monitorja za prikaz različnih dokumentov ali aplikacij.
Uporabniški priročnik za združitveno postajo HZ-1 USB 3.0 Zrcaljenje namizja na zunanji monitor Za podvojitev namizja uporabite zunanji monitor. OPOMBA: Ko spremenite način prikaza zunanjega monitorja, je običajno, da zaslon počrni ali začasno utripa. Za zrcaljenje namizja na zunanji monitor: 1. Z desno miškino tipko kliknite v območju za obvestila, da se odpre meni DisplayLink. 2. Kliknite ASUSTEK USB Docking Station (Združitvena postaja ASUSTEK USB). 3. Kliknite Mirror (Zrcalo).
Uporabniški priročnik za združitveno postajo HZ-1 USB 3.0 Vzpostavitev povezave z internetom S kablom RJ-45 povežite svojo združitveno postajo z modemom za lokalno omrežje (LAN) (A) ali DSL/kabelskim modemom (B). Rumena LED na vratih LAN zasveti, ko je povezava z internetom vzpostavljena. Zelena LED zasveti, ko poteka internetna aktivnost.
Uporabniški priročnik za združitveno postajo HZ-1 USB 3.0 Odklapljanje združitvene postaje HZ-1 USB 3.0 Združitveno postajo lahko priključite ali izključite, medtem ko je vaš računalnik vključen. • Združitvene postaje NE odklopite, ko se med računalnikom in združitveno postajo prenašajo podatki. Počakajte, da je prenos podatkov končan. • Združitvene postaje NE odklopite, ko preko vrat LAN vzpostavljena povezava z internetom. Internetno povezavo najprej prekinite.
Ghid de utilizare pentru Staţia de andocare HZ-1 USB 3.0 Prezentare generală a staţiei de andocare HZ-1 USB 3.0 Conţinutul pachetului • 1x Staţie de andocare ASUS • 1x Adaptor alimentare • 1x CD driver • 1x Cablu USB 3.0 • 1x Ghid de utilizare Dacă unul din articole aceste articole lipseşte sau este deteriorat, contactaţi distribuitorul. Porturi 3x Port USB 3.0 downstream pentru un dispozitiv USB 3.
Ghid de utilizare pentru Staţia de andocare HZ-1 USB 3.0 Caracteristici hardware 1 2 3 4 5 6 7 8 Vedere din spate 8 9 Vedere din partea stângă Română 184 7 10 8 Vedere din partea dreaptă 1 Port DVI-D (o singură legătură) Pentru conectarea la un monitor DVI-D sau la alte dispozitive compatibile DVI-D. 2 Port HDMI Pentru conectarea la un monitor HDMI sau la alte dispozitive compatibile HDMI. 3 Port VGA Pentru conectarea la un monitor VGA sau la alte dispozitive compatibile VGA.
Ghid de utilizare pentru Staţia de andocare HZ-1 USB 3.0 Instalarea staţiei de andocare HZ-1 USB 3.0 Instalarea driverelor 1. Introduceţi CD-ul driver în unitatea optică a computerului. 2. Faceţi clic pe Setup.exe. 3. Selectaţi limba şi faceţi clic pe I Accept (Accept). 4. Aşteptaţi până când driverele sunt instalate cu succes pe computer.
Ghid de utilizare pentru Staţia de andocare HZ-1 USB 3.0 Utilizarea staţiei de andocare HZ-1 USB 3.0 Când utilizaţi staţia de andocare, aceasta trebuie să fie conectată la o priză. În caz contrar, dispozitivele conectate la aceasta nu vor funcţiona bine. Conectarea la un monitor extern Utilizaţi un cablu VGA, HDMI sau DVI-D pentru a conecta un monitor extern la staţia de andocare.
Ghid de utilizare pentru Staţia de andocare HZ-1 USB 3.0 Tabelul următor afişează modul de conectare al staţiei de andocare HZ-1 USB 3.
Ghid de utilizare pentru Staţia de andocare HZ-1 USB 3.0 Controlul afişajului Atunci când sunt ataşate diverse dispozitive, în bara de activităţi apare o pictogramă. Acest fapt vă permite accesul la meniul manager DisplayLink. Română 188 �. Din bara de activităţi, faceţi clic pe săgeata Show hidden icon (Se afişează pictogramele ascunse). 2. Faceţi clic pe pentru afişarea listei de meniuri pentru staţia de andocare.
Ghid de utilizare pentru Staţia de andocare HZ-1 USB 3.0 Funcţiile staţiei de andocare Meniu Manager DisplayLink Căutare actualizări Staţie de andocare ASUSTEK USB Funcţie Faceţi clic pentru a deschide şi gestiona afişajele prin intermediul utilitarului Windows. Faceţi clic pentru a căuta şi descărca cea mai recentă versiune de driver de pe serverul de actualizare.
Ghid de utilizare pentru Staţia de andocare HZ-1 USB 3.0 Extinderea desktop-ului la un monitor extern Utilizaţi un monitor extern pentru a extinde desktop-ul şi pentru a avea un spaţiu de lucru suplimentar. Vă permite: • � Afişarea unui document sau a unei aplicaţii pe monitorul � �������������� ������������� ��������� ���� ������� ���������� ��� �������������������������� computerului şi pe monitorul ��� ���������� extern.
Ghid de utilizare pentru Staţia de andocare HZ-1 USB 3.0 Oglindirea desktop-ului la un monitor extern Utilizaţi un monitor extern pentru a duplica zona desktop-ului. NOTÃ: Este normal ca ecranul computerului să se înnegrească sau să pâlpâie temporar după modificarea modului de afişare pe monitorul extern. Pentru a oglindi desktop-ul la un monitor extern: 1. Faceţi clic cu butonul din dreapta în zona de notificare DisplayLink. pentru a deschide meniul 2.
Ghid de utilizare pentru Staţia de andocare HZ-1 USB 3.0 Conectarea la Internet Utilizaţi un cablu RJ-45 pentru a conecta staţia de andocare la o reţea locală (LAN) (A) sau un modem cablat (B) Ledul galben al portului LAN se aprinde în momentul în care există o conexiune la Internet. Ledul verde se aprinde când există activitate pe Internet.
Ghid de utilizare pentru Staţia de andocare HZ-1 USB 3.0 Deconectarea staţiei de andocare HZ-1 USB 3.0 Puteţi conecta şi deconecta staţia de andocare în timp ce computerul este în funcţiune. • NU deconectaţi staţia de andocare în momentul transferului de date între computer şi staţia de andocare. Aşteptaţi până la finalizarea transferului de date. • NU deconectaţi staţia de andocare atunci când sunteţi conectat la Internet prin portul ei LAN. Mai întâi deconectaţi-vă de la Internet.