
User Guide
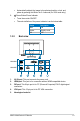
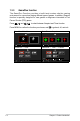
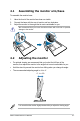
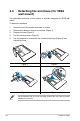
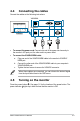
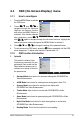
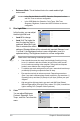
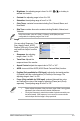
Table Of Contents
- Notices
- Safety information
- Care & Cleaning
- Takeback Services
- 1.1 Welcome!
- 1.2 Package contents
- 1.3 Monitor introduction
- 2.1 Assembling the monitor arm/base
- 2.2 Adjusting the monitor
- 2.3 Detaching the arm/base (for VESA wall mount)
- 2.4 Connecting the cables
- 2.5 Turning on the monitor
- 3.1 OSD (On-Screen Display) menu
- 3.2 Specifications summary
- 3.3 Troubleshooting (FAQ)
- 3.4 Supported operating modes

1-3ASUS VA249 Series LCD Monitor
• Automatically adjusts the image to its optimized position, clock, and
phase by pressing this Button for 2-4 seconds (for VGA mode only).
6.
Power Button/Power Indicator
• Turns the monitor ON/OFF.
• The color definition of the power indicator is as the below table.
Blue ON
Amber Standby mode
Off OFF
VA
249NA
VA
249HE
. This port connects the power cord.
This port is for connection with an HDMI compatible device.
This 24-pin port is for PC (Personal Computer) DVI-D digital signal
connection.
. This 15-pin port is for PC VGA connection.
.