
User Guide

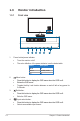


Table Of Contents
- Contents
- Notices
- Safety information
- Care & Cleaning
- Takeback Services
- Product information for EU energy label
- Chapter 1: Product introduction
- 1.1 Welcome!
- 1.2 Package contents
- 1.3 Monitor introduction
- Chapter 2: Setup
- 2.1 Assembling the monitor arm/base
- 2.2 Detaching the arm/base (for VESA wall mount)
- 2.3 Adjusting the monitor
- 2.4 Connecting the cables
- 2.5 Turning on the monitor
- Chapter 3: General instructions
- 3.1 OSD (On-Screen Display) menu
- 3.2 Specifications summary
- 3.3 Outline dimensions
- 3.4 Troubleshooting (FAQ)
- 3.5 Supported operating modes

1-3ASUS VA24DCP / VA27DCP LCD Monitor
5. Shortcut
• Press this button to display the OSD menu when the OSD is off.
• Default: Brightness hotkey
• To change the hotkey function, go to the Shortcut > Shortcut 1 menu.
6. Shortcut
• Press this button to display the OSD menu when the OSD is off.
• Default: Blue light lter hotkey
• To change the hotkey function, go to the Shortcut > Shortcut 2 menu.
1.3.2 Back view
6 1 2 3 4 5
1. AC-IN port. This port connects the power cord.
2. HDMI port. This port is for connection with an HDMI compatible device.
3. USB Type-C port. This port is for connection with an USB Type-C compatible
device. The connection supports USB power delivery.
This port offers Max. 65W power delivery with output voltage 5V/3A, 9V/3A,
12V/3A, 15V/3A and 20V/3.25A. Connecting the USB Type-C cable can input
the DisplayPort source and output power.
4. Earphone jack. This port is only available when an HDMI/USB Type-C cable
is connected.
5. Kensington lock slot.
6. Control buttons.