E4240 V1 Outubro 2008 M on it or LCD da sé r ie VH 2 4 2 / VH 2 2 2 Gu ia do u t iliza dor
Índice Avisos ................................................................................................................iii Informações de segurança ..............................................................................iv Cuidados e limpeza ...........................................................................................v Capítulo 1: Apresentação do produto 1.1 1.2 1.3 1.5 Bem-vindo! ........................................................................................
Avisos Declaração da Federal Communications Commission (Comissão Federal de Comunicações) Este dispositivo está de acordo com o Artigo 15º das Regras da FCC. O seu funcionamento está sujeito às duas condições seguintes: ‧ Este dispositivo não pode causar interferências prejudiciais e ‧ Este dispositivo deve aceitar qualquer tipo de interferência recebida, incluindo interferências que possam causar um funcionamento indesejado.
I n for m a çõe s de se gu r a n ça ‧ ‧ ‧ ‧ ‧ ‧ ‧ ‧ ‧ ‧ ‧ ‧ ‧ ‧ iv Antes de instalar o monitor, leia atentamente toda a documentação que vem na embalagem. Para evitar o perigo de incêndio ou de choque eléctrico, nunca exponha o monitor à chuva ou a humidade. Nunca tente abrir a caixa do monitor. As altas voltagens existentes no interior do monitor são perigosas e podem causar ferimentos graves. Se a fonte de alimentação deixar de funcionar, não tente repará-la pelos seus próprios meios.
Cuida dos e lim pe za ‧ Antes de levantar ou reposicionar o monitor, deve desligar os cabos de sinal e o cabo de alimentação. Siga as técnicas de levantamento correctas ao posicionar o monitor. Para levantar ou transportar o monitor, segure-o pelas extremidades. Não levante o monitor segurando-o pela base ou pelo cabo de alimentação. ‧ Limpeza. Desligue o monitor e o cabo de alimentação. Limpe a superfície do monitor com um pano sem pêlos e não abrasivo.
Onde encontrar mais informações Consulte as seguintes fontes para obter mais informações e actualizações tanto do produto como do software. 1. Web sites da ASUS Os web sites da ASUS fornecem-lhe informação actualizada sobre o hardware e o software ASUS. Visite o site http://www.asus.com 2. Documentação opcional A embalagem do seu produto pode incluir documentação opcional como, por exemplo, certificados de garantia, que podem ter sido incluídos pelo vendedor.
1 .1 Be m - vin do! Obrigado por ter comprado o monitor LCD da série VH242/VH222 da ASUS O mais recente monitor com ecrã LCD largo da ASUS proporciona uma visualização mais nítida, mais alargada e com cores mais vivas para além de oferecer uma série de outras funções que ajudam a melhorar a sua experiência. Com estas capacidades, pode desfrutar ao máximo do que os monitores LCD da série VH242/VH222 têm para lhe oferecer! 1 .
1 .3 M on t a ge m da ba se do m on it or Para montar a base do monitor: 1. Coloque a base no monitor Um estalido indica que a base foi correctamente colocada no monitor. 2. Ajuste o monitor para um ângulo que lhe seja mais confortável. Recomendamos-lhe que cubra a superfície da mesa com um pano macio para evitar danificar o ecrã do monitor.
1.4 Cabos de ligação Conectar os cabos necessários. 1.4.1 VH242H/VH222H 1 Porta de entrada AC 2 Porta de entrada HDMI 3 Porta DVI 4 Porta VGA 5 Porta de entrada de linha 6 Porta de saída dos auscultadores 7 Porta de saída SPDIF de HDMI 1.4.
1.5 Apr e se n t a çã o do m on it or 1.5.1 Parte da frente do monitor LCD 1.5.1.1 1. 2. 3. 4. 5. VH242H/VH242T/VH222H/VH222T 4 5 7 6 3 1 2 Botão: ‧ Ajuste automaticamente a imagem optimizando a sua posição, a frequência dos píxeis e a fase premindo este botão durante 2-4 segundos (apenas no modo VGA).
6. 7. Botão de alimentação : ‧ Prima este botão para ligar/desligar o monitor Indicador de alimentação 1.5.1.2 VH242S/VH222S 1 1. 2 3 4 5 6 7 Botão: ‧ 2. 3. 4. Utilize este botão de atalho para aceder aos cinco modos de vídeo predefinidos (Modo de jogo, Modo nocturno, Modo paisagem, Modo padrão, Modo cinema) que utilizam a tecnologia SPLENDID™ Video Enhancement. ‧ Saia do menu apresentado no ecrã ou volte ao menu anterior enquanto o menu apresentado no ecrã estiver activo.
1.5.1.3 VH242D/VH222D 1 1. ‧ 2. ‧ 4. 5. 7. 4 6 5 7 Utilize este botão de atalho para aceder aos cinco modos de vídeo predefinidos (Modo de jogo, Modo nocturno, Modo paisagem, Modo padrão, Modo cinema) que utilizam a tecnologia SPLENDID™ Video Enhancement. Saia do menu apresentado no ecrã ou volte ao menu anterior enquanto o menu apresentado no ecrã estiver activo. Botão: Prima este botão para diminuir o valor da função seleccionada ou para ir para a função seguinte.
1.5.2 Parte de trás do monitor LCD Orifícios para os parafusos para montagem do monitor na parede de acordo com a norma VESA 1.5.2.1 VH242H/VH222H Conectores traseiros 1 Porta de entrada AC 2 Porta de entrada HDMI 3 Porta DVI 4 Porta VGA 5 Porta de entrada de linha 6 Porta de saída dos auscultadores 7 Porta de saída SPDIF de HDMI 1.5.2.
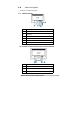
2 .1 Re m oçã o do br a ço/ da ba se ( pa r a m on t a ge m VESA) A base amovível do monitor LCD da série VH242/VH222 foi especialmente concebida para permitir a montagem na parede segundo a especificação VESA. Para remover o braço/a base: 1. Remover a protecção do braço. 2. Colocar o monitor voltado para baixo sobre uma mesa. 3. Usar uma chave de fendas para remover os três parafusos no suporte do monitor conforme exemplificado nas imagens abaixo. 4. Remover o braço do monitor.
2 .2 ‧ ‧ ‧ Aj u st e do m on it or Para uma óptima visualização, recomendamos-lhe que olhe para o monitor de frente e que ajuste o monitor adoptando um ângulo que lhe seja mais confortável. Segure na base para evitar a queda do monitor ao alterar o seu ângulo. Pode ajustar o ângulo do monitor entre -5º e 20º.
3 .1 O m e n u a pr e se n t a do n o e cr ã 3.1.1 Como reconfigurar 1. 2. 3. 4. 3.1.2 Prima o botão MENU para activar a apresentação do sistema de menus no ecrã. Prima o botão e para se deslocar pelas várias funções. Seleccione e active a função pretendida premindo o botão MENU. Se a função seleccionada tiver um sub menu, prima novamente o botão e para navegar pelas funções desse sub menu. Seleccione e active a função pretendida no sub menu premindo o botão MENU.
2. A opção Image (Imagem) Esta opção permite-lhe ajustar o brilho, o contraste, a nitidez, a saturação, a posição (apenas VGA) e a focagem (apenas VGA). ‧ ‧ ‧ ‧ ‧ ‧ Brilho: o intervalo para ajuste situa-se entre 0 a 100. é a tecla de atalho que activa esta função. Contraste: o intervalo para ajuste situa-se entre 0 e 100. Nitidez : o intervalo para ajuste situa-se entre 0 e 100. Saturação: o intervalo para ajuste situa-se entre 0 e 100.
‧ Temperatura da cor: esta opção inclui cinco modos de cor: Fria, Normal, Quente, sRGB e Utilizador. Tom de pele: esta opção inclui três modos de cor: Avermelhado, Natural e Amarelado. ‧ No modo Utilizador, as cores R (Red, vermelho), G (Green, verde) e B (Blue, azul) podem ser configuradas pelo utilizador sendo o intervalo para ajuste entre 0-100. 4. A opção Input Select (Selecção de entrada) Nesta função, pode seleccionar a fonte de entrada de VGA, DVI, HDMI . (Para alguns modelos) 5.
3 .2 Espe cifica çõe s Model VH242H VH242T Rozmiar ekranu 23.6"W 23.6"W VH242S 23.6"W VH242D 23.6"W Maks. rozdzielczość 1920x1080 1920x1080 1920x1080 1920x1080 Jasność (maks.) ≧300cd/㎡ ≧300cd/㎡ ≧300cd/㎡ ≧300cd/㎡ ≧1000:1 ≧1000:1 ≧1000:1 ≧1000:1 ≧160°(V), ≧160°(V), ≧160°(V), ≧160°(V), ≧170°(H) ≧170°(H) ≧170°(H) ≧170°(H) Rzeczywisty współczynnik kontrastu (maks.) Kąt widzenia (CR=10) Nasycenie kolorów (NTSC) Kolory wyświetlacza 72% 72% 72% 72% 16.7 M 16.7 M 16.7 M 16.
Model VH222H VH222T VH222S VH222D Rozmiar ekranu 21.5"W 21.5"W 21.5"W 21.5"W Maks. rozdzielczość 1920x1080 1920x1080 1920x1080 1920x1080 Jasność (maks.) ≧300cd/㎡ ≧300cd/㎡ ≧300cd/㎡ ≧300cd/㎡ ≧1000:1 ≧1000:1 ≧1000:1 ≧1000:1 ≧160°(V), ≧160°(V), ≧160°(V), ≧160°(V), ≧170°(H) ≧170°(H) ≧170°(H) ≧170°(H) 72% 72% 72% 72% 16.7 M 16.7 M 16.7 M 16.
3 .3 Re solu çã o de pr oble m a s ( pe r gu n t a s fr e qu e n t e s) Problema O LED de alimentação não está aceso Solução possível • Prima o botão para ver se o monitor está ligado. • Verifique se o cabo de alimentação está devidamente ligado ao monitor e à tomada eléctrica. O LED de alimentação fica âmbar e • Verifique se o ecrã e o computador estão ligados. não é apresentada qualquer imagem • Certifique-se de que o cabo de sinal está no ecrã devidamente ligado ao monitor e ao computador.
3.4 VH242/VH222 Lista de temporizações suportadas em PC Modos VESA, Temporizações de predefinições originais Modo Resolução VGA 640x480 640x480 SVGA XGA SXGA H (KHz) V (Hz) Pixel (MHz) 31.469 60 25.175 37.861 72 31.5 640x480 37.5 75 31.5 800x600 35.156 56 36 800x600 37.879 60 40 800x600 48.077 72 50 800x600 46.875 75 49.5 1024x768 48.363 60 65 1024x768 56.476 70 75 1024x768 60.023 75 78.75 1152x864 67.5 75 108 1280x960 60 60 108 1280x1024 63.
Modos VESA, Temporizações do utilizador Modo Resolução H (KHz) 848x480 720P WXGA 31.02 V (Hz) Pixel (MHz) 60 33.75 1280x720 44.444 60 64 1280x720 44.772 60 74.5 1280x720 56.456 75 95.75 1280x768 47.396 60 68.25 1280x768 47.776 60 79.5 1280x768 60.289 75 102.25 1280x800 49.306 60 71 1280x800 49.702 60 83.5 1280x800 62.795 75 106.5 1440x900 55.469 60 88.75 1440x900 70.635 75 136.75 WSXGA+ 1680x1050 64.674 60 119 1080P 1920x1080 66.587 60 138.