E4240 V1 Oktober 2008 VH 2 4 2 / VH 2 2 2 -serie LCD-monitor Brukerhåndbok
Innholdsfortegnelse Merknader..........................................................................................................iii Sikkerhetsinformasjon .....................................................................................iv Pleie og vedlikehold ..........................................................................................v Kapittel 1: Introduksjon av produktet 1.1 1.2 1.3 1.5 Velkommen!....................................................................................
Merknader Erklæring fra Federal Communications Commission Denne enheten er i samsvar med Part 15 i FCC-reglene. Driften er underlagt to betingelser: Dette utstyret må ikke medføre skadelige forstyrrelser, og Denne enheten må akseptere enhver forstyrrelse som mottas, inkludert forstyrrelse som kan forårsake uønsket bruk. z z Utstyret er testet og overholder kravene gitt for digitalt utstyr av klasse B i henhold til del 15 i FCC-reglene.
Sikkerhetsinformasjon Les nøye igjennom dokumentasjonen som fulgte med før du setter opp monitoren. For å unngå fare for brann eller elektrisk sjokk, ikke utsett monitoren for regn eller fukt. Aldri prøv å åpne monitorkabinettet. De farlige høye spenningene inni monitoren kan føre til alvorlig fysisk skade. Hvis strømforsyningen er ødelagt, må du ikke prøve å reparere det selv. Kontakt en kvalifisert servicetekniker eller forhandleren.
Pleie og vedlikehold z z z Før du løfter eller endrer monitorens posisjon er det bedre at du kobler fra kablene og strømledningen. Følg de rette løfteteknikkene når du plasserer monitoren. Når du løfter eller bærer monitoren, ta tak i kantene til monitoren. Ikke løft skjermen etter stativet eller ledningen. Rengjøring. Skru av monitoren og koble fra strømledningen. Rengjør monitoroverflaten med en lofri, ikke-skrubbende klut.
Hvor du kan finne mer informasjon Se følgende kilder for ytterligere informasjon og for oppdatering av produktet og programvaren. 1. ASUS-websider ASUS-websider inneholder oppdatert informasjon om ASUS-programvare og maskinvare. Se http://www.asus.com 2. Ekstra dokumentasjon Produktpakken din kan inkludere ekstra dokumentasjon, som garantikort, som kan ha blitt lagt til av forhandleren. Disse dokumentene er ikke en del av standardpakken.
1.1 Velkommen! Takk for at du kjøpte ASUS® VH242/VH222-serie LCD-monitoren! Den nyeste bredskjerm LCD-monitoren fra ASUS har en klarere, bredere og lysere skjerm, pluss en rekke funksjoner som kan forbedre visningsopplevelsen. Med disse funksjonene kan du nyte komforten og den herlige visuelle opplevelsen som VH242/VH222-serien gir deg! 1.
1.3 Montere sokkelen Montere sokkelen: 1. Sett sokkelen sammen med monitoren. Et klikk indikerer at sokkelen har blitt koblet til. 2. Juster monitor til den vinkelen som er mest komfortabel for deg. Vi anbefaler at du dekker til bordflaten med en myk klut for å forhindre skade på monitoren.
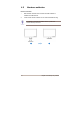
1.4 Koble til kabler Koble til kablene du trenger. 1.4.1 VH242H/VH222H 1 AC INN-tilkobling 2 HDMI INN-port 3 DVI-port 4 VGA-port 5 6 Linje inn-port Hodetelefoner ut-port 7 SPDIF ut-port hos HDMI 1.4.
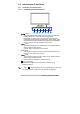
1.5 Introduksjon til monitoren 1.5.1 Frontsiden av LCD-monitoren 1.5.1.1 VH242H/VH242T/VH222H/VH222T 1. A 1 2. 3. 4. 5. 2 3 4 5 6 7 knapp: ‧ Automatisk justerer bildet til optimal posisjon, klokke og fase ved å trykke på knappen i 2-4 sekunder (kun for VGA-modus). ‧ Hurtigknapp for bytting mellom fem avanserte forhåndsinnstilte videomodier (Scenery Mode, Standard Mode, Theater Mode, Game Mode, Night Mode) med videoforberedningsteknologi fra SPLENDID™.
6. 7. Strømknapp : ‧ Bruk denne knappen for å slå monitoren på og av. Strømindikator 1.5.1.2 VH242S/VH222S 1 1. 2 3 4 5 6 7 knapp: ‧ 2. 3. 4. 5. Hurtigknapp for bytting mellom fem avanserte forhåndsinnstilte videomodier (Scenery Mode, Standard Mode, Theater Mode, Game Mode, Night Mode) med videoforberedningsteknologi fra SPLENDID™. ‧ Gå ut av OSD-menyen eller gå tilbake til forrige meny.
1.5.1.3 VH242D/VH222D 1 1. 2 3 4 5 6 7 knapp: ‧ 2. 3. 4. Hurtigknapp for bytting mellom fem avanserte forhåndsinnstilte videomodier (Scenery Mode, Standard Mode, Theater Mode, Game Mode, Night Mode) med videoforberedningsteknologi fra SPLENDID™. ‧ Gå ut av OSD-menyen eller gå tilbake til forrige meny. knapp : ‧ Trykk på denne knappen for å minske verdien av den valgte funksjonen eller for å flytte til neste funksjon. ‧ Dette er også en hurtigtast for justering av kontrastforholdet.
1.5.2 Baksiden av LCD-monitoren Screw holes for VESA Wall Mount 1.5.2.1 VH242H/VH222H Rear connectors 1 AC INN-tilkobling 2 HDMI INN-port 3 DVI-port 4 VGA-port 5 6 Linje inn-port Hodetelefoner ut-port 7 SPDIF ut-port hos HDMI 1.5.2.
2.1 Ta av armen/stativet (for VESA-veggstativ) Det sammenleggbare stativet til VH242/VH222 LCD-monitoren er spesielt designet for et VESA-veggstativ. Demontere armen/stativet 1. Fjern det hengslede dekselet. 2. Legg skjermen med forsiden ned på et bord. 3. Bruk en skrutrekker for å fjerne de tre skruene på skjermsokkelen slik vist på tegningen nedenfor. 4. Fjern hengslet fra skjermen. ‧ Vi anbefaler at du dekker til bordflaten med en myk klut for å forhindre skade på monitoren.
2.2 z z z Justere skjermen For optimal visning anbefaler vi at du ser på hele monitoren og deretter justerer monitoren til den vinkelen som er mest komfortabel for deg. Hold stativet for å forhindre at monitoren faller når du endrer vinkelen. Du kan justere monitorens vinkel fra -5º til 20º.
3.1 OSD (On-Screen Display) meny 3.1.1 Konfigurering 1. Trykk på MENU-knappen for å åpne skjermmenyen. 2. og for å navigere deg gjennom funksjonene. Merk Trykk og aktiver ønsket funksjon ved å trykke på MENU-knappen. Dersom den valgte funksjonen har en undermeny, trykk og igjen for å navigere gjennom funksjonene i undermenyen. Merk og aktiver ønsket funksjon i undermenyen ved å trykke på MENU-knappen. 3. og Trykk funksjonen. 4. For å avslutte OSD-menyen, trykk på å justere andre funksjoner. 3.1.
2. Bilde Du kan justere klarhet, kontrast, skarphet, metning, posisjon (kun VGA) og fokus (kun VGA) fra denne hovedfunksjonen. ‧ ‧ ‧ ‧ ‧ ‧ Klarhet: Kan justeres fra 0 til 100. er en hurtigtast for å aktivere denne funksjonen. Kontrast: Rekkevidden er fra 0 til 100. Skarphet: Rekkevidden er fra 0 til 100. Metning: Rekkevidden er fra 0 til 100. Posisjon: Justerer den horisontale posisjonen (H-posisjon) og den vertikale posisjonen (V-posisjon) til bildet. Rekkevidden er fra 0 til 100.
‧ ‧ Fargetemperatur: Inneholder fem fargemoduser inkludert kjølig, normal, varm, sRGB og brukermodus. Hudtone: Inneholder tre fargemoduser inkludert rødaktig, naturlig og gulaktig. I brukermodus kan fargene R (rød), G (grønn) og B (blå) justeres av bruker, fra 0-100. 4. Inngangsvalg Med denne funksjonen kan du velge VGA-, DVI- eller HDMIinngangskilde. (For noen modeler) 5. Systemoppsett Lar deg justere systemet. ‧ ‧ ‧ ‧ ‧ ‧ Volum : Kan justeres fra 0 til 100.
3.2 Sammendrag av spesifikasjoner Modell VH242H VH242T VH242S VH242D Kabinettstørrelse 23.6"W 23.6"W 23.6"W 23.6"W Maks. Skjermoppløsning 1920x1080 1920x1080 1920x1080 1920x1080 Lysstyrke (Maks.) ≧300cd/㎡ ≧300cd/㎡ ≧300cd/㎡ ≧300cd/㎡ ≧1000:1 ≧1000:1 ≧1000:1 ≧1000:1 Innsynsvinkel ≧160°(V), ≧160°(V), ≧160°(V), ≧160°(V), (kontrastforhold=10) ≧170°(H) ≧170°(H) ≧170°(H) ≧170°(H) Reelt kontrastforhold (Maks.) Fargemetning (NTSC) Skjermfarger 72% 72% 72% 72% 16.7 M 16.
Modell VH222H VH222T VH222S Kabinettstørrelse 21.5"W 21.5"W 21.5"W 21.5"W Maks. Skjermoppløsning 1920x1080 1920x1080 1920x1080 1920x1080 Lysstyrke (Maks.) ≧300cd/㎡ ≧300cd/㎡ ≧300cd/㎡ ≧300cd/㎡ Reelt kontrastforhold VH222D ≧1000:1 ≧1000:1 ≧1000:1 ≧1000:1 Innsynsvinkel ≧160°(V), ≧160°(V), ≧160°(V), ≧160°(V), (kontrastforhold=10) ≧170°(H) ≧170°(H) ≧170°(H) ≧170°(H) Fargemetning (NTSC) 72% 72% 72% 72% Skjermfarger 16.7 M 16.7 M 16.7 M 16.
3.3 Feilsøking (OSS) Problem Strømlysdioden er ikke PÅ Strømlysdioden lyser gult og det er intet skjermbilde Skjermbildet er for lyst eller for mørkt. Mulig løsning • Trykk på knappen for å sjekke om monitoren er i PÅ-modus. • Sjekk om strømledningen er korrekt koblet til monitoren og stikkontakten. • Sjekk at både monitoren og datamaskinen er i PÅ-modi. • Sjekk at signalkabelen er sikkert koblet mellom monitoren og datamaskinen. • Sjekk signalkabelen og sjekk at ingen pinner har blitt bøyd.
3.4 VH242/VH222 liste over PC-støttede innstillinger VESA-modi, fabrikkinnstillinge Modus VGA SVGA XGA SXGA SkjermoppløsningHorisontal(KHz) Vertikal(Hz) Piksler(MHz) 640x480 31.469 60 25.175 640x480 37.861 72 31.5 640x480 37.5 75 31.5 800x600 35.156 56 36 800x600 37.879 60 40 800x600 48.077 72 50 800x600 46.875 75 49.5 1024x768 48.363 60 65 1024x768 56.476 70 75 1024x768 60.023 75 78.75 1152x864 67.5 75 108 1280x960 60 60 108 1280x1024 63.
VESA-modi, brukerdefinerbare innstillinger Modus Skjermoppløsning Horisontal(KHz) Vertikal(Hz) 848x480 720P WXGA 31.02 60 Piksler(MHz) 33.75 1280x720 44.444 60 64 1280x720 44.772 60 74.5 1280x720 56.456 75 95.75 1280x768 47.396 60 68.25 1280x768 47.776 60 79.5 1280x768 60.289 75 102.25 1280x800 49.306 60 71 1280x800 49.702 60 83.5 1280x800 62.795 75 106.5 1440x900 55.469 60 88.75 1440x900 70.635 75 136.75 WSXGA+ 1680x1050 64.