E3621 V1 Januar VK221/VK222-Reihe LCD-Monitor Benutzerhandbuch 2008
Inhaltsverzeichnis Hinweise ............................................................................................................ iii Sicherheitshinweise ......................................................................................... iv Pflegen & Reinigen............................................................................................ v Kapitel 1: 1.1 1.2 1.3 1.4 Kapitel 2: 2.1 2.2 3.2 3.3 3.4 Einrichten Abnehmen des Halters/Fußes (für die VESA-Wandmontage) .....
Hinweise Federal Communications Commission-Erklärung Dieses Gerät erfüllt alle Anforderungen des Teils 15 der FCC-Bestimmungen. Der Betrieb muss die folgenden zwei Bedingungen erfüllen: ‧ Das Gerät darf keine schädlichen Interferenzen verursachen. ‧ Das Gerät muss alle empfangenen Interferenzen inklusive der Interferenzen, die eventuell einen unerwünschten Betrieb verursachen, annehmen.
Sicherheitshinweise ‧ Lesen Sie sorgfältig die mitgelieferte Dokumentation durch, bevor Sie beginnen, den Monitor einzurichten. Setzen Sie den Monitor weder Regen noch Feuchtigkeit aus, um einen Brand oder elektrischen Schlag zu vermeiden. Versuchen Sie niemals das Monitorgehäuse zu öffnen. Die gefährliche Hochspannung innerhalb des Monitors kann ernsthafte Verletzungen verursachen. Falls das Netzteil defekt ist, versuchen Sie es nicht in eigener Regie zu reparieren.
Pflegen & Reinigen ‧ Es ist ratsam, alle Kabel inklusive Stromkabel zu entfernen, bevor Sie den Monitor hochheben oder verstellen. Beachten Sie bitte die richtigen Hebemethoden, wenn Sie den Monitor aufstellen. Greifen Sie den Monitor an den Kanten, wenn Sie den Monitor hochheben oder tragen wollen. Versuchen Sie nicht durch Halten an dem Monitorfuß oder dem Kabel den Monitor hochzuheben. ‧ Reinigung. Schalten Sie den Monitor aus und ziehen das Stromkabel aus der Steckdose heraus.
Weitere Informationen An den folgenden Stellen finden Sie weitere Informationen und Quellen für eine Softwareaktualisierung. 1. ASUS-Websites Die weltweiten ASUS-Websites bieten aktuelle Informationen zu Hardware- und Software-Produkten von ASUS. Besuchen Sie die Website http://www.asus.com. 2. Optionale Dokumentation Ihr Produktpaket kann zusätzliche Bestandteile wie z.B. eine Garantiekarte enthalten, die eventuell von Ihrem Händler hinzugefügt wurde.
1.1 Willkommen! Vielen Dank für Ihren Kauf des LCD-Monitors der VK221/VK222-Reihe von ASUS®! Der neueste Breitbild-LCD-Monitor von ASUS liefert schärfere, breitere und hellere Bilder und bietet viele Funktionen, um Ihnen ein schönes visuelles Erlebnis zu geben. Durch diese Funktionen können Sie die Bequemlichkeit und das wunderbare visuelle Erlebnis der VK221/VK222-Reihe erleben! 1.
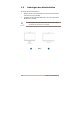
1.3 Anbringen des Monitorfußes So bringen Sie den Monitorfuß an: 1. Bringen Sie den Fuß an dem Monitor an. Sie hören einen Klickton, wenn der Fuß ricntig einrastet. 2. Verstellen Sie die Lage des Bildschirms, um einen angenehmen Blickwinkel zu erhalten. ‧ Wir empfehlen Ihnen ein weiches Tuch auf den Tisch zu legen, um Schäden an dem Monitor zu vermeiden.
1.4 Einführung zum Monitor 1.4.1 Frontseite des LCD-Monitors 1.4.1.1 VK222H/VK222U 1. A ‧ ‧ ‧ 2. ‧ ‧ 4 5 7 6 3 1 2 Taste: Durch Drücken auf diese Taste für 2 bis 4 Sekunden lassen Sie den Monitor die Bildposition, den Takt und die Phase der Anzeige automatisch optimieren (nur beim VGA-Modus).
VK221S/VK222S 1.1.2 1 1. ‧ ‧ 2. ‧ ‧ 2 3 4 5 6 7 Taste: Verwenden Sie diesen Hotkey, um zwischen den fünf voreingestellten, auf der SPLENDID™ Video Enhancement Technology basierenden Videomodi (Spielmodus, Nachtmodus, Landschaftsmodus, Standardmodus und Theatermodus) umzuschalten. Mit dieser Taste schließen Sie das OSD-Menü oder kehren zum vorherigen Menü zurück. Taste: Mit dieser Taste verringern Sie den Wert der ausgewählten Funktion oder springen zur nächsten Funktion.
1.4.1.3 VK221D 1 1. 2 3 4 5 6 7 Taste: Verwenden Sie diesen Hotkey, um zwischen den fünf voreingestellten, auf der SPLENDID™ Video Enhancement Technology basierenden Videomodi (Spielmodus, Nachtmodus, Landschaftsmodus, Standardmodus und Theatermodus) umzuschalten. ‧ Mit dieser Taste schließen Sie das OSD-Menü oder kehren zum vorherigen Menü zurück. Taste: Mit dieser Taste verringern Sie den Wert der ausgewählten Funktion ‧ oder springen zur nächsten Funktion.
1.4.2 Rückseite des LCD-Monitors 1.4.2.1 VK222H Schraubenbohrungen für VESA-Wandmontage 6 1 2 3 4 5 Anschlüsse an der Rückseite 7 Anschlüsse an der Rückseite (von links nach rechts) 1. 2. Netzstromeingang. Hier schließen Sie das beigelegte Netzkabel an. 3. DVI-Anschluss. Der 24-polige Anschluss ist für die PC (Personal-Computer) DVI-D Digitalsignalverbindung vorgesehen. (Bei einigen Modellen) VGA-Anschluss. Dieser 15-polige Anschluss ist für die PC VGA-Verbindung vorgesehen. Audioeingang.
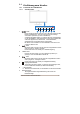
2.1 Abnehmen des Halters/Fußes (für die VESA-Wandmontage) Der Fuß des LCD-Monitors der VK221/VK222-Reihe kann abgenommen werden, um eine VESA-Wandmontage vorzunehmen. Entfernen des Monitorfußes: 1. Entfernen Sie die Abdeckung von dem Halter. 2. Legen Sie den Monitor mit dem Bildschirm nach unten zeigend auf einen Tisch. 3. Entfernen Sie wie unten abgebildet mit einem Schraubenzieher die drei Schrauben von dem Monitorfuß. 4. Nehmen Sie den Halter von dem Monitor ab.
2.2 Anpassen des Bildschirms ‧ Schauen Sie bitte auf die volle Fläche des Bildschirms und passen die Position des Bildschirms an, um einen optimalen Blickwinkel zu erhalten. ‧ Halten Sie den Monitorfuß fest, damit der Monitor beim Anpassen des Blickwinkels nicht umkippt. ‧ Der Bildschirmwinkel kann auf -5º bis 20º eingestellt werden. -5º~20º 2.
3.1 Bildschirmmenü (OSD-Menü) 3.1.1 Bedienungsvorgang 1. Drücken Sie die MENU-Taste, um das OSD-Menü aufzurufen. 2. und Verwenden Sie die Tasten , um durch die Funktionen zu navigieren. Drücken Sie die MENU-Taste, um zu der markierten Funktion zu gelangen. Wenn die ausgewählte Funktion ein Untermenü hat, verwenden Sie bitte die Tasten und , um durch die Funktionen im Untermenü zu navigieren. Drücken Sie die MENU-Taste, um zu der markierten Funktion im Untermenü zu gelangen. 3.
dunklen Szenen mit der SPLENDID™ Video Enhancement. • Im Standardmodus können Sie die Funktionen Sättigung und Schärfe nicht anpassen. • In anderen Modi können Sie die Funktion sRGB nicht anpassen. 2. Bild Hier können Sie die Helligkeit, den Kontrast, die Schärfe, die Sättigung, die Position (nur im VGA-Modus) und den Fokus (nur im VGA-Modus) anpassen.
‧ Helligkeit: Der Wert kann auf 0 bis 100 gestellt werden. Mit dem Hotkey können Sie diese Funktion direkt aufrufen. Kontrast: Der Wert kann auf 0 bis 100 gestellt werden. Schärfe: Der Wert kann auf 0 bis 100 gestellt werden. Sättigung: Der Wert kann auf 0 bis 100 gestellt werden. ‧ ‧ ‧ ‧ ASCR: Wählen Sie "YES (JA)" oder "NO (NEIN)", um das dynamische Kontrastverhältnis zu aktivieren oder deaktivieren. Over Drive: Diese Funktion erlaubt Ihnen die Ansprechzeit durch die OverDrive‐Technik zu kürzen.
4. Eingangsauswahl Hier können Sie entweder die VGA,HDMI - oder DVI-Eingabequelle auswählen. (Bei einigen Modellen) 5. Systemeinstellungen Hier können Sie das System anpassen. ‧ ‧ ‧ ‧ ‧ ‧ 3-4 Lautstärke: Der Wert kann auf 0 bis 100 gestellt werden. Mit dem Hotkey können Sie diese Funktion direkt aufrufen. OSD-Einstellungen Hier können Sie die horizontale Position (H-Position) und die vertikale Position (V-Position) des OSD-Menüs anpassen. Der Wert kann auf 0 bis 100 gestellt werden.
3.2 Technische Daten Bildschirmtyp Bildschirmgröße Max. Auflösung Helligkeit (i.d.R.) Kontrastverhältnis (i.d.R.
3.3 Fehlerbehebung (häufig gestellte Fragen) Problem Die Betriebs-LED leuchtet nicht. Die Betriebs-LED leuchtet orange, und kein Bild erscheint Das Anzeigebild erscheint zu hell oder zu dunkel. Das Anzeigebild steht nicht in der Mitte oder hat eine nicht passende Größe. Mögliche Lösung • Drücken Sie die Taste , um den Monitor einzuschalten • Prüfen Sie, ob das Netzkabel richtig mit dem Monitor und der Steckdose verbunden ist.
3.4 VK221-VK222 Unterstützte Anzeigemodi Auflösung Horizontale Frequenz (KHz) Vertikale Frequenz (Hz) 640x480 31.469 60Hz 640x480 37.861 72Hz 31.5 640x480 37.5 75Hz 31.5 800x600 35.156 56Hz 36 800x600 37.879 60Hz 40 800x600 48.077 72Hz 50 800x600 46.875 75Hz 49.5 1024x768 48.363 60Hz 65 1024x768 56.476 70Hz 75 1024x768 60.023 75Hz 78.75 1152x864 67.5 75Hz 108 1280x960 60 60Hz 108 1280x1024 63.981 60Hz 108 1280x1024 79.
Von VK222H HDMI unterstützte Hauptfrequenzen Auflösung Modus 480P 640x480P 576P 720P 1080i Horizontale Frequenz (KHz)ı 31.469 Vertikale Frequenz (Hz) (MHz) 59.94Hz 25.175 25.2 Pixel 640x480P 31.5 60Hz 720x480P 31.469 59.94Hz 27 720x480P 31.5 60Hz 27.027 720x576P 31.25 50Hz 27 1280x720P 37.5 50Hz 74.25 1280x720P 44.955 59.94Hz 74.176 1280x720P 45 60Hz 74.25 1920x1080i 28.125 50Hz 74.25 1920x1080i 33.716 59.94Hz 74.176 1920x1080i 33.75 60Hz 74.