E3621 V1 2008 年1 月 VK221/VK222系列 液晶顯示器 使用手冊
目錄 宣告.....................................................................................................................iii 安全資訊..............................................................................................................iv 保養和清潔 ...........................................................................................................v 第 1 章:產品介紹 1.1 1.2 1.3 1.4 歡迎使用! ........................................................................................ 1-1 包裝內容......................
注意事項 聯邦通訊委員會(FCC)聲明 本設備符合FCC條款(FCC Rules)第15部份(Part 15)的規定。操作 程序受限於以下兩個條件: ‧ 本設備不得引起有害干擾,且 ‧ 本設備必須接收任何可接收的干擾,包括可能導致意外操作的干擾。 本設備已經測試,並符合FCC條款第15部份中,關於B級(Class B)數 位設備的規定。該規定之主要目的乃確保住宅區內的安裝安全,並提供對 於有害干擾的合理保護。本設備會產生、使用並放射無線射頻能量,如未 根據製造商的指示方法安裝和使用本設備,可能會對無線電通訊造成有害 干擾。然而,我們無法保證在特定環境下安裝此設備不會造成任何干擾。 若本設備已對無線電或電視接收造成不良干擾,您可採取以下方式,改善 干擾的情形: ‧ 重新調整收訊天線的方向或位置。 ‧ 將設備與接收器間的距離加大。 ‧ 將設備與接收器插至使用不同電路的電源插座。 ‧ 向經銷商或有經驗的無線電/電視技師尋求協助。 身為Energy Star®的合作夥伴,本公司確保本產品符合Energy Star®關於 能源效益的指導原則。 加拿大通訊部聲明 本數位裝置所發射出之無線電干擾,
安全資訊 ‧ 設定本顯示器前,請詳讀產品包裝內的說明文件。 ‧ 為避免起火或觸電,請勿將顯示器暴露在下雨或潮溼的環境中。 ‧ 切勿嘗試打開顯示器機殼。顯示器內的高壓電可能會造成人員嚴重受 傷。 ‧ 若電源中斷,切勿嘗試自行修復。請向專業的維修技師或您的零售商 洽詢。 ‧ 使用本產品前,請確定已正確連接所有纜線,且電源線沒有損壞。若 發現任何損壞,請立刻向您的經銷商洽詢。 ‧ 機殼背面或頂端的狹槽和開口作為通風使用。請勿堵塞該通風口。除 非通風良好,切勿將本產品放置在散熱器或熱源的附近或上方。 ‧ 本顯示器只能在標籤指示的電源類型下運作。若您不確定府上的電源 類型,請洽詢您的經銷商或當地的電力公司。 ‧ 請使用符合當地電源標準的電源插頭。 ‧ 請勿讓排插和延長線的電源過載。電源過載可能會引起火災或觸電。 ‧ 請避開多塵、潮溼和極溫的環境。請勿將顯示器放置在任何可能會被 弄濕的地方。請將顯示器放置在平穩的表面上。 ‧ 雷雨期間或長時間不使用時,請拔下本裝置的插頭,避免顯示器因電 源突波造成損壞。 ‧ 切勿將固體推入顯示器的機殼開口,或讓液體潑灑流入。 ‧ 若要確保
保養和清潔 ‧ 抬高或重新放置顯示器前,請先拔下接線和電源線。請依照正確的抬 高方式放置顯示器。抬高或移動顯示器時,請抓住顯示器的邊緣。 請勿從底座或電源線抬起顯示器。 ‧ 清潔:請先關閉顯示器的電源,然後拔下電源線。請使用不會造成刮 傷的軟布清潔顯示器表面,並使用稍微蘸濕中性清潔劑的布清除頑 垢。 ‧ 避免使用含有酒精或丙酮的清潔劑。請使用液晶顯示器專用的清潔 劑。切勿將清潔劑直接噴灑在螢幕上,以免滲入顯示器內並引起觸 電。 下列徵狀為顯示器的正常徵狀: ‧ 第一次使用本顯示器時,螢幕可能會因螢光燈的自然特性出現閃爍。 請關閉電源後重新開啟,確保閃爍的情況消失。 ‧ 不同的桌面樣式可能會造成螢幕出現輕微亮度不均的情況。 ‧ 顯示同樣的影像數小時後,切換時可會出現殘影。殘影會慢慢消失, 或是您可以關閉電源開關數小時以改善情況。 ‧ 螢幕變黑、閃爍、或是無法運作時,請交由您的經銷商或維修中心處 理。請勿自行維修! 本手冊使用慣例 警告:警告使用者在嘗試完成工作時,避免受傷的資訊。 注意:提醒使用者在嘗試完成工作時,避免損壞零組件的資訊。 重要:提示使用者在完成工作時,「必須」遵守的資
更多詳細資訊 更多關於其他資訊以及產品和軟體的更新程式,請參閱下列來源。 1. ASUS網站 ASUS全球網站提供關於ASUS硬體和軟體產品的最新資訊。請查 閱網站http://www.asus.com 2.
歡迎使用! 1 .1 感謝您購買ASUS® VK221/VK222系列液晶顯示器! ASUS最新的寬螢幕液晶顯示器提供更清晰、更寬廣明亮的畫面顯示,以 及許多增強您感官經驗的功能。 您可以透過這些功能,享受VK221/VK222系列所帶來便利而快樂的視覺體驗! 包裝內容 1 .
1 .3 組合顯示器底座 組合顯示器底座: 1. 連接底座與顯示器。發出「喀」一聲時,表示已成功連接底座。 2.
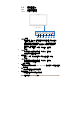
1 .4 顯示器簡介 1.4.1 液晶顯示器正面 1.4.1.1 VK222H/VK222U 6 1 1. 2. 3. 4. 4 5 6 7 按鈕: ‧ 按住此按鈕 2 到 4 秒,自動調整影像至最佳位置、時脈和相位 (僅限 VGA 模式)。 ‧ 使用此快速鍵,在五個擁有 SPLENDID™影像增強技術的預 設影像顯示模式(遊戲模式、夜視模式、風景模式、標準模式、 劇院模式)間進行切換。 ‧ 啟用 OSD 時,退出 OSD 選單,或返回上一個選單。 按鈕: ‧ 按下此鈕減少所選功能的數值,或移至下一個功能。 ‧ 此按鈕同時為音量調整快速鍵。 選單按鈕: ‧ 啟用 OSD 時,按下此按鈕進入/選取反白的圖示(功能)。 按鈕: ‧ 按下此鈕增加所選功能的數值,或移至下一個功能。 ‧ 此按鈕同時為亮度調整快速鍵。 ‧ 7. 3 A 5. 6.
1.4.1.2 VK221S/VK222S 1 ‧ ‧ 3. 4. 5. 6. 7. 1-4 3 4 5 6 7 按鈕: 1. 2.
1.4.1.3 VK221D 1 2 3 4 5 6 7 按鈕: 1. ‧ 2. 3. 4. 5. 6. 7.
1.4.2 液晶顯示器背面 1.4.2.1 VK222H VESA 壁掛架的螺絲孔 1 2 3 4 6 後方接頭 1 2 3 5 4 7 後方接頭(左至右) 1. 2. 3. AC-IN連接埠。此連接埠連接至隨附電源線的電源接頭。 HDMI‐IN port 。 此連接埠連接 HDMI 訊號源。 DVI埠。此24針連接埠連接至個人電腦的DVI-D數位訊號。 (適用於部份機型) 4. VGA埠。此15針連接埠連接至個人電腦的VGA介面。 5. Audio-in連接埠。此連接埠透過隨附的聲音纜線,連接至個人電腦 的音源。 (適用於部份機型) Earphone‐out Port。 此連接埠連接耳機或獨立喇叭。 USB‐IN port。 此連接埠連接網路攝影機。 6. 7. 1.4.2.2 VK222U/VK222S/VK221S/VK221D 1 2 3 4 5 1. AC-IN連接埠。此連接埠連接至隨附電源線的電源接頭。 2. Audio-in連接埠。此連接埠透過隨附的聲音纜線,連接至個人電腦 的音源。 (適用於部份機型) 3.
2 .1 拆開支臂/ 底座(適用於 VESA 壁掛式安 裝) VK221/VK222系列液晶顯示器的可拆式底座,乃特別為VESA壁掛式安裝而設 計。 拆開支臂/底座 1. 取下支臂蓋。 2. 將顯示器的正面朝向桌子。 3. 如下圖所示,使用螺絲起子取下支臂/底座上的三顆螺絲。 4.
2 .2 調整顯示器 ‧ 為取得最佳視角,建議您先從所有角度觀看顯示器,然後再將顯示器 調整到您最舒適的觀看角度。 ‧ 變更角度時,請握住底座,避免顯示器摔落。 ‧ 顯示器的調整角度為-5º到20º。 -5º~20º 2.3 安裝 Life‐Frame 2 軟體 ASUS VK221/VK222系列提供容易使用的 LifeFrame 2 軟體,可與網路攝影機搭配 使用,便於使用者建立專屬的相片或視訊短片。 @ • LifeFrame 2 僅支援 Microsoft @ Windows Vista/XP Service Pack 2 作業系統。 • 支援 CD 包含 LifeFrame 2 軟體。 安裝說明 1. 關閉所有其他應用程式。 2. 將支援 CD 放入光碟機,然後執行 LifeFrame 2 程式。 3.
3 .1 OSD (螢幕功能顯示)選單 3.1.1 如何重新設定 1. 按下「選單」按鈕,啟動OSD選單。 2. 和 瀏覽各個功能。按下 按下 「選單」按鈕反白顯示並啟動想要的功能。若選取的功能有子選 單,請再按一次 和 ,瀏覽子選單功能。按下「選單」按鈕反白顯 示並啟動想要的子選單功能。 3. 按 4. 若要離開OSD選單,請按 複步驟2和3。 3.1.2 1.
2. 影像 您可以在主功能表上調整亮度、對 比度、銳利度、飽和度、位置(僅 限VGA)和焦距(僅限VGA)。 VK221-P1 VK222 -P1 VK221-P2 VK222 -P2 ‧ ‧ ‧ ‧ 亮度:調整範圍 0 到 100。 是啟動此功能的快速鍵。 對比度:調整範圍 0 到 100。 銳利度:調整範圍 0 到 100。 飽和度:調整範圍 0 到 100。 · ASCR:選擇是或否啟用或停用動態對比功能。 · Over Drive:以 Over drive 技術加速反應時間。 設定範圍介於 0 至 100 之間 (不適用 VK221S/D) ‧ 位置:調整影像的水平位置(H 位置)和垂直位置(V 位置)。 調整範圍 0 到 100。 ‧ 焦距:個別調整相位和時脈,降低影像水平線和垂直線的干 擾。調整範圍 0 到 100。 • 相位調整可調整像素時脈訊號的相位。錯誤的相位調整會導致畫 面出現水平干擾。 • 3.
‧ ‧ 色溫:包括冷色系、正常、暖色 系、sRGB 和使用者自訂五種顏色模式。 色調:包括紅色、自然色和黃色,三種顏色模式。 在使用者自訂模式下,使用者可設定R(紅色)、G(綠色)和B(藍 色)的顏色。調整範圍0到100。 4. 輸入選擇 在此功能中,您可以選擇VGA,DVI或 HDMI 輸入來源。 (適用於部份機型) 5.
3 .2 規格摘要 機型 面板尺寸: 最高解析度 亮度類型 對比度類型 可視角度(水平/垂直)≥ 10 顯示顏色 反應時間 Webcam (內建) VK222H 22吋寬螢幕 WSXGA+1680 x 1050 300 cd/m 1000:1 ≧160°(V) ; ≧170°(H) 16.7M 2ms(灰階至灰階) 130萬畫素 2 VK222U 22吋寬螢幕 WSXGA+1680 x 1050 300 cd/m 1000:1 ≧160°(V) ; ≧170°(H) 16.7M 2ms(灰階至灰階) 130萬畫素 VK222S 22吋寬螢幕 WSXGA+1680 x 1050 300 cd/m 1000:1 ≧160°(V) ; ≧170°(H) 16.
3 .
3 .4 VK2 2 1 - VK2 2 2 支援的操作模式 模式 解析度頻率 VGA 640x480 31.469 60Hz 640x480 37.861 72Hz 31.5 640x480 37.5 75Hz 31.5 800x600 35.156 56Hz 36 800x600 37.879 60Hz 40 800x600 48.077 72Hz 50 800x600 46.875 75Hz 49.5 1024x768 48.363 60Hz 65 1024x768 56.476 70Hz 75 1024x768 60.023 75Hz 78.75 1152x864 67.5 75Hz 108 1280x960 60 60Hz 108 1280x1024 63.981 60Hz 108 1280x1024 79.976 75Hz 135 WXGA+ 1440x900 55.935 60Hz 106.5 1440x900 70.635 75Hz 136.
VK222H HDMI 支援的主要定時 模式 480P 576P 720P 1080i 垂直 频率 (Hz) 分辨率 水平 频率 ( KHz) 640x480P 31.469 59.94Hz 25.175 640x480P 31.5 60Hz 25.2 720x480P 31.469 59.94Hz 27 720x480P 31.5 60Hz 27.027 像素 ( MHz) 720x576P 31.25 50Hz 27 1280x720P 37.5 50Hz 74.25 1280x720P 44.955 59.94Hz 74.176 1280x720P 45 60Hz 74.25 1920x1080i 28.125 50Hz 74.25 1920x1080i 33.716 59.94Hz 74.176 1920x1080i 33.75 60Hz 74.