VS207/VK207 Serisi LCD Monitör Kullanıcı Kılavuzu VS207 BRIGHT CAM HD VK207
İçindekiler Tablosu Bildirimler..................................................................................................... iii Güvenlik bilgileri.......................................................................................... iv Bakım ve Temizlik......................................................................................... v 1.1 Hoşgeldiniz!................................................................................... 1-1 1.2 Paketin içeriği............................
Bildirimler Federal İletişim Komisyonu (FCC) Beyanı Bu cihaz, FCC Kurallarının 15. Bölümü ile uyumludur. Kullanım, aşağıdaki iki şarta bağlıdır: • Bu aygıt zararlı parazitlerin oluşmasına neden olmaz ve • Bu cihaz, istenmeyen işlemlere neden olabilecek parazitler dahil olmak üzere alınan tüm parazitleri kabul etmelidir. Bu ekipman test edilmiş ve Federal İletişim Komisyonu (FCC) Kurallarının 15.Bölümü uyarınca, B Sınıfı dijital cihazlarla ilgili kısıtlamalara uygun olduğu tespit edilmiştir.
Güvenlik bilgileri iv • Monitörü kurmadan önce, paket içinde gelen tüm belgeleri okuyun. • Yangın veya elektrik çarpması tehlikesini önlemek için, monitörü asla yağmura veya neme maruz bırakmayın. • Monitör kapağını asla açmaya çalışmayın. Monitör içindeki tehlikeli yüksek voltaj, ciddi fiziksel yaralanmaya yol açabilir. • Güç kaynağı arızalanırsa, onu kendiniz onarmaya çalışmayın. Yetkili bir servis teknisyeni veya perakendecinizle bağlantıya geçin.
Bakım ve Temizlik • Monitörünüzü kaldırmadan veya yeniden yerleştirmeden önce, kablolarını ve elektrik kablosunu çıkarmanız iyi olur. Monitörü yerleştirirken doğru kaldırma teknikleri kullanın. Monitörü kaldırıken veya taşırken, kenarlarından kavrayın. Monitörü statifinden veya kablosundan tutarak kaldırmayın. • Temizleme. Monitörünüzü kapatın ve elktrik kablosunu prizden çıkarın. Monitör yüzeyini, tüy bırakmayan, aşındırmayan bir bezle temizleyin.
Bilgilerin bulunabileceği yerler Ek bilgiler ve ürün ve yazılım güncellemeleri için aşağıdaki kaynaklara başvurun. vi 1. ASUS web siteleri Dünya çapındaki ASUS web siteleri, ASUS donanım ve yazılım ürünleri hakkında güncel bilgiler sunar. http://www.asus.com adresini ziyaret edin 2. İsteğe bağlı belgeler Ürün paketinizde, bayiiniz tarafından eklenmiş olabilecek isteğe bağlı belgeler bulunabilir. Bu belgeler, standart paketin bir parçası değildir.
1.1 Hoşgeldiniz! ® ASUS VS207/VK207 Serisi LCD monitörü aldığınız için teşekkürler! ASUS'un en yeni geniş ekran LCD monitörü, daha canlı, daha geniş ve daha parlak bir görüntünün yanı sıra görüntüleme deneyiminizi geliştirecek pek çok özellik sunmaktadır. Bu özellikler sayesinde, VS207/VK207 Serisinin size getirdiği kolaylığın ve zevk veren görsel deneyimin tadını çıkarabilirsiniz. 1.
1.3 Monitör tabanının montajı Monitör tabanını monte etmek için: 1. Altlığı monitörün koluna takın ve saat yönünde çevirin. Bir klik sesi altlığın başarıyla takıldığına işaret eder. 2. Monitörü en rahat edeceğiniz açıya ayarlayın. Monitörün hasar görmesini önlemek için masa yüzeyine yumuşak bir örtü örtmenizi öneririz. 3 1 2 1.4 Kabloları bağlama Kabloları bağlamak için: Bölüm 1.5.2, sayfa 1-5'teki bilgilere göre gereksinme duyduğunuz kabloları bağlayın.
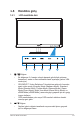
1.5 Monitöre giriş 1.5.1 LCD monitörün önü 1 1. 2 3 4 5 Düğme: • Bu düğmeye 2-4 saniye süreyle basarak görüntüyü optimum konumuna, saate ve faza otomatik olarak ayarlayın (yalnız VGA modu için). • SPLENDID™ Video Geliştirme Teknolojisine sahip altı önceden ayarlı video modu (Scenery Mode (Manzara Modu), Standard Mode (Standart Mod), Theater Mode (Sinema Modu), Game Mode (Oyun Modu), Night View Mode (Gece Görüş Modu) ve sRGB Mode (sRGB Modu)) arasında geçiş yapmak için bu geçiş tuşunu kullanın.
3. • Hizalama için tasarlanmış Hızlı Sığdır işlevini etkinleştirmek için bu düğmeye basın. • Hızlı Uydur işlevi 2 sayfa ortak kılavuz deseni ve fotoğraf boyutu içerir. (Lütfen 1.5.3 Hızlı Sığdır İşlevine bakın) MENU Düğmesi: • OSD menüsüne girmek için bu düğmeye basın. • OSD etkinken, vurgulanan simgeyi (işlevi) girmek/seçmek için bu düğmeye basın. • Bu, QuickFit döngü tuşudur • Seçilen işlevin değerini artırmak veya sağdaki/yukarıdaki sonraki işleve geçmek için bu düğmeye basın.
1.5.2 LCD monitörün arkası VS207T 7 1 2 1 2 4 3 VS207S 4 VS207N 6 1 4 3 VS207D 1 4 8 VK207S 1 2 1. AC-IN yuvası 2. Ses Hat Girişi bağlantı noktası 3. DVI yuvası 4. VGA yuvası 5. USB akış yukarı bağlantı noktası 6. Kensington kilidi yuvası 7. VESA Duvara Montaj Arka konektörleri için 8.
1.5.3 Hızlı Sığdır İşlevi Hızlı Sığdır işlevi 2 desen içerir: (1) Kılavuz (2) Fotoğraf boyutu. 1. Kılavuz desenleri Kılavuz desenleri tasarımcıların ve kullanıcıların içeriği ve sayfadaki düzeni organize etmelerini kolaylaştırır ve tutarlı bir görünüş ve his sağlar. Hizalama Kılavuzu 2. Fotoğraf boyutu Hızlı Sığdır işlevinde görüntülenen çeşitli gerçek fotoğraf boyutları fotoğrafçıların ve diğer kullanıcıların fotoğraflarını ekranda gerçek boyutta görüntülemelerini ve düzenlemelerini sağlar.
2.1 Kolu/statifi ayırma (VESA standardında duvar montajı için) VS207/VK207 Serisi LCD monitörün ayrılabilir statifi, VESA duvar montajı için özellikle tasarlanmıştır. Kolu/statifi ayırmak için: 1. Durdurma kolunu çekin ve kilidini açmak için saat yönünün tersine çevirin. 2. Altlığı monitörden çıkarın. 3. Parmaklarınızı hafifçe kullanarak statif köşesini kaplayan plakayı çekip çıkarın. Statifi monitöre tutturan dört vidayı bir tornavidayla çıkarın. 4. Statifi monitörden ayırın.
2.2 Monitörü ayarlama • Optimum bir görüntüleme için, monitörün bütün yüzüne bakmanızı ve ardından monitörü sizin için en rahat olan açıya ayarlamanızı öneririz. • Açısını değiştirirken monitörün devrilmesini önlemek için statifi tutun. • Monitörün açısını -5˚ ile 20˚ arasında ayarlayabilirsiniz. -5 ~ 20 2.
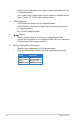
3.1 OSD (Ekran Üzerinde Görüntüleme) menüsü 3.1.1 Yeniden yapılandırma VK207 Splendid Scenery Mode Color Standard Mode Image Theater Mode Input Select Game Mode System Setup Night View Mode sRGB Move Menu Exit 1. OSD menüsünü etkinleştirmek için [MENU] (Menü) düğmesine basın. 2. İşlebler arasında gezinmek için ve düğmelerine basın. [MENU] (Menü) düğmesine basarak istenen işlevi vurgulayın ve etkinleştirin.
• Scenery Mode (Manzara Modu): Bu, SPLENDID™ Video Geliştirme ile manzara fotoğrafı görüntüleme için en iyi seçimdir. • Standard Mode (Standart Mod): Bu, SPLENDID™ Video Geliştirme ile belge düzenleme için en iyi seçimdir. • Theater Mode (Sinema Modu): Bu, SPLENDID™ Video Geliştirme ile film izleme için en iyi seçimdir. • Game Mode (Oyun Modu): Bu, SPLENDID™ Video Geliştirme ile oyun oynama için en iyi seçimdir.
• Skin Tone (Cilt Tonu): Kırmızımsı, Doğal ve Sarımsı olmak üzere üç renk modu içerir. • Smart View: Smart View Teknolojisi ile çok yönlü görüntüleme konumları.  User Mode (Kullanıcı Modu)'nda, R (Kırmızı), G (Yeşil) ve B (Mavi) renk değerleri kullanıcı tarafından yapılandırılabilir; ayarlama aralığı 0 ~ 100 arasındadır. 3. Image (Görüntü) Bu ana işlevden Sharpness (Keskinlik), Aspect Control (Görünüm Oranı Kontrolü) ve Position (Konum) (yalnızca VGA) ayarlayabilir ve Focus (Odak) (yalnızca VGA).
4. Input Select (Giriş Seçimi) Giriş kaynağını VGA, DVI olarak belirleyin. VK207 Splendid VGA Color DVI Image Input Select System Setup Move • 5. Menu Exit DVI: Yalnızca VS207T/N modellerinde mevcuttur. System Setup (Sistem Ayarları) Sistem yapılandırmasını ayarlayın.
• Information (Bilgiler): Giriş Bağlantı Noktasının, Çözünürlüğün, H-frekansının, V-frekansının ve Model Adının monitör bilgilerini görüntüleyin. • All Reset (Tümünü Sıfırlama): Tüm ayarları fabrika varsayılan durumuna geri getirmek için "Yes" (Evet) seçin.
3.
3.3 Sorun giderme (SSS) Sorun Olası Çözüm Güç LED'i AÇIK değil • Monitörün AÇIK modda olup olmadığını anlamak için düğmesine basın. • Elektrik kablosunun monitöre ve elektrik prizine doğru biçimde bağlanıp bağlanmadığını kontrol edin. Güç LED'i ışıkları amber renginde • Monitörün ve bilgisayarın AÇIK modda olup ve ekranda hiç bir görüntü yok. olmadıklarını kontrol edin. • Sinyal kablosunun monitöre ve bilgisayara uygun biçimde bağlandığından emin olun.
3.4 Desteklenen Zamanlama Listesi VESA / IBM Modları Destek Zamanlaması (D-SUB, DVI-D girişleri) Çözünürlük 640 x 350 640 x 480 640 x 480 640 x 480 640 x 480 720 x 400 800 x 600 800 x 600 800 x 600 800 x 600 832 x 624 1024 x 768 1024 x 768 1024 x 768 1152 x 864 1280 x 1024 1280 x 1024 1600 x 900 VS207/VK207 Yenileme Hızı 70Hz 60Hz 67Hz 72Hz 75Hz 70Hz 56Hz 60Hz 72Hz 75Hz 75Hz 60Hz 70Hz 75Hz 75Hz 60Hz 75Hz 60Hz Yatay Frekans 31.469KHz 31.469KHz 35KHz 37.861KHz 37.5KHz 31.469KHz 35.156KHz 37.879KHz 48.