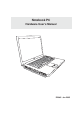
Notebook PC Hardware User’s Manual DV E2083 / Jun 2005
Contents 1. Introducing the Notebook PC ..................................................................5 About This User’s Manual .......................................................................................... 6 Notes For This Manual .......................................................................................... 6 Preparing your Notebook PC ..................................................................................... 9 2. Knowing the Parts ..................................
Contents 4. Using the Notebook PC ......................................................................... 33 Operating System .................................................................................................... 34 Support Software ................................................................................................. 34 Pointing Device ........................................................................................................ 34 Using the Touchpad ...................
Contents 4
1.
1 Introducing the Notebook PC About This User’s Manual You are reading the Notebook PC User’s Manual. This User’s Manual provides information on the various components in the Notebook PC and how to use them. The following are major sections of this User’s Manuals: 1. Introducing the Notebook PC Introduces you to the Notebook PC and this User’s Manual. 2. Knowing the Parts Gives you information on the Notebook PC’s components. 3.
Introducing the Notebook PC 1 Safety Precautions The following safety precautions will increase the life of the Notebook PC. Follow all precautions and instructions. Except as described in this manual, refer all servicing to qualified personnel. Do not use damaged power cords, accessories, or other peripherals. Do not use strong solvents such as thinners, benzene, or other chemicals on or near the surface. Disconnect the AC power and remove the battery pack(s) before cleaning.
1 Introducing the Notebook PC Transportation Precautions To prepare the Notebook PC for transport, you should turn it OFF and disconnect all external peripherals to prevent damage to the connectors. The hard disk drive’s head retracts when the power is turned OFF to prevent scratching of the hard disk surface during transport. Therefore, you should not transport the Notebook PC while the power is still ON.
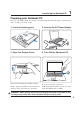
1 Introducing the Notebook PC Preparing your Notebook PC These are only quick instructions for using your Notebook PC. Read the later pages for detailed information on using your Notebook PC. 1. Install the battery pack 2. Connect the AC Power Adapter 2 1 3 DV 2 1 3. Open the Display Panel 4. Turn ON the Notebook PC This Notebook PC features a latchless design. Press the power button and release. Lift the display panel with one hand while holding the system portion with your other hand.
1 10 Introducing the Notebook PC
2.
2 Knowing the Parts Top Side Refer to the diagram below to identify the components on this side of the Notebook PC. Details are given starting from the top and going clockwise. Display Panel (Use a soft cloth without chemical liquids to clean. Use plain water if necessary.
Knowing the Parts 2 Display Panel The display panel functions the same as a desktop monitor. The Notebook PC uses an active matrix TFT LCD, which provides excellent viewing like that of desktop monitors. Unlike desktop monitors, the LCD panel does not produce any radiation or flickering, so it is easier on the eyes. Stereo Speakers The built-in stereo speaker system allows you to hear audio without additional attachments.
2 Knowing the Parts Bottom Side Refer to the diagram below to identify the components on this side of the Notebook PC. Details are given starting from the top and going clockwise. Sub-Woofer Speaker Hard Disk Drive Compartment Memory Compartment CPU Compartment TV-Tuner Compartment Shutdown Button Cooling Fan and Air Vents Battery Lock Battery Pack Spring Battery Lock IMPORTANT! The bottom of the Notebook PC can get very hot.
Knowing the Parts 2 Audio Speaker (Sub-Woofer) The built-in sub-woofer speaker allows you to enjoy amazing bass (low frequency) sounds in your multimedia applications. Central Processor (CPU) Some Notebook PC models feature a socketed-processor design to allow upgrading to faster processors in the future. Some models feature a ULV design for compactness and may not be upgraded. Visit an authorized service center or retailer for information on upgrades.
2 Knowing the Parts Left Side Refer to the diagram below to identify the components on this side of the Notebook PC. Power Input LAN Port Display Output Antenna Input AV/S-Video Flash Memory Input Slot Infrared Port Modem Port PC Card Slot PC Card Eject 1394 Port TV-Out Port Air Vents USB Ports Power (DC) Input The supplied power adapter converts AC power to DC power for use with this jack.
Knowing the Parts 2 Audio Video Input (AV/S-Video Input) The audio video input is featured on selected models and provide a way of inputting audio and video signals through RCA jacks or S-Video (requires the 1/8” to RCA adapter included with selected models). This function only works when purchased with the TV tuner hardware and software package.
2 Knowing the Parts Right Side Refer to the diagram below to identify the components on this side of the Notebook PC. Electronic Eject Optical Drive (varies by model) Cooling Fan and Air Vents USB Port Kensington® Lock Port Optical Drive The Notebook PC comes in various models with different optical drives. The Notebook PC’s optical drive may support compact discs (CD) and/or digital video discs (DVD) and may have recordable (R) or re-writable (RW) capabilities.
Knowing the Parts 2 Front Side Refer to the diagram below to identify the components on the front side of the Notebook PC. Display opening tab Stereo Speaker Phone Output Mic Audio Input Input CIR Port AV Status Display (see front view) Stereo Speaker Stereo Speakers The built-in stereo speaker system allows you to hear audio without additional attachments.
2 Knowing the Parts Back Side Refer to the diagram below to identify the components on this side of the Notebook PC. Battery Pack Battery Pack The battery pack is automatically charged when connected to an AC power source and maintains power to the Notebook PC when AC power is not connected. This allows use when moving temporarily between locations. Battery time varies by usage and by the specifications for this Notebook PC.
3.
3 Getting Started Power System Using AC Power The Notebook PC power is comprised of two parts, the power adapter and the battery power system. The power adapter converts AC power from a wall outlet to the DC power required by the Notebook PC. Your Notebook PC comes with a universal AC-DC adapter. That means that you may connect the power cord to any 100V-120V as well as 220V-240V outlets without setting switches or using power converters.
3 Getting Started Using Battery Power The Notebook PC is designed to work with a removable battery pack. The battery pack consists of a set of battery cells housed together. A fully charged pack will provide several hours of battery life, which can be further extended by using power management features through the BIOS setup. Additional battery packs are optional and can be purchased separately through a Notebook PC retailer.
3 Getting Started Powering ON the Notebook PC The Notebook PC’s power-ON message appears on the screen when you turn it ON. If necessary, you may adjust the brightness by using the hot keys. If you need to run the BIOS Setup to set or modify the system configuration, press [F2] upon bootup to enter the BIOS Setup. If you press [Tab] during the splash screen, standard boot information such as the BIOS version can be seen.
Getting Started 3 Checking Battery Power The battery system implements the Smart Battery standard under the Windows environment, which allows the battery to accurately report the amount of charge percentage left in the battery. A fullycharged battery pack provides the Notebook PC a few hours of working power. But the actual figure varies depending on how you use the power saving features, your general work habits, the CPU, system memory size, and the size of the display panel.
3 Getting Started Restarting or Rebooting After making changes to your operating system, you may be prompted to restart the system. Some installation processes will provide a dialog box to allow restart. To restart the system manually, click Windows Start button and select Shut Down and then choose Restart. (Screens are different depending on security settings.
Getting Started 3 Special Keyboard Functions Colored Hot Keys The following defines the colored hot keys on the Notebook PC’s keyboard. The colored commands can only be accessed by first pressing and holding the function key while pressing a key with a colored command. NOTE: The Hot Key locations on the function keys may vary depending on model but the functions should remain the same. Follow the icons instead of the function keys.
3 Getting Started Num Lk (Ins): Toggles the numeric keypad (number lock) ON and OFF. Allows you to use a larger portion of the keyboard for number entering. Scr Lk (Del): Toggles the “Scroll Lock” ON and OFF. Allows you to use a larger portion of the keyboard for cell navigation. Fn+C: Toggles “Chameleon LCD Enhancement Technology”. This allows switching between different display color enhancement modes. You can see the current mode through the onscreen display (OSD).
Getting Started 3 Microsoft Windows™ Keys There are two special Windows™ keys on the keyboard as described below. The key with the Windows™ Logo activates the Start menu located at the bottom left of the Windows™ desktop. The other key, that looks like a Windows™ menu with a small cursor, activates the properties menu and is equivalent to pressing the right mouse button on a Windows™ object.
3 Getting Started Instant Launch Keys and Status Indicators Instant Launch Keys InstantON Key When the Notebook PC is Off: Pressing this button will launch a multimedia player application (without entering Windows) to view DVDs, VCDs, videos, photos, or television programs; or listen to music CDs or files. When the Notebook PC is On: Pressing this button will launch a multimedia player designed for Windows.
Getting Started 3 Status Indicators (top–right) Drive Activity Indicator Indicates that the Notebook PC is accessing one or more storage device(s) such as the hard disk. The light flashes proportional to the access time. Number Lock Indicates that number lock [Num Lk] is activated when lighted. Number lock allows some of the keyboard letters to act as numbers for easier numeric data input. Capital Lock Indicates that capital lock [Caps Lock] is activated when lighted.
3 Getting Started Status Indicators (front) Power Indicator This indicator lights to indicate that the Notebook PC is turned ON and blinks slowly when the Notebook PC is in the Suspend-to-RAM (Standby) mode. This indicator is OFF when the Notebook PC is OFF or in the Suspend-to-Disk (Hibernation) mode.
4.
4 OS Using the Notebook PC Operating System This Notebook PC may offer (depending on territory) its customers the choice of a pre-installed operating system such as Microsoft Windows XP. The choices and languages will depend on the territory. The levels of hardware and software support may vary depending on the installed operating system. The stability and compatibility of other operating systems cannot be guaranteed.
Using the Notebook PC 4 Pointing Device The Notebook PC’s integrated touchpad pointing device is fully compatible with all two/three-button and scrolling knob PS/2 mice. The touchpad is pressure sensitive and contains no moving parts; therefore, mechanical failures can be avoided. A device driver is still required for working with some application software.
4 Using the Notebook PC Touchpad Usage Illustrations Clicking/Tapping - With the cursor over an item, press the left button or use your fingertip to touch the touchpad lightly, keeping your finger on the touchpad until the item is selected. The selected item will change color. The following 2 examples produce the same results.