Motherboard X99 II Series Feature Manual
E11551 First Edition May 2016 Copyright© 2016 ASUSTeK COMPUTER INC. All Rights Reserved. No part of this manual, including the products and software described in it, may be reproduced, transmitted, transcribed, stored in a retrieval system, or translated into any language in any form or by any means, except documentation kept by the purchaser for backup purposes, without the express written permission of ASUSTeK COMPUTER INC. (“ASUS”).
Contents About this guide........................................................................................................... 5 AI Suite 3 Main menu................................................................................................... 6 Dual Intelligent Processors 5...................................................................................... 8 5-Way Optimization..........................................................................................
ASUS Media Streamer............................................................................................... 44 System requirements..................................................................................... 45 Adding and deleting media files..................................................................... 46 Push Notice................................................................................................................ 47 Key Express............................................
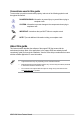
Conventions used in this guide To ensure that you perform certain tasks properly, take note of the following symbols used throughout this manual. DANGER/WARNING: Information to prevent injury to yourself when trying to complete a task. CAUTION: I nformation to prevent damage to the components when trying to complete a task. IMPORTANT: I nstructions that you MUST follow to complete a task. NOTE: Tips and additional information to help you complete a task.
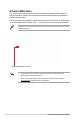
AI Suite 3 Main menu The AI Suite 3 main menu gives you easy-access controls and insight to what’s going on with your computer - allowing you to optimize performance settings while at the same time ensuring system stability. The AI Suite main menu includes is a quick-access menu bar that allows you to swiftly launch any of the integrated ASUS utilities. Click on the left of the menu to launch the menu bar.
AI Suite 3 main menu bar AI Suite 3 mini-menu The AI Suite 3 mini-menu appears on the desktop and can be conveniently accessed and moved around. The AI Suite 3 mini-menu allows you to quickly access the important items in the AI Suite 3.
Dual Intelligent Processors 5 ASUS Dual Intelligent Processors 5 combines TPU, EPU, DIGI+ Power Control, Fan Xpert 4, and Turbo Core App functions to push the system’s performance to its optimal potential. It automatically balances the system’s performance, power saving, levels, and fan settings via the user-friendly AI Suite 3 utility. 5-Way Optimization The 5-Way Optimization function dynamically optimizes your PC based on real-time usage to provide the best system status.
TPU (Turbo Processing Unit) TPU allows you to manually adjust the CPU frequency, CPU cache, core frequencies, DRAM frequency, and related voltages for an enhanced system stability and a performance boost. Refer to the CPU documentation before adjusting CPU voltage settings. Setting a high voltage may damage the CPU permanently, and setting a low voltage may lead to an unstable system. For system stability, the TPU settings are not saved in the BIOS and are not loaded during system bootup.
EPU (Energy Processing Unit) EPU is a real-time system power-saving chip that automatically detects the current system load and intelligently moderates power usage. It offers a total system-wide energy optimization, reduces fan noise, and extends the lifespan of your hardware components.
DIGI+ Power Control ASUS DIGI+ Power Control features the revolutionary and innovative digital VRM and DRAM Voltage controllers. These controllers offers ultra-precise memory and voltage tuning for optimal system efficiency, stability and performance. The following screens are for reference only. Configuration options varies depending on the motherboard model.
Adjusting the DRAM Power Click to undo the changes Click to apply the changes DRAM Voltage Frequency Allows you to adjust the DRAM switching frequency to stabilize the system or to increase the overclocking range. DRAM Current Capability A higher value brings a wider total power range and extends the overclocking frequency range simultaneously.
Fan Xpert 4 ASUS Fan Xpert 4 provides customizable settings of your fans for a cooler and quieter computing environment. With its fan Auto Tuning feature, ASUS Fan Xpert 4 automatically tweaks the settings of CPU and chassis fans to achieve their best cooling performance. ASUS Fan Xpert 4 also supports hardware level PWM/DC combo mode for the CPU, chassis fans, and fans connected to the fan extension card.
RPM Mode RPM Mode allows you to set the fan speed when the CPU temperature is below 75oC. Click and drag to adjust the fan’s speed Click to switch between fans • When the CPU temperature reaches 75oC, the fan will automatically run at full speed to protect the CPU. • The Fan Xpert 4 may not be able to detect the fan speed if your fan is installed with an external control kit for rotation speed. • Fan Xpert 4 does not support 2-pin fans. If you install a 2-pin fan, it can only run at its full speed.
Turbo Core App (for Broadwell-E CPUs) Turbo Core App allows you customize the system performance of an application. When an application is on the Turbo Core App List, you can drag and drop the application to change the priority to allocate the CPU frequency. Turbo Core App will automatically determine the CPU cores with the best performance, and then allocate the best cores to the applications in the Turbo Core App list based on the application priority.
Turbo App Turbo App allows you customize the system performance, network priority, and audio setting of an application. When an application is on the Turbo App List, you can you can drag and drop the application to change the priority to allocate the CPU frequency, network priority, and define the audio setting of the selected application. Click to refresh the list of running applications Click to toggle the Turbo App function ON or OFF Click to assign a specific application (.
Ai Charger+ Ai Charger+ allows you to fast-charge your portable BC 1.1* mobile devices on your computer’s USB port three times faster than the standard USB devices**. Launching Ai Charger+ To launch Ai Charger+, click Charger+. on the left of the AI Suite 3 main menu, then select Ai Ai Charger+ is available on selected motherboard models.
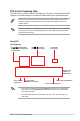
USB 3.1 Boost USB 3.1 Boost technology supports UASP (USB Attached SCSI Protocol) that automatically speeds up the transfer rates of your USB storage devices. Launching USB 3.1 Boost To launch USB 3.1 Boost, click 3.1 Boost. on the left of the AI Suite 3 main menu, then select USB Using the USB 3.
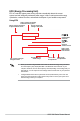
EZ Update EZ Update is a utility that allows you to automatically update your motherboard’s software, drivers and BIOS easily. With this utlity, you can also manually update the BIOS and select the boot logo that displays during POST. Launching EZ Update To launch EZ Update, click Update. on the left of the AI Suite 3 main menu, then select EZ Using EZ Update Click to automatically update your motherboard driver, software and firmware X99-DELUXE II X99-DELUXE_II-ASUS-0001.
Manually update the BIOS and selecting a boot logo Click to search an image file for your boot logo X99-DELUXE II X99-DELUXE_II-ASUS-0001.CAP X99-DELUXE II Click to go back to EZ Update main screen Click to proceed the updating BIOS and boot logo After you Click BIOS Update button, Click Flash to update the BIOS and upload the boot logo in your system.
System Information This utility allows you to get the detailed information of the motherboard, CPU, and memory settings. Launching the System Information To launch System Information, click System Information. on the left of the AI Suite 3 main menu, then select Viewing the motherboard information Click the MB tab to view the motherboard’s information. X99-DELUXE II Viewing the CPU information Click the CPU tab to view the processor’s information.
Viewing the SPD information Click the SPD tab to view the memory’s information.
Mobo Connect Mobo Connect allows you to share the PC’s keyboard/mouse for smart devices, or stream audio playback from your smart device to the PC. Launching Mobo Connect To launch Mobo Connect, click Connect. on the left of the AI Suite 3 main menu, then select Mobo Mobo Connect screen Set Hotkey for Keyboard/ Mouse sharing Select device for Keyboard/Mouse sharing Select device for audio Audio Mode Set Hotkey for Audio Mode Click to apply the settings • This feature only supports Android devices.
PC Cleaner PC Cleaner allows you to clean the system junk files by scanning and deleting selected files. Launching PC Cleaner To launch PC Cleaner, click Cleaner.
USB BIOS Flashback USB BIOS Flashback allows you to check and save the latest BIOS version to a USB storage device. Use this utility to quickly check for the latest available BIOS and set the BIOS download schedule. Launching USB BIOS Flashback To launch USB BIOS Flashback, click USB BIOS Flashback. on the left of the AI Suite 3 main menu, then select USB BIOS Flashback is available only in selected motherboard models.
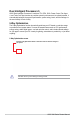
Downloading the latest BIOS Before you start downloading, ensure that you have installed the USB storage device to your computer’s USB port that supports USB BIOS Flashback. Refer to section Rear I/O connection of your motherboard’s user manual for more details. To download the updated BIOS: 1. From the USB BIOS Flashback screen, Click Check for New BIOS Update. Wait for the system to check the latest BIOS version. 26 2.
Turbo LAN Turbo LAN is a network management software that features four preset packet prioritized profiles (VoIP, Media Streaming, Games and File Sharing) facilitating different user scenarios. Users can also manually allocate bandwidth and adjust priority settings of each application to run faster and smoother. To use Turbo LAN, double click on the desktop.
Aura Aura allows you to adjust the onboard RGB LEDs’ color and also select different light effects. You can also correct or adjust the RGB LED color by calibrating the LED strip. To use Aura, double click on the desktop. Select the component to adjust Turn the onboard RGB LEDs ON or OFF Adjust RGB LED light color Select the RGB LED light effect Select the RGB LED light direction Select the RGB LED light speed A header calibration pop-up window will appear when you select a header for the first time.
HyStream HyStream allows you to stream contents on your smart device straight onto your computer’s monitor. To use HyStream, double click on the desktop. Click to toggle HyStream for Android devices ON or OFF Click to select screen size Click to toggle HyStream for iOS devices ON or OFF • This feature may not be compatible on some smart devices. • Use AirPlay to stream photos and audio files from iOS devices.
Wi-Fi GO! Card The Wi-Fi GO! card is an easy-to-use wireless LAN adapter that allows you to connect to a wireless LAN in a single network. With the Wi-Fi GO! card, you can also use your system as an access point for other Wi-Fi supported devices. By default, the Wi-Fi GO! card is already installed on your motherboard. To locate the Wi-Fi GO! card, refer to section Motherboard rear and audio connections of your motherboard’s user guide. The Wi-Fi standard of 802.
ASUS Wi-Fi GO! card specifications Antenna 1: Wi-Fi Tx/Rx Antenna 2: Wi-Fi Tx/Rx + Bluetooth 1 x ASUS 2T2R dual band Wi-Fi moving antenna (with SMA connector) Antenna Antenna3: Wi-Fi- Tx/Rx 1 x ASUS 3T3R dual band Wi-Fi moving antenna (with MMCX connector) 32-bit / 64-bit Windows® 7, 32-bit / 64-bit Windows® 8 / 8.1, Windows® 10 Support OS ASUS special features ASUS Wi-Fi Engine ASUS Wi-Fi GO! * The specifications are subject to change without notice.
Installing Wi-Fi GO! card driver The contents of the support DVD are subject to change without notice. Visit the ASUS support site at https://www.asus.com/support/ for driver or utilities updates. To install Wi-Fi GO! card driver: 1. Place the support DVD into the optical drive. If Autorun is enabled in your computer, the DVD automatically displays the installation wizard. 2. Click the Driver tab then click ASUS Bluetooth 4.0 Wi-Fi Driver. 3.
Using the Client Mode The Client mode allows you to connect your system to a wireless network. To use the client mode: 1. Click Client Mode to launch Network Connections. 2. From the Network Connections window, select a network adapter. 3. From the list of available networks, select a network that you want to connect to. Some networks may require you to key in a password.
Using the AP Mode The AP mode allows you to set your system as an access point for other wireless-enabled devices. To use AP mode, click AP Mode on the Wi-Fi Engine menu. Key in a network name Key in your password Key in your password for confirmation Click to disable AP mode Click to go back to previous screen 34 Click to select a network Click to enable AP mode • ASUS WiFi Engine supports Windows® 7 (32-bit & 64-bit) and Windows® 8.1 (32-bit & 64-bit).
Wi-Fi GO! and Remote GO! Wi-Fi GO! and Remote GO! are ASUS exclusive utilities that gives you complete control of your PC anytime and anywhere with your smart devices. You can manage all your public clouds or sync and backup files among your PC and devices. The user interface of your smart device may vary with the operating system and the screen resolution. System requirements System requirements PC Smart device OS Windows® 7/Windows® 8/ Windows® 8.1, Windows® 10 Android 4.
Creating an ASUS account Ensure that you have an internet connection before you create an account. To create a new ASUS Account: 1. Click Create a New Account on your PC or smart device. The browser will direct you to the ASUS website (www.asus.com). 2. From the ASUS website, click Sign Up then follow onscreen instructions to complete the registration. Logging in To log-in using your PC: 1. Launch Wi-Fi GO! on your PC.
To log-in using your smart device: 1. Launch Wi-Fi GO! & NFC Remote on you smart device. 2. Tap ASUS Account (A), key in your ASUS Account and password, then click Login (C). • PCs with the same ASUS account logged in will show up in the device list. • The public-to-private network functions for the iOS system will be available from Wi-Fi GO! & NFC Remote V2.00.00 or later versions.
Wi-Fi GO! & NFC Remote (App for smart devices) Using Wi-Fi GO! & NFC Remote To use the Wi-Fi GO! & NFC Remote: 1. Connect your smart device to the same Wi-Fi network as your computer or log in on your computer and smart devices using the same ASUS account to fully utilize the Wi-Fi GO! functions across different networks. 2. On your smart device, tap 3. From the list of scanned PCs, tap the computer that you want to connect with your smart device. then tap Enter.
Using the Wake-on-LAN If you want to wake up your computer using the smart device, ensure that you enable the computer’s Wake-on-LAN settings. To configure your computer’s Wake-on-LAN settings: 1. From BIOS Setup, go to Advanced > APM Configuration then set Power On By PCI-E/PCI to [Enabled]. 2. From Windows® OS, do the following: a. On your desktop, click Start, right-click Computer > Manage to launch the Computer Management screen. b. Click Device Manager to view all the installed devices. c.
Cloud GO! Cloud GO! allows you to control and synchronize your files across multiple cloud services such as ASUS WebStorage, Dropbox®, Google Drive™, and OneDrive®. • Ensure to set the correct system date and time of your computer and smart device when using Cloud GO! • Due to the cloud storage limitation, you can only upload or synchronize files with a maximum size of 100 MB. • The synchronized files will be saved under the Wi-Fi GO! folder of each cloud storage.
Remote Desktop Remote Desktop allows you to remotely control your desktop in real-time using your smart device. The System User Account Control (UAC) will be set to Never Notify when using Remote Desktop function. The UAC level will return to your previous settings after you exit Remote Desktop. To use Remote Desktop: On your smart device, tap Remote Desktop. Remote Desktop interface for Windows® 10 Tap to view the cursor Tap to launch the Charms bar Tap to launch the smart device’s keypad.
Remote Desktop Control Notification This function allows you to send the control authorization to a smart device and directly start using Remote Desktop in your device. To use Remote Desktop Control Notification: 1. Click Select Device. 2. Select a device from the drop list. 3. Click Send to send the Remote Desktop control authorization to the selected device. This function requires the Push Notice feature to be installed.
File Transfer File Transfer allows you to sync and share files between your PCs and smart devices with just a click in public-to-private networks. Transferring files from computer to smart device To transfer files from computer to smart device: 1. Click File Transfer. 2. Click Setting to select the destination for your transferred files. 3. Right-click the file then select Send to > [Device Name]. 4. After the file transfer is complete, click OK.
Remote Keyboard & Mouse Remote Keyboard & Mouse allows you to use your smart device’s touch panel as a remote keyboard and mouse for your computer.
System requirements System requirements PC Smart device OS Windows 7 / Windows 8 / Windows® 8.1 / Windows® 10 Android 4.0 or higher versions iOS7 or later versions Utilities ASUS HomeCloud ASUS Media Streamer ® ® To use ASUS Media Streamer: On your computer, click ASUS HomeCloud then select Media Streamer from the mini bar. On your device, click or tap Media Streamer. You can use Push Notice to receive a media link. The link can be clicked and allows you to play the file directly.
Adding and deleting media files Drag and drop or tick files to add or delete Click to add or create a new folder Click to add the selected files Click to delete selected files Click to proceed with the deletion or addition of files Click to cancel changes The following media formats are supported by Android and iOS devices: 46 • Android: .3gp, .mp4, .m4a, .aac, .ts, .flac, .mp3, .mid, .xmf, .mxmf, .rtttl, .rtx, .ota, .imy, .ogg, .mkv, .wav, .jpg, .gif, .png, .bmp, .webp, .
Push Notice This utility allows you get the detailed status of your system to your smart device. You can also send messages to your smart device using this utility. Before using this utility, ensure that you pair your computer with your smart device. For pairing information, refer to section Pairing your computer and smart device. Launching Push Notice on your computer To launch Push Notice, click Notice.
Setting up PC Mode alerts of your computer This feature allows you to restart, shut down, or put your computer to sleep mode and sends an alert to your smart device.
Sending messages to your smart device This feature allows you to send messages to your smart device. You can also send messages via the Push Notice messaging shortcut on the lower-right then select . corner of your screen. To do this, Click << then Click Tick to select the smart device Click to send your message Click to key in your message Viewing your computer status on your smart device Tap on your smart device to launch Push Notice.
Key Express Key Express is a built-in microprocessor that provides instant upgrade to your keyboard. You can configure and assign macros to specific keys on your keyboard to perform specific or several task at the same time. 1. Connect the USB keyboard into the dedicated Key Express USB port. Refer to the I/O shield for more information about the location of the Key Express USB port. 2. Click on the left of the AI Suite 3 main menu, then select Key Express.
Function Keys Drag and drop the icons onto F1 to F10 Set the power-on button to a hotkey to use it to wake up your PC when Key Express is installed. Shortcut Select a folder or a program to launch • Key Express is designed for standard keyboards. We recommend not to use keyboards which have its own software or hub for better compatibility. • When Key Express is enabled, you can only activate your PC by using the hotkeys in S5 mode.
ASUS Disk Unlocker This ASUS exclusive utility provides an easy-to-use interface to identify and utilize all drive space in hard disk drives (HDD). ASUS Disk Unlocker is supported only on Windows® 7 and Windows® 8. To launch ASUS Disk Unlocker, click .
ASUS Boot Setting ASUS Boot Setting utility allows you to quickly enter the BIOS setup with a click of the DirectBIOS button. It also allows you to select the system bootup process using Normal Boot or Fast Boot. To fully support ASUS Boot Setting on your motherboard, download the latest BIOS from ASUS Support site at http://www.asus.com and update the BIOS to your system.
Using Advanced setup Advanced setup allows you to set the bootup process of your system. There are two settings to boot up your system: Fast Boot and Next boot after AC power loss. Enabling or disabling Fast Boot This setting allows you to quickly boot your system. This setting will take effect after shutting down or restarting your system normally. To enable or disable Fast Boot: 1. Click Advanced Setup to show the boot setup settings. 2. In Fast Boot, click Enabled.