Xonar U7 7.
E8349 First Edition August 2013 Copyright © 2013 ASUSTeK COMPUTER INC. All Rights Reserved. No part of this manual, including the products and software described in it, may be reproduced, transmitted, transcribed, stored in a retrieval system, or translated into any language in any form or by any means, except documentation kept by the purchaser for backup purposes, without the express written permission of ASUSTeK COMPUTER INC. (“ASUS”).
Contents Introduction...................................................................................... 4 1.1 Package contents .............................................................. 4 1.3 General Specification.......................................................... 5 1.2 2. 3. 4. 5. System requirements.......................................................... 4 Hardware overview.......................................................................... 7 Driver Installation.............
English 1. Introduction 1.1 Package contents Check your ASUS Xonar™ U7 audio card package for the following items: • ASUS XonarTM U7 7.1-Channel USB Audio Card • Driver CD • Quick Start Guide • • 1.2 S/PDIF TOSLINK optical adapter x 1 USB Cable x 1 System requirements To ensure a successful installation of the Xonar U7 audio card, make sure that your computer meets the following requirements: • USB port 2.0 and above • Intel® Pentium® 4 1.
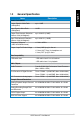
General Specification Items English 1.3 Description Audio Performance Output Signal-to-Noise Ratio (A-Weighted) up to 114dB Input Signal-to-Noise Ratio (A-Weighted) 110dB Output Total Harmonic Distortion + Noise at 1kHz (A-Weighted) up to 0.0006% (104dB) Input Total Harmonic Distortion + Noise at 1kHz (A-Weighted) up to 0.0001% (-100dB) Frequency Response (-3dB, 24-bit/96kHz format) < 10Hz to 46KHz Output / Input Full-Scale Voltage 1 Vrms (2.828 Vp-p) for line out 1.3 Vrms (3.
English Items Description I/O Ports Analog Output Jack RCA (phone) jack * 2 (Front left / Front right) 3.50mm mini jack * 3 for surround (Side/Center-Subwoofer/Rear-out) 3.50mm mini jack * 1 (Headphone out) Analog Input Jack 3.
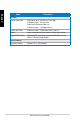
1 Hardware overview Xonar U7 Audio Card Top view 1 2 3 4 5 Rear6view 7 8 9 Bottom view 10 11 12 13 1 22 11 2 33 1 2 3 4 2 4 1 2 3 5 3 4 5 1 1 2 3 6 44 5 6 1 2 2 3 4 7 55 6 7 3 1 2 3 4 5 8 66 7 8 2 3 4 4 5 6 7 8 99 7 3 4 5 10 5 6 7 8 9 10 8 5 6 11 4 6 7 8 99 10 11 7 12 5 6 7 8 9 10 10 11 12 6 8 7 9 810 11 12 13 11 13 9 7 9 8 10 11 12 12 13 10 9 810 11 12 13 13 91110 11 12 13 101211 12 13 11 12 13 13 12 13 13 ASUS Xonar U7 User Manual 2 3 English 2.
No. English 1. 2. Items Description Headphone Out port Connect your headphone to this port. Microphone In port Connect your external PC microphone to this 3.5mm port for voice input. Line In port Connect analog devices like MP3 players, CD players, music synthesizers, and other line-level sound sources to this 3.5mm port for audio recording or processing. 3. Microphone Volume Control Press to increase or decrease microphone volume. 4.
Driver Installation 3.1 Installing the Xonar U7 Audio Card driver English 3. After installing the Xonar U7 audio card on your computer, you need to install the device driver that enables the Xonar U7 audio card to work with Windows® operating system. • The driver is required only when you connect the Xonar U7 to a PC or notebook. • The version and contents of the support CD are subject to change without notice. To install the device driver: 1.
English 3.2 Uninstalling or reinstalling the Xonar U7 Audio Card driver 3.2.1 Uninstalling the Xonar U7 Card Driver To uninstall the Xonar U7 card driver: 1. Click Start > Settings > Control Panel. 2. Double click the Add/Remove Programs icon. 3. Click the Change or Remove Programs button. 4. Select the program that you want to remove and then click Add/Remove (or Change/Remove) button. 5. In the InstallShield Wizard dialog box, select Remove. 6. Restart your computer when prompted. 3.2.
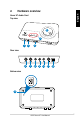
Connecting Speakers and Peripherals 4.1 Input connection 4.1.1 Connecting to a USB 2.0 port on your computer English 4. OR PC NB 1 USB 2 3 No. 1. Items USB Port Description 4 Connects to your computer using a USB Type B-A lead.
English 4.1.2 Connecting a digital audio system AVR S/PDIF 1 2 3 4 No. Items 1. S/PDIF Output port Description Connect an AVR to this S/PDIF output port.
English 4.1.3 Connecting a microphone / Line-In CD Player OR MP3 Player 1 2 HP Out Mic In/Line In 3 4 No. 1. 5 Items Description Microphone In / Line-In port Connect the microphone’s 3.5mm plug into this Mic in port for voice communication, recording or karaoke. 7 Connect the 3.5mm plug of the CD/MP3 Player or any other Line level analog audio sources into this Line-In port for sound recording.
English 4.2 Output connection 4.2.1 Connecting Stereo Headphones 1 HP Out Mic In/Line In 2 3 4 5 No. 1. Items6 Headphone Out Port 7 Description The Headphone Out port has a built-in high-quality amplifier to drive headphones. Connect your stereo headphones directly to this port.
Connecting 5.1 channel headphones English 4.2.2 1 1 2 No. 1. 2. 3. 4. 1 2 3 1 2 3 4 2 3 4 5 3 4 5 6 4 5 6 7 5 6 7 8 6 7 8 9 9 10Description 8 7 Front (R) Out port Connects to the front right input plug of a 5.1 channel pair of headphones. 9 10 11 8 Connects Front (L) Out port to the front left input plug of a 5.1 channel pair of headphones. 12 10 to the11Center/Bass-channel Center/Subwoofer 3.5mm plug of a 9 Connects Items Out port 5.1 channel pair of headphones.
English 4.2.3 Connecting analog speaker systems Connecting 2 channel speakers 1 1 2 2 3 3 4 4 5 No. Items 5 6 6 7 Description 1. Front (R) Out port Connects to the front right input port of 2 channel 2. Front (L) Out port Connects to the front left input port of 2 channel speakers using the RCA cable. 8 using the RCA cable.
English Connecting 4 channel speakers / power amplifier OR 1 No. 1 2 1 2 3 2 3 4 3 4 5 4 5 6 5 6 7 6 7 8 Items 1. 7 8 Front (R) Out port 2. Front (L) Out port 3. Rear Surround Out port 8 9 9 10 9 Amplifier Description Connects to the front right input port of 4 channel speakers. 10 Connects to the front left input port of 4 channel speakers. 11 Connects to the rear surround input port of 4 channel speakers.
English Connecting 5.1 channel speakers 1 1 2 No. 18 Items 1 2 3 1 2 3 4 2 3 4 5 3 4 5 6 4 5 6 7 5 6 7 8 6 7 8 9 9 10 Description 1. Front (R) Out port Connects to the front right input port of 5.1 channel speakers. 2. Front (L) Out port Connects to the front left input port of 5.1 channel 9speakers. 10 11 3. Center/Subwoofer Out port Connects to the Center and Subwoofer input ports of 5.1 channel speakers. 4. Rear Surround Out port speakers.
English Connecting 7.1 channel speakers 1 1 2 1 2 3 1 2 3 4 1 2 3 4 5 2 3 4 5 6 3 4 5 6 7 No. 1. 2. 3. 4. 5. 4 5 6 7 8 9 5 6 7 8 9 10 Items 7 8 Description 6 Front (R) Out port Connects to the front right input port of 7.1 channel 10 11 8 9speakers. 7 Front (L) Out port Connects to the front left input port of 7.1 channel speakers. 11 12 8 9Out 10Connects to the Left surround and Right surround input Side Surround port ports of 7.1 channel speakers.
English 5. Software Utilities 5.1 Sonic Studio overview Sonic Studio Pro comes with advanced sound algorithms and virtual surround effects to enhance your gaming and entertainment experience. For more details about using Sonic Studio Pro please refer to the Sonic Studio Pro and Sonic Radar manual.
English 5.2 Sonic Radar overview Sonic Radar is a visualization overlay of audio elements that can be easily selected, combined and re-focused for gaming. This helps gamers to visually see threats which are heard but are not immediately visible. Gamers can also customize the appropriate level of sensitivity and graphics settings to meet his/her needs for different gaming scenarios. For more details about using Sonic Radar please refer to the Sonic Studio Pro and Sonic Radar manual.
5.3 English Dolby® Home Theater v4 (Windows® 7 and later OS only) Dolby® Home Theater v4 delivers the ultimate surround sound experience to PCs. This comprehensive set of tools uses the latest audio technology to provide consumers with high fidelity audio. Consumers can create EQ profiles to achieve exceptional sound quality. 5.3.1 Launching Dolby® Home Theater v4 5.3.2 Dolby® Home Theater v4 interface On the Advanced Plug-ins area, click Dolby HTV4.
1. Troubleshooting I cannot install the audio card driver in my PC. • • • • • • 2. English 6. Ensure that you have switched the USB sound card to USB Audio 2.0 and plugged it to the USB port. Make sure that the LEDs light up. Ensure that you have the latest driver version. Check that the Windows hardware Device Manager has detected the device. Restart your computer. Try to plug the device into another USB port. I cannot find the Sonic Studio Pro application.
English 3. I can’t hear any sound from my analog speakers • • • • • • 4. Ensure that the device master volume or the software player has not been muted in Sonic Studio Pro. Ensure that the output LED indicator matches the output source configured in the device. Check if you are using the Dolby Digital Live encoder through the S/PDIF output. Analog output is muted to get rid of the interference between your digital speaker system and analog speakers or headphones.