
User Guide

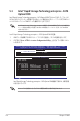


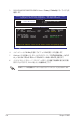

Table Of Contents
- ご注意
- Chapter 1: 製品の概要
- Chapter 2: ハードウェア
- Chapter 3: 電源のオン/オフ
- Chapter 4: BIOS
- 4.1 BIOSの管理と更新
- 4.2 BIOSセットアップユーティリティ
- 4.3 Main
- 4.4 AiTweaker
- 4.5 Advanced
- 4.5.1 ACPI Settings
- 4.5.2 SMART Settings
- 4.5.3 NCT6779D Super IO Configuration
- 4.5.4 Onboard LAN I210 Configuration
- 4.5.5 Serial Port Console Redirection
- 4.5.6 APM
- 4.5.7 Advanced Power Management Configuration
- 4.5.8 PCI Subsystem Settings
- 4.5.9 Network Stack Configuration
- 4.5.10 CSM Configuration
- 4.5.11 Trusted Computing
- 4.5.12 USB Configuration
- 4.5.13 ASMedia Storage Controller
- 4.6 IntelRCSetup
- 4.7 Server Mgmt
- 4.8 Event Logs
- 4.9 Monitor
- 4.10 Security
- 4.11 Boot
- 4.12 Tool
- 4.13 Exit
- Chapter 5: RAID
- Chapter 6: インストール
- Chapter7: 付録

5-30
Chapter 5: RAID
3. DISK/VOLUME INFORMATIONのRAID Volumes 「Status」が「 Rebuild」になっていることを
確認します。
4. メインメニューより「4.Exit」を選択してオプションROMを閉じ、OSを起動します。
5. Windows® OS が起動したら、スタートボタンをクリックし、「すべてのプログラム」→「 インテ
ル」→「 インテル ®ラピッド・ストレージ・テクノロジー・エンタープライズ」を開きます。
6. インテル® ラピッド・ストレージ・テクノロジーのステータス画面で再構築の進行状況を確
認することができます。100%に達したら、再構築は完了です。
[ESC]-Exit [ENTER]-Select Menu[ ]-Select
Intel(R) Rapid Storage Technology enterprise - SATA Option ROM - 3.6.0.1023
Copyright(C) 2003-12 Intel Corporation. All Rights Reserved.
[ MAIN MENU ]
[ DISK/VOLUME INFORMATION]
RAID Volumes: *=Data is Encrypted
ID Name Level1 Strip Size Status Bootable
1 Volume0 RAID1(Mirror) N/A 149.0GB Rebuild Yes
Physical Devices:
Port Drive Model Serial # Size Type/Status(Vol ID)
1 ST3160812AS 9LS0F4HL 149.0GB Member Disk(0)
2 ST3160812AS 3LS0JYL8 149.0GB Member Disk(0)
Volumes with “Rebuild” status will be rebuilt within the operating system.
3. Reset Disks to Non-RAID
4. Exit
1. Create RAID Volume
2. Delete RAID Volume
RAIDボリュームの再構築中はディスクにできるだけアクセスしないことをおすすめします。