ZC554KL Gebruikershandleiding
DU13624 November 2017 Tweede editie Zorg en veiligheid Richtlijnen Veiligheid op de weg is topprioriteit. Wij raden u sterk af het apparaat te gebruiken tijdens het besturen of het bedienen van enig type voertuig. Dit apparaat mag alleen worden gebruikt in omgevingen met een omgevingstemperatuur tussen 0°C (32°F) en 35°C (95°F). Schakel het apparaat uit in begrensde gebieden waar het gebruik van mobiele apparaten verboden is.
Goede verwijdering Ontploffingsgevaar als de batterij wordt vervangen door een onjuist type. Gooi lege batterijen weg in overeenstemming met de instructies. Gooi de ASUS Phone NIET bij het huishoudelijk afval. Dit product is ontworpen om een correct hergebruik van onderdelen en recycling mogelijk te maken. Het symbool met de doorgekruiste vuilnisbak geef aan dat het artikel (elektrisch, elektronische apparatuur en knoopbatterijen welke kwik bevatten) niet bij het gemeentelijk afval mogen worden afgeleverd.
Inhoudsopgave 1 Basisprincipes Welkom!..................................................................................................................................................... 7 Uw ASUS Phone gebruiksklaar maken!.......................................................................................... 8 Een nano SIM-kaart installeren.......................................................................................................... 9 Een nano SIM-kaart verwijderen.........................
De cloud........................................................................................................................47 ASUS WebStorage................................................................................................................................47 Veelgestelde vragen ZenUI.........................................................................................48 4 Contact houden Bel in stijl.......................................................................................
Bluetooth®....................................................................................................................74 Bluetooth® inschakelen......................................................................................................................74 Uw ASUS Phone koppelen met een Bluetooth®-apparaat....................................................75 Het koppelen van uw ASUS Phone met een Bluetooth®-apparaat opheffen................75 Tethering........................................
1 Basisprincipes Basisprincipes 1 Welkom! Verken de intuïtieve eenvoud van ASUS Zen UI. ASUS Zen UI is een charmante en intuïtieve interface, exclusief ontworpen voor ASUS Phones. U kunt gebruikmaken van speciale apps die in of bij andere apps zijn geïntegreerd zodat ze voldoen aan uw unieke persoonlijke behoeften en ze uw leven vergemakkelijken terwijl u plezier beleeft aan het gebruik van uw ASUS Phone.
Uw ASUS Phone gebruiksklaar maken! Onderdelen en functies Leer uw apparaat kennen en maak het in een handomdraai gebruiksklaar.
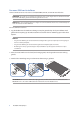
Een nano SIM-kaart installeren De Nano SIM-kaartsleuven ondersteunen de GSM, WCDMA, FDD-LTE, en TDD-LTE-netwerkbanden. OPMERKING: om schade aan de aansluiting te voorkomen, moet u ervoor zorgen dat u een standaard nano SIMkaart zonder SIM-adapter gebruikt of zonder het gebruik van een mes. OPGELET! Wees extra voorzichtig wanneer u omgaat met een Nano SIM-kaart. ASUS is niet verantwoordelijk voor verlies of schade aan uw Nano SIM-kaart. Een nano SIM-kaart installeren: 1.
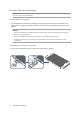
Een nano SIM-kaart verwijderen OPGELET! Wees extra voorzichtig wanneer u omgaat met een Nano SIM-kaart. ASUS is niet verantwoordelijk voor verlies of schade aan uw Nano SIM-kaart. Een nano SIM-kaart verwijderen: 1. Leg de telefoon met de voorkant omhoog en stop het gereedschap dat bij uw telefoon werd geleverd in de opening op de SIM-/microSD-kaartsleuf en duw er voorzichtig op om de lade te openen.
Een geheugenkaart installeren Uw ASUS Phone ondersteunt een microSD™- en microSDXC™-geheugenkaart met een capaciteit tot 256GB. OPMERKING: • Sommige geheugenkaarten zijn mogelijk niet compatibel met uw ASUS Phone. Zorg dat u alleen compatibele geheugenkaarten gebruikt om gegevensverlies, schade aan uw apparaat of geheugenkaart, of beide te voorkomen. • De microSD-kaart is afzonderlijk verkrijgbaar. OPGELET! Wees extra voorzichtig wanneer u omgaat met een geheugenkaart.
Een geheugenkaart verwijderen OPMERKING: • Sommige geheugenkaarten zijn mogelijk niet compatibel met uw ASUS Phone. Zorg dat u alleen compatibele geheugenkaarten gebruikt om gegevensverlies, schade aan uw apparaat of geheugenkaart, of beide te voorkomen. • Werp de geheugenkaart op de juiste wijze uit het apparaat. Om de geheugenkaart uit te werpen, tikt u op > Settings (Instellingen) > Storage (Opslag) en klikt u onder Portable storage (Draagbare opslag) op naast SD card (SD-kaart).
Uw ASUS Phone opladen Uw ASUS Phone is bij de levering gedeeltelijk opgeladen. Laad het apparaat volledig op voordat u het voor de eerste keer gebruikt. Lees de volgende belangrijke opmerkingen en waarschuwingen voordat u uw apparaat oplaadt. BELANGRIJK! • Voor veiligheidsdoeleinden mag u ALLEEN de meegeleverde voedingsadapter en -kabel gebruiken om schade aan uw apparaat te voorkomen en het risico op letsels te voorkomen.
BELANGRIJK! • Wanneer u de ASUS Phone gebruikt terwijl deze is aangesloten op een stopcontact, moet het geaarde stopcontact zich in de buurt van het toestel bevinden en gemakkelijk toegankelijk zijn. • Wanneer u uw ASUS Phone oplaadt via de computer, moet u ervoor zorgen dat u de micro-USBkabel aansluit op de USB 2.0 / USB 3.0- poort van de computer. • Vermijd het opladen van de ASUS Phone in een omgeving waar de temperatuur hoger is dan 35°C.
Uw ASUS Phone in- of uitschakelen Uw apparaat inschakelen Om uw apparaat in te schakelen, houdt u de voedingsknop ingedrukt tot het apparaat trilt en opstart. Uw apparaat uitschakelen Uw apparaat uitschakelen: 1. Als uw scherm is uitgeschakeld, drukt u op de voedingsknop om het apparaat uit te schakelen. Als uw scherm is vergrendeld, moet u het apparaatscherm ontgrendelen. 2. Houd de voedingsknop ingedrukt, tik op Power off (Uitschakelen) wanneer u dat wordt gevraagd en tik dan op OK.
Eerste gebruik Wanneer u de ASUS Phone voor de eerste keer inschakelt, zal de Installatiewizard u begeleiden door het installatieproces. Volg de instructies op het scherm om uw taal te selecteren, de invoermethoden te selecteren, uw mobiele netwerk en wifi in te stellen, accounts te synchroniseren en uw locatieservices te configureren. Gebruik uw Google- of ASUS-account om uw apparaat in te stellen. Als u nog geen Google- of ASUS-account hebt, kunt u er nu een maken.
Tips voor het sparen van batterijvermogen De batterijlading is de levenslijn van uw ASUS Phone. Hier zijn enkele tips waarmee u het batterijvermogen van uw ASUS Phone kunt sparen. – Sluit alle geopende apps die niet in gebruik zijn. – Als u het apparaat niet gebruikt, drukt u op de voedingsknop om het apparaat in de slaapstand te zetten. 17 – Verlaag de helderheid van het scherm. – Houd het luidsprekervolume op een laag niveau. – Schakel de wifi-functie uit. – Schakel de Bluetooth-functie uit.
Het aanraakscherm gebruiken Gebruik deze gebaren op het aanraakscherm voor het starten van apps, openen van enkele instellingen en navigeren door uw ASUS Phone. Apps starten of items selecteren Voer een van de volgende bewerkingen uit: • Voor het starten van een app tikt u er gewoon op. • Voor het selecteren van een item, zoals in de app Bestandsbeheer, tikt u er gewoon op.
Door pagina’s of schermen lopen Voer een van de volgende bewerkingen uit: • Veeg met uw vinger naar links of rechts om over te schakelen tussen schermen of om door een Galerie met afbeeldingen te bladeren. • Scroll met uw vinger omhoog of omlaag door webpages of lijst met items. Inzoomen Spreid uw twee vingers open op het aanraakscherm om in te zoomen op een afbeelding in Gallery (Galerie) of Maps (Kaarten) of om in te zoomen op een webpagina.
Uitzoomen Breng uw twee vingers samen op het aanraakscherm om uit te zoomen op een afbeelding in Gallery (Galerie) of Maps (Kaarten) of om uit te zoomen op een webpagina. OPMERKING: het is mogelijk dat u niet kunt in- of uitzoomen op bepaald webpagina's omdat deze pagina's mogelijk specifiek zijn ontworpen om te passen op het scherm van uw mobiel apparaat.
2 Nergens is het zo goed als thuis Nergens is het zo goed als thuis 2 Zen beginschermfuncties Beginscherm Ontvang herinneringen aan belangrijke gebeurtenissen, app- en systeemupdates, weersvoorspellingen en tekstberichten van mensen die belangrijk zijn voor u, direct vanaf uw beginscherm.
Pictogrammen begrijpen Deze pictogrammen worden weergegeven in de statusbalk en begeleiden u bij de huidige status van uw ASUS Phone. Mobiel netwerk Toont de signaalsterkte van uw mobiel netwerk. 1 Nano SIM1-kaart Geeft aan dat een Nano-SIM-kaart in de Nano-SIM1-kaartsleuf is geplaatst. 2 Nano SIM2-kaart Geeft aan dat een Nano-SIM-kaart in de Nano-SIM2-kaartsleuf is geplaatst. OPMERKING: Als het SIM-kaartpictogram groen wordt weergegeven, betekent dit dat het is ingesteld als het voorkeursnetwerk.
Snelle instellingen Het meldingspaneel van Snelle instellingen biedt toegang met één tik tot enkele draadloze functies en instellingen van uw ASUS Phone. Al deze functies worden voorgesteld door een knop. Om het paneel Quick settings (Snelle instellingen) veegt u twee keer omlaag vanaf de bovenkant van uw scherm. OPMERKING: Een blauwe knop geeft aan dat de functie momenteel is ingeschakeld. Een grijze knop wijst op een uitgeschakelde functie.
Meldingen Via Meldingen ziet u de nieuwste uitgevoerde updates en systeemwijzigingen die zijn gemaakt op uw ASUS-telefoon. De meeste van deze wijzigingen hebben betrekking op gegevens en het systeem. Om het paneel Meldingen te starten, veegt u omlaag vanaf de bovenkant van uw scherm. Tik om Settings (Instellingen) te openen Tik hierop om alle weergegeven meldingen te verwijderen. T ik op de melding om de details ervan weer te geven.
Uw startscherm aanpassen Zet uw persoonlijke stempel op uw startscherm. Selecteer een aantrekkelijk ontwerp als achtergrond, voeg snelkoppelingen toe voor snelle toegang tot uw favoriete apps en voeg widgets toe voor een snel overzicht van belangrijke info. U kunt ook meer pagina’s toevoegen zodat u meer apps of widgets kunt toevoegen en snel kunt openen of controleren op uw beginscherm.
Uw app-snelkoppelingen groeperen in een map Maak mappen om uw app-snelkoppelingen te ordenen op uw startscherm. 1. Tik en sleep een app bovenop een andere app op je startscherm en een map verschijnt met een automatisch toegewezen naam. 2. Als u de mapnaam wilt wijzigen, tikt u op de map en tikt u op de mapnaam om een nieuwe naam aan deze map toe te wijzen. Achtergronden Plaats uw apps, pictogrammen en andere Zen-elementen op een aantrekkelijk ontworpen achtergrond.
Een geanimeerde achtergrond toepassen Een geanimeerde achtergrond toepassen: 1. Tik en houd een leeg gebied op uw beginscherm vast en selecteer Achtergronden. 2. Tik op Live Wallpaper (Live achtergrondafbeelding). 3. Selecteer een geanimeerde achtergrondafbeelding en tik dan op Set Wallpaper (Achtergrondafbeelding instellen). OPMERKING: U kunt uw achtergrondinstellingen ook configureren via Weergave > Achtergronda.
Snelkoppelingen toevoegen In de Easy Mode (Gemakkelijke modus) kunt u maximaal zesendertig (36) app-snelkoppelingen toevoegen aan het startscherm. 1. Veeg naar rechts op het startscherm en tik dan op . 2. Selecteer in het scherm All apps (Alle apps) de app die u wilt toevoegen aan de lijst. Snelkoppelingen verwijderen Doe het volgende: 1. Tik op . 2. Selecteer de app of apps die u wilt verwijderen uit de lijst en tik dan op Delete (Verwijderen).
Contacten toevoegen In de Easy Mode (Gemakkelijke modus) kunt u vaak gebruikte contacten toevoegen op het startscherm. 1. Veeg naar de linkerzijde van het startscherm en tik dan op . 2. Selecteer op het scherm Contacten het contact dat u wilt toevoegen aan de lijst. Contacten verwijderen Doe het volgende: 1. Veeg naar de linkerzijde van het startscherm en tik dan op Edit contacts (Contacten bewerken). 2.
Kindermodus De Kindermodus is een functie voor ouderlijk toezicht waarmee u het gebruik van de telefoon door uw kinderen kunt beperken. Hierbij horen ook apptoegang, beperkingen op de gebruikstijd en het blokkeren van binnenkomende oproepen. Kindermodus gebruiken De Kindermodus gebruiken: 1. Start het scherm Settings (Instellingen) met een van de volgende acties: •• Start Quick settings (Snelle instellingen) en tik dan op •• Tik op . > Settings (Instellingen). 2.
6. Configureer de binnenkomende oproepinstellingen en tik dan op Finish (Voltooien). 7. Tik op om meer instellingen voor de Kindermodus te configureren. 8. Tik op om de Kindermodus uit te schakelen.
De datum en tijd instellen De datum en tijd die op uw startscherm worden weergegeven, worden standaard automatisch gesynchroniseerd met de instellingen van uw mobiele provider. De datum- en tijdsinstellingen wijzigen: 1. Open het scherm Instellingen door één van de volgende bewerkingen uit te voeren: •• Start Snelle instellingen en tik dan op •• Tik op . > Instellingen. 2. Schuif omlaag in het scherm Instellingen en selecteer Datum en tijd. 3.
Scherm vergrendelen Het vergrendelingsscherm verschijnt standaard na het inschakelen van uw apparaat en bij het activeren uit de slaapstand. Vanaf het vergrendelingsscherm kunt u doorgaan naar het Android®systeem van uw apparaat door over uw aanraakscherm te vegen. Het vergrendelingsscherm van uw apparaat kan ook worden aangepast om de toegang tot uw mobiele gegevens en apps te regelen.
De knoppen voor snelle toegang aanpassen Uw vergrendelingsscherm bevat standaard snelle toegangsknoppen voor deze apps: Telefoon, Berichten en Chrome. Volg de onderstaande stappen om deze standaardinstellingen te wijzigen en deze knoppen aan te passen om andere apps op het vergrendelingsscherm te starten. 1. Start Snelle instellingen en tik op . 2. Schuif omlaag in het scherm Instellingen en selecteer Scherm vergrendelen. 3. Tik onder Display (Scherm) op Quick access (Sneltoegang). 4.
Fingerprint ID sensor (Sensor vingerafdruk-id) Fingerprint ID sensor (Sensor vingerafdruk-id) verhindert dat anderen uw ASUS phone gebruiken zonder uw toestemming. U kunt uw vingerafdruk gebruiken voor het ontgrendelen van uw apparaat, toegang tot uw telefoongesprekken en gegevens. Wanneer u uw vingerafdruk-id instelt, moet u ook de schermvergrendelingsmethode voor het opstarten van het apparaat instellen.
De vingerafdruk-id instellen vanaf Settings (Instellingen) Uw vingerafdruk-id instellen vanaf Settings (Instellingen): 1. Controleer of de vingerafdrukscanner en uw vinger schoon en droog zijn. 2. Start het scherm Settings (Instellingen) met een van de volgende acties: •• Start Quick settings (Snelle instellingen) en tik dan op •• Tik op . > Settings (Instellingen). 3. Scroll omlaag op het scherm Settings (Instellingen) en selecteer Fingerprint (Vingerafdruk) 4.
6. Selecteer hoe u uw meldingen wilt weergeven op het vergrendelingsscherm en tik dan op DONE (GEREED). 7. Tik op NEXT (VOLGENDE) en volg de instructies voor het registreren van uw vingerafdruk.
8. Wanneer u klaar bent, tikt u op Done (Gereed).
ZenUI-toetsenbord Met het ZenUI-toetsenbord geniet u van een snellere, vloeiendere en gemakkelijkere ervaring bij het typen met één hand. De grootte van uw ZenUI-toetsenbord wijzigen Maak het u gemakkelijk terwijl u de toetsenbordgrootte van uw voorkeur aanpast op het scherm. De grootte van uw ZenUI-toetsenbord wijzigen: 1. Tik in de werkbalk van het ZenUI-toetsenbord op aanpassen). > Resize keyboard (Grootte toetsenbord 2.
2. Tik op Select (Selecteren) en verplaats de cursor over de tekst met de navigatietoetsen om de gewenste inhoud te markeren. Tik dan op de toets Cut (Knippen), Copy (Kopiëren) of Paste (Plakken) om toe te passen. OPMERKING: U kunt de instellingen voor het ZenUI-toetsenbord ook aanpassen via > Settings (Instellingen)> Languages & input (Talen & invoer) > Virtual keyboard (Virtueel toetsenbord)> ZenUI keyboard (ZenUI toetsenbord)..
3 Werk hard, speel harder Werk hard, speel harder 3 Chrome Met Chrome voor Android` kunt u genieten van dezelfde snelle, veilige en stabiele ervaring bij het surfen op het net als bij de bureaubladversie van Chrome. Meld aan bij uw Google-account om tabbladen, bladwijzers en de zoekgeschiedenis te synchroniseren op al uw apparaten. Als u geen Google account hebt, registreert u er een. OPMERKING: voor details over het maken van een Google-account, zie Gmail.
Een pagina delen Deel interessante pagina’s vanaf u ASUS Phone met anderen via een e-mailaccount, cloudopslagaccount, Bluetooth of andere apps van de ASUS Phone. 1. Start de Chrome. 2. Tik vanaf een webpagina op > Share...(Delen...). 3. Tik op de account of app die u wilt gebruiken als medium bij het delen van de pagina. Bladwijzers toevoegen aan pagina’s Geef uw favoriete pagina’s of websites een bladwijzer zodat u kunt terugkeren en ze opnieuw kunt bezoeken.
Gmail Gebruik Gmail voor het instellen van uw Google-account om naar de met Google verwante diensten en apps te gaan en voor het ontvangen, verzenden en zoeken van e-mails, direct vanaf uw ASUS Phone. U kunt ook andere e-mailaccounts instellen, zoals Yahoo of uw e-mailaccount voor uw werk via Gmail. BELANGRIJK! Uw ASUS Phone moet verbonden zijn met een wifi- of mobiel netwerk zodat u een e-mailaccount kunt toevoegen of e-mails kunt verzenden en ontvangen van toegevoegde accounts.
Google Agenda Breng uw planning tot leven en houd al uw belangrijke gebeurtenissen of herinneringen bij. Gebeurtenissen die u maakt of bewerkt zullen automatisch synchroniseren met alle versies van Google Agenda waarop u hebt aangemeld. Gebeurtenissen maken Een gebeurtenis maken: 1. Tik vanaf het startscherm op Google > Calendar (Agenda). 2. Tik op en tik dan op Event (Gebeurtenis). 3. Voer de naam in van uw gebeurtenis en selecteer de datum en tijd voor de gebeurtenis.
Herinneringen maken Een herinnering maken: 1. Tik vanaf het startscherm op Google > Calendar (Agenda). 2. Tik op en tik dan op Reminder (Herinnering). 3. Voer de naam in van uw herinnering en tik op DONE (GEREED). 4. Stel de datum en tijd in voor de herinnering. U kunt de herinnering instellen als een herinnering voor een volledige dag of als een terugkerende gebeurtenis. • Herinnering voor gebeurtenis volledige dag: beweeg de schuifregelaar naar rechts in het veld All day (Hele dag).
Bestandsbeheer Via Bestandsbeheer kunt u uw gegevens gemakkelijk zoeken en beheren in het interne geheugen van uw ASUS Phone en aangesloten externe opslagapparaten. Om File Manager (Bestandsbeheer) te starten, tikt u op > File Manager (Bestandsbeheer).
De cloud Maak een back-up van uw gegevens, synchroniseer bestanden tussen verschillende apparaten en deel bestanden veilig en persoonlijke via een cloud-account, zoals ASUS WebStorage, Drive, OneDrive en Dropbox. ASUS WebStorage Registreer of meld u aan bij ASUS WebStorage en ontvang gratis cloud-opslagruimte. Upload automatisch nieuw gemaakte foto’s om ze onmiddellijk te delen, synchroniseer bestanden tussen verschillende apparaten of deel bestanden via uw ASUS WebStorage-account.
Veelgestelde vragen ZenUI Zoek antwoorden in FAQ’s (veelgestelde vragen) of werk direct samen met andere Zen UIgebruikers om oplossingen over ZenUI-apps te zoeken en te delen. Om ZenUI FAQs (Veelgestelde vragen ZenUI) te openen: 1. Tik op > ASUS > ZenUI FAQs (Veelgestelde vragen ZenUI). 2. Tik op ZenUI FAQs (Veelgestelde vragen ZenUI), en selecteer dan de app waarvoor u antwoorden wilt vinden.
4 Contact houden Contact houden 4 Bel in stijl Dubbele SIM-functie De dubbele SIM-functie van uw ASUS Phone biedt u de mogelijkheid instellingen van de geïnstalleerde Nano SIM-kaarten te beheren. Met deze functie kunt u de Nano SIM-kaarten in- en uitschakelen, SIM-namen toewijzen of één ervan instellen als voorkeursnetwerk. De namen van uw Nano SIM-kaarten hernoemen Wijzig de namen van uw Nano SIM-kaarten op uw ASUS Phone zodat u ze gemakkelijk kunt identificeren.
Een SIM-kaart van uw voorkeur toewijzen Wijs een SIM-kaart toe als uw verkozen SIM voor spraakoproepen, SMS-berichten en dataservices. SIM-kaart voor spraakoproepen Wanneer u een nummer kiest, gebruikt uw ASUS Phone automatisch de SIM-kaart van uw voorkeur om de verbinding voor het gesprek tot stand te brengen. Om een SIM-kaart voor spraakoproepen toe te wijzen, tikt u op Spraakoproep en tikt u op de SIM die u wilt gebruiken.
Bellen Uw ASUS Phone biedt u talrijke manieren om een gesprek te voeren. Bel uw vrienden van uw contactenlijst, gebruik slim kiezen om snel een nummer te bellen of voer een snelkeuzetoets in om een vaak gebeld contact te bellen. OPMERKING: Orden uw contacten in de app Personen. Zie Contactpersonen beheren voor details. De app Telefoon starten Voer één van de volgende bewerkingen uit vanaf uw startscherm om de app Telefoon te starten: • Tik op • Tik op . > Telefoon.
Automatisch een toestelnummer kiezen U kunt een korte of lange pauze invoegen na het kiezen van het hoofdnummer. Daarna wordt het toestelnummer automatisch gekozen. 1. Voer het hoofdnummer in vanaf de app Telefoon. 2. Om een pauze in te voegen, tikt en houdt u * vast tot een komma (,) verschijnt. 3. Voer het toestelnummer in. 4. Selecteer de beltoets SIM1 of SIM2 om het nummer te kiezen. 5. Tik om het gesprek te beëindigen.
Uw favoriete contacten bellen Als u een contact toevoegt aan uw Favorietenlijst, kunt u snel dit contact bellen vanaf de app Telefoon. 1. Start de app Personen of Telefoon. 2. Tik op > Favorites (Favorieten) om uw Favorietenlijst weer te geven en tik dan op uw favoriet contact dat u wilt bellen. 3. Tik om het gesprek te beëindigen. Oproepen ontvangen Het aanraakscherm van uw ASUS Phone licht op wanneer er een oproep binnenkomt.
Uw laatst gekozen nummer opnieuw bellen Om uw laatst gekozen nummer opnieuw te bellen: 1. Tik vanaf de app Telefoon op om uw gesprekslogboeken weer te geven. 2. Tik op BELLEN om uw laatst gekozen nummer weer te geven en tik dan opnieuw op BELLEN om het nummer opnieuw te kiezen. 3. Tik om het gesprek te beëindigen. Overige belopties Druk tijdens een actief gesprek op en tik vervolgens op één van de mogelijke belopties die beschikbaar zijn wanneer een gesprek bezig is.
Meerdere oproepen beheren Uw ASUS Phone biedt u het gemak om twee gesprekken te voeren of aan te nemen. U kunt ook een vergaderingsgesprek instellen voor uw bedrijfsvergaderingen, partylijnen en andere groepsgesprekken. Een andere oproep beantwoorden Terwijl u praat via uw ASUS Phone, hoort u een pieptoon die aangeeft dat er een andere oproep binnenkomt. Tik op het aanraakscherm op Answer (Antwoorden) om een binnenkomende oproep te ontvangen terwijl u een actief gesprek voert.
Contactpersonen beheren Organiseer uw contacten en blijf gemakkelijk in contact met hen via gesprekken, sms-berichten, e-mails of sociale netwerken. Groepeer uw contacten als Favorieten om snel in contact te komen met hen, of groepeer ze als VIP’s om op de hoogte te worden gebracht van komende gebeurtenissen, gemiste oproepen of ongelezen berichten.
Contactpersonen toevoegen Voeg contacten toe aan uw apparaat-, bedrijfs-, Google- of andere e-mailaccounts en vul meer belangrijke contactgegevens in, zoals nummers van contacten, e-mailadressen, speciale gebeurtenissen voor VIP’s en meer. 1. Start de app Personen en tik dan op . 2. Selecteer Apparaat. OPMERKINGEN: • U kunt het contact ook opslaan op uw SIM-kaart of een e-mailaccount. • Als u geen e-mailaccount hebt, tikt u op Nieuw account toevoegen en maakt u een nieuwe account. 3.
Het profiel van uw contact aanpassen Bewerk de gegevens van uw contact, voeg een foto toe, stel een beltoon in of maak een foto als voorblad voor het profiel van uw contact. 1. Start de app Personen en selecteer dan het contact van wie u het profiel wilt bewerken of aanpassen. 2. Breng de wijzigingen aan vanaf de profielpagina van uw contact.
Uw VIP instellen vanaf het VIP-scherm Om uw VIP instellen vanaf het VIP-scherm: 1. Start de app Personen. 2. Tik op > VIP. 3. Tik in het VIP-scherm op . 4. Selecteer de contacten die u wilt groeperen als VIP’s en tik dan op toegevoegd aan uw VIP-lijst. . De contacten worden Een gebeurtenis toevoegen aan een VIP-contact U kunt een gebeurtenis toevoegen aan een VIP-contact, zoals een jubileum, een verjaardag en andere belangrijke gebeurtenissen. 1.
Uw favoriete contacten markeren Stel uw vaak gebelde contacten in als uw favorieten zodat u ze snel kunt bellen vanaf de Phoneapp (Telefoon). 1. Tik vanaf het startscherm op > Contacts (Contacten). 2. Selecteer het contact dat u als favoriet wilt markeren. 3. Tik op . Het contact wordt toegevoegd aan uw lijst van favorieten in de Phone-app. OPMERKINGEN: • Om uw Favorietenlijst weer te geven, tikt u op Favorites (Favorieten).
Contactpersonen exporteren Exporteer uw contactpersonen naar elk van de opslagaccounts in uw ASUS Phone. 1. Tik op > Personen en tik dan op > Contactpersonen beheren. 2. Tik op Importeren/exporteren en maak vervolgens een selectie uit de volgende exportopties: a. Exporteer naar SIM 1-kaart/Exporteer naar SIM 2-kaart b. Exporteren naar opslag 3. Tik om de contactpersonen van de volgende accounts te selecteren: a. Alle contactpersonen b. Apparaat c. SIM1/SIM2 4.
De blokkering van contacten of nummers opheffen U kunt een geblokkeerd contact of nummer verwijderen uit uw lijst en gesprekken of berichten van het contact of nummer opnieuw ontvangen. 1. Tik op > Personen en tik dan op > Contactpersonen beheren > Geblokkeerde lijst. 2. Tik op de contactpersoon of het nummer dat u wilt deblokkeren en tik dan op Remove from block list (Verwijderen uit blokkeerlijst).
Berichten versturen en meer Google Messenger Met Google Messenger, een gebruiksvriendelijke en schitterende app, kunt u SMS-/MMS-berichten verzenden/ontvangen en groepsteksten, foto’s of audioberichten verzenden. U kunt ook emoticons of stickers toevoegen aan uw berichten, uw locatie delen, uw berichten activeren en gemakkelijk SMS-afzenders blokkeren. Het is ook mogelijk foto’s te maken of video’s op te nemen en deze bestanden vervolgens gemakkelijk te delen. Berichten verzenden 1.
5 Plezier en amusement Plezier en amusement 5 De headset gebruiken Wanneer u een headset gebruikt, kunt u genieten van de vrijheid om andere dingen te doen terwijl u een gesprek voert of uw favoriete muziek beluistert. Een audiostekker aansluiten Stop de 3,5 mm headsetaansluiting in de audiopoort van uw apparaat. WAARSCHUWING! • Stop geen andere objecten in de audio-aansluiting. • Stop geen kabel met elektrische stroomuitgang in de audiopoort.
Google Play Music Met Google Play Muziek kunt u uw favoriete muziek streamen, afspeellijsten maken of luisteren naar de radio. U kunt ook gratis tot 50.000 muziekbestanden opslaan in de cloud. U kunt zich ook abonneren op Google Play Muziek voor een onbeperkte en advertentievrije toegang tot miljoenen muziekbestanden die u kunt toevoegen aan uw eigen muziekbibliotheek. Google Play Muziek instellen Meld aan bij uw Google- of Gmail-account om Google Play Muziek te kunnen gebruiken.
6 Uw dierbare momenten Uw dierbare momenten 6 Momenten vastleggen De app Camera starten Maak foto’s en neem video’s op met de app Camera van de ASUS Phone. Raadpleeg de onderstaande stappen om de app Camera te openen. Vanaf het vergrendelingsscherm Sleep naar enige richting totdat de camera-app wordt gestart. Vanaf het beginscherm Tik op .
Beginscherm Camera De camera van uw ASUS Phone is uitgerust met een automatische scènedetectie en functie voor de automatische beeldstabilisatie. De camera beschikt ook over een videostabilisatiefunctie die helpt beverige beelden te voorkomen tijdens video-opname. Tik op de pictogrammen om te starten met het gebruik van uw camera en om de videofuncties van uw ASUS Phone.
Geavanceerde camerafuncties Verken nieuwe manieren voor het vastleggen van beelden of video’s en leg speciale momenten vast met behulp van de geavanceerde camerafuncties van uw ASUS Phone. BELANGRIJK! Pas eerst de instellingen toe voordat u opnamen maakt. De beschikbare functies kunnen verschillen afhankelijk van het model. Schoonheid Maak plezier tijdens en na het maken van foto’s van uw gezin en vrienden met de functie Beauty (Schoonheid) va uw ASUS-telefoon.
Panorama Leg beelden vanuit verschillende hoeken vast met Panorama. Beelden die zijn opgenomen vanuit een groothoekperspectief worden met deze functie automatisch samengevoegd tot één panoramafoto. Panoramafoto’s vastleggen 1. Tik vanaf het beginscherm van de app Camera op 2. Tik op > Panorama. en pan dan uw ASUS Phone naar links of rechts om het landschap vast te leggen.
De galerie gebruiken Bekijk foto’s en speel video’s af op uw ASUS Phone met de app Galerij. Met deze app kunt u ook foto- en videobestanden die in uw ASUS Phone zijn opgeslagen, bewerken, delen of verwijderen. Vanaf Galerij kunt u foto’s weergeven in een diavoorstelling of kunt u tikken om het geselecteerde foto- of videobestand weer te geven. > Galerie.
De fotolocatie bekijken Schakel de locatietoegang op uw ASUS Phone in en verkrijg de locatiegegevens op uw foto's. De locatiegegevens van uw foto bevatten het gebied waar de foto's zijn gemaakt, evenals een kaart van de locatie via Google Maps of Baidu (alleen in China). De gegevens van een foto weergeven: 1. Schakel de locatietoegang in via > Instellingen > Locatie. 2. Controleer of u uw locatie hebt gedeeld met Google Maps of Baidu. 3.
Bestanden van de galerie delen 1. Tik op het scherm Galerie op de map met de bestanden die u wilt delen.. 2. Tik na het openen van de map op om de bestandsselectie te activeren. 3. Tik op de bestanden die u wilt delen. Er verschijnt een vinkje bovenaan in het beeld dat u selecteert. 4. Tik op en selecteer in de lijst waar u de beelden wilt delen. Bestanden verwijderen uit de galerie. 1. Tik op het scherm Galerie op de map met de bestanden die u wilt verwijderen. 2.
7 Verbonden blijven 7 Verbonden blijven Mobiel netwerk Wanneer er geen beschikbaar wifi-netwerk is waarmee u verbinding kunt maken, kunt u de gegevenstoegang van uw mobiel netwerk inschakelen voor internetverbinding. Het mobiele netwerk inschakelen 1. Open het scherm Instellingen door één van de volgende bewerkingen uit te voeren: •• Start Snelle instellingen en tik dan op •• Tik op . > Instellingen. 2. Tik op Meer > Cellular networks (Mobiele netwerken). 3.
Een verbinding maken met een Wifi-netwerk 1. Tik op het scherm Instellingen op Wi-Fi om alle gedetecteerde wifi-netwerken weer te geven. 2. Tik op een netwerknaam om een verbinding te maken met dit netwerk. Voor een beveiligd netwerk kunt u worden gevraagd een wachtwoord of andere beveiligingsgegevens in te voeren. OPMERKINGEN: • Uw ASUS Phone maakt automatisch opnieuw verbinding met het netwerk waarmee u eerder verbonden was. • Schakel de wifi-functie uit om te helpen batterijvermogen te sparen.
Uw ASUS Phone koppelen met een Bluetooth®-apparaat Voordat u de Bluetooth-functies van uw ASUS Phone optimaal kunt gebruiken, moet u deze eerst koppelen met het Bluetooth-apparaat. De ASUS Phone slaat automatisch de koppelingsverbinding van het Bluetooth-apparaat op. 1. Tik op het scherm Instellingen op Bluetooth om alle beschikbare apparaten weer te geven.
Tethering Wanneer er geen wifi-service beschikbaar is, kunt u uw ASUS Phone gebruiken als modem of het instellen als een wifi-hotspot om internettoegang te krijgen op uw laptop, tablet en andere mobiele apparaten. BELANGRIJK! De meeste mobiele serviceproviders kunnen een data-abonnement vereisen voor het gebruik van de tetheringfunctie. Neem contact op met uw mobiele serviceprovider voor het kiezen van dit data-abonnement.
4. Ga naar het scherm Tethering & draagbare hotspot en schuif Portable Wi-Fi hotspot (Draagbare wifi-hotspot) naar ON (AAN). 5. Verbind andere apparaten met de hotspotverbinding van uw ASUS Phone op dezelfde manier als wanneer u verbindt met een wifi-netwerk. Bluetooth tethering Schakel Bluetooth in op uw ASUS Phone en gebruik het als een modem voor internettoegang op uw mobiele Bluetooth-apparaten, zoals een laptop of tablet. 1. Schakel Bluetooth in op uw ASUS Phone en op het andere apparaat. 2.
8 Reizen en kaarten Reizen en kaarten 8 Weer Ontvang weerupdates in real time, direct vanaf uw ASUS Phone met de weerapp. Met de app Weather kunt u ook andere weerdetails uit de hele wereld controleren. De app Weer starten Start de app Weer vanaf uw beginscherm met één van de volgende opties: •• Tik op > Weer. •• Tik vanaf het beginscherm van uw ASUS Phone op het weerpictogram.
Beginscherm Weer Stel de weerupdates voor uw huidige locatie en andere delen van de wereld in of haal ze op. Tik om weerinformatie voor een plaats te zoeken Tik om de huidige weerinformatie van het gebied op te halen, de weerinformatie bij te werken, de locatielijst te bewerken of de weersinstellingen te configureren. Veeg omhoog om andere weerinformatie te zien. Veeg naar links of rechts om weerinformatie van andere plaatsen in uw locatielijst te zien.
Klok Pas de tijdzone-instellingen van uw ASUS Phone aan, stel een alarm in en gebruik uw ASUS Phone als stopwatch met de app Klok. De klok starten Start de app Klok met een van de volgende opties: > Klok. • Tik op • Tik op het beginscherm van uw ASUS Phone op de digitale klokweergave. Wereldklok Tik op om de wereldklokinstellingen te openen vanaf uw ASUS Phone. Tik hierop om te schakelen tussen de weersvoorspellingen en de kaart van de wereldklok.
Wekker Tik op om de instellingen voor de wekker van uw ASUS Phone te openen. Tik hierop om een van de eerder ingestelde wektijden te verwijderen. Tik hierop om de instellingen voor de wekkerfunctie te openen. Tik hierop om een nieuwe alarmtijd in te stellen. Stopwatch Tik op om uw ASUS Phone te gebruiken als een stopwatch. Tik op deze knop om de stopwatchfunctie te starten.
Timer U kunt meerdere timeropties instellen voor uw ASUS Phone. Volg hiervoor de onderstaande stappen: De timer instellen 1. Tik op om de timerfunctie van uw ASUS Phone te openen. Tik hierop om de instellingen voor de timerfunctie te openen. Tik hierop om de vooraf ingestelde timer te verwijderen. Tik om de beltoon voor de timer in te stellen. Tik hierop om de vooraf ingestelde timer te bewerken. Tik op deze knop om de timer te starten.
9 Zen Overal 9 Zen Overal Speciale Zenhulpmiddelen Calculator U hebt slechts één veeg en één tik nodig om uw calculator te starten. Als u het paneel Snelle instellingen opent, is het Calculatorpictogram zichtbaar bovenaan in de lijst. Tik erop om te starten met uw berekeningen. Tik hierop om Calculator in te schakelen.
Calculatorscherm Geluids-recorder Neem audiobestanden op met uw ASUS Phone door de app Sound Recorder in te schakelen. Geluids-recorder starten Om de geluidsopname te starten, tikt u op > Geluids-recorder. Tik hierop om de instellingen voor Sound Recorder aan te passen. Tik hierop om de lijst weer te geven van opgeslagen audio-opnamebestanden. Tik hierop om de audio-opname te starten.
Een opname pauzeren Tijdens een gepauzeerde opname, kunt u kiezen om de opname te hervatten, te verwijderen of op te slaan. Tik om de opname te verwijderen Tik om de opname te hervatten Tik om de opname op te slaan Opnamelijst Vanaf de opnamelijst kunt u een opgeslagen audio-opnamebestand afspelen, hernoemen, delen of verwijderen. Om uw opnamelijst weer te geven, tikt u op vanaf het hoofdscherm van Geluids-recorder.
Mobile Manager Mobile Manager biedt een geïntegreerde interface voor meerdere apps die zijn ontworpen voor het optimaliseren van de apparaatprestaties, het beheer van telefoonvermogen, opslaggebruik en systeemmeldingen. Om de app ASUS Mobile Manager te starten, tikt u vanaf het startscherm op vervolgens op Mobile Manager.
PowerMaster Met een intelligente reeks energiebesparingstechnologieën, zorgt PowerMaster voor optimale prestaties van uw apparaat, krijgt u een geïntegreerde interface voor met stroom verwante optimalisatiefuncties en -instellingen en geniet u van uitgebreide bescherming voor uw systeem. Voer een van de volgende bewerkingen uit om PowerMaster te starten. > Settings (Instellingen)> Power Management (Energiebeheer)> PowerMaster. •• Tik vanaf het startscherm van uw ASUS-telefoon op PowerMaster.
10 Behoud uw Zen Behoud uw Zen 10 Uw apparaat up-to-date houden Houd uw ASUS Phone in de lus van Android-systeemupdates en bijgewerkte apps en functies. Uw systeem bijwerken 1. Tik op en tik vervolgens op Instellingen. 2. Schuif in het scherm Instellingen omlaag om andere items weer te geven en tik op Over. 3. Tik op Systeemupdate en tik vervolgens op Update controleren.
Uw ASUS Phone beveiligen Gebruik de beveiligingsfuncties van uw ASUS Phone om onbevoegde gesprekken of gegevenstoegang te voorkomen. Uw scherm ontgrendelen Wanneer het scherm is vergrendeld, kunt u het openen met de opties voor de beveiligingsontgrendeling van de ASUS Phone. 1. Tik op en tik vervolgens op Instellingen > Scherm vergrendelen. 2. Tik op Schermvergrendeling en selecteer vervolgens een optie voor het ontgrendelen van uw ASUS Phone.
PIN Voer minstens vier cijfers in om een pincode in te stellen. BELANGRIJK! Zorg dat u de pincode onthoudt die u hebt gemaakt voor het ontgrendelen van uw apparaat. Patroon Schuif uw vinger over de punten en maak een patroon. BELANGRIJK! U kunt een patroon maken met een minimum van vier punten. Zorg dat u het patroon onthoudt dat u hebt gemaakt voor het ontgrendelen van uw apparaat.
Wachtwoord Voer minstens vier tekens in om een wachtwoord te maken. BELANGRIJK! Zorg dat u het wachtwoord onthoudt dat u hebt gemaakt voor het ontgrendelen van uw apparaat. De andere schermbeveiligingsfuncties configureren Naast de schermvergrendelingsmodus, kunt u ook het volgende doen in het venster Schermbeveiliging: • Snelle toegang: Schuif de schakelaar Snelle toegang naar AAN om apps te starten op het vergrendelingsscherm.
Bijlagen Bijlagen Veiligheidsinformatie OPGELET! Gebruik van andere bedieningselementen, aanpassingen of procedures dan diegene die in deze handleiding zijn vermeld, kunnen blootstelling aan schadelijke straling tot gevolg hebben. Onderhoud ASUS Phone • Gebruik uw ASUS Phone-toestel in een omgeving met een omgevingstemperatuur tussen 0 °C (32 °F) en 35 °C (95 °F). De batterij WAARSCHUWING: Als u de batterij zelf demonteert, wordt de garantie ongeldig en kan er ernstige schade ontstaan.
• Raak de contacten van de batterij niet aan. • Om brand of brandwonden te voorkomen, mag u de batterij niet demonteren, plooien, pletten of doorprikken. OPMERKINGEN: • Explosiegevaar als de batterij wordt vervangen door een onjuist type. • Gooi de lege batterijen weg volgens de instructies. De lader • Gebruik alleen de lader die bij uw ASUS Phone-toestel is geleverd. Waarschuwingen Uw ASUS Phone is een toestel met een hoge kwaliteit.
Kennisgevingen Naleving Richtlijn voor Radioapparatuur van de EU Vereenvoudigde EU-verklaring van conformiteit ASUSTeK Computer Inc. verklaart hierbij de dat de radio-apparatuur [ASUS_X00ID] conform Richtlijn 2014/53/EU is. De volledige tekst van de EU-verklaring van conformiteit is beschikbaar op: https://www.asus.com/support (Zoek ZC554KL) Tabel RF-uitgangen Items Maximale radiofrequentie Tabel uitgangsvermogen Bluetooth RF (2402~2480 MHz) Bluetooth Bluetooth 4.0-LE (2402~2480 MHz) 2.4GHz 802.
Informatie RF-blootstelling Dit ASUS-product is getest en voldoet aan toepasselijke Europese SAR-limieten. De SAR-limiet is 2.0 W/kg in landen die de limiet instellen met een gemiddelde over 10 gram weefsel. De specifieke maximale SAR-waarden voor dit apparaat zijn de volgende: • Kop: 0.386 W/Kg • Toestel: 1.200 W/Kg Bij het meedragen van dit apparaat of het gebruiken bij het dragen op het lichaam, moet u een goedgekeurde accessoire gebruiken, zoals een holster, of anderszins een afstand van 0.
ASUS-services van recycling/terugbrengen ASUS-programma’s van recycling/terugbrengen komen voort uit onze inzet voor de hoogste normen met betrekking tot het beschermen van ons milieu. Wij geloven erin u oplossingen te bieden om onze producten, batterijen, andere componenten alsook het verpakkingsmateriaal verantwoordelijk te recyclen. Ga naar http://csr.asus.com/english/Takeback.htm voor gedetailleerde informatie over recycling in verschillende regio’s.