Eee PC User Manual Eee PC 1025C ASUS is devoted to creating environment-friendly products/ packagings to safeguard consumers’ health while minimizing the impact on the environment. In order to reduce the use of substances harmful to the environment, the Eee PC™ product package does not come with the Eee PC™ support DVD. The reduction of the number of the manual pages complies with the reduction of carbon emission.
Sound Pressure Warning Excessive sound pressure from earphones or headphones can cause hearing damage or loss. Adjustment of the volume control as well as the equalizer to settings other than the center position may increase the earphones or headphones output voltage and the sound pressure level. Transportation Precautions To prepare your Eee PC for transport, you should turn it OFF and disconnect all external peripherals to prevent damage to the connectors.
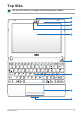
Top Side The top side may vary in appearance depending on models.
1 2 3 4 5 6 7 Camera Cover and Zooming Switch (on selected models) The camera cover switch allows you to open and close the protective camera cover. Slide the switch to the left to close the camera cover. Slide the switch to the middle to open the camera cover. Slide the switch to the right to zoom in or zoom out the camera view. Microphone (Built-in) Built-in Camera Camera Indicator The camera indicator shows when the built-in camera is in use.
Powered OFF / Standby mode With Adapter High battery power Green ON (95%–100%) Medium battery power Orange ON (11%–94%) Low battery power Orange Blinking (0%–10%) Without Adapter Off Off Off Hard Disk Drive (HDD) Indicator The hard disk drive indicator blinks when data is written to or read from the disk drive. Wireless Indicator This is only applicable on models with built-in wireless LAN. When the built-in wireless LAN is enabled, this indicator lights.
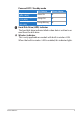
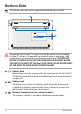
Bottom Side The bottom side may vary in appearance depending on model. 1 2 3 The bottom of the Eee PC can get very hot. Be careful when handling the Eee PC while it is in operation or recently been in operation. High temperatures are normal during charging or operation. DO NOT use on soft surfaces such as sofas or beds, which may block the vents. DO NOT PUT THE Eee PC ON YOUR LAP OR OTHER PARTS OF THE BODY TO AVOID INJURY FROM THE HEAT.
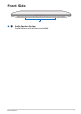
Front Side 1 1 Audio Speaker System Audio features are software controlled.
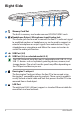
Right Side / 1 1 2 3 4 2 3 4 5 6 Memory Card Slot The built-in memory card reader can read SD/SDHC/MMC cards. / Headphone Output / Microphone Input Combo Jack This combo jack can be used to connect the Eee PC’s audio out signal to amplified speakers or headphones, or can be used to connect an external microphone or output signals from audio devices. Plug in a headphone or microphone and follow the screen instruction to switch the audio jack function. USB Port (2.0) USB Port (3.
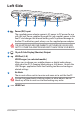
Left Side 1 1 2 3 4 5 Power (DC) Input The supplied power adapter converts AC power to DC power for use with this jack. Power supplied through this jack supplies power to the Eee PC and charges the internal battery pack. To prevent damage to the Eee PC and battery pack, always use the supplied power adapter. THE ADAPTER MAY BECOME WARM TO HOT WHEN IN USE. BE SURE NOT TO COVER THE ADAPTER AND KEEP IT AWAY FROM YOUR BODY. 2 15 pin D-Sub Display (Monitor) Output 3 USB Port (2.
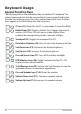
Keyboard Usage Special Function Keys The following defines the colored hot keys on the Eee PC’s keyboard. The colored commands can only be accessed by first pressing and holding the function key while pressing a key with a colored command. Some function icons appear in the Notification area after activation. Zz Icon (F1): Places the Eee PC in sleep mode (Suspend-to-RAM). adio Tower (F2) (Wireless Models Only): Toggles the internal R wireless LAN ON or OFF with an on-screen-display.
uper Hybrid Engine (Space Bar): Toggles among various S power saving modes. The selected mode is shown on the display. um Lk (Insert): Toggles the numeric keypad (number lock) N ON and OFF. Allows use of a larger portion of the keyboard for number entering. Scr Lk (Delete): Toggles the “Scroll Lock” ON and OFF. Allows you to use a larger portion of the keyboard for cell navigation. Pg Up (↑): Press to scroll up in documents or the web browser.
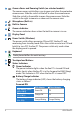
Powering on your Eee PC These are quick instructions for using your Eee PC. 1. Install the battery pack 2. Connect the AC power adapter 2 2 3. 1 Turn ON the Eee PC Damage may occur if you use a different adapter which is not provided together with your Eee PC to power it. You may damage your battery pack(s), adapter, and the Eee PC with a faulty ACDC adapter.
Wireless Network Connection Configuring a wireless network connection (Win7) 1. Click the wireless network icon with an orange star Notification area. in the Windows® If the wireless network icon with an orange star does not show in the Notification area, activate the wireless LAN function by pressing + before configuring a wireless network connection. 2. Select the wireless access point you want to connect to from the list and click Connect to build the connection.
System Recovery • • Disable Boot Booster in BIOS setup before you perform system recovery from USB flash disk, external optical drive or hidden partition. The Boot Booster function is available on selected models. Ensure to connect your Eee PC to the AC power adapter before using F9 recovery to avoid recovery failure. Using recovery partition (F9 Recovery) 1. Press during bootup. Ensure to press only once during bootup. 2. Select the language you use and click to continue. 3.
Back up the recovery files 1. Repeat the step 1–2 in the previous section. 2. Connect a USB storage device to your Eee PC and click Backup in the Recovery System dialog box to start the recovery files backup. • The size of the connected USB storage device should be equal to or larger than 16GB. • Memory cards are not supported for this function. • Please connect the storage device to USB 2.0 port.
Using the USB storage device (USB recovery) Please use the USB 2.0 port to back up the recovery files. 1. Connect the USB storage device that you backup the system recovery files. 2. Press on bootup and the Please select boot device screen appears. Select USB:XXXXXX to boot from the connected USB storage device. Please select boot device: HDD:SM-ASUS-PHISON SSD USB:XXXXXXXX ↑ and ↓ to move selection ENTER to select boot device 3. 4. Select the language you use and click to continue.
Boot Booster (On Selected Model) The Boot Booster item in BIOS setup helps shorten your Eee PC bootup time. However, you MUST disable this BIOS item before you change any Eee PC components or perform system recovery (from USB flash disk, external optical drive or hidden partition). Follow the instructions below to disable Boot Booster: 1. 2. Start the system and press on bootup to show the POST screen. Press again to enter the BIOS setup. Set Boot Booster to [Disabled].
Declarations and Safety Statements CE Mark Warning CE marking for devices without wireless LAN/Bluetooth The shipped version of this device complies with the requirements of the EEC directives 2004/108/EC “Electromagnetic compatibility” and 2006/95/EC “Low voltage directive”.
Copyright Information No part of this manual, including the products and software described in it, may be reproduced, transmitted, transcribed, stored in a retrieval system, or translated into any language in any form or by any means, except documentation kept by the purchaser for backup purposes, without the express written permission of ASUSTeK COMPUTER INC. (“ASUS”). ASUS and Eee PC logo are trademarks of ASUSTek Computer Inc. Information in this document is subject to change without notice.
Manufacturer Address, City Country Authorized Representative in Europe Address, City Country 20 ASUSTek COMPUTER INC. No. 150, LI-TE RD., PEITOU, TAIPEI 112, TAIWAN R.O.C TAIWAN ASUS COMPUTER GmbH HARKORT STR.
FEDERAL COMMUNICATIONS COMMISSION INTERFERENCE STATEMENT This equipment has been tested and found to comply with the limits for a Class B digital device, pursuant to Part 15 of the FCC Rules. These limits are designed to provide reasonable protection against harmful interference in a residential installation. This equipment generates, uses and can radiate radio frequency energy and, if not installed and used in accordance with the instructions, may cause harmful interference to radio communications.
Canada, Industry Canada (IC) Notices This Class B digital apparatus complies with Canadian ICES-003 and RSS-210. Operation is subject to the following two conditions: (1) this device may not cause interference, and (2) this device must accept any interference, including interference that may cause undesired operation of the device. Radio Frequency (RF) Exposure Information The radiated output power of the Wireless Device is below the Industry Canada (IC) radio frequency exposure limits.