
User Manual
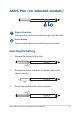
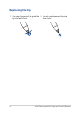
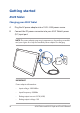
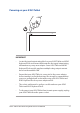
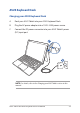
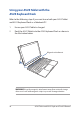
Table Of Contents
- About this manual
- Chapter 1: Hardware Setup
- Chapter 2: Using your ASUS Tablet and ASUS Keyboard Dock
- Chapter 3: Working with Windows® 10
- Chapter 4: Power-On Self-Test (POST)
- Tips and FAQs
- Appendices
- Internal Modem Compliancy
- Overview
- Network Compatibility Declaration
- Non-Voice Equipment
- Federal Communications Commission Interference Statement
- Slave Equipment
- RF Exposure warning
- FCC Radio Frequency (RF) Exposure Caution Statement
- RF Exposure Information (SAR)
- RF Exposure information (SAR) - CE
- CE Mark Warning
- IC Radiation Exposure Statement for Canada
- Déclaration d’Industrie Canada relative à l’exposition aux ondes radio
- Radiation Exposure Statement
- Déclaration d'exposition aux radiations
- Caution
- Avertissement
- Wireless Operation Channel for Different Domains
- France Restricted Wireless Frequency Bands
- UL Safety Notices
- Power Safety Requirement
- TV Notices
- REACH
- Macrovision Corporation Product Notice
- Nordic Lithium Cautions (for lithium-ion batteries)
- Optical Drive Safety Information
- CTR 21 Approval (for ASUS Tablet and ASUS Keyboard Dock with built-in modem)
- ENERGY STAR complied product
- Global Environmental Regulation Compliance and Declaration
- ASUS Recycling/Takeback Services
- Prevention of Hearing Loss
- Notices for removable batteries
- Avis concernant les batteries remplaçables
- Rechargeable Battery Recycling Service in North America
- Regional notice for India
- Regional notice for California
- Regional notice for Singapore
- Japan Technical Conformity Mark
- National Telecommunications Commission of the Philippines
- Simplified EU Declaration of Conformity
- Internal Modem Compliancy

ASUS Tablet and ASUS Keyboard Dock E-Manual
21
ASUS Pen (on selected models)
Right-click button
You can use this button to enable the right-click function.
Eraser button
You can use this button to enable the eraser function.
1. Remove the top half of the stylus.
2. Remove the sticker and insert the battery, noting the
correct polarity.
3. Return the top half of the stylus into place.
Inserting the battery