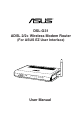
DSL-G31 ADSL 2/2+ Wireless Modem Router (For ASUS EZ User Interface) User Manual
E4862 First Edition June 2009 Copyright © 2009 ASUSTeK Computer Inc. All Rights Reserved. No part of this manual, including the products and software described in it, may be reproduced, transmitted, transcribed, stored in a retrieval system, or translated into any language in any form or by any means, except documentation kept by the purchaser for backup purposes, without the express written permission of ASUSTeK Computer Inc. (“ASUS”).
Table of contents About this guide..................................................................................... 4 Chapter 1: Knowing your wireless router Package contents................................................................................... 6 System requirements............................................................................. 6 Before you proceed................................................................................ 6 Hardware features...........................
Table of contents Troubleshooting.................................................................................... 28 Appendices Notices................................................................................................... 31 GNU General Public License............................................................... 35 ASUS Contact information...................................................................
• Chapter 5: Troubleshooting This chapter provides you with a troubleshooting guide for solving common problems you may encounter when using the ASUS Wireless Router. • Appendices This chapter provides you with the regulatory Notices and Safety Statements. Conventions used in this guide WARNING: Information to prevent injury to yourself when trying to complete a task. CAUTION: Information to prevent damage to the components when trying to complete a task.
1 Knowing your wireless router Package contents Check the following items in your ASUS Wireless Router package. DSL-G31 11g WiFi ADSL Router AC Power adapter (type varies by region) Category 5 (CAT5) Ethernet cable RJ-11 cable Support CD (manual) Splitter (type varies by region) Quick Start Guide Note: If any of the items is damaged or missing, contact your retailer.
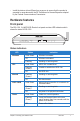
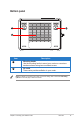
• Install the device at least 20cms from a person to ensure that the product is operated in accordance with the RF Guidelines for Human Exposure adopted by the Federal Communications Commission. Hardware features Front panel The DSL-G31 11g WiFi ADSL Router front panel contains LED indicators which shows the status of DSL-G31.
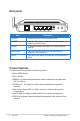
Rear panel POWER ADSL Item RESET ON/OFF Description ON/OFF Press this button to turn the power on/off POWER Insert the AC adapter into this port to connect your router to a power source RESET This button restores the system to its factory default settings. LAN1-LAN4 Connect RJ-45 Ethernet cables to these ports to establish LAN connection. ADSL Connects to the splitter provided with the bundled RJ-11 cable.
Bottom panel 1 1 2 Item 1 2 Description Mounting hooks Use the mounting hooks to mount your router on concrete or wooden surfaces using two roundhead screws. Air vents These vents provide ventilation to your router. Note: For details on mounting your router on a wall or ceiling, refer to the section Mounting options on the next page of this user manual.
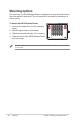
Mounting options Out of the box, the ASUS Wireless Router is designed to sit on a raised flat surface like a file cabinet or book shelf. The unit may also be converted for mounting to a wall or ceiling. To mount the ASUS Wireless Router: 1. Look on the underside for the two mounting hooks. 2. Mark two upper holes in a flat surface. 3. Tighten two screws until only 1/4'' is showing. 4. Latch the hooks of the ASUS Wireless Router onto the screws.
2 Setting up the hardware Setting up the wireless router The ASUS Wireless Router meets various working scenarios with proper configurations. You may need to change the wireless router’s default settings so as to meet the requirements in your wireless environment. Notes: We recommend that you use wired connection for initial configuration to avoid possible setup problems due to wireless uncertainty.
Setting up a wireless connection To set up the wired connection: 1. Insert the splitter's line connector to the phone outlet and connect your phone into the phone port (A). 2. Connect your wireless router's ADSL port to the splitter’s DSL port (B). 3. Turn on your computer and double-click the wireless network icon on the Windows® task bar to view available networks. Select your wireless router. By default, there is no security key for the wireless router.
3 Configuring the network clients Accessing the wireless router Setting an IP address for wired or wireless client To access the ASUS Wireless Router, you must have the correct TCP/IP settings on your wired or wireless clients. Ensure that the clients’ IP addresses are within the same subnet as the ASUS Wireless Router. By default, the ASUS Wireless Router integrates the DHCP server function, which automatically assigns IP addresses to the clients in your network.
Windows® 9x/ME 1. Click Start > Control Panel > Network to display the Network setup window. 2. Select TCP/IP then click Properties. 3. If you want your computer to automatically obtain an IP address, click Obtain an IP address automatically then click OK. Otherwise, click Specify an IP address, then key in the IP address and Subnet Mask.
4. Select the Gateway tab, and key in New gateway then click Add. 5. Select the DNS configuration tab and click Enable DNS. Key in Host, Domain, and DNS Server Search Order, then click Add. 6. Click OK.
Windows® NT4.0 1. Go to Control Panel > Network to display the Network setup window then select the Protocols tab. 2. Select TCP/IP Protocol from the Network Protocols list then click Properties. 3. From the IP Address tab of the Microsoft TCP/IP Properties window, you can: • Select the type of network adapter installed in your system. • Set the router to assign IP address automatically. • Manually set up the IP address, subnet mask, and default gateway.
4. Select the DNS tab then click Add under the DNS Service Search Order and key in DNS. Windows® 2000 1. Click Start > Control Panel > Network and Dial-up Connection. Right-click Local Area Connection then click Properties.
2. Select Internet Protocol (TCP/IP), then click Properties. 3. Select Obtain an IP address automatically if you want the IP settings to be assigned automatically. Otherwise, select Use the following IP address: and key in IP address, Subnet mask, and Default gateway. 4. Select Obtain an IP address automatically if you want the DNS server settings to be assigned automatically. Otherwise, select Use the following DNS server address: and key in the Preferred and Alternate DNS server. 5. Click OK when done.
2. Select Internet Protocol (TCP/IP), then click Properties. 3. Select Obtain an IP address automatically if you want the IP settings to be assigned automatically. Otherwise, select Use the following IP address: and key in IP address, Subnet mask, and Default gateway. 4. Select Obtain DNS server address automatically if you want the DNS server settings to be assigned automatically. Otherwise, select Use the following DNS server addresses: and key in the Preferred and Alternate DNS server. 5.
Windows® Vista 1. Click Start, select Control Panel > Network and Sharing Center. Rightclick Local Area Connection then select Properties. 2. Select Internet Protocol Version 4(TCP/IPv4), then click Properties. 3. Select Obtain an IP address automatically if you want the IP settings to be assigned automatically. Otherwise, select Use the following IP address: and key in IP address, Subnet mask, and Default gateway. 4.
4 Configuring via the web GUI Configuring via the web GUI The router’s web graphics user interface (web GUI) allows you to configure these features: Network Map, EZQoS Bandwidth Management and other Advanced Setting. To configure via the web GUI: 1. After setting up a wired or wireless connection, launch a web browser. The login page automatically launches. Note: You may also manually key in the router’s default IP address (192.168.1.1) to launch the router’s web interface. 2.
3. From the main page, click the navigation menu or links to configure the various features of the ASUS Wireless Router. Using the Network Map Network Map allows you to view the status and configure the connection settings of the Internet, system, and clients in your network. It enables you to quickly set up your Wide Area Network (WAN) using the Quick Internet Setup (QIS) feature, or to quickly set up your Local Area Network (LAN).
Setting up WAN using the Quick Internet Setup (QIS) The ASUS Quick Internet Setup (QIS) function automatically detects your Internet connection settings. If the ASUS Wireless Router cannot automatically detect your Internet connection type, you may need to manually set up your Internet connection settings. To use the ASUS Quick Internet Setup (QIS): 1. Launch the web browser. Wait for about 20 seconds for QIS to automatically detect your Internet connection type. 2.
2. Select your Country and ISP, then click Next. If your country and ISP are not on the list, select Not list and key in your VPI and VCI then click Next. You may ask your ISP for VPI/VCI values. 3. On the login page, key in the default user name (admin) and password (admin). 4. The router supports these connection types: PPP over ATM (PPPoA), PPP over Ethernet (PPPoE), MAC Encapsulation Routing (MER), IP over ATM (IPoA), and Bridging. Select your connection type and follow the onscreen instructions.
Managing EzQoS bandwidth EzQoS Bandwidth ������������������������������������������������������������������� Management enables you to set the bandwidth priority and manage the network traffic. To set up the bandwidth priority: 1. Click EzQoS Bandwidth Management from the navigation menu at the left side of your screen. 2. Click each of these four applications to set the bandwidth priority: Icon Description Gaming Blaster The router handles gaming traffic at first priority.
Upgrading the firmware Note: Download the latest firmware from the ASUS website at http://www.asus.com To upgrade the firmware: 1. Click Advanced Setting from the navigation menu at the left side of your screen. 2. Under the Administration menu, click Firmware Upgrade. 3. In the New Firmware File field, click Browse to locate the new firmware on your computer. 4. Click Upload. The uploading process takes about three minutes.
Restoring/Saving/Uploading settings To restore/save/upload the settings: 1. Click Advanced Setting from the navigation menu at the left side of your screen. 2. Under the Administration menu, click Restore/Save/Upload Setting. 3. Select the tasks that you want to do: • To restore to the default factory settings, click Restore, and click OK in the confirmation message.
5 Troubleshooting Troubleshooting This troubleshooting guide provides solutions to some common problems that you may encounter while installing or using the ASUS Wireless Router. These problems require simple troubleshooting that you can perform by yourself. Contact the ASUS Technical Support if you encounter problems not mentioned in this chapter. Problem Action I cannot access a web browser for configuring the router. 1. Launch a web browser, then click Tools > Internet Options...
Problem Action Cannot access the Internet via wireless LAN adapter • Move the router closer to the wireless client. Internet is not accessible When ADSL Modem “DSL” light is ON (not blinking), this means Internet Access is possible. • Check whether the wireless adapter is connected to the correct wireless router. • Check whether the wireless channel in use conforms to the channels available in your country/ area. • Check the encryption settings.
Problem If the DSL-G31 “DSL” light blinks continuously or stays off, Internet access is not possible - the Router is unable to establish a connection with the ADSL network. Network name or encryption keys are forgotten How to restore the system to its default settings Action • Ensure that all your cables are all properly connected . • Disconnect the power cord from the DSLG31, wait a few minutes, then reconnect the cord.
Appendices Notices Federal Communications Commission Statement This device complies with Part 15 of the FCC Rules. Operation is subject to the following two conditions: • • This device may not cause harmful interference. This device must accept any interference received, including interference that may cause undesired operation. This equipment has been tested and found to comply with the limits for a class B digital device, pursuant to part 15 of the FCC Rules.
Safety Information To maintain compliance with FCC’s RF exposure guidelines, this equipment should be installed and operated with minimum distance 20cm between the radiator and your body. Use on the supplied antenna. Declaration of Conformity for R&TTE directive 1999/5/EC Essential requirements – Article 3 Protection requirements for health and safety – Article 3.1a Testing for electric safety according to EN 60950-1 has been conducted. These are considered relevant and sufficient.
FCC Part 68 REQUIREMENTS This equipment complies with Part 68 of the FCC rules and the requirements adopted by the ACTA. On the bottom of this equipment is a label that contains, among other information, a product identifier in the format US: ASUDL01BDSLG31. If requested, this number must be provided to the telephone company. The REN is used to determine the number of devices that may be connected to a telephone line.
IC (Canada) 1. 2.4GHz Mobile device (ex. 11b/g/n AP/Router) with fixed antenna: ( Industry Canada Statement ) This device complies with RSS-210 of the Industry Canada Rules. Operation is subject to the following two conditions: 1) this device may not cause interference and 2) this device must accept any interference, including interference that may cause undesired operation of the device This Class A digital apparatus complies with Canadian ICES-003.
GNU General Public License Licensing information This product includes copyrighted third-party software licensed under the terms of the GNU General Public License. Please see The GNU General Public License for the exact terms and conditions of this license. We include a copy of the GPL with every CD shipped with our product. All future firmware updates will also be accompanied with their respective source code. Please visit our web site for updated information.
terms so they know their rights. We protect your rights with two steps: (1) copyright the software, and (2) offer you this license which gives you legal permission to copy, distribute and/or modify the software. Also, for each author’s protection and ours, we want to make certain that everyone understands that there is no warranty for this free software.
thus forming a work based on the Program, and copy and distribute such modifications or work under the terms of Section 1 above, provided that you also meet all of these conditions: a) You must cause the modified files to carry prominent notices stating that you changed the files and the date of any change.
c) Accompany it with the information you received as to the offer to distribute corresponding source code. (This alternative is allowed only for noncommercial distribution and only if you received the program in object code or executable form with such an offer, in accord with Subsection b above.) The source code for a work means the preferred form of the work for making modifications to it.
on you (whether by court order, agreement or otherwise) that contradict the conditions of this License, they do not excuse you from the conditions of this License. If you cannot distribute so as to satisfy simultaneously your obligations under this License and any other pertinent obligations, then as a consequence you may not distribute the Program at all.
For software which is copyrighted by the Free Software Foundation, write to the Free Software Foundation; we sometimes make exceptions for this. Our decision will be guided by the two goals of preserving the free status of all derivatives of our free software and of promoting the sharing and reuse of software generally. NO WARRANTY 11 BECAUSE THE PROGRAM IS LICENSED FREE OF CHARGE, THERE IS NO WARRANTY FOR THE PROGRAM, TO THE EXTENT PERMITTED BY APPLICABLE LAW.
Manufacturer: ASUSTeK Computer Inc. Tel: +886-2-2894-3447 Address: No. 150, LI-DE RD., PEITOU, TAIPEI 112, TAIWAN Authorised representative ASUS Computer GmbH in Europe: Address: H A R K O R T S T R . 2 1 - 23 , 4 0 8 8 0 RATINGEN, GERMANY Authorised distributors BOGAZICI BIL GISAYAR SAN. VE TIC. A.S. Tel: +90 212 3311000 in Turkey: Address: AYAZAGA MAH. KEMERBURGAZ CAD. NO.10 AYAZAGA/ISTANBUL INDEX BILGISAYAR SISTEMLERI MUHENDISLIK SAN. VE TIC. A.S.
ASUS Contact information ASUSTeK COMPUTER INC. (Asia Pacific) Address Website Technical Support Telephone Support Fax Software download 15 Li-Te Road, Peitou, Taipei, Taiwan 11259 www.asus.com +886228943447 +886228907698 support.asus.com* ASUS COMPUTER INTERNATIONAL (America) Address Telephone Fax Website Software download 800 Corporate Way, Fremont, CA 94539, USA +15029550883 +15029338713 usa.asus.com support.asus.