Table of Contents Table of Contents....................................................................................................................... ii About This User’s Manual.......................................................................................................iv Notes for This Manual..............................................................................................................iv Safety Precautions........................................................................
Eee Docking.............................................................................................................................3-7 Eee @Vibe...................................................................................................................3-7 Eee Sharing................................................................................................................3-8 Eee Xperience........................................................................................................
About This User’s Manual You are reading the Eee PC User’s Manual. This User’s Manual provides information regarding the various components in the Eee PC and how to use them. The following are major sections of this User’s Manual: 1. Knowing the Parts Provides information on the Eee PC’s components. 2. Getting Started Provides information on getting started with the Eee PC. 3. Using the Eee PC Provides information on using the Eee PC’s utilities. 4.
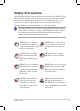
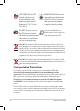
Safety Precautions The following safety precautions will increase the life of the Eee PC. Follow all precautions and instructions. Except as described in this manual, refer all servicing to qualified personnel. Do not use damaged power cords, accessories, or other peripherals. Do not use strong solvents such as thinners, benzene, or other chemicals on or near the surface. Disconnect the AC power before cleaning.
SAFE TEMP: This Eee PC should only be used in environments with ambient temperatures between 5°C (41°F) and 35°C (95°F) INPUT RATING: Refer to the rating label on the bottom of the Eee PC and be sure that your power adapter complies with the rating. DO NOT carry or cover a Eee PC that is powered ON with any materials that will reduce air circulation such as a carrying bag. Incorrect installation of battery may cause explosion and damage the Eee PC. DO NOT throw the Eee PC in municipal waste.
Charging Your Batteries If you intend to use battery power, be sure to fully charge your battery pack before going on long trips. Remember that the power adapter charges the battery pack as long as it is plugged into the computer and an AC power source. Be aware that it takes much longer to charge the battery pack when the Eee PC is in use. Remember to fully charge the battery (8 hours or more) before first use and whenever it is depleted to prolong battery life.
viii Table of Contents
Top Side Bottom Side Front Side Right Side Left Side Keyboard Usage Touchpad Usage 1 Knowing the Parts
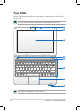
Top Side Refer to the illustration below to identify the components on this side of the Eee PC. The top side may vary in appearance depending on models. 1 2 3 4 5 6 7 8 The keyboard differs for each territory.
1 Array Microphone (Built-in) The built-in array microphone is more clear and echo-free compared with traditional single microphones. The array microphone differs depending on models. 2 Built-in Camera 3 Display Panel 4 Touchpad key Toggles the touchpad ON/OFF. You can also turn on/off the function by pressing + . 5 Power Switch The power switch allows powering ON and OFF the Eee PC and recovering from STR. Press the switch once to turn ON and hold it to turn OFF the Eee PC.
Battery Charge Indicator The battery charge indicator (LED) shows the battery charging status as follows: Powered ON With Adapter High battery power Green ON (95%–100%) Medium battery power Orange ON (11%–94%) Low battery power Orange Blinking (0%–10%) Without Adapter Off Off Orange Blinking Powered OFF / Standby mode With Adapter High battery power Green ON (95%–100%) Medium battery power Orange ON (11%–94%) Low battery power Orange Blinking (0%–10%) Without Adapter Off Off Off Hard Disk Drive (HDD) In
Bottom Side Refer to the illustration below to identify the components on this side of the Eee PC. The bottom side may vary in appearance depending on model. 1 2 3 4 The bottom of the Eee PC can get very hot. Be careful when handling the Eee PC while it is in operation or recently been in operation. High temperatures are normal during charging or operation. DO NOT use on soft surfaces such as beds or sofas, which may block the vents.
2 Battery Pack The battery pack is automatically charged when connected to an AC power source and maintains power to the Eee PC when AC power is not connected. This allows use when moving temporarily between locations. Battery time varies by usage and by the specifications for this Eee PC. The battery pack cannot be disassembled and must be purchased as a single unit. 3 Battery Lock - Manual The manual battery lock is used to keep the battery pack secured.
Right Side Refer to the illustration below to identify the components on this side of the Eee PC. 1 2 3 4 5 1 Memory Card Slot 2 Headphone Output Jack The 1/8” stereo headphone jack (3.5mm) connects the Eee PC’s audio out signal to amplified speakers or headphones. Using this jack automatically disables the built-in speakers. 3 Microphone Jack The microphone jack is designed to connect the microphone used for Skype, voice narrations, or simple audio recordings. 4 USB Port (2.0/1.
Left Side Refer to the illustration below to identify the components on this side of the Eee PC. 1 1 2 3 4 5 Power (DC) Input The supplied power adapter converts AC power to DC power for use with this jack. Power supplied through this jack supplies power to the Eee PC and charges the internal battery pack. To prevent damage to the Eee PC and battery pack, always use the supplied power adapter. THE ADAPTER MAY BECOME WARM TO HOT WHEN IN USE.
Keyboard Usage Special Function Keys The following defines the colored hot keys on the Eee PC’s keyboard. The colored commands can only be accessed by first pressing and holding the function key while pressing a key with a colored command. Some function icons appear in the Notification area after activation. The Hot Key locations on the function keys may vary depending on model but the functions should remain the same. Follow the icons whenever your hot key locations do not match the manual.
Task Manager Icon (F9): Initiates the Task Manager to view the application process or terminates applications. Crossed Speaker Icon (F10): Mutes the speaker. Volume Down Icon (F11): Decreases speaker volume. Volume Up Icon (F12): Increases the speaker volume. Super (Fn+Space Bar): Toggles among various power saving modes. The selected mode is shown on the display. Num Lk (Insert): Toggles the numeric keypad (number lock) ON and OFF. Allows use of a larger portion of the keyboard for number entering.
Touchpad Usage Multi-finger gesture input Finger gesture Two-finger zooming in/out Applications Impress, Adobe reader, Photomanager Two-finger zooming in/out - Moving two fingertips apart or together on the touchpad to zoom in or zoom out. This is convenient when viewing photos or reading documents.
1-12 Chapter 1: Knowing the Parts
Powering on your Eee PC First-time Startup Desktop ASUS Eee PC Tray Utility Network Connection 2 Getting Started
Powering on your Eee PC These are only quick instructions for using your Eee PC. 1. Install the battery pack 2. Connect the AC power adapter 3 1 3. 2 2 1 3 110 V-220V Turn ON the Eee PC Damage may occur if you use a different adapter to power the Eee PC. You may damage both your battery pack(s) and the Eee PC with a faulty ACDC adapter.
First-time Startup For the first time you start your Eee PC, the Windows wizard will launch automatically and lead you through setting up your preferences and some basic information. Follow the wizard instructions to finish the initialization: 1. The Welcome message 2. Select you system settings by appears. Click Next to specifying the region you are continue. in, the language you use and the keyboard type you use. Click Next to continue. 3. Select the time zone you are in and click Next to continue.
5. Click Help protect my PC by turning on Automatic Updates now to get the latest important updates and click Next to continue. 7. Follow the onscreen instructions to register with Microsoft and finish the initialization. 6. Type your computer’s name in the Computer name box and click Next to continue. Desktop The are several shortcuts on the desktop. Double-click them to launch the corresponding applications and enter the specified folders.
ASUS EeePC Tray Utility The preloaded ASUS EeePC Tray utility allows you to turn off some devices to minimize the power consumption and helps you adjust the display resolution easily. Enabling and Disabling Devices To disable or enable devices 1. Right-click the ASUS EeePC Tray Utility icon in the Notification area and the utility shows the available options: Disable WLAN: Turns on and off the wireless LAN connection. Disable Blue Tooth: Turns on and off the Bluetooth connection.
Network Connection Configuring a wireless network connection 1. Double-click the crossed wireless network icon Notification area. in the If the wireless connection icon does not show in the Notification area. Activate the wireless LAN function by pressing + ( + ) before configuring a wireless network connection. 2. Select the wireless access point you want to connect to from the list and click Connect to build the connection.
Local Area Network To establish a wired network, follow the instructions below: Using a dynamic IP: 1. Right-click the network icon with a yellow warning triangle on the Windows® taskbar and select Open Network Connections. 2. Right-click Local Area Connection and select Properties. 3. Click Internet Protocol (TCP/IP) and click Properties. ASUS Eee PC 4. Click Obtain an IP address automatically and click OK.
2-8 5. Click Create a new connection to start the New Connection Wizard. 6. Click Next. 7. Select Connect to the Internet and click Next. 8. Select Set up my connection manually. 9. Select your connection type and click Next. 10. Enter your ISP Name and click Next.
11. Enter your User name and Password. Click Next. 13. Enter your user name and password. Click Connect to connect to the Internet. ASUS Eee PC 12 Click Finish to finish the configuration.
Using a static IP: 1. 2 3. 4. 5. Repeat the step 1–3 of Using a dynamic IP to start the static IP network configuration. Click Use the following IP address. Enter the IP address, Subnet mask and Gateway from your service provider. If needed, enter the preferred DNS Server address and alternative address. After entering all the related values, click OK to build the network connection. Contact your Internet Service Provider (ISP) if you have problems connecting to the network.